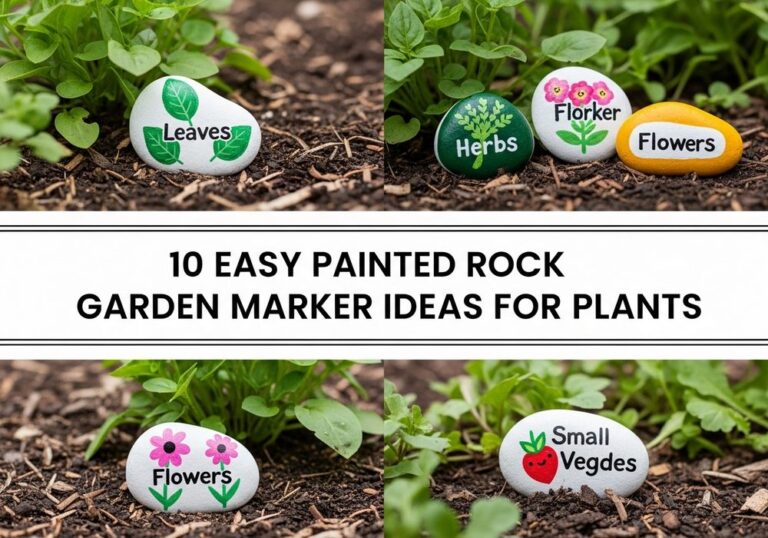
12 Creative Ways To Paint Pots For A Gorgeous Garden
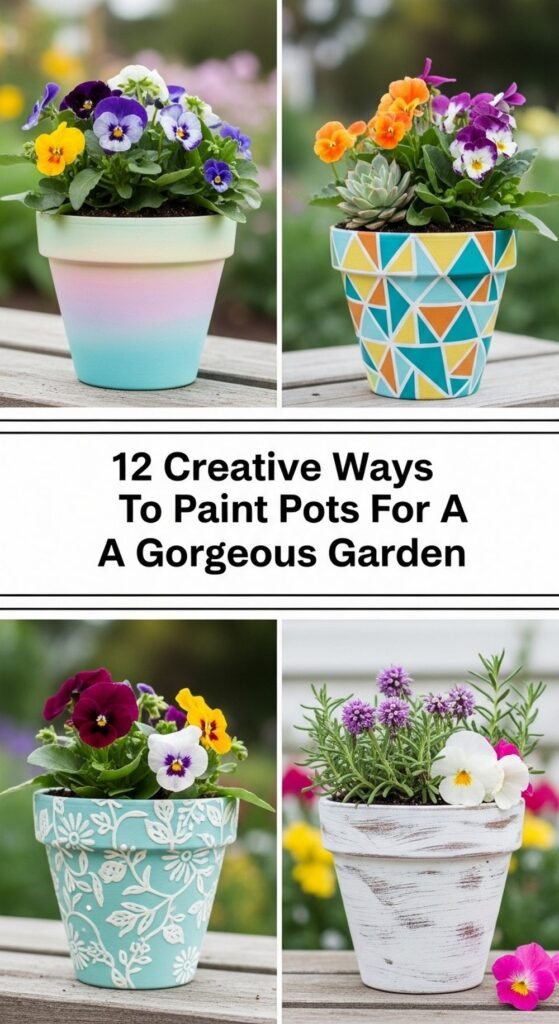
Painted pots are one of the easiest ways to give your garden a fresh, personal touch without starting from scratch. Whether you’re working with terracotta, plastic, or basic concrete planters, a little color and creativity can completely change how your outdoor space feels.
This post is for home gardeners, renters, and small-space plant lovers who want simple but stylish ideas that don’t require fancy tools or art-school skills. You’ll find budget-friendly paint techniques, clever finishes, and fun family projects that turn plain pots into decor pieces. Pick one or two ideas to start with, and soon your garden shelves, steps, and corners will look more polished, welcoming, and uniquely yours.
Quick List
- Ombre Sunset Painted Pots
- Bold Color-Blocked Planters
- Chalkboard Label Herb Pots
- Delicate Botanical Line Art Pots
- Speckled Terrazzo-Style Containers
- Whimsical Drip-Paint Rainbow Pots
- Rustic Whitewashed Terracotta
- Starry Night Galaxy Planters
- Handprint And Thumbprint Family Pots
- Stenciled Tile-Inspired Pots
- Faux Stone And Aged Patina Pots
- Metallic Accent Rim And Foot Pots
1. Ombre Sunset Painted Pots
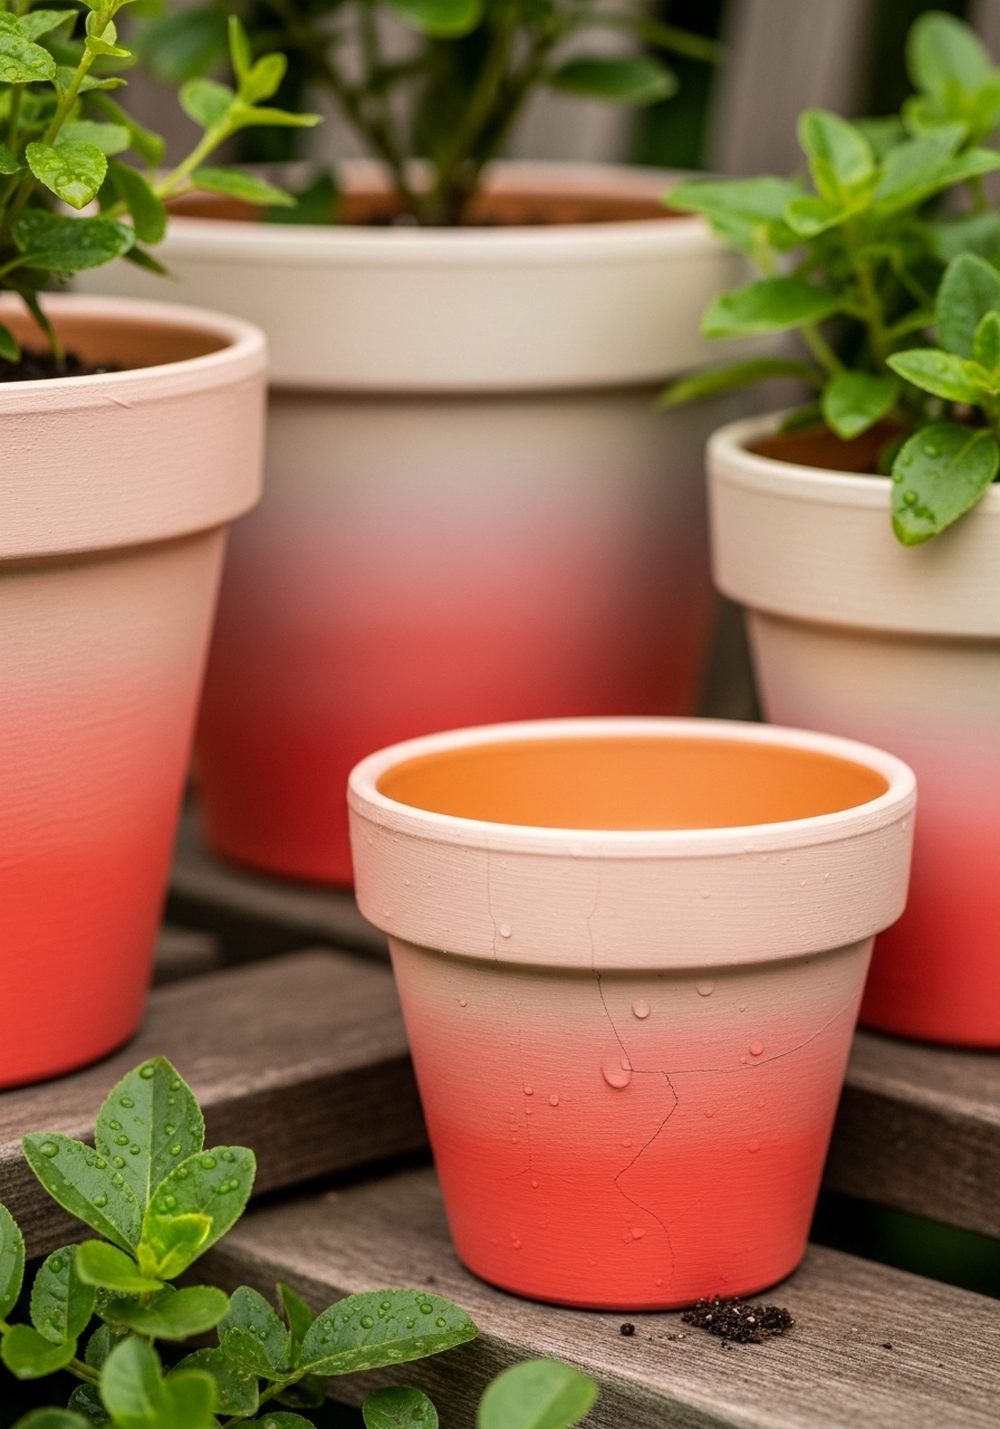
Soft ombre pots bring a dreamy, designer look to even the simplest containers. Choose three or four colors from dark to light (think coral, peach, blush, cream) and blend them up the pot with a slightly damp brush or sponge. Start at the base with the deepest shade and gently work upward, allowing the colors to overlap and soften as you go. Once dry, group these “sunset” pots together with simple green plants so the gradient really stands out.
- Best For: Highlighting a special corner, garden bench, or front step display.
- Budget Tip: Use tester pots of wall paint or leftover interior paint rather than buying full cans.
- Styling Idea: Keep plant choices simple—ferns, grasses, or single-color flowers—to avoid visual clutter.
- Practical Note: Always seal the outside with a clear outdoor sealer to protect the blend from rain.
- Extra Idea: Paint coordinating ombre patterns on a small tray or watering can nearby.
2. Bold Color-Blocked Planters
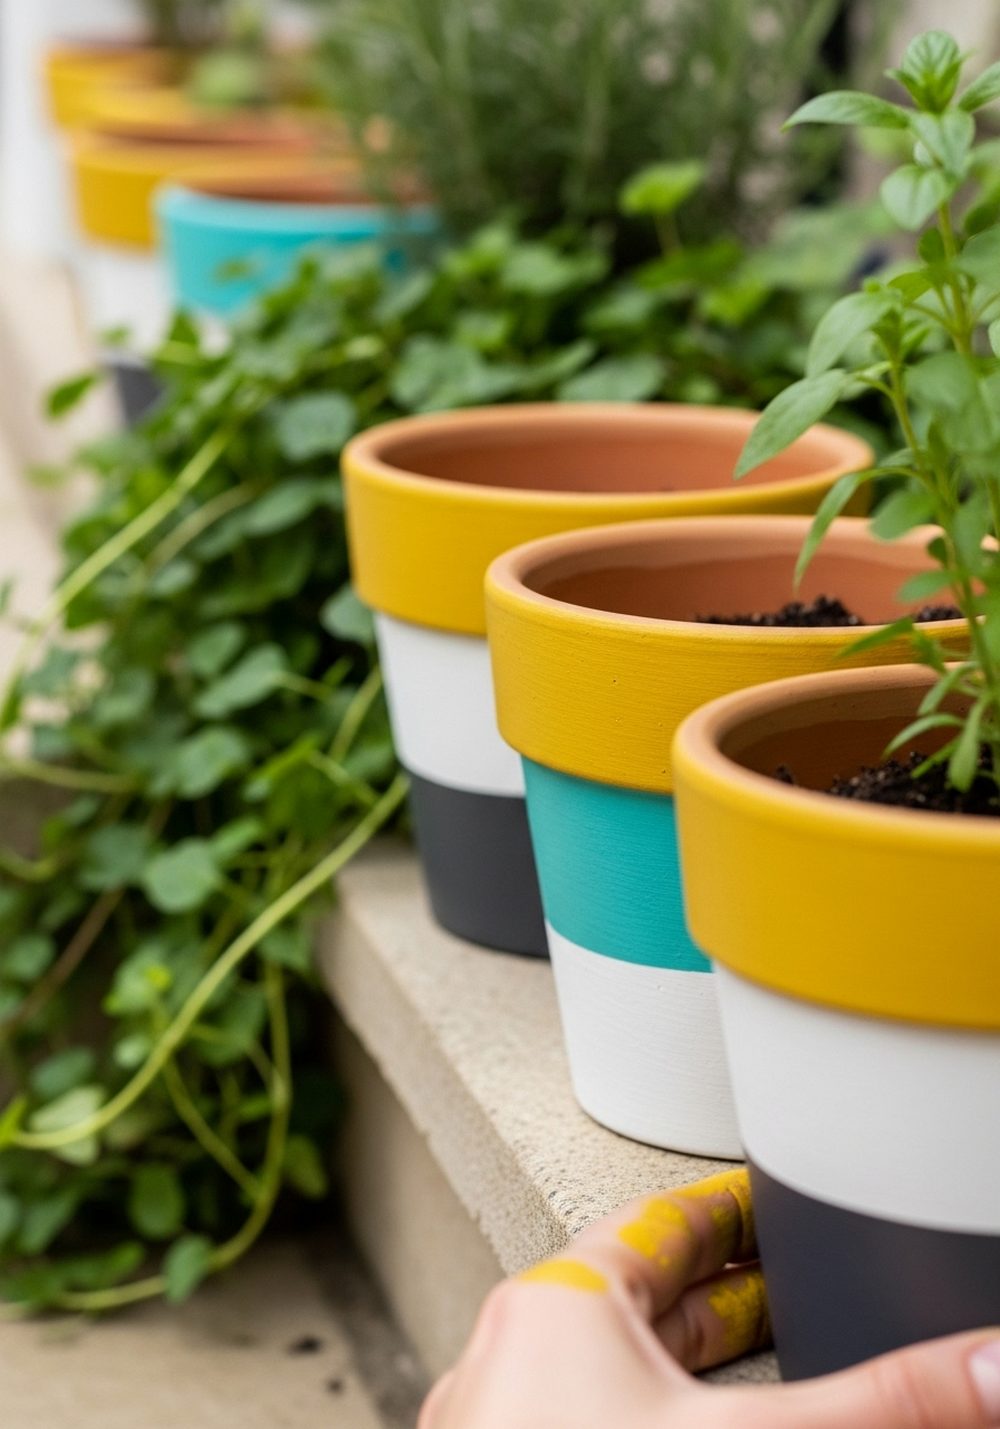
Color-blocked pots are all about crisp lines and playful contrast. Pick two or three strong shades plus a neutral, then tape off sections of your pot with painter’s tape to create rectangles, stripes, or angled bands. Paint one section at a time, letting each color dry before removing the tape and moving on. The result feels modern and graphic, especially when you line several pots together on steps or shelves.
- Best For: Contemporary patios, balconies, and front porches.
- Budget Tip: Choose one main color and pair it with white and the natural pot color to reduce paint costs.
- Styling Idea: Repeat your favorite accent color from outdoor cushions or door paint so everything ties together.
- Practical Note: Press tape edges well to avoid paint bleeding and get sharper lines.
- Care & Maintenance: Wipe with a damp cloth instead of scrubbing to keep edges from chipping.
3. Chalkboard Label Herb Pots
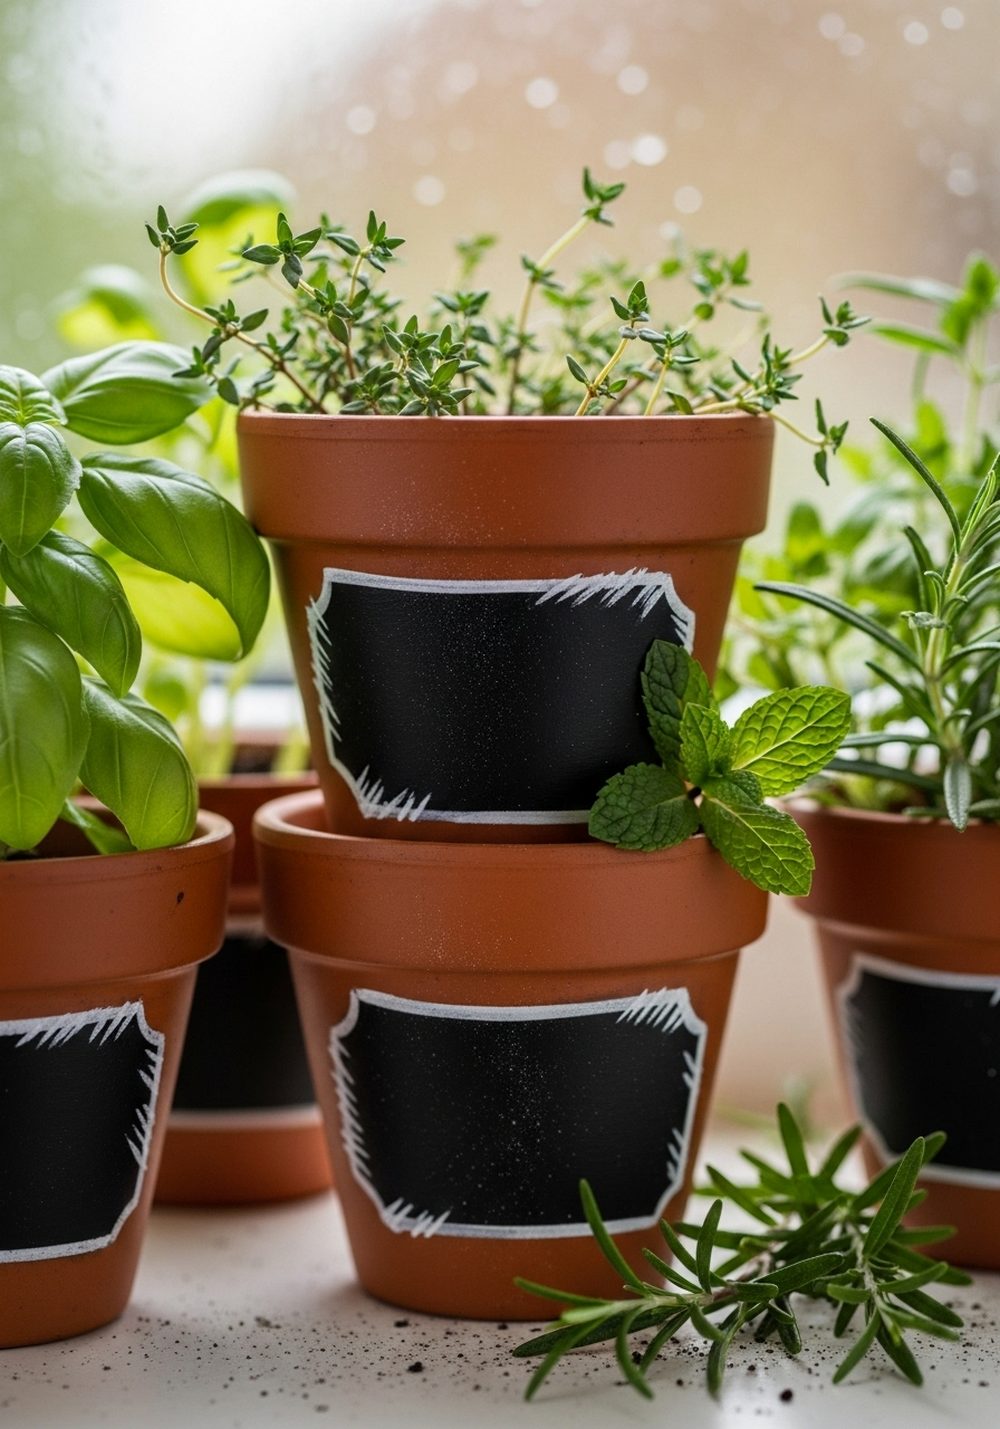
Chalkboard label pots make herb care and harvesting feel organized and charming. Paint a simple rectangle or oval on each pot with chalkboard paint, leaving a border of natural terracotta or base color showing. Once dry and primed, you can write plant names, watering notes, or even harvest dates with chalk or a chalk marker. Group these along a sunny windowsill, kitchen step, or balcony rail where they’re easy to reach.
- Best For: Herb gardens, small kitchens, and rental balconies.
- Budget Tip: Use one small tin of chalkboard paint and divide it across many little pots.
- Styling Idea: Keep your writing loose and casual for a relaxed cottage feel rather than perfect lettering.
- Practical Note: Seal only the non-chalk areas; leave the label section unsealed so chalk erases cleanly.
- Extra Idea: Add a thin border line around the label in white paint for a “framed” look.
4. Delicate Botanical Line Art Pots
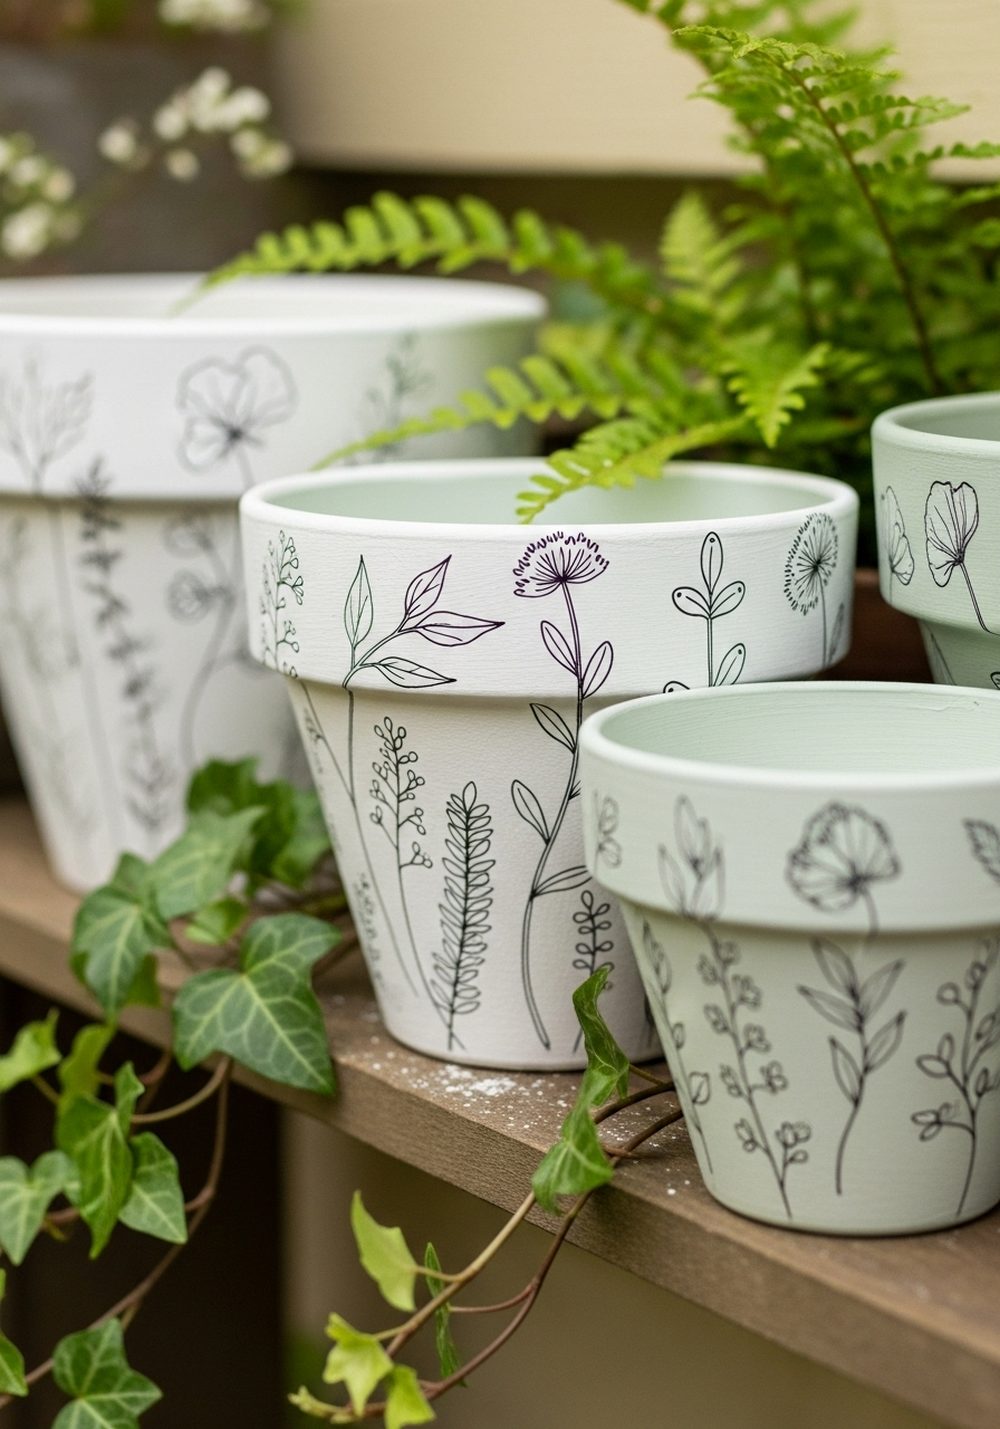
If you like a minimalist, artful look, try simple line drawings on pale pots. Start with a soft base coat (stone, cream, or sage), then sketch slender leaves, stems, and buds in pencil. Go over the lines with a fine paint pen or thin brush in black or dark brown. You don’t need to be perfect—slightly wobbly lines feel hand-drawn and sweet. These pots look beautiful when clustered together or mixed among plain ones.
- Best For: Calm, neutral gardens and plant shelves where details can be appreciated up close.
- Budget Tip: One paint pen can decorate many small pots; save money by keeping the designs simple.
- Styling Idea: Repeat one motif—like fern fronds or lavender stems—across several pots for a mini collection.
- Practical Note: Let line work dry completely before sealing to avoid smudging.
- Care & Maintenance: Handle gently; thin lines are more prone to visible chips than solid blocks of color.
5. Speckled Terrazzo-Style Containers
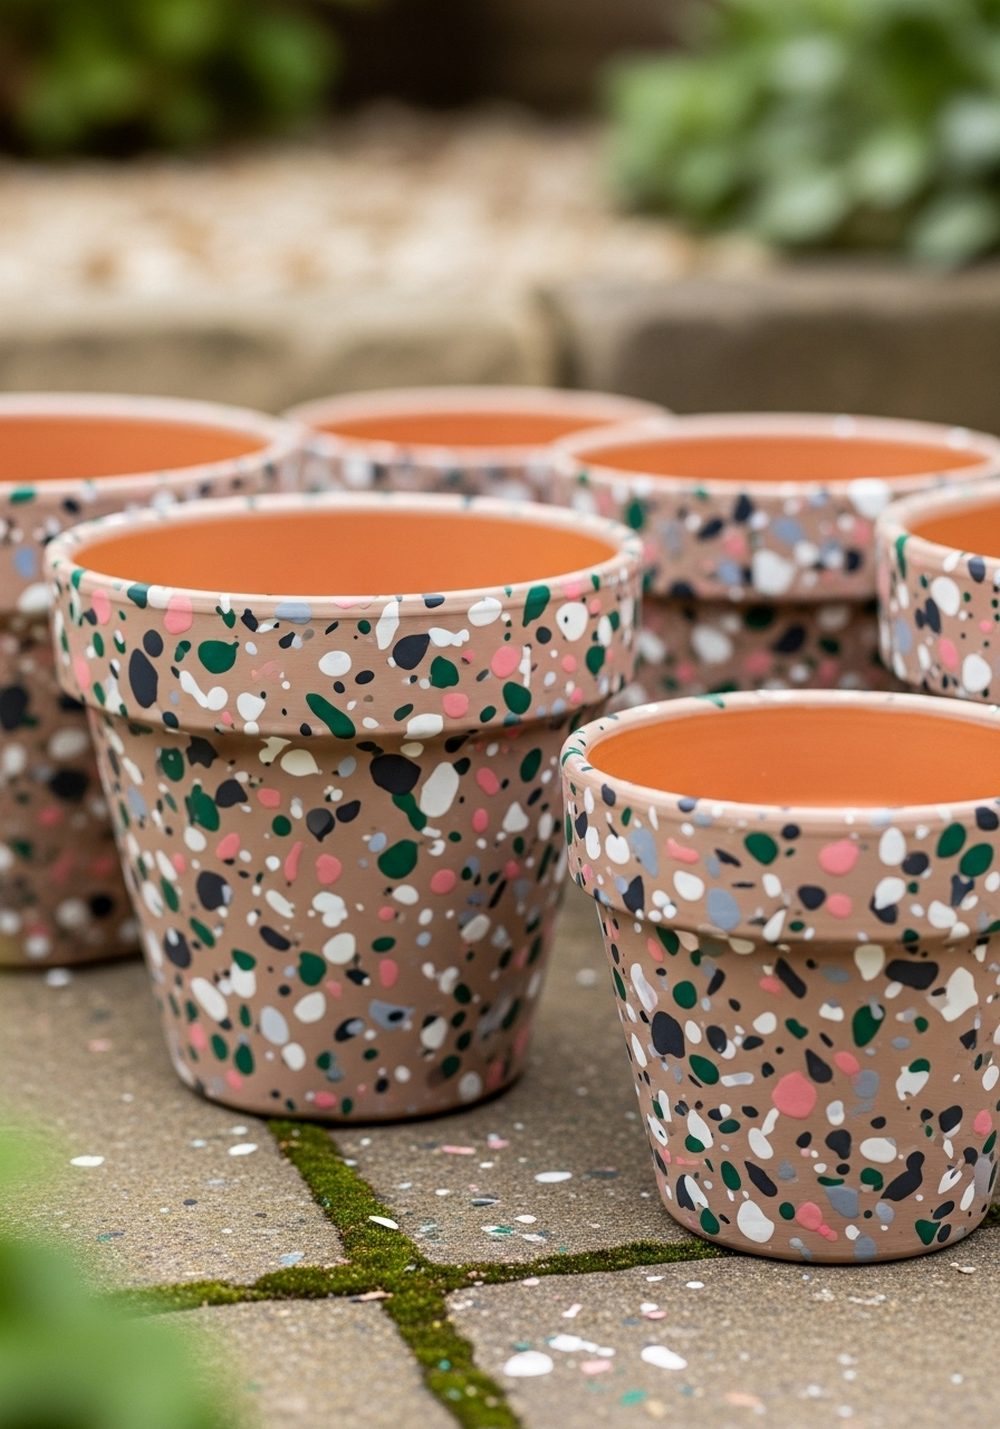
Terrazzo-style speckled pots give you that high-end designer look with just a toothbrush and some paint. Start with a neutral base coat, then flick tiny amounts of contrasting paint colors onto the pot using a stiff brush, skewer, or old toothbrush. Layer different colors, keeping some speckles tiny and others slightly larger. The effect is subtle but eye-catching, especially up close on a table or low shelf.
- Best For: Modern patios, balcony rails, and coffee-table planters.
- Budget Tip: Use leftover craft paints for the speckles; you only need a few drops of each color.
- Styling Idea: Choose speckle shades that echo your outdoor textiles or furniture tones.
- Practical Note: Practice on paper first so you can control how far the speckles travel.
- Care & Maintenance: Seal thoroughly so the small dots don’t wear away with weather and wiping.
6. Whimsical Drip-Paint Rainbow Pots
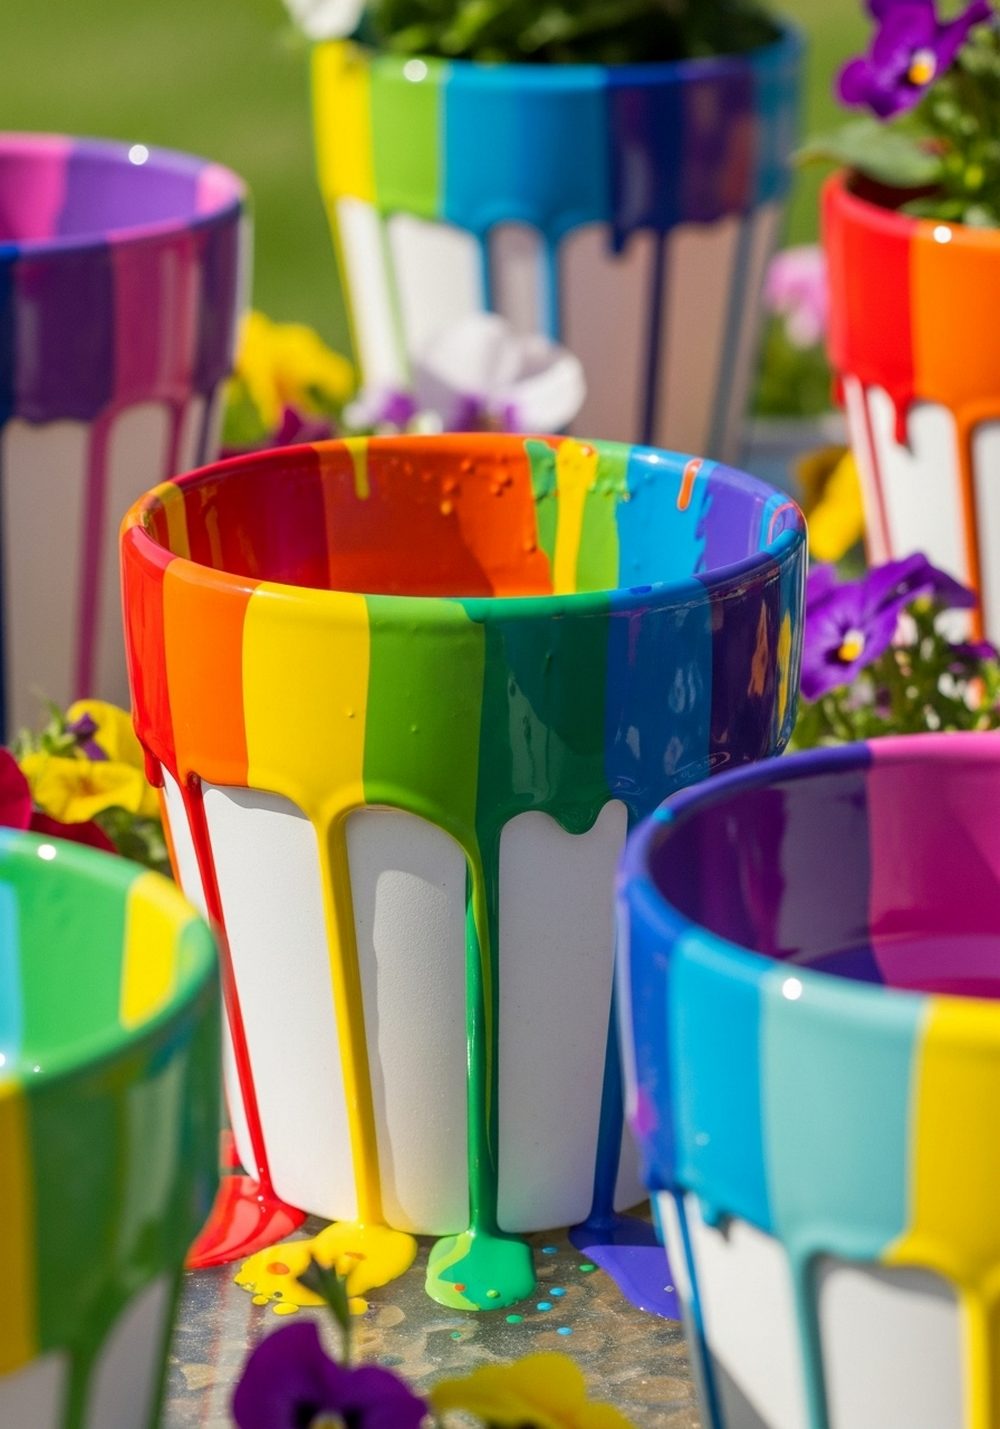
Drip-paint pots are bold, messy, and joyful—perfect for brightening a dull corner. Paint the pot in a solid base color and let it fully dry. Then, mix several bright paints to a slightly runny consistency and pour small amounts along the rim, allowing them to drip down naturally. Rotate the pot to spread the drips, layering different colors until you like the effect. Every pot will look a little different, which is half the fun.
- Best For: Kids’ garden areas, playful patios, and colorful entryways.
- Budget Tip: Water down thick acrylic paint instead of buying special pouring mediums.
- Styling Idea: Stick to one color family (like blues and greens) for a more grown-up version of this look.
- Practical Note: Work over cardboard or plastic sheeting to catch drips and keep your surface clean.
- Extra Idea: Use the same drip colors on a matching plant stand or side table.
7. Rustic Whitewashed Terracotta

Whitewashed terracotta makes new pots look instantly soft, aged, and relaxed. Dilute white or off-white paint with water, then brush it lightly over dry terracotta, working in thin layers and wiping off excess with a cloth. Focus on rims and raised areas so some of the warm clay still peeks through. Once dry, these pots pair beautifully with lavender, rosemary, and silvery foliage for a gentle rustic feel.
- Best For: Cottage-style gardens, farmhouse porches, and relaxed balconies.
- Budget Tip: This technique uses very little paint—great for using up the last bits in an old tin.
- Styling Idea: Mix whitewashed pots with a few plain terracotta ones for a collected, not-too-perfect look.
- Practical Note: Let pots dry fully before planting so moisture doesn’t break down the finish.
- Care & Maintenance: The slightly worn look hides small chips and scuffs, making them low-maintenance.
8. Starry Night Galaxy Planters
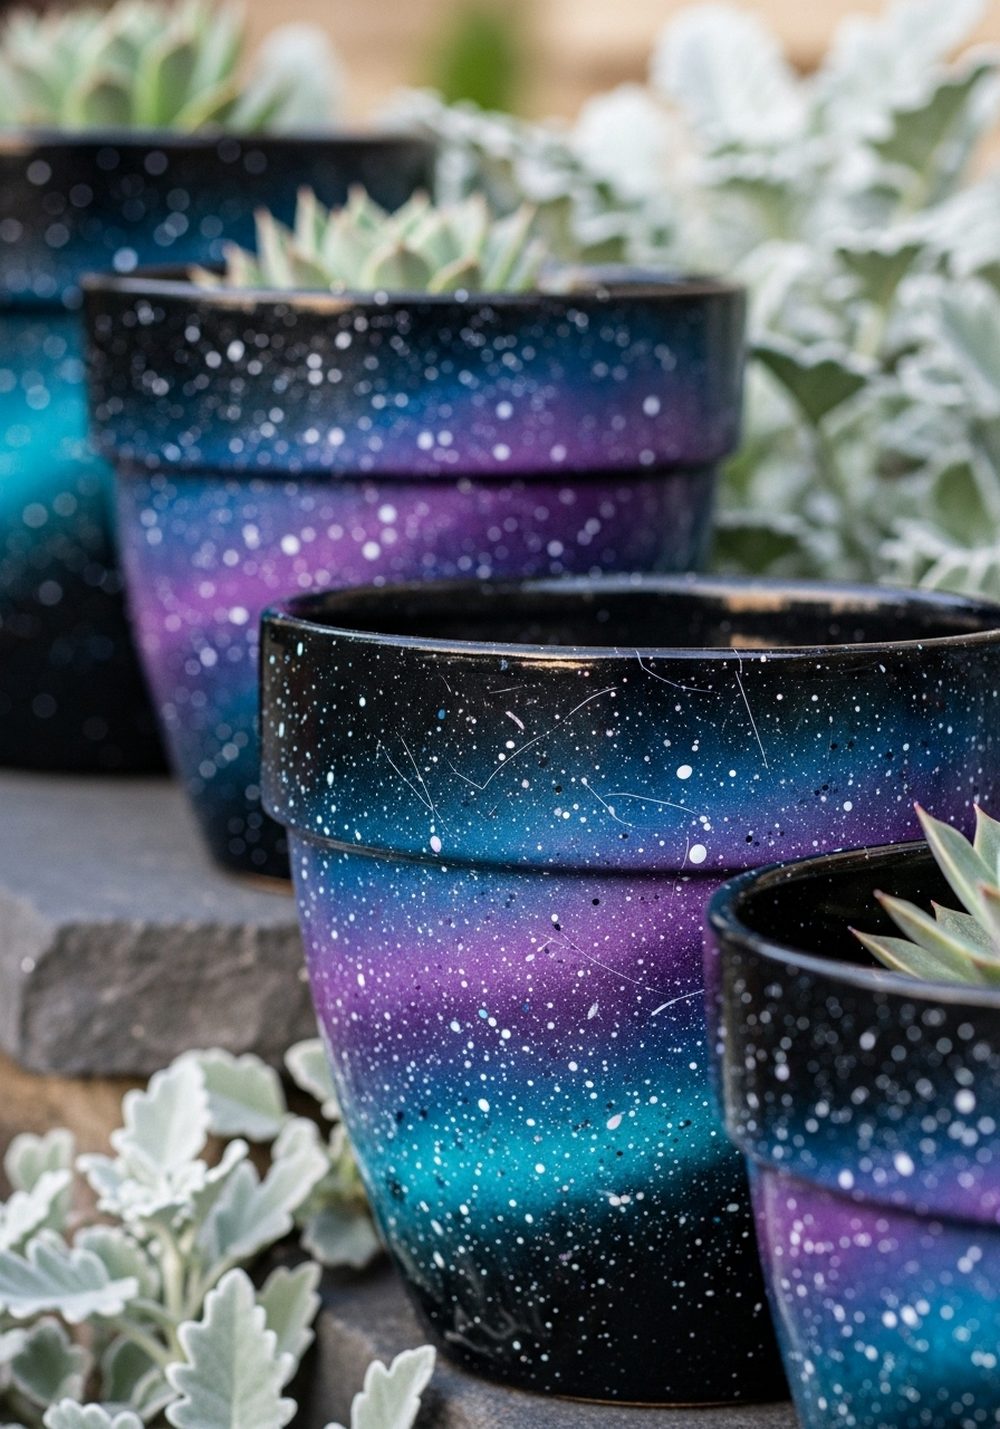
Galaxy planters add drama and a little magic, especially in evening light. Start with a dark navy or black base, then sponge on layers of purple, teal, and deep blue in soft, cloudy shapes. Add tiny star-like dots by flicking white paint or using a toothpick to place them. A touch of metallic paint gives the illusion of distant shimmer. Fill these with pale, silvery plants or succulents for extra contrast.
- Best For: Night-time patios, balcony corners near string lights, and statement planters.
- Budget Tip: Use one dark base color and just two accent shades; clever blending makes them look more complex.
- Styling Idea: Pair with warm fairy lights so the metallic details catch and reflect the glow.
- Practical Note: Use a sponge rather than a brush for softer, cloud-like transitions of color.
- Care & Maintenance: Avoid harsh scrubbing; gently wipe with a damp cloth to protect the painted “stars.”
9. Handprint And Thumbprint Family Pots
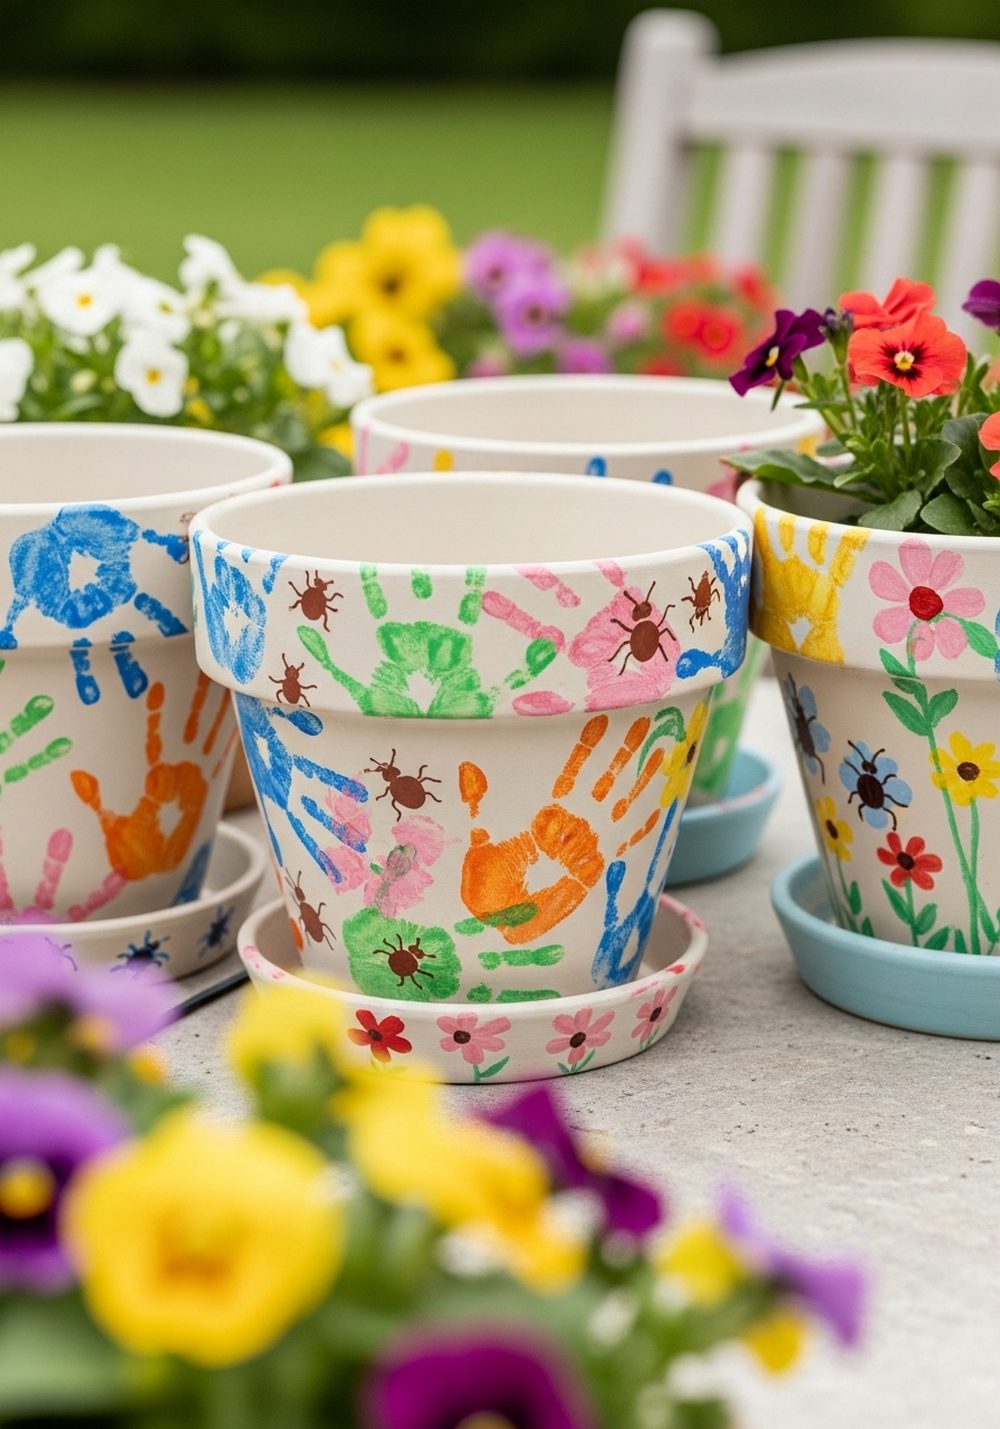
Turn simple pots into memory keepers with handprints and thumbprint art. Paint your pot in a light background shade, then press painted hands or thumbs directly onto the surface. Thumbprints can become flowers, bees, or ladybirds with a bit of extra detail added later. Label the base with a date in tiny writing if you like, then cluster your “family” pots together somewhere you see often. It’s a lovely way to capture how small kids once were.
- Best For: Family gardens, grandparents’ patios, and sentimental gift pots.
- Budget Tip: One small set of basic craft paints will go a long way for this project.
- Styling Idea: Use coordinated pastel colors so multiple pots still look cohesive together.
- Practical Note: Wash little hands promptly with warm soapy water once prints are done.
- Extra Idea: Add a new pot every year to show how hands grow over time.
10. Stenciled Tile-Inspired Pots
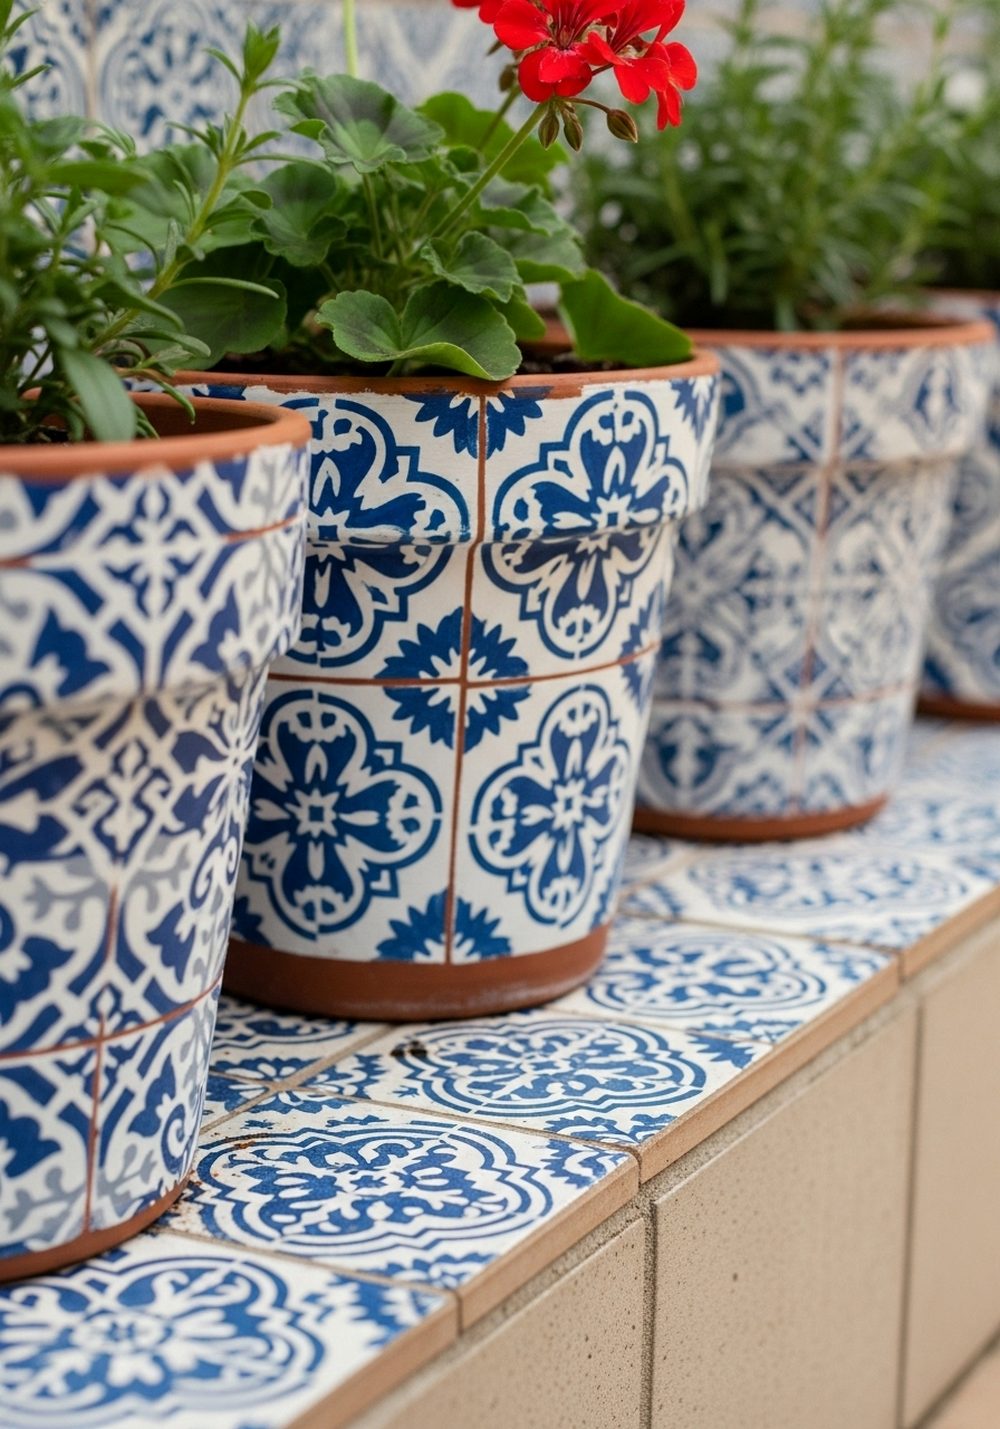
Stenciled tile-inspired pots bring a hint of Mediterranean style to any space. Start with a smooth base coat, then tape a reusable stencil around the pot and dab paint through gently with a sponge or stencil brush. Choose a limited palette—perhaps deep blue and white or charcoal and cream—for a classic look. Rotate the stencil as you go to wrap the pattern all the way around. The result feels tidy, repeatable, and surprisingly professional.
- Best For: Steps, entryways, and neat balcony displays.
- Budget Tip: Make your own stencil from sturdy plastic or card instead of buying a ready-made one.
- Styling Idea: Line several stenciled pots up together like patterned tiles along a stair.
- Practical Note: Use very little paint on the sponge to prevent bleeding under the stencil.
- Care & Maintenance: If a section chips, it’s easy to touch up just that motif with a small brush.
11. Faux Stone And Aged Patina Pots
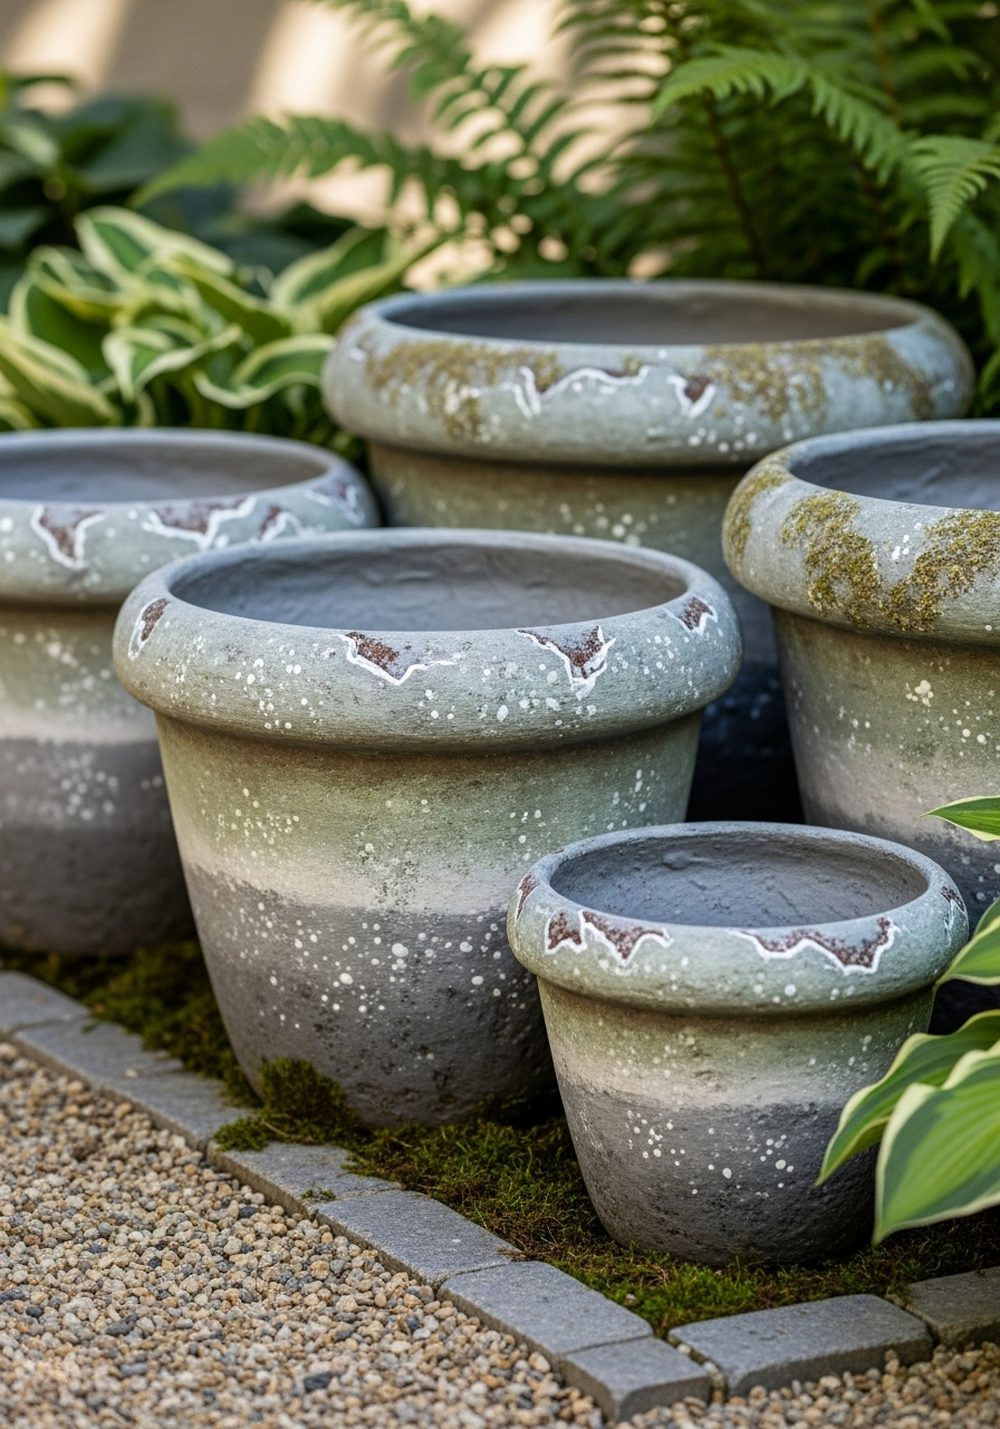
Faux stone and patina finishes are perfect if you love old garden urns but not their price tag. Layer two or three related colors—soft grey, warm stone, and muted green—using a sponge or scrunched cloth, dabbing and twisting to build a mottled surface. Add tiny darker spots and faint streaks to mimic lichen and weather marks. From a short distance, your pot will read as heavy and old, even if it’s lightweight and new.
- Best For: Shady corners, hosta beds, and classic-style seating areas.
- Budget Tip: Mix your own shades from basic white, black, and a couple of colors rather than buying many pots of paint.
- Styling Idea: Combine these pots with actual stones, gravel, or a small statue for a cohesive scene.
- Practical Note: Work slowly in thin layers; it’s easier to build age than to remove heavy patches.
- Care & Maintenance: Minor chips just add to the “weathered” story, so these finishes age gracefully.
12. Metallic Accent Rim And Foot Pots
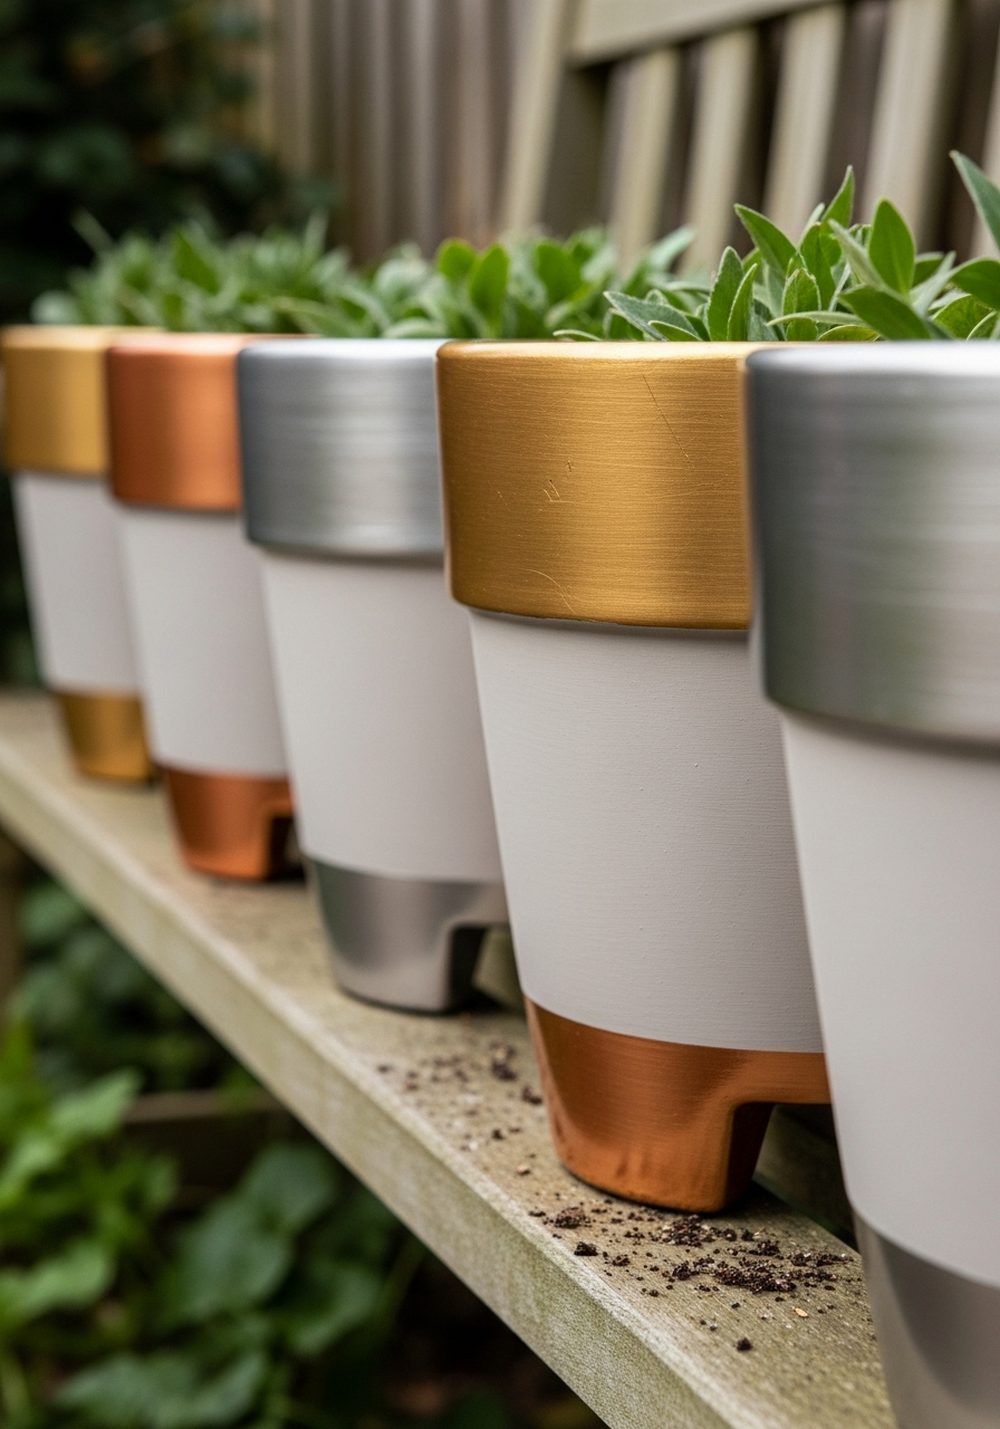
Metallic accent pots are simple but sophisticated, giving everyday containers a touch of polish. Paint your pot in a soft matte base color, let it dry, then carefully brush metallic paint around the rim and perhaps a thin band at the bottom. A steady hand or painter’s tape keeps those lines neat. Group a few of these together with lush green plants and they’ll instantly elevate your shelf, step, or side table.
- Best For: Small city balconies, rental patios, and formal front-door displays.
- Budget Tip: A tiny pot of metallic paint will embellish lots of plain containers.
- Styling Idea: Match the metallic tone to your door handle, lanterns, or outdoor furniture hardware.
- Practical Note: Metallic paints can show brush marks—use long, smooth strokes or a soft sponge.
- Care & Maintenance: Top up the rim once a season if the shine starts to fade.
Conclusion
A few coats of paint can completely transform the mood of your garden, turning plain pots into little pieces of decor that show off your style. Whether you prefer soft whitewash, playful drips, tidy stencils, or starry galaxy effects, there’s a technique here that you can manage in an afternoon. Start with one or two pots, experiment with color, and build your collection over time. Soon, your plants will sit in containers that feel every bit as lovely as they look.
FAQs
Q1. What kind of paint should I use to decorate garden pots?
Use acrylic or masonry paint that’s suitable for outdoor use. For terracotta or concrete, a primer helps paint stick better and last longer. Always finish with a clear outdoor sealer on the outside of the pot so rain, watering, and sun don’t quickly fade your hard work.
Q2. How can I paint pots on a small budget?
Start with just one idea and a couple of basic colors you truly love. Sample pots of wall paint or small craft tubes are usually enough for several small planters. Reuse old brushes, yogurt pots for mixing, and cardboard as a drop sheet so you’re mainly paying for paint and sealer.
Q3. Will painted pots still be safe for my plants?
Yes, as long as you paint only the outside or keep inner layers thin so the pot can still breathe. Make sure drainage holes stay open and don’t block them with paint. If you’re worried, keep a plastic nursery pot inside the painted outer pot so soil never touches the painted surface.
Q4. How do I stop my painted pots from peeling or flaking outside?
Good prep makes a big difference. Clean pots, let them dry completely, and lightly sand glossy surfaces before priming. Use outdoor-suitable paint in thin layers, allowing each one to dry properly. Finish with a clear sealer and try to lift pots when moving them rather than dragging, which can scrape off edges.
Q5. Are any of these ideas suitable for renters who can’t change much?
Absolutely. All of these projects are completely portable and don’t alter the building or ground at all. Painted pots sit on balconies, steps, or shelves and can move with you when you leave, so they’re perfect for renters who want personality without permanent changes.
Q6. What’s the easiest painting idea for complete beginners?
Whitewashing terracotta, simple color blocking, or basic chalkboard labels are very forgiving. They don’t rely on perfect lines or complicated patterns, and small imperfections actually add charm. Start with those, gain confidence, and then move on to finer details like line art or stenciled designs if you feel like a new challenge.