10 Painted Tyre Planter DIY Ideas To Brighten Your Garden
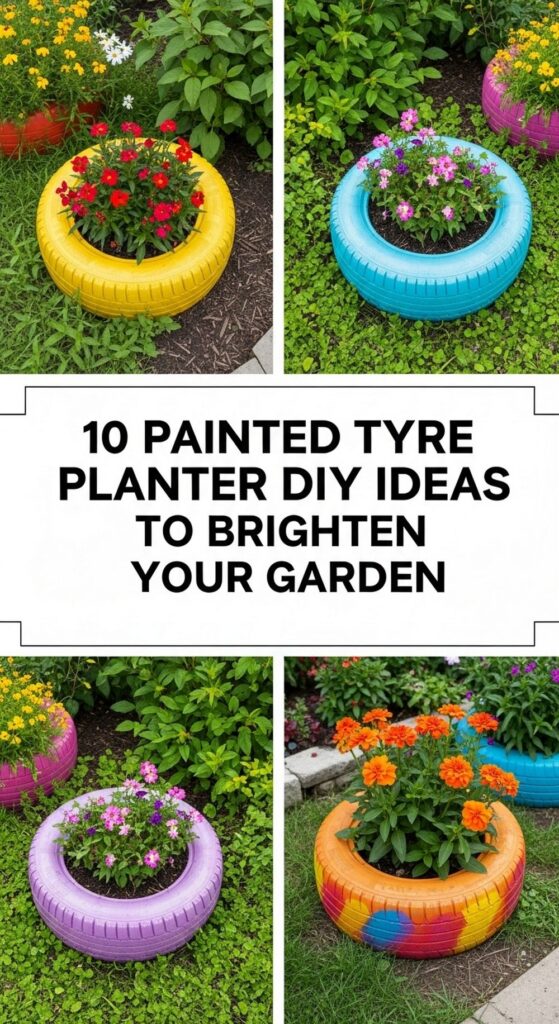
Painted tyre planters are one of those satisfying DIY projects that tick every box: they recycle old materials, add a big splash of colour, and don’t require fancy tools or skills. Whether you have a sprawling backyard, a small courtyard, or just a sunny wall to play with, tyres can be turned into charming planters with a little paint and imagination.
In this guide, you’ll find ten creative painted tyre planter ideas with simple how-to tips, styling suggestions, and budget shortcuts. Follow them as loose “tutorials” you can adapt to your space, or mix elements from different ideas. By the end, you’ll be ready to turn tired rubber into cheerful, character-filled planters that make your outdoor space feel more personal and welcoming.
Quick List
- Rainbow Stack Tyre Planter Tower
- Pastel Ombre Hanging Tyre Planter
- Chalkboard Label Herb Tyre Planters
- Polka Dot Kids’ Tyre Flower Bed
- Mandala Art Floor Tyre Planter
- Bee And Ladybug Garden Tyre Planters
- Rustic Whitewashed Tyre Rose Planter
- Striped Beach-Hut Tyre Planters
- Mosaic-Effect Tyre Planter With Stencils
- Vertical Wall Tyre Planter Trio
1. Rainbow Stack Tyre Planter Tower
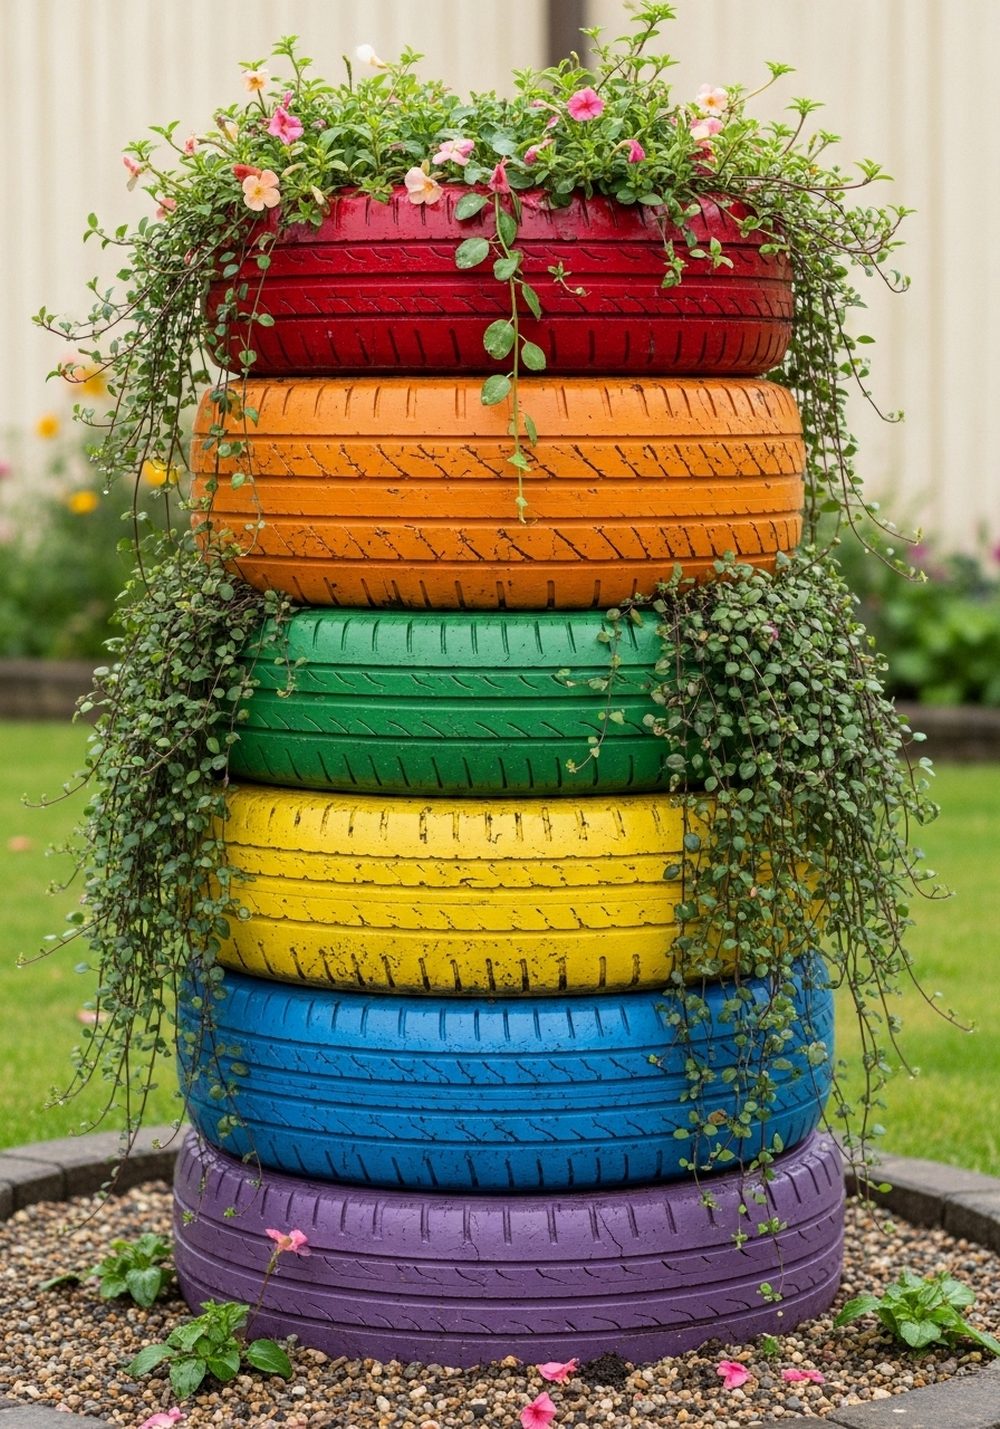
Stacked tyres painted in rainbow colours create instant height and drama in the garden. Start by cleaning and drying your tyres well, then paint each one a different bold colour using exterior paint. Once dry, stack them securely, filling each layer with gravel at the bottom and potting mix on top before adding bright flowers or trailing plants. The tower looks fantastic in a dull corner, and the layered colours make even simple plants look like a feature display.
- Best For: Empty corners, side yards, or a focal point by the shed or fence.
- Budget Tip: Use leftover paints or mix colours to create your “rainbow” rather than buying new tins.
- Styling Idea: Repeat one of the tyre colours in nearby pots, cushions, or a door for a pulled-together look.
- Practical Note: Insert a metal rod or stake through the stack if you’re worried about wobbling.
- Care & Maintenance: Refresh the colour with a quick extra coat every couple of years as the sun fades paint.
2. Pastel Ombre Hanging Tyre Planter
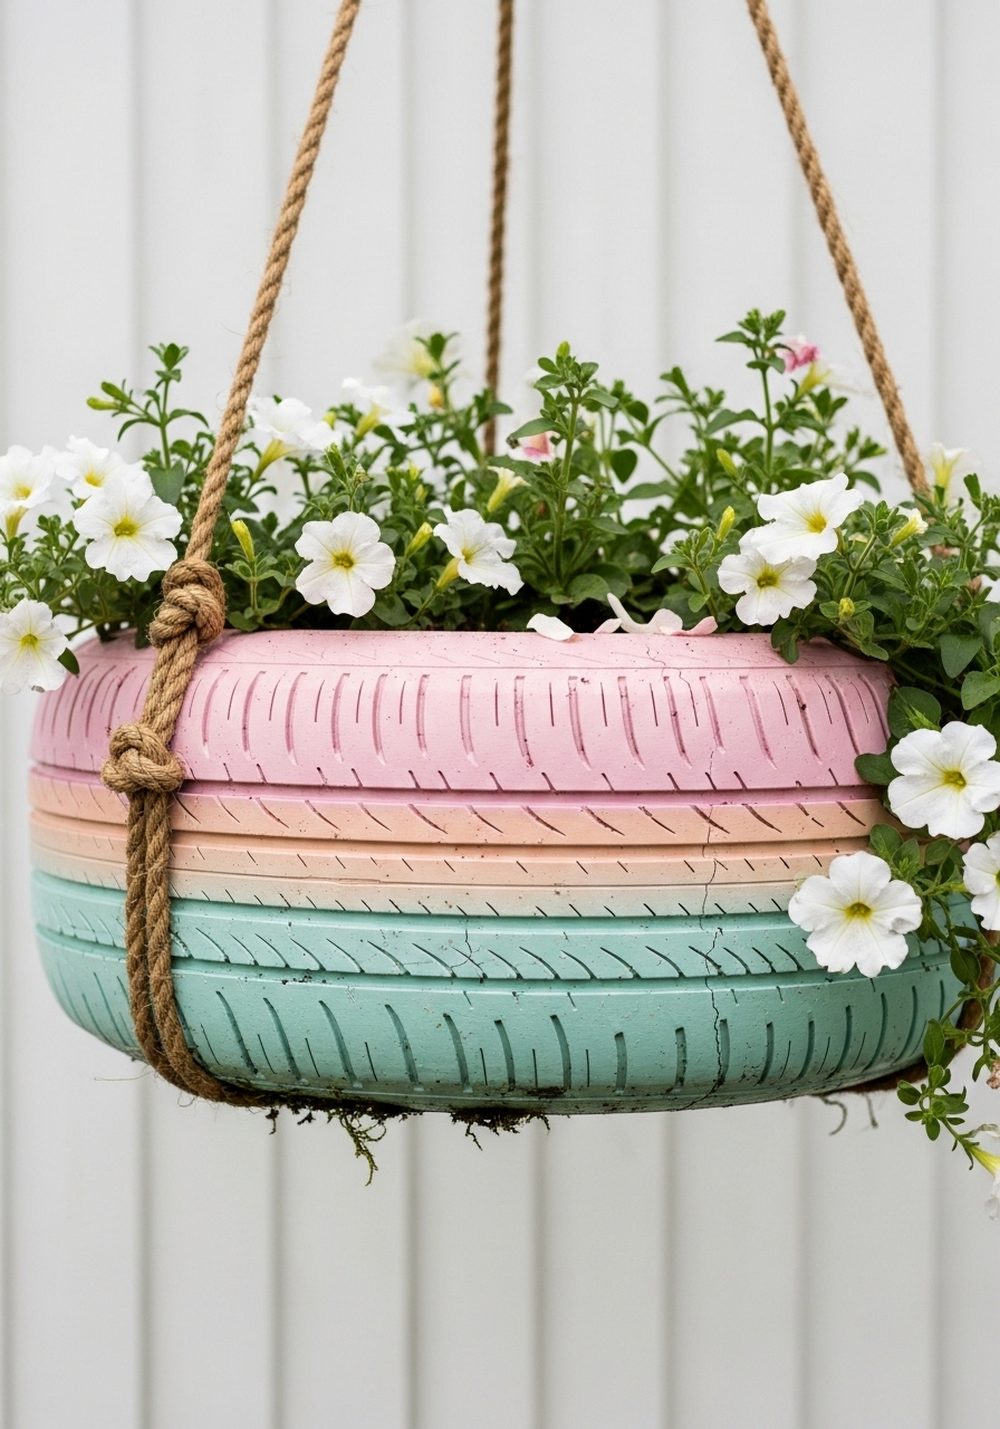
A pastel ombre hanging tyre planter is soft, romantic, and perfect when floor space is limited. Cut drainage holes in the tyre’s bottom, then paint it in a gentle gradient, blending from one pastel shade into the next. Attach strong rope or chain, secure it to a sturdy hook, and line the bottom with landscape fabric before filling with soil and trailing plants or soft-coloured blooms. Hung against a plain wall or fence, it becomes a dreamy feature that feels light and airy.
- Best For: Small patios, balconies, and rented spaces where you can’t build big structures.
- Budget Tip: Use sample pots of paint for the ombre effect; they’re cheap and you only need a little.
- Styling Idea: Pair with fairy lights or a sheer outdoor curtain for an extra romantic mood at night.
- Practical Note: Always use proper wall plugs and heavy-duty hooks designed to hold weight outdoors.
3. Chalkboard Label Herb Tyre Planters

If you love cooking with fresh herbs, these chalkboard label tyre planters are both cute and practical. Paint each tyre in a soft, matte colour, then leave a rectangle unpainted or overpaint that area with chalkboard paint. Once everything is dry, fill the tyres with good-quality potting mix and plant your favourite herbs. Use chalk or a chalk marker to write the herb names on the front. The result is a neat, organised herb “border” that doubles as charming garden decor.
- Best For: Herb lovers who want plants close to the back door or kitchen window.
- Budget Tip: One small can of chalkboard paint will cover several tyres and other little garden labels.
- Styling Idea: Keep the main tyre colours muted so the lush green herbs and white chalk lettering stand out.
- Practical Note: Place the tyres where they’ll get at least 4–6 hours of sun for happy, productive herbs.
- Extra Idea: Add a small decorative stake or spoon marker inside each planter for extra personality.
4. Polka Dot Kids’ Tyre Flower Bed
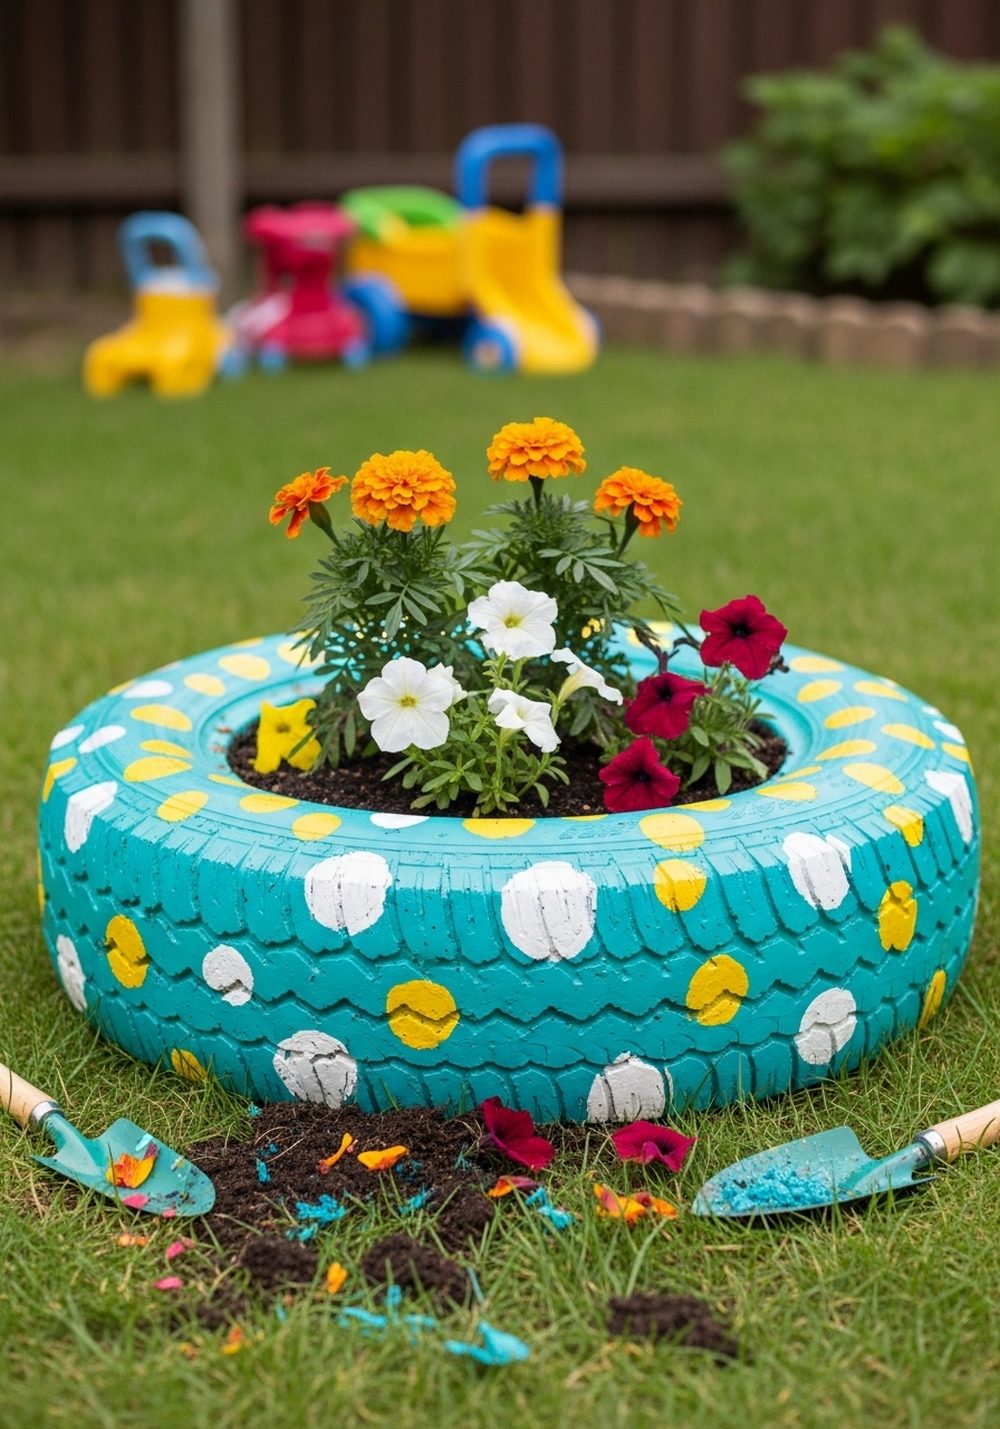
This idea is perfect if you want to involve children in the garden. Paint a tyre in a bright base colour, then let the kids help dab on polka dots using brush ends, sponges, or even their thumbprints. Once sealed and dry, place the tyre on a patch of soil or lawn, fill it with compost, and plant easy, cheerful flowers like marigolds or pansies. The playful pattern and bold colours make the planter feel like a toy that just happens to grow flowers.
- Best For: Family gardens, play areas, or schoolyards where kids spend time outdoors.
- Budget Tip: Use cheap tester pots and leftover craft paints, then finish with a clear outdoor sealer.
- Styling Idea: Choose one colour palette (e.g. blues and yellows) so the dots feel fun but not chaotic.
- Practical Note: Pre-dig the spot so the tyre sits slightly “nested” and won’t roll if bumped.
- Care & Maintenance: Let kids help with watering and deadheading to keep them involved in the garden.
5. Mandala Art Floor Tyre Planter
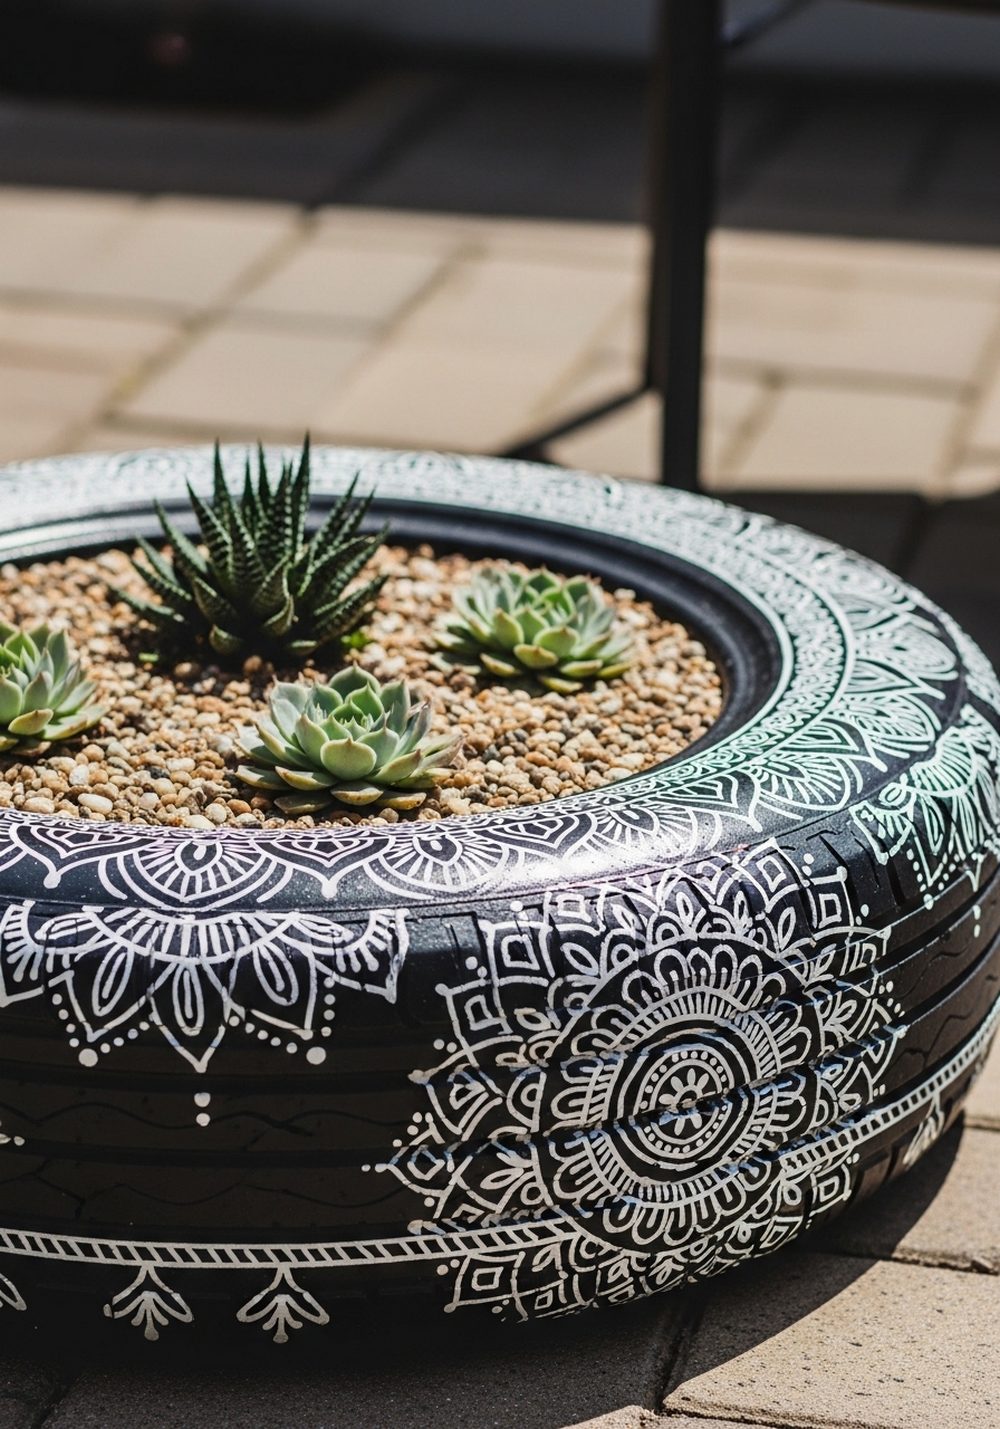
A mandala tyre planter adds a calm, artistic touch to any patio. Paint the tyre in a deep solid colour, then lightly sketch a circular design around the rim before filling it in with fine white or metallic lines and dots. Once finished and sealed, place the tyre flat on a patio, top up with gravel for drainage, then soil and low-growing succulents or compact flowering plants. The contrast between the patterned rim and tidy planting feels intentional and very “designed”.
- Best For: Patio corners, meditation spots, or alongside outdoor seating where the details can be admired.
- Budget Tip: Use paint pens instead of multiple brushes; they’re precise and last for several projects.
- Styling Idea: Stick to two or three colours so the mandala looks sophisticated rather than busy.
- Practical Note: Use a lazy Susan or rotate the tyre on a bucket while painting to make symmetry easier.
6. Bee And Ladybug Garden Tyre Planters
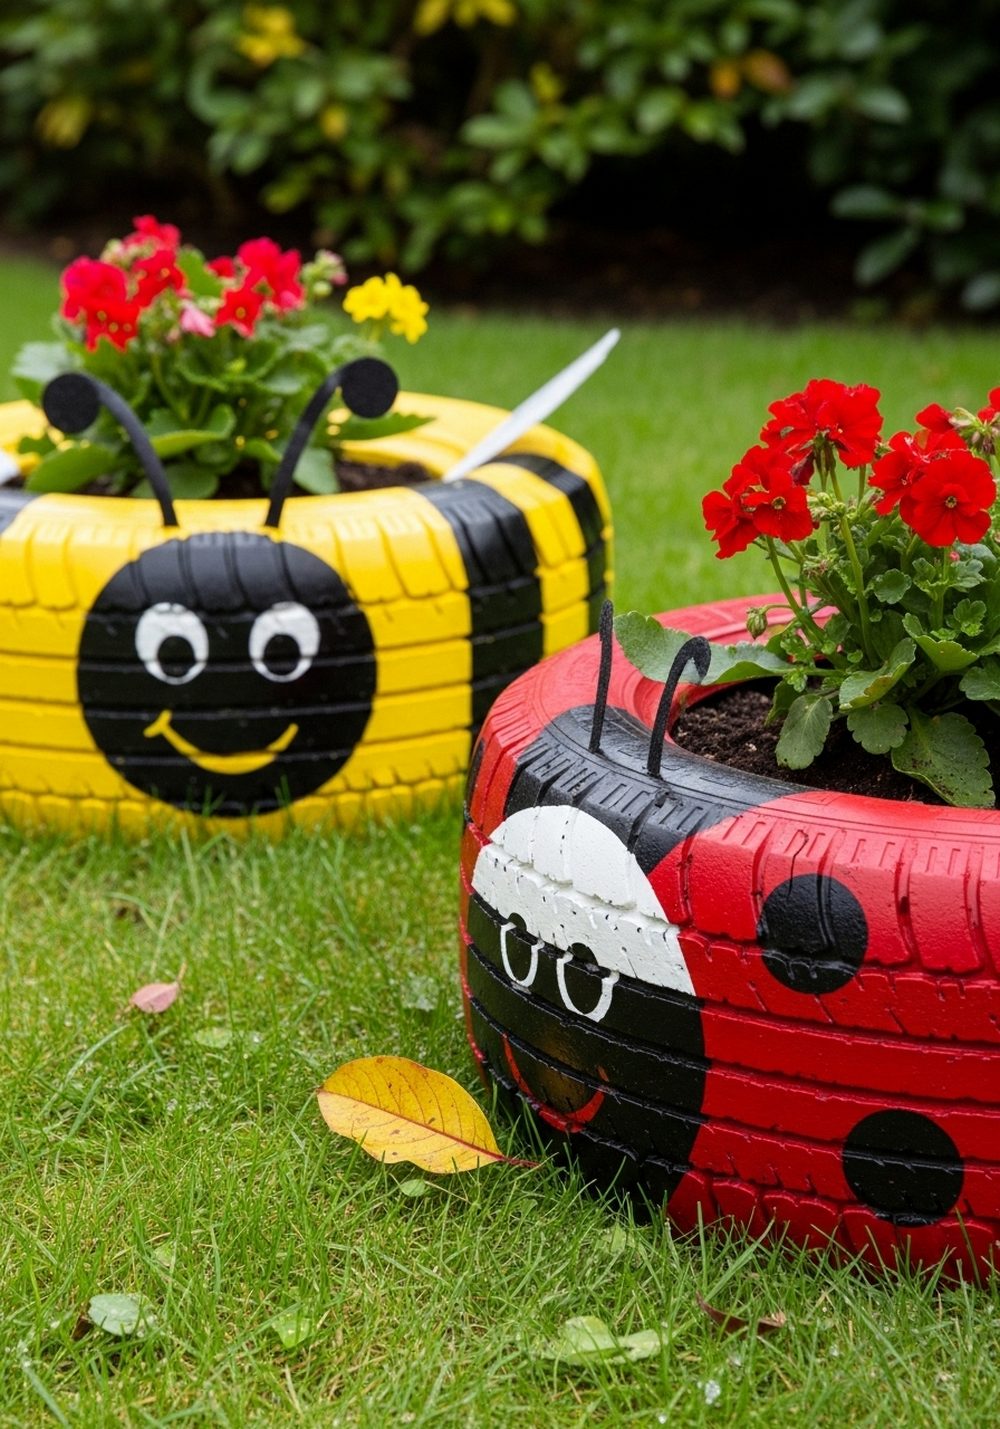
Turn your tyres into oversized garden “bugs” that children and adults both love. Paint one tyre with yellow and black stripes and add a simple face; paint another red with black spots like a ladybug. Once dry, position them on the lawn or near a flower bed, fill with soil, and plant bright flowers that look like “wings” or “fur”. The result is charming, slightly cartoonish planters that bring a sense of fun and personality to the garden.
- Best For: Front gardens, cottage-style spaces, and anywhere you want a playful focal point.
- Budget Tip: You can get both designs out of just three colours of paint: red, yellow, and black.
- Styling Idea: Keep surrounding decor simple so the bee and ladybug really pop as statement pieces.
- Practical Note: Use a small piece of plywood inside the tyre base if you’re placing it on uneven ground.
- Extra Idea: Add simple wire or pipe-cleaner “antennae” to complete the look.
7. Rustic Whitewashed Tyre Rose Planter

For a softer, country garden look, a whitewashed tyre filled with roses works beautifully. Start with a dark or black tyre, then dry-brush white or cream paint over the surface to create a worn, rustic finish, letting some of the original colour show through. Once the paint dries, position the tyre on gravel or a mulched bed, add well-draining soil, and plant compact roses in soft shades. The contrast between rough tyre and delicate blooms gives a lovely, romantic feel.
- Best For: Cottage gardens, gravel driveways, or under a window where roses can be enjoyed up close.
- Budget Tip: Use one basic white paint and dilute it slightly with water for a quick, streaky whitewash.
- Styling Idea: Pair with galvanised watering cans, wooden crates, or a vintage chair nearby.
- Care & Maintenance: Choose disease-resistant rose varieties and keep them mulched and well watered.
8. Striped Beach-Hut Tyre Planters
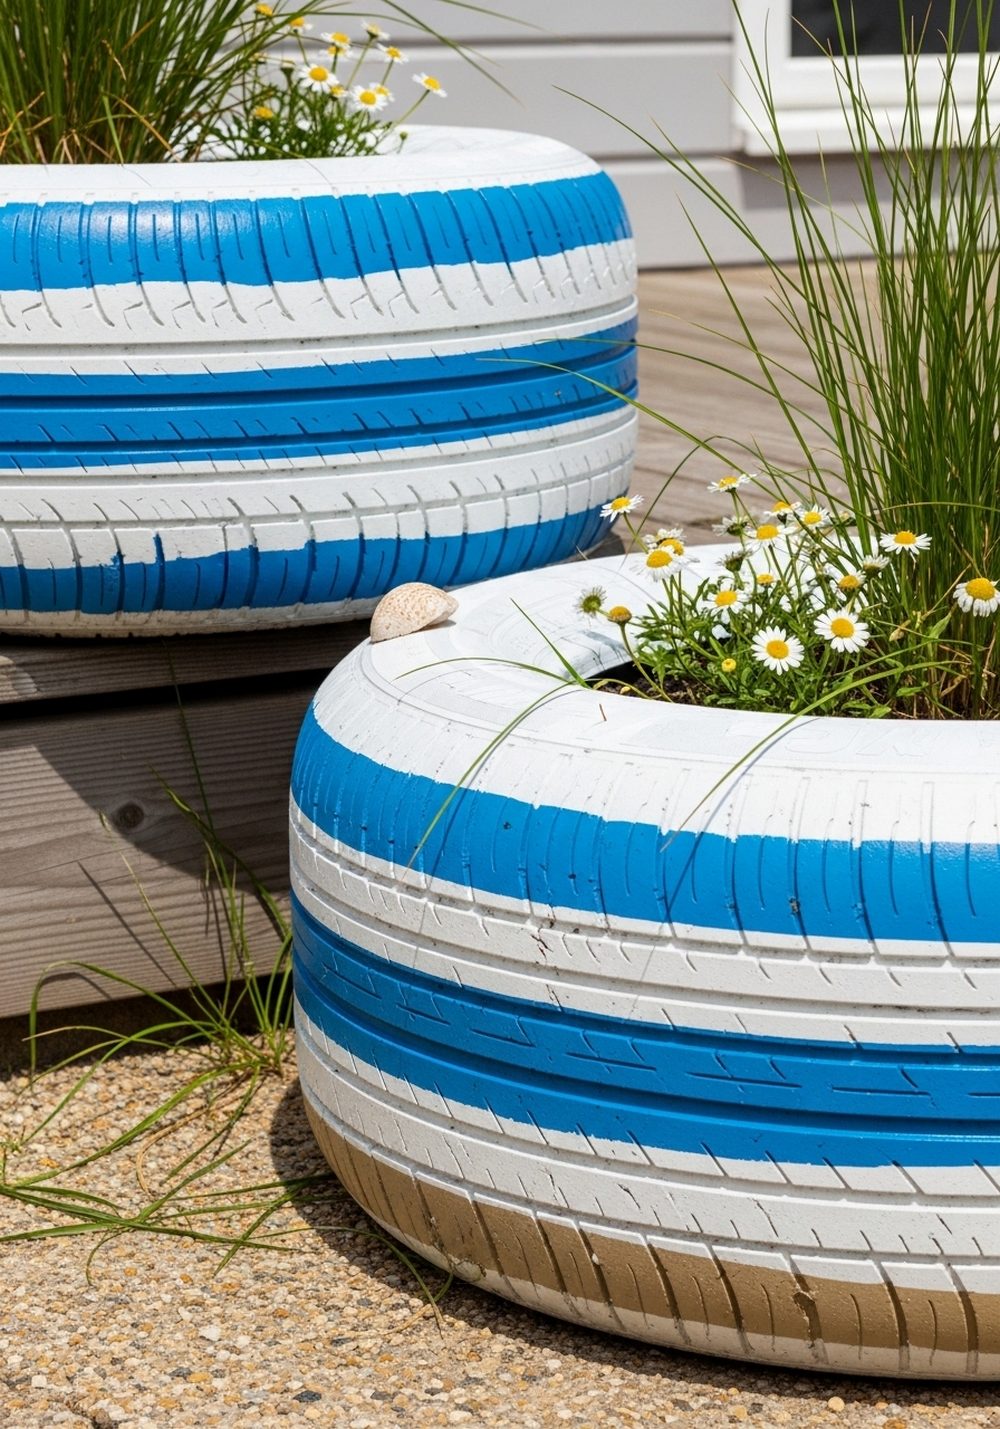
These seaside-inspired tyre planters are perfect if you love coastal style. Paint your tyres in alternating vertical stripes of white, blue, and a sandy neutral, using masking tape to keep edges crisp. Once dry, stack or line them up near a deck, fill with gritty potting mix, and plant ornamental grasses, daisies, or lavender. The clean stripes echo beach huts and deckchairs, instantly giving your space a light, breezy holiday feel even if you’re far from the sea.
- Best For: Decks, patios, or poolsides where you want a relaxed, coastal vibe.
- Budget Tip: One tin of white plus one blue can create all your stripes; mix white with a touch of brown for “sand”.
- Styling Idea: Add striped cushions, lanterns, or a rope-wrapped pot to repeat the beach theme.
- Practical Note: Tape carefully and remove it while the paint is still slightly tacky for sharper lines.
9. Mosaic-Effect Tyre Planter With Stencils
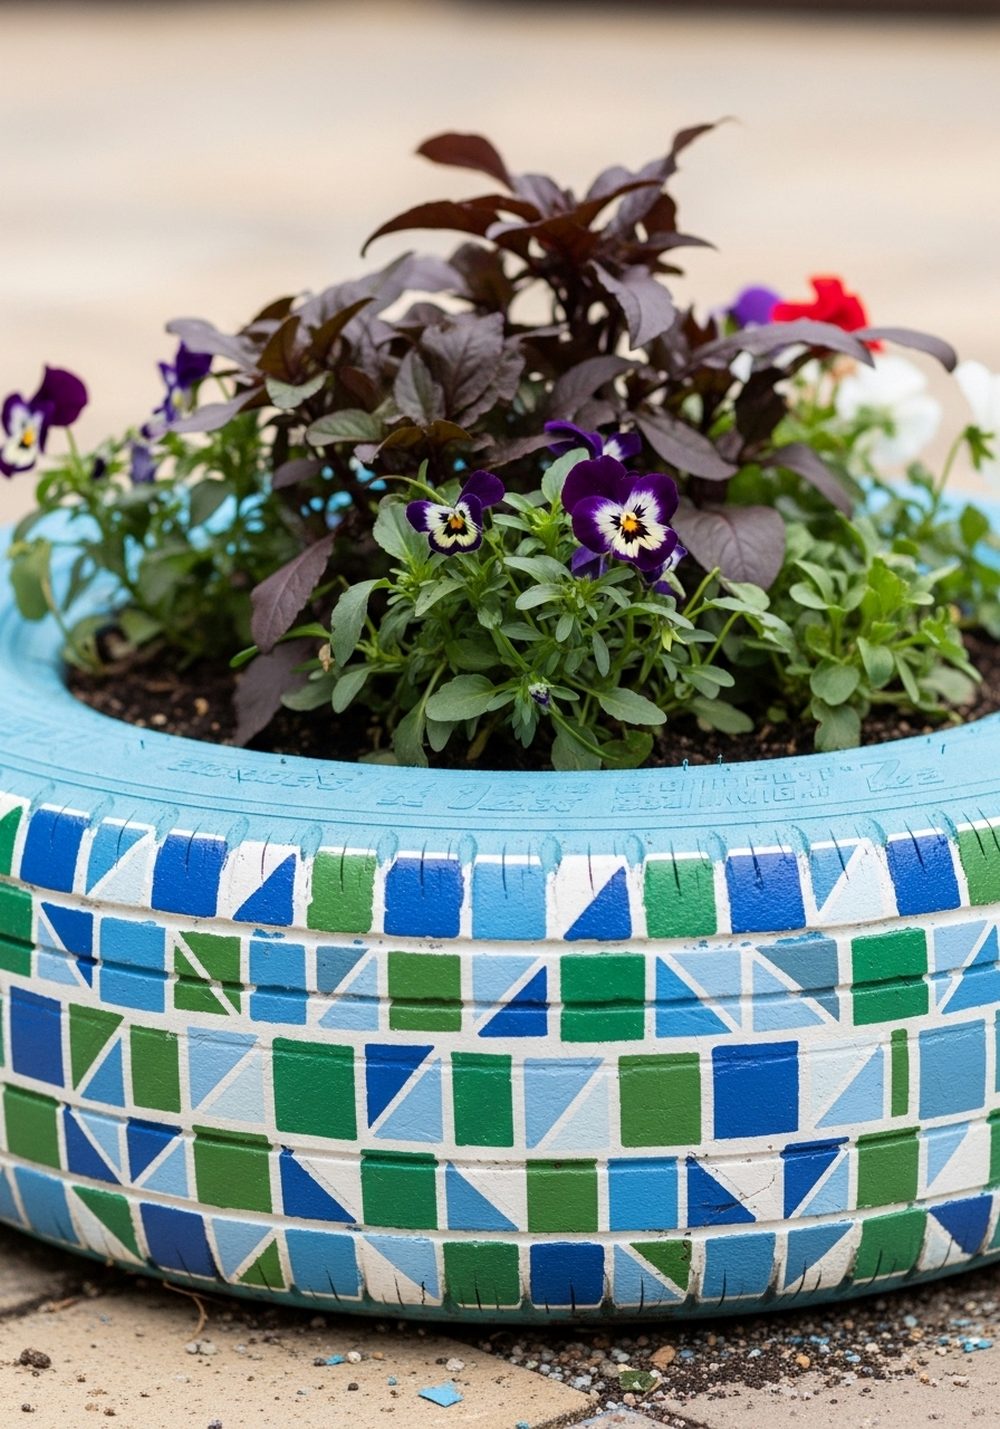
You can create a mosaic look without any real tiles by using stencils and paint. After priming and painting your tyre a base colour, use square or geometric stencils to dab on patches of contrasting paint, building up a pattern that looks like small tiles. Seal once dry, then fill the tyre with soil and a mix of flowering plants and foliage. From a distance, the tyre looks richly detailed, but the process is actually quick and satisfying, even for beginners.
- Best For: Patios, entrance areas, or anywhere you want a more “artistic” planter.
- Budget Tip: Cut your own stencils from plastic folder covers instead of buying ready-made ones.
- Styling Idea: Pick a limited palette, such as different blues with a touch of white, for a cohesive mosaic effect.
- Practical Note: Work in light layers so the paint doesn’t bleed under the stencil edges.
10. Vertical Wall Tyre Planter Trio
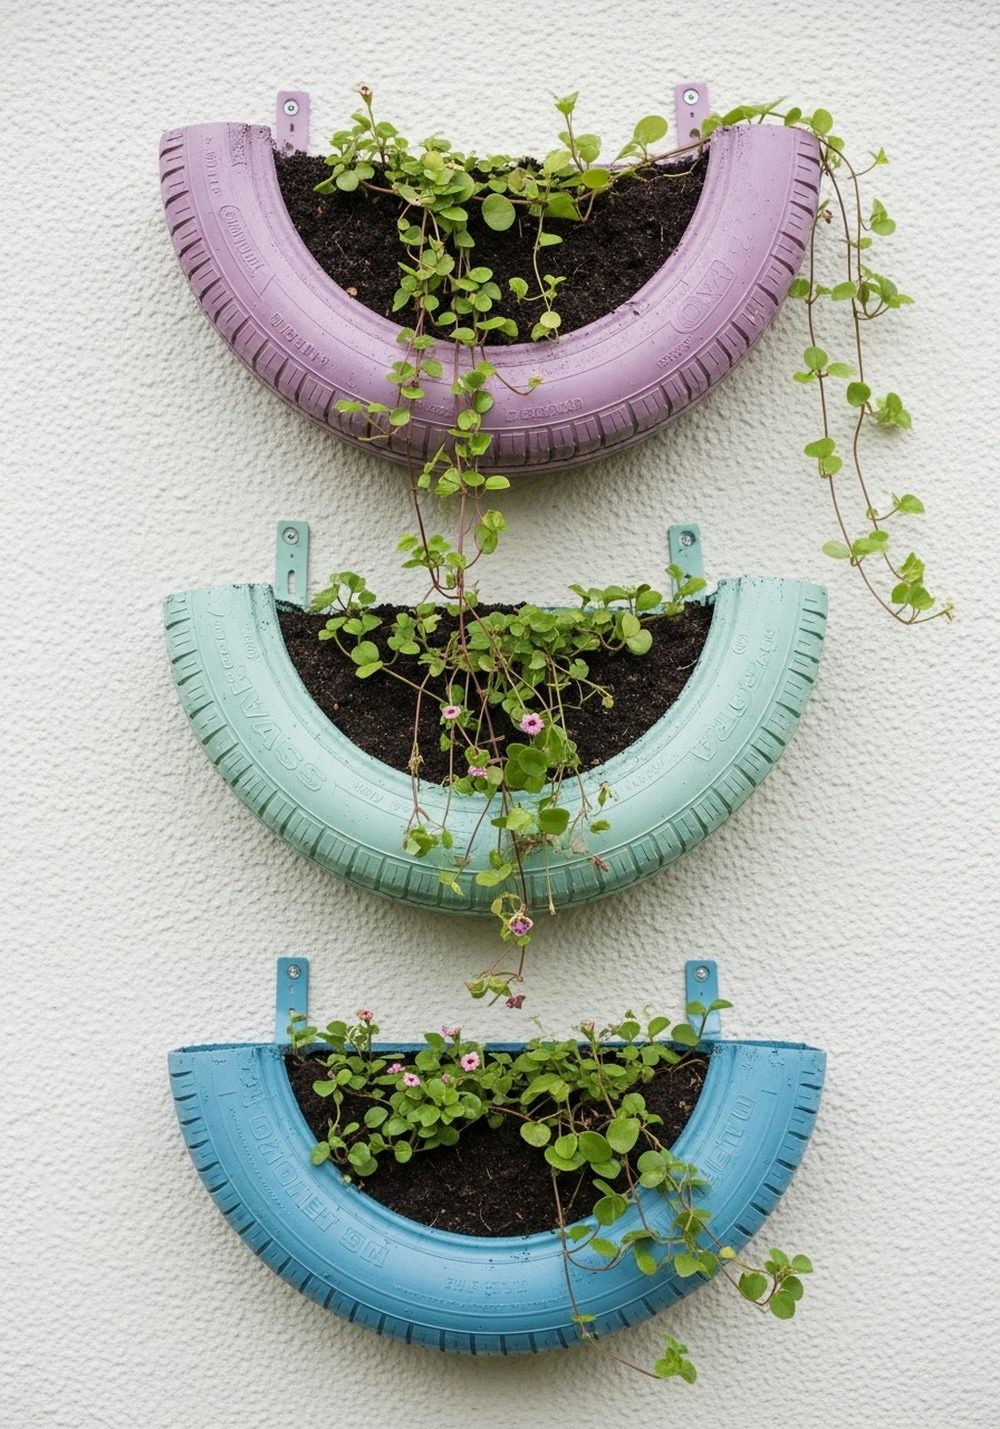
When floor space is tight, move your tyres up onto the wall. Cut each tyre in half (or use halves from the start), paint them in coordinating colours, and fix them securely to a sturdy wall or fence with brackets. Line the bottom of each half with landscape fabric, add soil, and plant trailing herbs or flowers so they spill over the edges. Arranged in a vertical trio, the tyres create a striking living feature that acts like wall art and planter in one.
- Best For: Small gardens, courtyards, or bare fences that need softening with greenery.
- Budget Tip: Start with just one or two halves and add more as you find spare tyres.
- Styling Idea: Use a single colour family (e.g. different shades of green-blue) to keep the vertical display elegant.
- Practical Note: Always drill drainage holes and make sure fixings are rated for outdoor use and weight.
- Care & Maintenance: Choose drought-tolerant plants if the wall gets lots of sun and dries out quickly.
Conclusion
Painted tyre planters turn something most people throw away into cheerful, personality-packed garden decor. With a bit of scrubbing, priming, and paint, you can create everything from playful creatures to calm, artistic centrepieces and vertical gardens. Start with one simple idea that suits your space and skill level, then build from there as your confidence grows. Before long, your garden will feel brighter, more creative, and completely your own, all thanks to a few upcycled tyres and some colour.
FAQs
1. Do I need special paint for tyre planters?
Yes, it’s best to use an exterior-grade paint that’s designed for outdoor use, such as masonry paint or exterior acrylic. These handle sun, rain, and temperature changes better than basic craft paint. You can still use craft paints for details, but seal them with a clear outdoor varnish to help them last longer.
2. How can I make tyre planters safe for kids and pets?
First, clean tyres thoroughly and check for exposed wire or sharp edges, sanding or trimming them away. Always drill drainage holes so water doesn’t sit and attract mosquitoes. Position planters where they won’t roll or tip, and avoid very tall stacks in play areas unless they’re securely fixed with stakes or rods.
3. Are tyre planters okay for growing herbs and vegetables?
Many people do use tyre planters for edibles, but if you’re concerned about potential leaching, stick to ornamental flowers or herbs grown in plastic pots nested inside the tyres. You get the colourful look without direct soil contact. You can also line the interior of the tyre with thick plastic or a rigid planter as an extra barrier.
4. What’s the easiest painted tyre project for beginners?
Simpler designs like a single-colour tyre with whitewashed effects, polka dots, or basic stripes are very forgiving. You mainly need to focus on cleaning, priming, and applying two good coats of paint. Start with one floor planter, then move on to hanging or wall-mounted versions once you’re comfortable drilling drainage and fixings.
5. How can I keep painted tyres looking good over time?
Place them where they don’t sit in water, and make sure drainage holes stay clear. A quick wipe-down once in a while removes dust and algae. Expect some fading in strong sun; plan to give them a fresh topcoat every couple of years. Using a UV-resistant clear sealer over bright colours will also slow down fading.
6. Can renters use tyre planters without damaging walls or floors?
Absolutely. Freestanding tyre planters are perfect for renters because they don’t need fixing into anything. For hanging or wall versions, use sturdy freestanding frames, over-the-fence hooks, or hang from existing pergola beams instead of drilling into walls. When you move, you can simply take the tyre planters with you.