12 Recycled Tin Can Garden Decor Ideas Kids Can Help Create

If your recycling bin is full of tin cans and your kids are full of energy, this is the perfect project list for you. With just a bit of paint, twine, soil, and imagination, those ordinary cans can become charming garden decor that children are proud to show off.
In this post, you’ll find simple, low-cost ideas that turn tin cans into planters, lanterns, bird feeders, and more. Each project is designed so kids can safely help with the fun parts like painting, filling, and arranging. You’ll end up with a brighter, more playful garden and a bunch of happy little helpers who feel more connected to the outdoor space they helped decorate.
Quick List
- Painted Tin Can Herb Pots
- Jangly Tin Can Wind Chimes
- Starry Tin Can Lanterns
- Hanging Tin Can Flower Tower
- Tin Can Bug Hotel Hideaways
- Colorful Tin Can Bird Feeders
- Tin Can Fairy House Planters
- Tin Can Rainbow Planter Row
- Tin Can Kids’ Tool Caddy
- Tinkling Tin Can Rain Chain
- Tin Can Garden Label Stakes
- Mini Tin Can Water Garden
1. Painted Tin Can Herb Pots
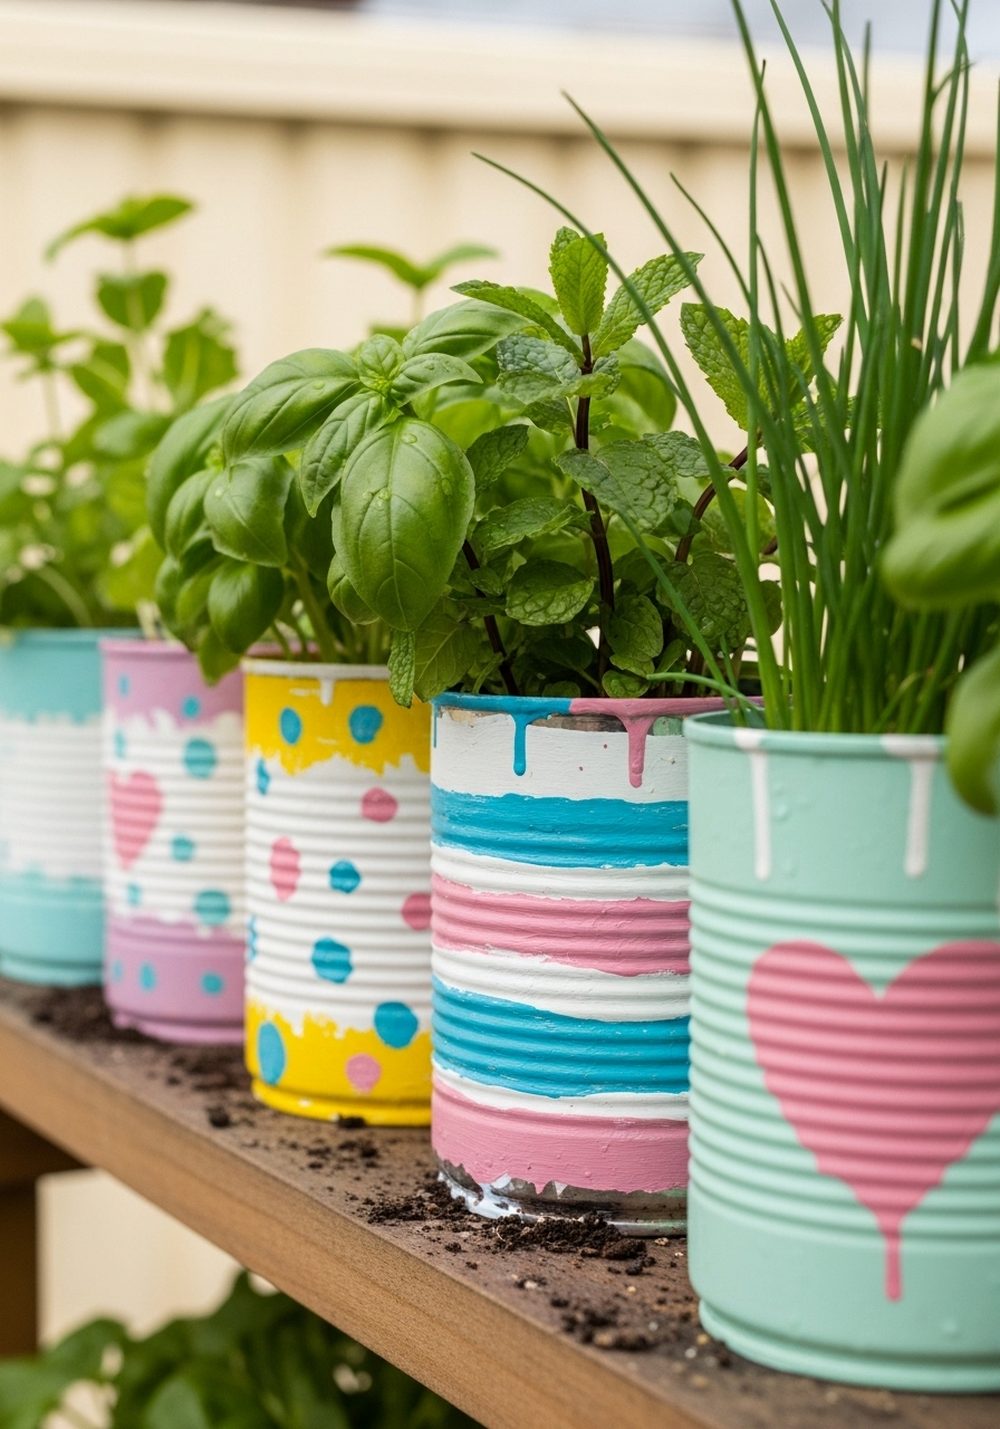
Turn clean tin cans into cheerful herb pots that kids can proudly line up on a windowsill or garden shelf. Adults can smooth any sharp edges and add drainage holes, then kids take over with bright acrylic paints and simple patterns. Once dry, fill with soil and easy herbs like mint, basil, or parsley. The mix of fresh green leaves against colorful cans instantly livens up even the tiniest outdoor corner.
- Best For: Windowsills, balcony rails, or narrow ledges.
- Budget Tip: Use leftover wall paint or tester pots instead of buying new.
- Styling Idea: Stick to two or three colors for a calm, modern look, or go full rainbow for a playful feel.
- Practical Note: Stand cans on a tray or saucer to catch extra water and protect surfaces.
- Care & Maintenance: Let kids be in charge of watering and picking leaves for recipes.
2. Jangly Tin Can Wind Chimes
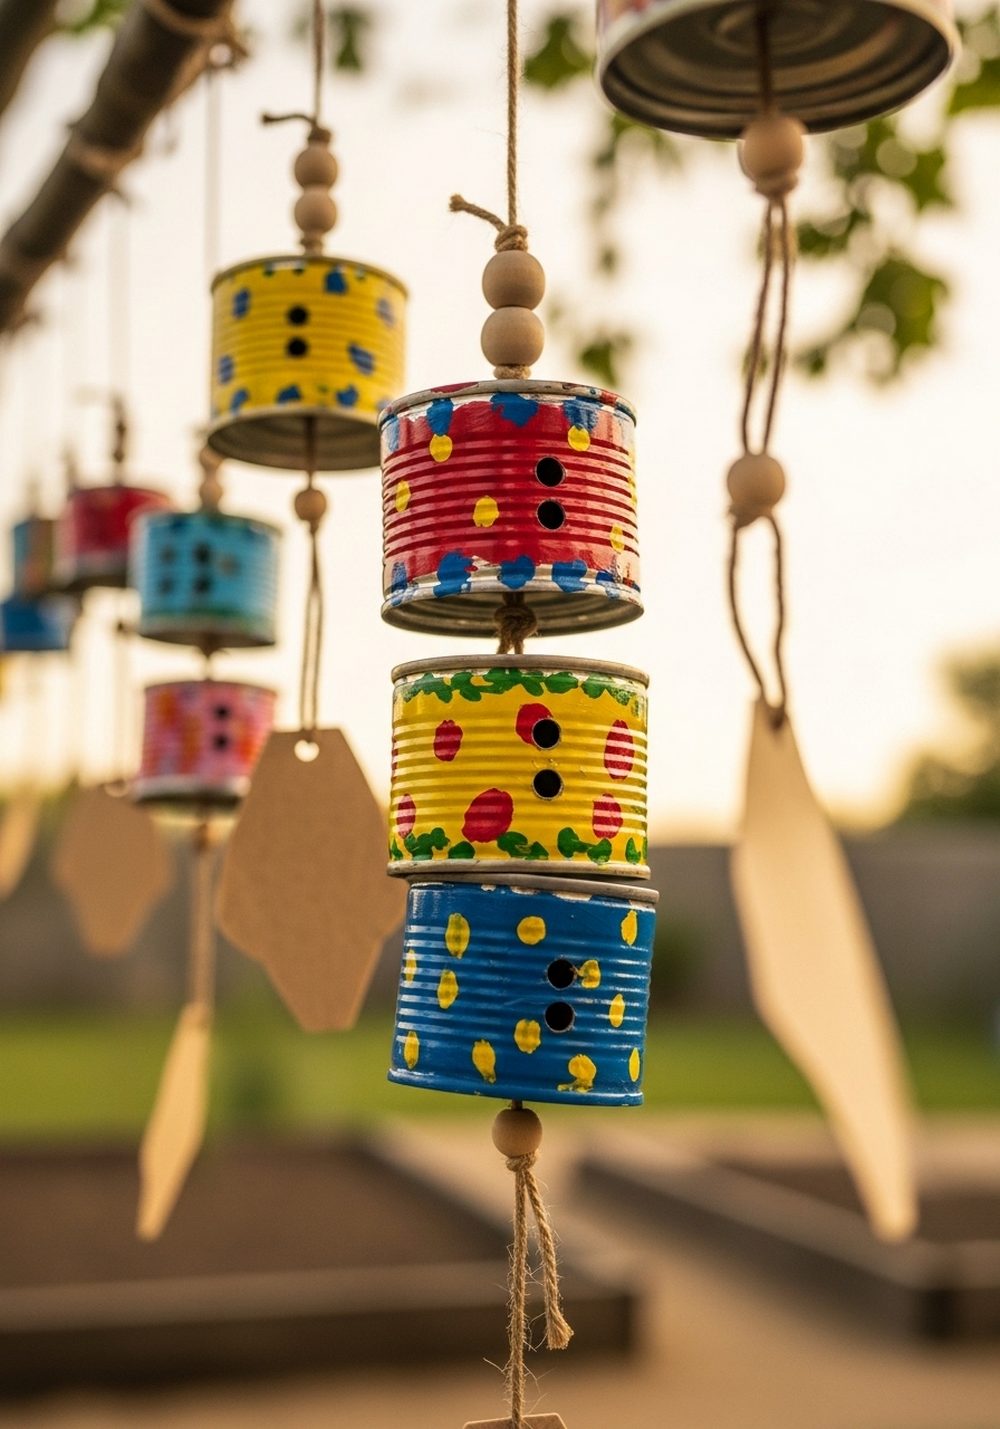
A cluster of small tin cans becomes a fun, tinkling wind chime that kids will love hearing on breezy days. After adults make safe holes in the bases, children can paint each can, then help thread them onto twine or fishing line with wooden beads between. Hang the finished chimes from a branch, pergola, or hook where they can move freely. The mix of color, metal shimmer, and gentle sound adds life to quiet garden corners.
- Best For: Porches, pergolas, or over a kids’ play area.
- Budget Tip: Mix in buttons or old keys instead of buying beads.
- Styling Idea: Use blues and greens for a seaside look, or metallic paints for something more rustic.
- Practical Note: Hang high enough that little heads do not bump into moving cans.
- Care & Maintenance: Check knots and twine once in a while in case they wear through.
3. Starry Tin Can Lanterns

Tin can lanterns bring magical sparkle to evenings in the garden. Adults can freeze water in the cans and then gently hammer star or dot patterns into the sides; kids can paint the outsides in deep night-sky colors. At dusk, pop in LED tealights and line a path, table, or step with the glowing cans. The tiny punctured holes let light spill out in speckles, turning a simple walkway into something special and storybook-like.
- Best For: Patio tables, steps, or along a garden path.
- Budget Tip: Use battery tea lights so you don’t need to buy or monitor real candles.
- Styling Idea: Dark navy, purple, and black paint make the glowing holes look extra dramatic.
- Practical Note: Always use flameless lights if children will be carrying or moving the lanterns.
- Extra Idea: Punch out initials or simple shapes instead of stars for a personalized touch.
4. Hanging Tin Can Flower Tower
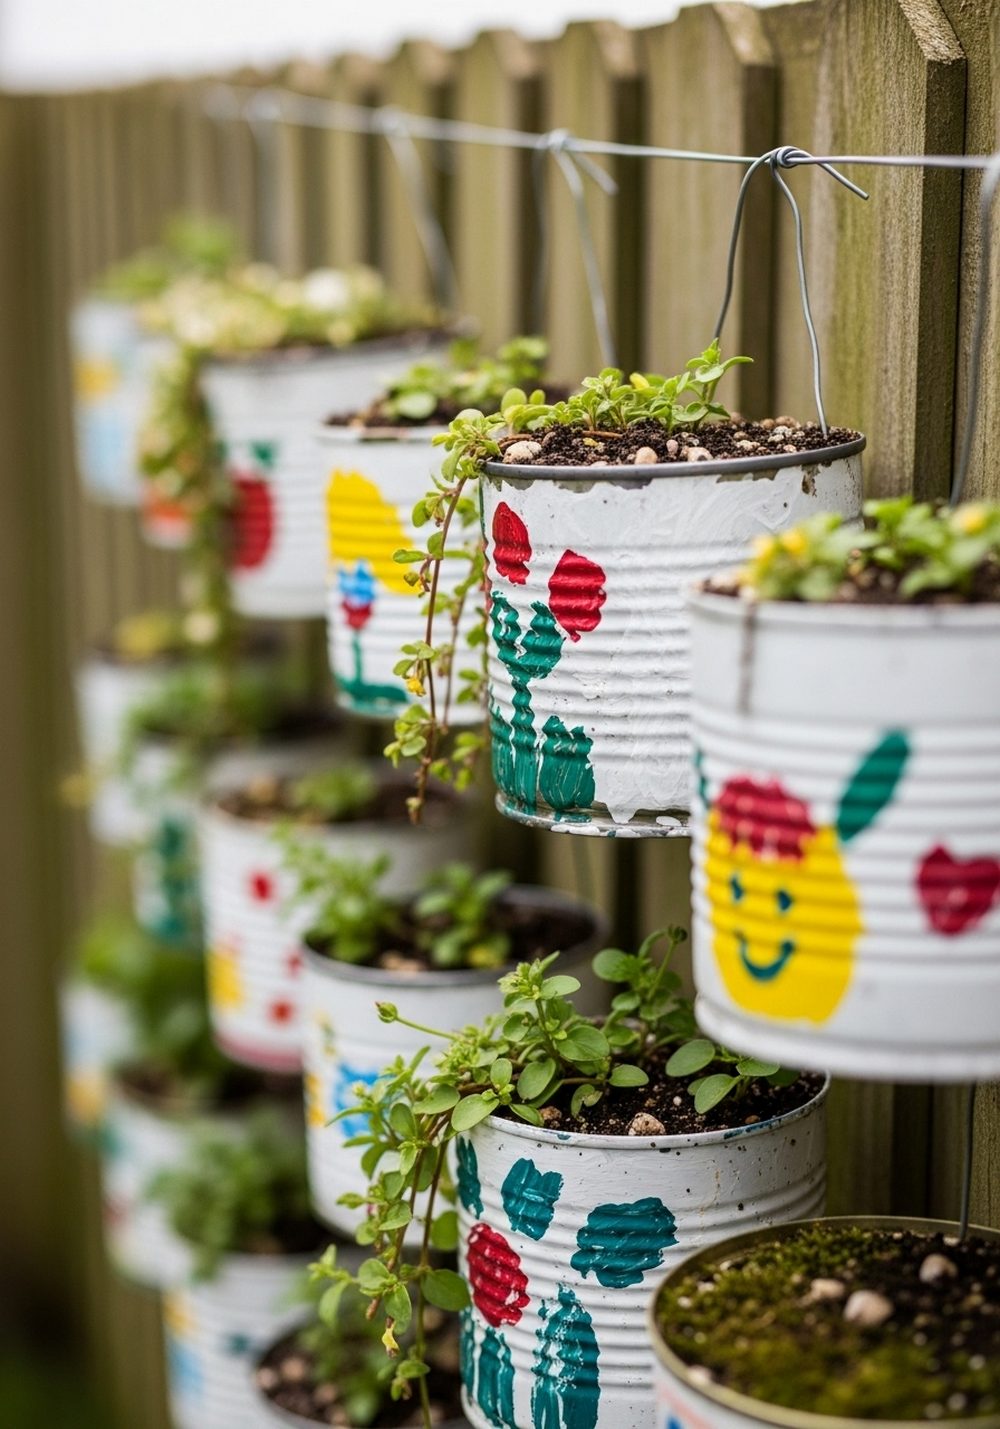
Stacked hanging cans create a vertical flower tower that’s perfect for small gardens. Fix strong wire or chain through each can (grown-up job), then let kids decorate the outsides with paint, stickers, or washi tape. Fill each one with potting mix and trailing plants such as lobelia, ivy, or nasturtiums. When hung from a bracket or pergola beam, the tower looks like a floating column of color and foliage, drawing the eye upward and saving ground space.
- Best For: Small patios, balconies, or bare fence posts.
- Budget Tip: Use cuttings or seedlings shared by friends instead of buying full-size plants.
- Styling Idea: Choose one color family for flowers, like all reds and oranges, for a strong statement.
- Practical Note: Ensure the top fixing is very secure and use lightweight potting mix.
- Care & Maintenance: Water gently from the top so it trickles down through the tower.
5. Tin Can Bug Hotel Hideaways
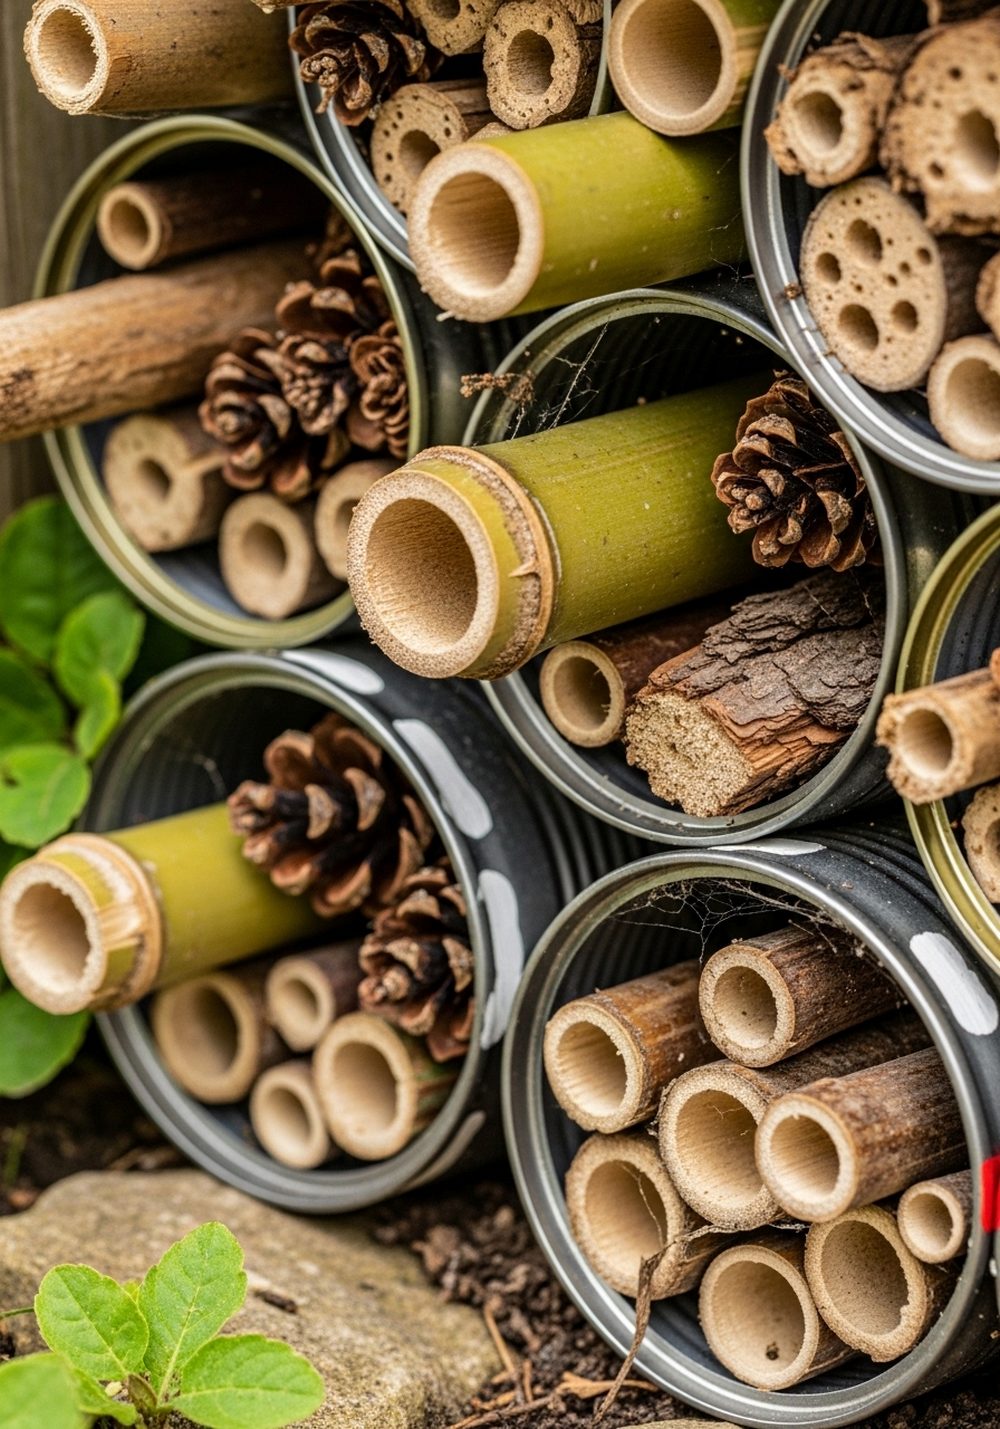
Help beneficial insects move into your garden with a bug hotel made from bundles of tin cans. Adults can group a few cans together inside an old crate or strap them with wire, then children can stuff each one with bamboo, twigs, dry leaves, bark, and pinecones. Tuck the finished hotel against a fence or under a shrub. It becomes both a decorative feature and a mini wildlife home where kids can quietly watch who moves in.
- Best For: Wild corners, near veggie patches, or under shrubs.
- Budget Tip: Fill cans with free natural materials collected on walks.
- Styling Idea: Let kids paint just the rims of the cans for pops of color that still look natural.
- Practical Note: Place the bug hotel somewhere it won’t be knocked or constantly moved.
- Care & Maintenance: Refresh the contents every year or so if they break down.
6. Colorful Tin Can Bird Feeders

Tin cans make wonderful side-feeding bird feeders that kids can decorate and fill. Adults should smooth the edges and add a hanging loop; children can paint the outside, glue on buttons, or add simple patterns. Lay the can on its side, fill with birdseed, and add a small stick or dowel as a perch at the open end. Hang the feeder from a branch where birds feel safe, and enjoy watching feathered visitors in a fun, homemade setting.
- Best For: Trees or sturdy hooks near windows for easy bird watching.
- Budget Tip: Use basic mixed seed and reuse twine or ribbon for hanging.
- Styling Idea: Soft greens and browns help the feeders blend into the foliage.
- Practical Note: Place feeders away from doors and busy paths to keep birds relaxed.
- Care & Maintenance: Clean the inside of the cans regularly to prevent mold.
7. Tin Can Fairy House Planters

Kids will love turning plain tin cans into tiny fairy houses that also hold plants. Adults can add drainage holes; children can paint doors, windows, chimneys, and even tiny vines and flowers climbing up the sides. Fill the top with soil and plant low-growing succulents, moss, or small flowering plants. Group a few fairy houses on a stump, in a shady nook, or beside a path, and the area suddenly feels like a storybook village tucked into your garden.
- Best For: Shady corners, under trees, or beside paths.
- Budget Tip: Use small offcuts of wood, pebbles, and twigs for steps and pathways.
- Styling Idea: Pick soft cottage colors like cream, pale blue, and blush pink for a gentle look.
- Practical Note: Keep fairy houses out of the way of running feet and lawn mowers.
- Care & Maintenance: Mist moss or small plants regularly to keep them lush.
8. Tin Can Rainbow Planter Row
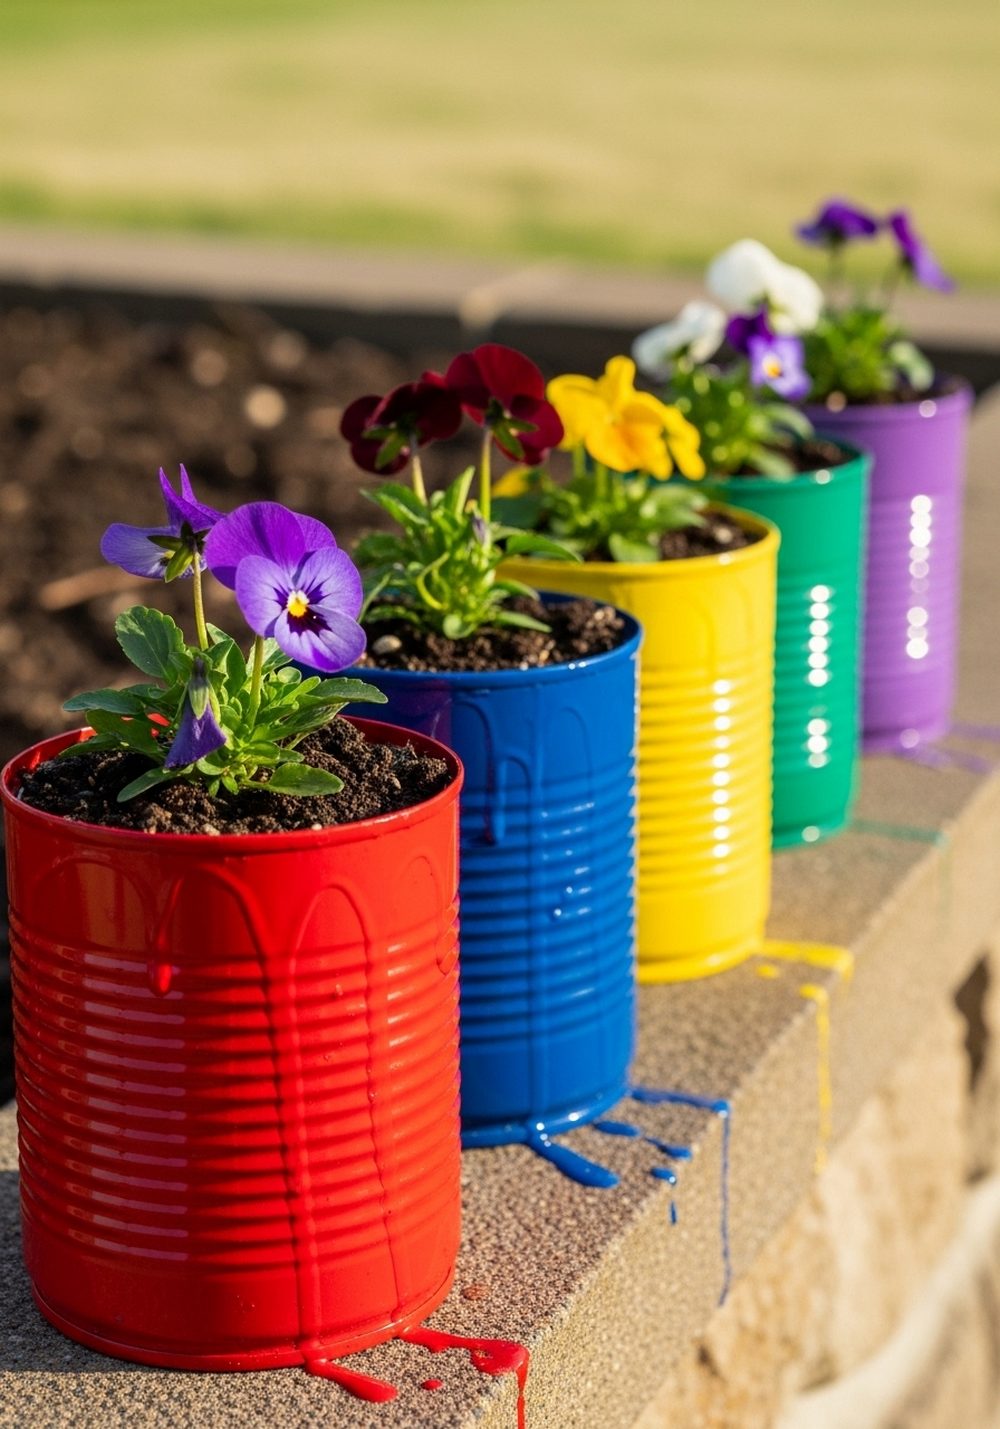
A simple line of tin cans becomes a joyful rainbow garden when each one is painted a different bright color. Kids can help choose the order of the rainbow and paint each can to match. Once dry, fill with soil and plant easy annuals, herbs, or small grasses. Place the row along a low wall, step, or fence base. The block of color instantly brightens the space and gives children a clear sense of ownership over “their” rainbow.
- Best For: Edges of patios, steps, or along fences.
- Budget Tip: Choose inexpensive bedding plants or sow seeds directly into the cans.
- Styling Idea: Stick to true rainbow shades for impact, or try a pastel version for a softer feel.
- Practical Note: Make sure the surface under the cans can handle water drips and soil spills.
- Care & Maintenance: Let kids be in charge of deadheading flowers to keep blooms coming.
9. Tin Can Kids’ Tool Caddy

Keep small garden tools tidy and within easy reach with a tin can caddy made just for kids. Attach several cans upright inside an old crate or onto a plank with screws or cable ties. Adults can secure everything; children decorate the cans and sort tools into each one. Trowels, gloves, labels, and small watering cans all find a home. The caddy can be carried to the garden when it’s time to plant, then parked neatly in a shed or corner.
- Best For: Families who garden together and want kid-sized tools organized.
- Budget Tip: Repurpose a worn-out wooden crate or box rather than buying storage.
- Styling Idea: Use simple symbols (glove, spade, watering can) painted on each tin to label what goes inside.
- Practical Note: Don’t overload the caddy; keep it light enough for little hands to carry.
- Care & Maintenance: Shake out soil and wipe cans occasionally to prevent rust.
10. Tinkling Tin Can Rain Chain

Swap a plain downpipe for a decorative rain chain made from tin cans. Adults can cut and drill small cans, then link them with strong wire or metal rings. Kids help paint the outsides and maybe drop a small stone or bead into each to change the sound. When rain falls, water trickles from can to can, making a gentle tinkle and interesting movement. Even on dry days, it acts as a sculptural element beside your home or shed.
- Best For: Near roof edges, sheds, or over a drainage area.
- Budget Tip: Combine different sizes of cans you already have for visual interest.
- Styling Idea: Use metallic or weathered finishes for a more natural, rustic feel.
- Practical Note: Direct the bottom of the chain into a gravel patch or barrel to handle runoff.
- Care & Maintenance: Check connections occasionally and repaint if rust appears.
11. Tin Can Garden Label Stakes

Turn tin can lids or flattened sides into sturdy, charming plant labels. Adults handle any cutting and drilling, then kids paint each piece with the name of a plant and a tiny drawing. Attach the metal to wooden stakes or old chopsticks, and push them into the soil beside herbs, flowers, or vegetables. The labels add a splash of color, help kids learn plant names, and make beds look more intentional and designed.
- Best For: Herb beds, veggie patches, and container gardens.
- Budget Tip: Use leftover paint or permanent markers you already own.
- Styling Idea: Keep the background white or pale so the plant names really stand out.
- Practical Note: Position stakes so they don’t interfere with watering or weeding.
- Care & Maintenance: Touch up faded lettering now and then as sun and rain wear it down.
12. Mini Tin Can Water Garden

A wide tin can can become a tiny water feature that fascinates children. Adults smooth the rim and ensure it’s safe, then kids fill the can with clean water, add a layer of pebbles, and place a simple floating flower or plastic lily pad on top. Arrange a group of mini water gardens on a sunny step or low wall. The reflections, ripples, and little details are surprisingly calming and make the space feel cooler and more tranquil.
- Best For: Sunny steps, tabletops, or small patios.
- Budget Tip: Use pebbles, shells, or glass marbles you already have at home.
- Styling Idea: Group three or five cans together at different heights for a mini “pond” display.
- Practical Note: Keep the water shallow and refresh it often to avoid mosquitoes.
- Care & Maintenance: Empty and clean cans regularly, especially after rain or heavy leaf fall.
Conclusion
Recycled tin cans are a brilliant starting point for kid-friendly garden decor that is colorful, personal, and wonderfully inexpensive. With a little adult help on the sharp or tricky parts, children can take the lead on painting, filling, and arranging these projects. Start with one or two ideas that fit your space, then add more as your kids grow in confidence. Before long, your garden will feel like a shared creation full of memories and handmade charm.
FAQs
1. How can I make tin can garden decor safe for kids?
Always handle cutting, drilling, and edge-smoothing yourself. Use a metal file or sandpaper to remove sharp edges, and check rims with your fingers before kids touch them. Choose child-safe paints, skip real candles, and opt for LED lights in lanterns. Supervise any project that involves tools, hanging items, or climbing to attach pieces.
2. Can renters use these tin can ideas without damaging walls or fences?
Yes. Many of these projects can simply sit on shelves, steps, or railings. For hanging items, use over-the-door hooks, removable adhesive hooks rated for outdoor use, or freestanding frames and trellises. You can also group tin can planters in crates or trays so everything moves easily when you do.
3. What’s the cheapest way to decorate my garden with tin cans?
Start by saving cans from everyday groceries, and wash and dry them well. Use leftover house paint, kids’ craft paints, or test pots rather than buying large tins. Fill planters with seeds, cuttings, or swapped plants from friends. Simple touches like painting cans in one color family and grouping them together can look stylish without spending much at all.
4. Are these projects suitable for very small balconies?
Definitely. Focus on vertical ideas like the Hanging Tin Can Flower Tower, Starry Tin Can Lanterns, or a narrow Rainbow Planter Row along a railing. Use trays under cans to catch drips and keep things tidy. A few well-chosen pieces will make the balcony feel cozy without taking up much floor space.
5. How do I stop tin can decor from rusting too quickly outdoors?
Rust is natural with metal, but you can slow it down. Once painted and fully dry, seal the outsides of the cans with a clear outdoor varnish or sealer. Try not to leave them sitting in puddles, and drill drainage holes in any planters so water doesn’t pool inside. If rust does appear, you can always repaint and reseal for a refreshed look.
6. Which tin can garden projects are easiest for beginners?
Painted Tin Can Herb Pots, the Rainbow Planter Row, and Garden Label Stakes are very beginner-friendly. They need minimal tools and mostly involve cleaning, painting, and filling. Once you feel comfortable, you can try slightly more advanced projects like wind chimes, bird feeders, or the rain chain, where fixings and hanging points need a bit more planning.