
10 Painted Tire Mushroom Garden Ideas For Kids (Cute, Colorful & So Fun)

If your kids love bright colors and make-believe worlds, painted tire mushrooms are a brilliant way to decorate the garden and invite more outdoor play. Old tires become magical toadstools, fairy rings, and tiny seats that make any patch of grass feel like a storybook scene.
In this post, you’ll find ten playful ideas that are budget-friendly, easy to paint, and great for small or big gardens. We’ll mix simple DIY steps with creative styling tips, plus a few clever touches to keep things safe and kid-proof. By the end, you’ll be ready to turn old rubber into a cheerful mushroom kingdom your children will never forget.
Quick List
- Classic Red-And-White Fairy Ring Tire Mushrooms
- Rainbow Stack Tire Mushroom Patch
- Glow-In-The-Dark Night Garden Mushrooms
- Storybook Toadstool Reading Nook
- Mini Mushroom Village With Tire Stools
- Polka-Dot Hopscotch Mushroom Path
- Bee-And-Bug-Themed Mushroom Guardians
- Pastel Tire Mushrooms For Sensory Play
- Chalkboard-Cap Mushrooms For Doodling
- Birthday Party Photo Booth Mushroom Cluster
1. Classic Red-And-White Fairy Ring Tire Mushrooms

Create the storybook mushroom look every child recognizes: bright red caps with crisp white spots. Stack one or two tires, add a sturdy wooden or concrete stem in the middle, and top it with a rounded plywood disc or bowl-shaped planter. Paint the whole cap red, then dab on white circles in different sizes. Arrange your mushrooms in a circle or half-ring around a tree or open lawn, so it feels like fairies might appear at any moment.
- Best For: Central lawn areas or under a tree where kids already like to play.
- Budget Tip: Use leftover fence paint for stems and cheap exterior sample pots for red and white.
- Styling Idea: Add a tiny fairy door at the base of a nearby tree to finish the fairy-tale feel.
- Practical Note: Anchor the stem or partially bury the bottom tire so the mushrooms don’t wobble.
2. Rainbow Stack Tire Mushroom Patch

This idea turns a pile of old tires into a colorful cluster of “stack mushrooms.” Build each mushroom from two or three tires, then paint each ring a different rainbow color before adding a simple flat cap on top. Cluster several mushrooms of different heights to make a playful patch near a fence or wall. The layered stripes look bright from a distance and even more fun up close when kids lean on them or weave between them during games.
- Best For: Long, plain fences that need a big pop of color.
- Budget Tip: Ask friends or local garages for spare tires and mix leftover paints to create your rainbow.
- Styling Idea: Match a few stripes to the colors of nearby toys or play equipment for a coordinated look.
- Practical Note: Drill small drainage holes in the bottom tires to prevent rainwater from collecting.
3. Glow-In-The-Dark Night Garden Mushrooms

For families who use the garden in the evening, glow-in-the-dark mushrooms are pure magic. Paint the caps with glow or phosphorescent outdoor paint, then layer regular bright colors underneath so they still look fun by day. Place them beside a path, near a seating area, or around a firepit (at a safe distance) so kids can watch them slowly light up as dusk falls. A few tiny solar lights hidden between them will boost the glow and help with safety.
- Best For: Gardens used at dusk for family dinners, story time, or camping-style evenings.
- Budget Tip: Only paint the tops and spots with glow paint; use normal outdoor paints for the rest.
- Styling Idea: Choose cool tones like teal, blue, and lime for a magical, slightly “otherworldly” feel.
- Care & Maintenance: Reapply glow paint every year or so as it fades in strong sunlight.
4. Storybook Toadstool Reading Nook

Turn a quiet corner of your garden into a cozy reading spot kids will adore. Arrange a few medium-sized tire mushrooms in a semi-circle and place a weather-resistant rug or mat in the center. Nearby, add a crate or low shelf for picture books and cushions that can be brought inside after use. Choose soft storybook colors like deep red, cream, and muted green, then add tiny painted details like windows or doors on the mushroom stems to make them look like homes.
- Best For: Shady corners, under trees, or along a back fence where kids can retreat to read.
- Budget Tip: Use second-hand crates as simple outdoor bookshelves and old blankets as rugs.
- Styling Idea: Hang a string of bunting or simple flags above the nook to mark it as a special “reading zone.”
- Practical Note: Choose weather-resistant cushions or keep a basket indoors to store them between uses.
5. Mini Mushroom Village With Tire Stools

Here, the mushrooms double as low stools for little legs. Use smaller tires or cut-down pieces, paint them in bright colors, and attach sturdy, flat tops children can sit on. Arrange them around a “village square” of stepping stones, then tuck tiny fairy houses, miniature fences, and potted flowers between the mushrooms. Kids can host pretend tea parties, build stories, and even snack at their village table. It’s a playful way to add seating and decoration at the same time.
- Best For: Younger children who love role-play games and outdoor tea parties.
- Budget Tip: Make fairy houses from painted scrap wood or old birdhouses instead of buying miniatures.
- Styling Idea: Keep the color palette to three or four repeating shades so the village looks charming, not messy.
- Practical Note: Check stool tops regularly to ensure they’re stable and smooth, with no rough edges.
6. Polka-Dot Hopscotch Mushroom Path

Transform a simple path or strip of lawn into a hopscotch-style game using low tire mushrooms. Space them out so kids can jump from one to the next, and paint each cap with bold polka dots and a large number or symbol. You can arrange them in a straight line, zigzag, or circle depending on your space. The path doubles as decor when no one is playing—bright spots of color that lead the eye through the garden.
- Best For: Narrow side gardens, paths to a playhouse, or areas kids already race along.
- Budget Tip: Use one base color for all caps, then vary the dot colors to save on paint.
- Styling Idea: Coordinate numbers with learning—add shapes, letters, or simple math symbols.
- Practical Note: Keep mushrooms low and stable to reduce tripping risk; test the spacing with your child’s stride.
7. Bee-And-Bug-Themed Mushroom Guardians

Give your flower beds their own set of friendly “guardians.” Paint tire mushroom caps in warm yellows, oranges, and greens, then add cute cartoon bees, ladybirds, butterflies, and caterpillars. Place the mushrooms at the edges of beds or around veggie patches, facing the garden like tiny sentries. Kids will love spotting all the different creatures, and it’s a gentle way to start talking about pollinators and garden wildlife.
- Best For: Vegetable beds, pollinator gardens, or mixed borders full of flowers.
- Budget Tip: Keep the base simple (solid color) and let children paint the bugs with cheap craft brushes.
- Styling Idea: Repeat the same few bug designs so the garden looks themed rather than cluttered.
- Care & Maintenance: Add a clear, child-safe outdoor sealant over detailed bug faces to protect against weather.
8. Pastel Tire Mushrooms For Sensory Play
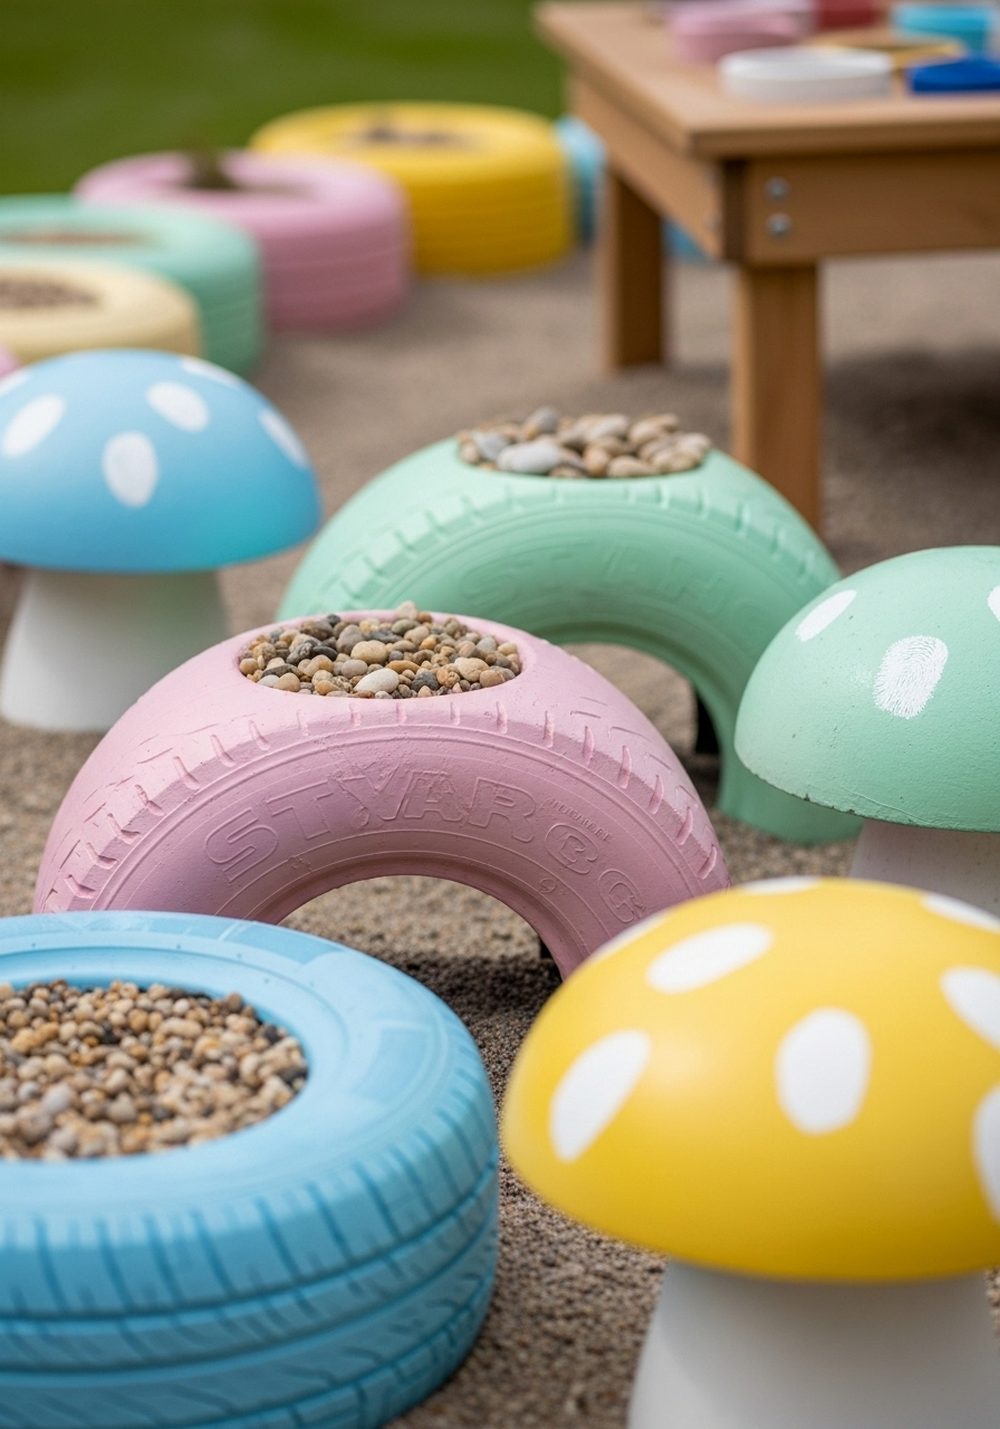
For calmer, sensory-friendly spaces, swap bright primaries for soft pastel mushrooms. Paint the tires in gentle pinks, blues, lilacs, and creams, then fill some with smooth pebbles, others with sand or bark, and leave a few as simple solid mushrooms. Kids can touch different textures, scoop materials, or use them as pretend kitchens and potion-making stations. The muted colors still feel magical, but the overall mood is more soothing and less visually busy.
- Best For: Sensory gardens, quiet corners, or children who prefer calmer spaces.
- Budget Tip: Collect pebbles, pinecones, and natural materials instead of buying special fillers.
- Styling Idea: Add a few lavender or other scented plants nearby to deepen the sensory experience.
- Practical Note: Cover loose-fill mushrooms with mesh or lids when not in use if you have pets.
9. Chalkboard-Cap Mushrooms For Doodling

Give your kids an outdoor canvas that changes every day. Paint the mushroom caps with chalkboard paint, then leave a small bucket of chunky colored chalk nearby. Children can draw faces, patterns, or messages on the caps and wipe them off with a damp cloth whenever they want to start again. The solid-colored stems and bases keep the design “finished” even when the caps are blank, and the chalk scribbles add a lively, personal touch.
- Best For: Kids who love drawing or writing and need a wipe-clean surface.
- Budget Tip: Only paint the cap tops with chalkboard paint; use standard outdoor paints on everything else.
- Styling Idea: Use a single stem color (like white or light grey) so the chalk drawings really stand out.
- Care & Maintenance: Repaint caps occasionally if heavy use or weather dulls the chalkboard finish.
10. Birthday Party Photo Booth Mushroom Cluster

This idea turns your mushroom garden into the star of every kids’ party. Group several tall tire mushrooms together in one corner, all painted in bright party colors with confetti-style dots, stripes, or stars. Add a simple bench or crate for sitting, hang bunting or balloons, and maybe place a few fun props in a basket. Guests can pose among the mushrooms for photos, and the cluster continues to brighten the garden long after the birthday is over.
- Best For: Backyards used for parties, playdates, and family gatherings.
- Budget Tip: Reuse bunting, props, and balloons from different celebrations to dress the area each time.
- Styling Idea: Choose one main color (like red or teal) and use it on every mushroom so the cluster looks coordinated.
- Practical Note: Position the photo booth in good natural light and keep clear space in front for group shots.
Conclusion
Painted tire mushrooms are a wonderfully simple way to decorate your garden while giving kids a magical place to play. With just a few old tires, some outdoor paint, and a bit of imagination, you can create reading nooks, play villages, glowing pathways, and party backdrops. Start with one or two mushrooms and see how your children use them. From there, you can slowly grow a whole mushroom kingdom that reflects your family’s personality and brings joy to your outdoor space.
FAQs
1. How can I make painted tire mushrooms on a very small budget?
Focus on using what you already have: old tires, scrap wood for stems and tops, and leftover exterior paint. Ask friends, family, or local garages for spare tires. You can also start with just one or two mushrooms and add more over time as you collect materials and paint samples.
2. Are painted tire mushrooms safe for kids to play around?
They can be safe if you build them thoughtfully. Make sure each tire stack is stable and, ideally, partially buried or anchored. Sand any rough edges on wooden tops, use non-toxic outdoor paint, and keep mushrooms low to reduce fall risk. Always supervise smaller children, especially if they’re climbing or sitting on the mushrooms.
3. What type of paint should I use on garden tires?
Use exterior-grade paint that’s designed to handle rain, sun, and temperature changes. Many people choose masonry or fence paint for stems and standard outdoor paint for bright caps. Adding a clear outdoor sealant can help designs last longer, especially detailed faces or glow-in-the-dark accents.
4. Can I make these mushroom ideas suitable for renters?
Yes. Instead of burying tires, place them on top of pavers or large stepping stones so they don’t mark the ground. Use freestanding stems and keep everything movable. When it’s time to move, you can simply lift the mushrooms and take your entire mushroom garden with you.
5. How do I stop water from collecting inside tire mushrooms?
Drill a few drainage holes in the bottom of each tire so rainwater can escape. You can also fill the lower part of the tire with rubble or stones before capping it. This helps with weight and stability, as well as keeping the inside from turning into a mosquito-friendly puddle.
6. Which ideas are easiest for beginners to start with?
The classic red-and-white fairy ring and simple pastel mushrooms are the easiest. They use basic shapes, two or three colors, and don’t require many extras. Once you’re comfortable painting tires and assembling the stems and caps, you can move on to chalkboard tops, glow paint, or detailed bug designs.


