10 Creative Yard Art DIYs You Can Craft This Weekend

If your yard is looking a little plain and you’re itching for a quick creative project, weekend yard art DIYs are a perfect fix. You don’t need fancy tools or a huge budget to turn a basic outdoor space into something that feels playful, personal, and full of charm.
In this guide, you’ll find simple, creative yard art ideas you can actually finish in a couple of days. Most use recycled materials, basic paint, and a bit of imagination. Whether you have a big lawn, a modest garden, or just a small patch by the patio, these projects will add color, character, and a welcoming vibe to your outdoor space.
Quick List
- Hand-Painted Garden Stepping Stones
- Colorful Glass Bottle Border Or Tree
- Whimsical Clay Pot Totem
- DIY Pallet Garden Signpost
- Tin Can Lantern Stakes
- Mosaic Birdbath From Broken Tiles
- Rustic Branch Or Driftwood Sculpture
- Upcycled Watering Can “Pouring Lights”
- Decorative Fence Panel Gallery
- Hanging Colander Planter Mobile
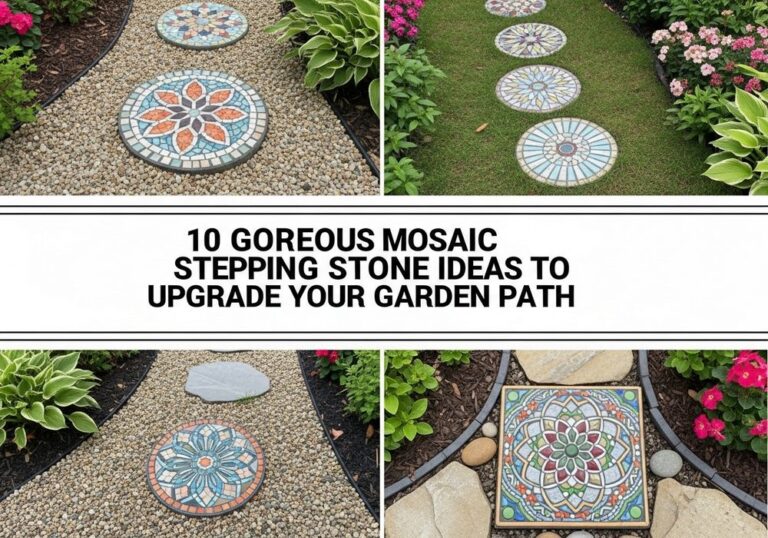
1. Hand-Painted Garden Stepping Stones

Hand-painted stepping stones are an easy way to sprinkle art across your yard while creating practical paths. Use concrete pavers, natural flat stones, or pre-made stepping stones as your canvas. Clean them thoroughly, then paint simple motifs like flowers, leaves, suns, or geometric patterns with outdoor acrylics. Once dry, seal them so they resist weather and muddy feet. Nestle your finished stones into grass or mulch so they sit flush with the ground, and enjoy the pop of color every time you walk through the garden.
- Best For: Paths through lawns, veggie beds, or between raised beds.
- Budget Tip: Use leftover house paint or sample pots instead of buying new colors.
- Styling Idea: Stick to two or three colors for a calm look, or go rainbow-bright for a playful cottage style.
- Practical Note: Place stones where water doesn’t pool to reduce slipping.
- Care & Maintenance: Re-seal every year or two if colors start to fade.
2. Colorful Glass Bottle Border Or Tree

Old glass bottles can become glowing yard art when you turn them into a border or a “bottle tree.” Save bottles in different heights and colors, remove labels, and wash them well. Hammer metal stakes or rebar securely into the ground, then slide the bottles over the ends to create a sparkling border along a bed, or cluster them on one central post like a tree. Sunlight shining through the glass adds magical color, especially at golden hour.
- Best For: Sunny flower beds that can show off the glass.
- Budget Tip: Ask friends or neighbors to save bottles instead of buying decorative ones.
- Styling Idea: Choose all blues for a coastal feel, or a mix of jewel tones for a boho garden.
- Practical Note: Make sure stakes are firmly in the ground and out of the way of lawn mowers.
- Care & Maintenance: Rinse dusty bottles occasionally so they keep gleaming.
3. Whimsical Clay Pot Totem

A clay pot totem is a stack of terracotta pots tilted playfully along a central rod, forming a charming sculpture. Slide pots over a metal rod anchored into the ground, alternating sizes and angles. Before stacking, paint faces, stripes, or simple patterns on the pots, or leave them natural for a rustic look. Top your totem with a small plant, decorative sphere, or finial. Nestle it into a flower bed or beside your front steps to create a fun, vertical focal point.
- Best For: Small yards that need height and personality.
- Budget Tip: Mix new pots with chipped or secondhand ones—they still look great in a totem.
- Styling Idea: Paint each pot a different bold color for a playful kid-friendly garden.
- Practical Note: Push the rod deep into the soil or concrete for stability against wind.
- Extra Idea: Add a small trailing plant in the top pot for extra softness.
4. DIY Pallet Garden Signpost

Turn an old pallet or scrap wood into a charming garden signpost that guides guests around your yard. Cut pallet boards into arrow shapes, sand them lightly, and paint them in soft colors. Use a brush or paint pen to add words like “Herbs,” “Veggies,” “Patio,” or even fun destinations like “Fairy Garden” or “Sunset View.” Screw the arrows onto a central post at different angles, then set the post into a bucket of concrete or directly into the ground near a path.
- Best For: Entry paths, veggie patches, or near a patio.
- Budget Tip: Source free pallets from local businesses and use leftover paint.
- Styling Idea: Choose weathered-looking colors for a rustic farmhouse look.
- Practical Note: Clear sealant will help protect the lettering from rain and sun.
- Extra Idea: Hang a small solar lantern from the post for evening glow.
5. Tin Can Lantern Stakes

Instead of tossing food cans, turn them into glowing lanterns that line your garden paths. Clean and remove labels from the cans, then fill them with water and freeze so the metal doesn’t bend. Use a hammer and nail to punch patterns—stars, hearts, or simple dots—around the sides. Once thawed and dry, paint the cans if you like, then attach them to stakes or hang them from hooks. Pop in tea lights or battery candles and enjoy the patterned light spilling onto gravel and plants.
- Best For: Edging driveways, paths, or small seating areas.
- Budget Tip: Use free cans and simple tea lights; no fancy materials needed.
- Styling Idea: Paint them all white for a soft, romantic glow, or bright colors for a festival feel.
- Practical Note: If using real candles, keep them clear of low branches or dry mulch.
- Care & Maintenance: Store over winter to prevent rust if you live in a wet climate.
6. Mosaic Birdbath From Broken Tiles

A mosaic birdbath combines art and wildlife-friendly function in one weekend project. Use a shallow concrete bowl, large plant saucer, or old birdbath as your base. Break leftover tiles, plates, or glass into small pieces, then arrange them in a pattern inside and around the rim. Fix them with tile adhesive and finish with outdoor grout, wiping away excess. Once cured, set the birdbath on a sturdy stand, fill with clean water, and watch birds and bees enjoy your colorful new yard feature.
- Best For: Central spots where you can see it from indoors.
- Budget Tip: Use broken crockery and leftover tiles instead of buying mosaic kits.
- Styling Idea: Stick to blues and whites for a classic water-themed look.
- Practical Note: Keep the basin shallow so small birds can bathe safely.
- Care & Maintenance: Change water often and scrub gently to keep algae at bay.
7. Rustic Branch Or Driftwood Sculpture

Gather interesting branches or driftwood and turn them into a sculptural feature that looks like natural art. Choose pieces with curves and forks, then experiment with arranging them into a standing bundle or simple arch. Lash them together with twine or wire, and anchor the base into a large pot filled with stones or directly into the ground. The rough texture of the wood contrasts beautifully with soft foliage and flowers, creating a calm, woodland feel in your yard.
- Best For: Corners of the yard that feel empty or awkward.
- Budget Tip: Collect branches after storms or from pruning instead of buying decor.
- Styling Idea: Add a few air plants or small hanging ornaments for a subtle boho touch.
- Practical Note: Check that any wood is dry and free of pests before bringing it close to the house.
- Extra Idea: Place a small spotlight at the base to create dramatic shadows at night.
8. Upcycled Watering Can “Pouring Lights”

A retired metal watering can can become magical yard art with the help of fairy lights. Hang the can from a shepherd’s hook or sturdy branch, then feed strands of warm-white solar fairy lights through the spout so they tumble downward like a glowing waterfall. Anchor the end of each strand into the soil or a small hidden support above a flower bed or decorative stones. At dusk, the lights switch on, and your garden looks instantly more whimsical and inviting.
- Best For: Visible spots near patios or seating areas.
- Budget Tip: Use a thrifted can and solar lights to avoid extra wiring costs.
- Styling Idea: Pair with soft pastel flowers for a dreamy cottage look.
- Practical Note: Position the solar panel where it receives plenty of daytime sun.
- Care & Maintenance: Replace light strands when they begin to dim after a season or two.
9. Decorative Fence Panel Gallery

If you have a plain fence, turn a section into an outdoor gallery wall. Paint simple wooden boards, arrange metal art, hang small mirrors, or mount mini planter boxes in a loose grid. Start by painting the fence section a neutral shade to act as a backdrop. Then lay your pieces out on the ground first to plan the arrangement before screwing or hanging them securely. This transforms a blank vertical surface into a lively art display that’s visible from both inside and outside.
- Best For: Small yards where fence space is more available than ground space.
- Budget Tip: Combine homemade art with a few thrift store finds for variety.
- Styling Idea: Stick to one color palette—like blacks, whites, and greenery—for a modern look.
- Practical Note: Use outdoor-safe screws and hooks so pieces don’t fall in wind.
- Extra Idea: Add a narrow bench or planter below to visually “ground” the gallery.
10. Hanging Colander Planter Mobile

Old colanders and wire baskets make wonderfully quirky hanging planters that double as yard art. Drill a few extra holes if needed, then line them with moss or landscape fabric and fill with soil and trailing plants like ivy, lobelia, or strawberries. Suspend several at different heights from an overhead bar, tree branch, or pergola beam, allowing them to sway gently in the breeze. The combination of perforated metal, cascading greenery, and shadows on the ground creates a playful, kinetic feature.
- Best For: Patios, pergolas, or over a small seating corner.
- Budget Tip: Hunt for secondhand colanders instead of buying new planters.
- Styling Idea: Mix enamelware and metal for a vintage, flea-market vibe.
- Practical Note: Ensure hooks and chains are strong enough to hold wet soil weight.
- Care & Maintenance: Water gently to avoid soil washing out through the holes.
Conclusion
A little creativity and a free weekend are all you need to transform your yard into a space that feels playful, welcoming, and uniquely yours. These DIY yard art ideas turn everyday materials into focal points, pathways, and glowing corners that make you smile every time you step outside. Start with one or two projects that fit your space and budget, then slowly build your own outdoor gallery of handmade pieces as inspiration strikes.
FAQs
1. How can I make yard art on a very small budget?
Focus on projects that use what you already have: cans, bottles, broken tiles, old pots, and scrap wood. A basic set of outdoor paint and a clear sealer go a long way. Start with one simple idea, like painted stepping stones or tin can lanterns, and add more pieces over time instead of trying to decorate the whole yard at once.
2. Are these DIY yard art ideas suitable for renters?
Yes, many of these projects are non-permanent or portable. Hanging colander planters, watering can lights on hooks, and pallet signs in buckets of concrete can all move with you. Avoid anything that requires digging large holes or permanently fixing pieces to fences that don’t belong to you.
3. What’s the easiest yard art project for beginners?
Hand-painted stepping stones and tin can lanterns are ideal for beginners. They require only simple tools, basic paint, and a bit of patience. Even if your designs aren’t perfect, they’ll still add charm and personality to your yard, and you can repaint or adjust them as you gain confidence.
4. How do I make sure my yard art survives the weather?
Choose outdoor-rated paints, seal wood and painted surfaces with a clear exterior sealer, and use rust-resistant screws and hooks. Whenever possible, secure tall items firmly into the ground or weighted containers. In very harsh climates, store more delicate pieces indoors or in a shed during winter.
5. Can I mix plants and yard art without it looking cluttered?
Absolutely. Think of yard art as accents, not the main event. Place a few key pieces near paths, seating areas, or blank fence sections, and leave plenty of open green space in between. Repeating a color or material—like terracotta, wood, or a single accent color—helps everything feel cohesive rather than busy.