10 Tin Can Herb Planter Ideas For Small Spaces

If you’re short on space but big on fresh flavors, tin can herb planters are a brilliant little hack. They’re compact, easy to hang or stack, and they turn everyday recycling into something stylish and useful. Whether you have a balcony, a tiny patio, or just a sunny window, you can squeeze in a mini herb garden.
In this guide, you’ll find ten creative ways to use tin cans for herbs, all designed specifically for small spaces and modest budgets. You’ll get simple styling tips, layout ideas, and practical notes so your herbs stay healthy and your home feels greener, fresher, and more personal.
Quick List
- Magnetic Tin Can Herb Strip On The Fridge
- Hanging Tin Can Herb Rail On The Balcony
- Window Sill Tin Can Herb Trio
- Tiered Tin Can Herb Ladder
- Wall-Mounted Tin Can Herb Grid
- Tin Can Herb Centerpiece For Small Tables
- Over-The-Sink Tin Can Herb Rod
- Tin Can Herb Crate On Wheels
- Tin Can Herb Fence Or Railing Planters
- Tin Can Herb Mini Greenhouse
1. Magnetic Tin Can Herb Strip On The Fridge

Turn your fridge door into a tiny vertical herb garden by gluing strong magnets to the backs of painted tin cans. Once you’ve drilled drainage holes and added a little gravel and soil, you can plant compact herbs like basil, thyme, or chives. Arrange the cans along a magnetic knife strip or directly on the fridge for a fresh, green display that’s right next to your cooking space. It’s a clever way to garden without using any floor or counter space.
- Best For: Tiny kitchens with almost no spare surfaces.
- Budget Tip: Use leftover spray paint and free tin cans from your recycling.
- Styling Idea: Stick to one color family (all whites, all pastels, or all black) for a clean, modern look.
- Practical Note: Keep herbs that need more light higher up, closer to the window side of the fridge.
2. Hanging Tin Can Herb Rail On The Balcony

A slim metal rail fixed along your balcony wall or railing is the perfect base for hanging tin can herb planters. Attach simple S-hooks to the rail, then hang drilled tin cans by their handles or wire loops. Fill them with herbs that suit your light conditions and let them cascade in a neat row. This keeps your floor clear, makes watering easy, and adds a lush, living border to your outdoor space without feeling cluttered.
- Best For: Narrow balconies and renters who want non-permanent setups.
- Budget Tip: Use a basic tension curtain rod or inexpensive towel rail instead of custom hardware.
- Styling Idea: Wrap a few cans in jute or burlap for a relaxed, rustic balcony vibe.
- Practical Note: Don’t overload the rail; choose lightweight cans and check fixings regularly.
3. Window Sill Tin Can Herb Trio

If you have one sunny window, you have room for a trio of tin can herb planters. Choose three matching cans, paint them in a simple color, and line them up on a tray to catch any drips. Plant handy kitchen herbs like basil, cilantro, and chives, and you’ll have fresh flavors within reach while they frame your view with soft green leaves. This simple arrangement adds a calm, minimal touch to even the smallest sill.
- Best For: Apartments with just one good light source.
- Budget Tip: Skip fancy trays and use a repurposed baking tin or shallow dish.
- Styling Idea: Label cans with a chalk marker or simple stamped letters for a clean, modern feel.
- Care & Maintenance: Rotate the cans every few days so each herb gets equal sunlight and grows evenly.
4. Tiered Tin Can Herb Ladder
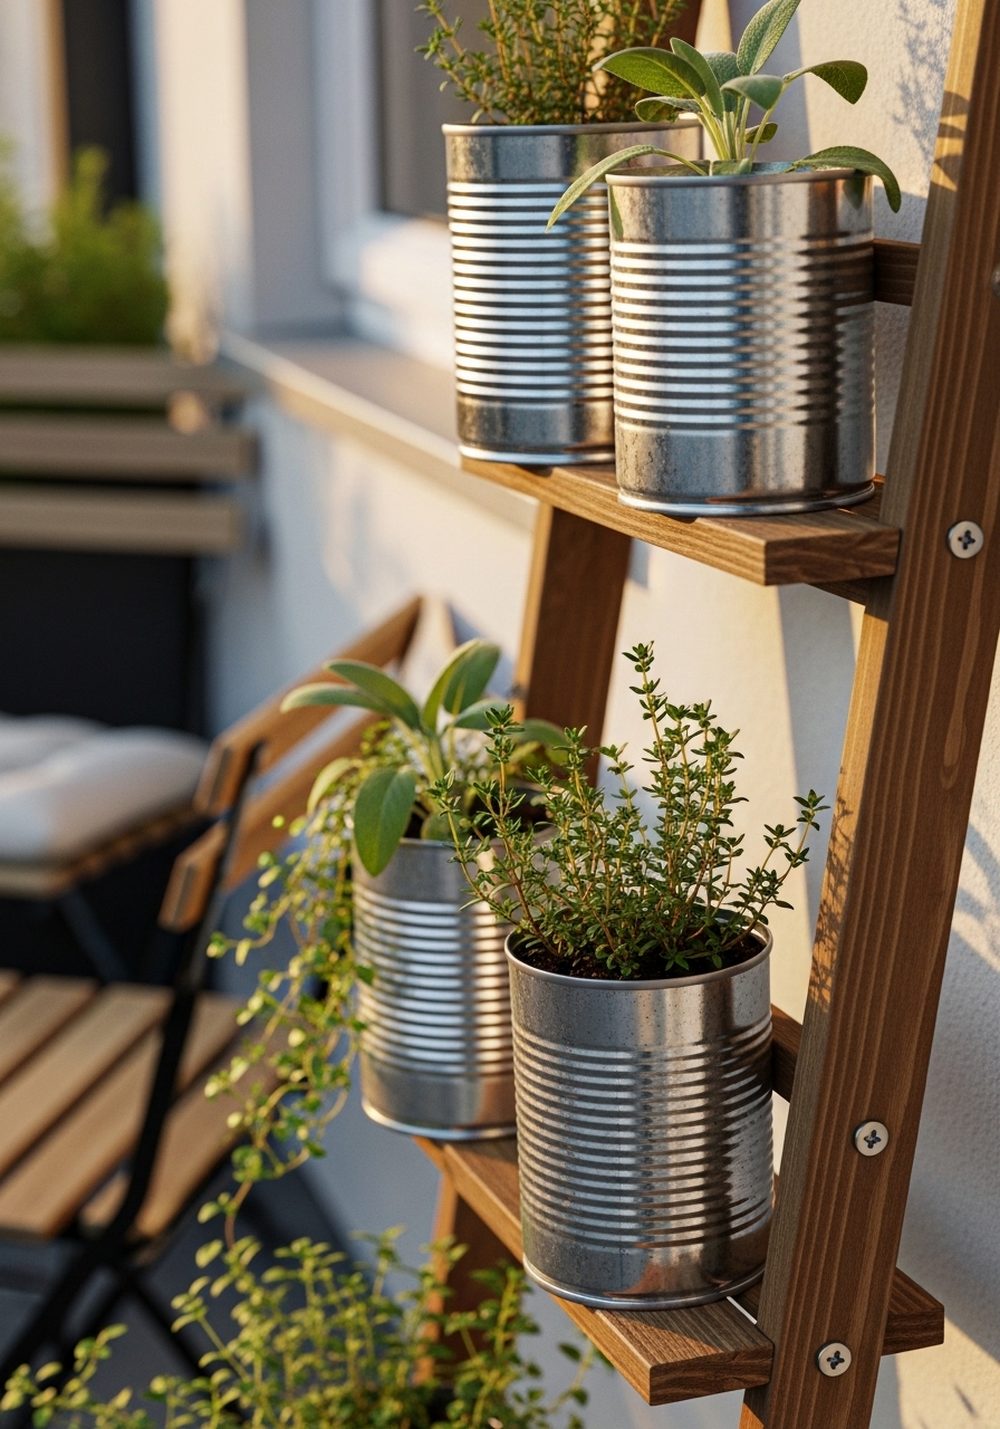
A slim, leaning ladder shelf instantly multiplies your planting space in a tight corner. Place tin can herb planters on each rung, starting with shorter herbs at the top and trailing or bushier varieties lower down. The stepped height creates depth and gives every plant a little breathing room, making the whole display look intentional rather than cluttered. It’s a great way to build a vertical garden without drilling into walls, especially in rentals.
- Best For: Small balconies, patios, or unused wall corners.
- Budget Tip: Upcycle an old wooden ladder or build a simple two-rung version from scrap wood.
- Styling Idea: Mix bare metal cans with a few painted in your accent color for a relaxed, collected look.
- Practical Note: Place the ladder where it gets light but won’t be knocked by doors or chairs.
5. Wall-Mounted Tin Can Herb Grid

A wire grid panel turns any blank wall into a modular herb garden. Clip tin cans onto the grid with metal hooks or strong clips, staggering them at different heights for a fun, graphic layout. This kind of setup is flexible—move or add cans as your herb collection grows—and it keeps the floor completely clear. It’s especially handy when you’re working with a narrow balcony or a small kitchen wall that needs a bit of life.
- Best For: Renters with one clear wall and limited floor space.
- Budget Tip: Use an inexpensive mesh panel or repurpose a metal shelf insert as your grid.
- Styling Idea: Paint a few cans in bold color blocks to mimic modern wall art.
- Practical Note: Keep heavier cans near the lower part of the grid and use sturdy anchors if you’re screwing into a wall.
6. Tin Can Herb Centerpiece For Small Tables

Turn a tiny table into a multi-purpose spot by making your herb planters the centerpiece. Arrange several tin cans on a tray or shallow box so you can move them easily for meals or cleaning. This gives you a lush, fragrant cluster of greenery right where you sit for coffee, reading, or evening chats, without taking up extra floor space. It’s a simple way to make a small balcony or patio feel inviting and lived-in.
- Best For: Small bistro tables on balconies or compact patios.
- Budget Tip: Cluster smaller cans rather than buying large containers—more plants, less cost.
- Styling Idea: Stick to one herb per can for a clean, orderly look that still feels full.
- Care & Maintenance: Lift the tray occasionally to wipe underneath and avoid moisture marks on the table.
7. Over-The-Sink Tin Can Herb Rod

If your kitchen sink is under a window, an over-the-sink rod is a smart way to grow herbs without losing counter space. Install a tension rod or simple curtain rod across the window frame and hang tin cans with hooks or wire hangers. The herbs enjoy good light and are easy to water right over the sink, while the cans add a cheerful, green frame around your view. It’s practical, space-saving, and turns washing dishes into a slightly nicer moment.
- Best For: Small kitchens with a window above the sink.
- Budget Tip: Use a basic tension rod and leftover tins; spend only on a bag of good potting mix.
- Styling Idea: Alternate painted cans with plain metal ones for a light, airy look.
- Practical Note: Keep herbs trimmed so they don’t block too much light from entering the room.
8. Tin Can Herb Crate On Wheels

A low crate filled with tin can herb planters and set on small wheels is a clever movable garden. You can slide it into a narrow strip of sun on the balcony during the day and tuck it out of the way when you need the space. Each can acts as its own mini pot, so you can rearrange or swap plants as needed, while the crate keeps everything tidy. It’s especially useful if your light changes throughout the day.
- Best For: Balconies or patios where you might need to rearrange often.
- Budget Tip: Add inexpensive caster wheels to a basic wooden crate or sturdy box.
- Styling Idea: Stain the crate a warm tone and keep cans mostly metallic for a simple, modern-rustic mix.
- Care & Maintenance: Check that water can drain out of the crate or line it with a waterproof layer to protect floors.
9. Tin Can Herb Fence Or Railing Planters

Clipping tin cans all along your balcony or terrace railing creates a living “fence” of herbs. Use railing brackets or sturdy clamps to hold the cans safely in place, then plant herbs that can handle wind and sun, like rosemary, thyme, or hardy mint in partial shade. The result is a green edge that softens the look of metal or concrete, gives you privacy, and makes your outdoor space feel more like a pocket garden than a plain ledge.
- Best For: Long, narrow balconies or terraces that feel exposed.
- Budget Tip: Start with a few cans at key spots, then gradually fill in gaps as you collect more.
- Styling Idea: Repeat two or three colors along the railing to keep things coordinated rather than chaotic.
- Practical Note: Make sure brackets are secure and choose shallower cans if your railing is light or narrow.
10. Tin Can Herb Mini Greenhouse

For balconies or windows with cooler weather or gusty wind, a mini greenhouse keeps tin can herbs protected. Place a few cans on a tray and cover with a glass dome, upturned jar, or small clear plastic cover. This traps warmth and moisture so seedlings and delicate herbs can get established. The whole setup is compact, easy to move, and adds a decorative, almost terrarium-style feature that looks as good as it functions in a tiny space.
- Best For: Cooler climates, drafty balconies, or early-season sowing.
- Budget Tip: Repurpose large glass jars or clear food containers instead of buying a special cloche.
- Styling Idea: Use simple metallic cans and a clean glass dome for a modern, minimal display.
- Care & Maintenance: Lift the cover regularly for fresh air so plants don’t overheat or grow mold.
Conclusion
Tin can herb planters are proof that you don’t need a large garden—or a big budget—to enjoy fresh greenery every day. With a bit of drilling, a little paint, and some thoughtful placement, you can turn walls, windows, rails, and even your fridge into growing space. Start with one simple idea that fits your home best, then add more as your confidence and herb collection grow. Small space, big flavor, and a lot more charm.
FAQs
Q1. How can I make tin can herb planters on a very small budget?
Rinse and save any food tins you already use, then drill or punch drainage holes in the bottom. Use leftover paint or even simple paper wraps to decorate. You really only need potting mix, a few herb seedlings or seeds, and something to catch drips. Start with just two or three cans and expand slowly as you find more materials.
Q2. Are tin can herb planters safe for renters who can’t drill into walls?
Yes, many of these ideas avoid permanent fixtures. Try tension rods over sinks, railing hooks, hanging rails that clamp to balcony edges, and movable crates or trays on tables. You can also place cans on window sills or shelves with a waterproof tray underneath. Everything can be removed later without leaving marks.
Q3. How do I stop tin cans from rusting or staining surfaces?
After cleaning the cans, let them dry completely and seal the outside with spray paint or a clear sealant. Always drill drainage holes and add a little gravel or pebbles at the bottom. Place cans on a tray, plate, or coaster to catch excess water and protect wood or metal surfaces. If a can starts to rust badly, simply repot the herb into a new one.
Q4. What herbs work best for tiny tin can planters?
Choose compact, frequently used herbs like basil, thyme, chives, parsley, and mint (mint prefers its own can so it doesn’t take over). Dwarf varieties are ideal if you can find them. Avoid very deep-rooted plants or large shrubs. Keep the soil topped up, trim regularly, and replant into fresh cans when herbs get too crowded or tired.
Q5. Can tin can herb planters work in low light or indoor spaces?
Herbs generally prefer good light, but you can still grow some in bright indoor spots. Place cans near the sunniest window you have and choose herbs that cope better with partial shade, like mint, parsley, and chives. If your home is very dark, consider a small grow light above a row of tin can planters to keep them healthy and lush.