10 Creative Ways To Turn Tin Cans Into Garden Magic
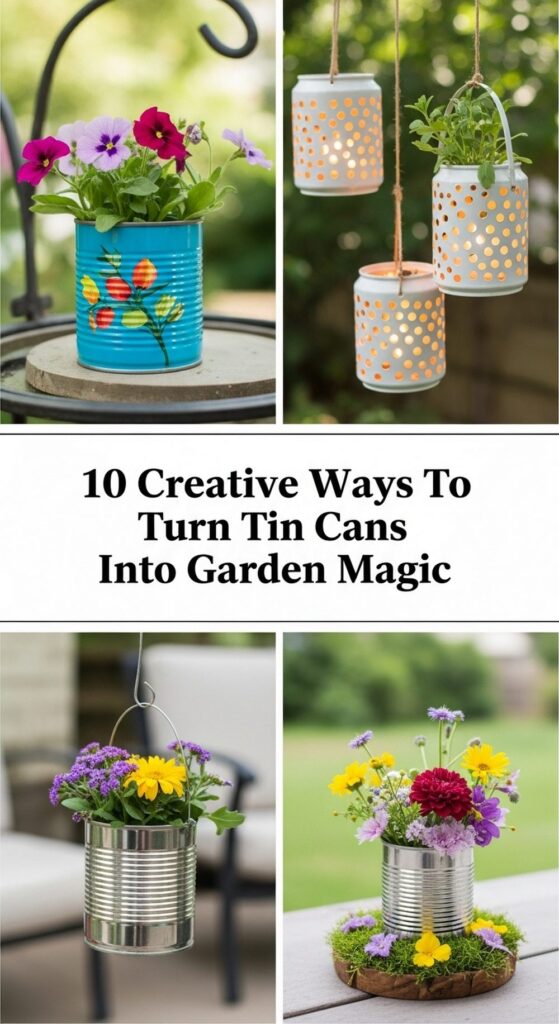
If you’re the kind of person who rinses out a tin can and thinks, “There must be a way to reuse this,” this post is for you. Garden lovers, balcony gardeners, and thrifty decorators can all turn everyday cans into charming little moments of garden magic.
In the ideas below, you’ll find simple ways to transform tin cans into planters, lanterns, organizers, and even tiny water features. Most projects need nothing more than paint, a drill, some twine, and a few plants or candles. These ideas are budget-friendly, renter-friendly, and easy to customize so your outdoor space feels more personal, welcoming, and full of character.
Quick List
- Stacked Tin Can Herb Tower
- Painted Tin Can Lantern Pathway
- Hanging Tin Can Planter Chain
- Tin Can Wall Planter Grid
- Tin Can Wind Chime Mobile
- Tin Can Tabletop Flower Vases
- Rustic Tin Can Utensil & Tool Caddy
- Tin Can Bird Feeder Trio
- Tin Can Fairy Garden Planter
- Tin Can Mini Water Feature
1. Stacked Tin Can Herb Tower
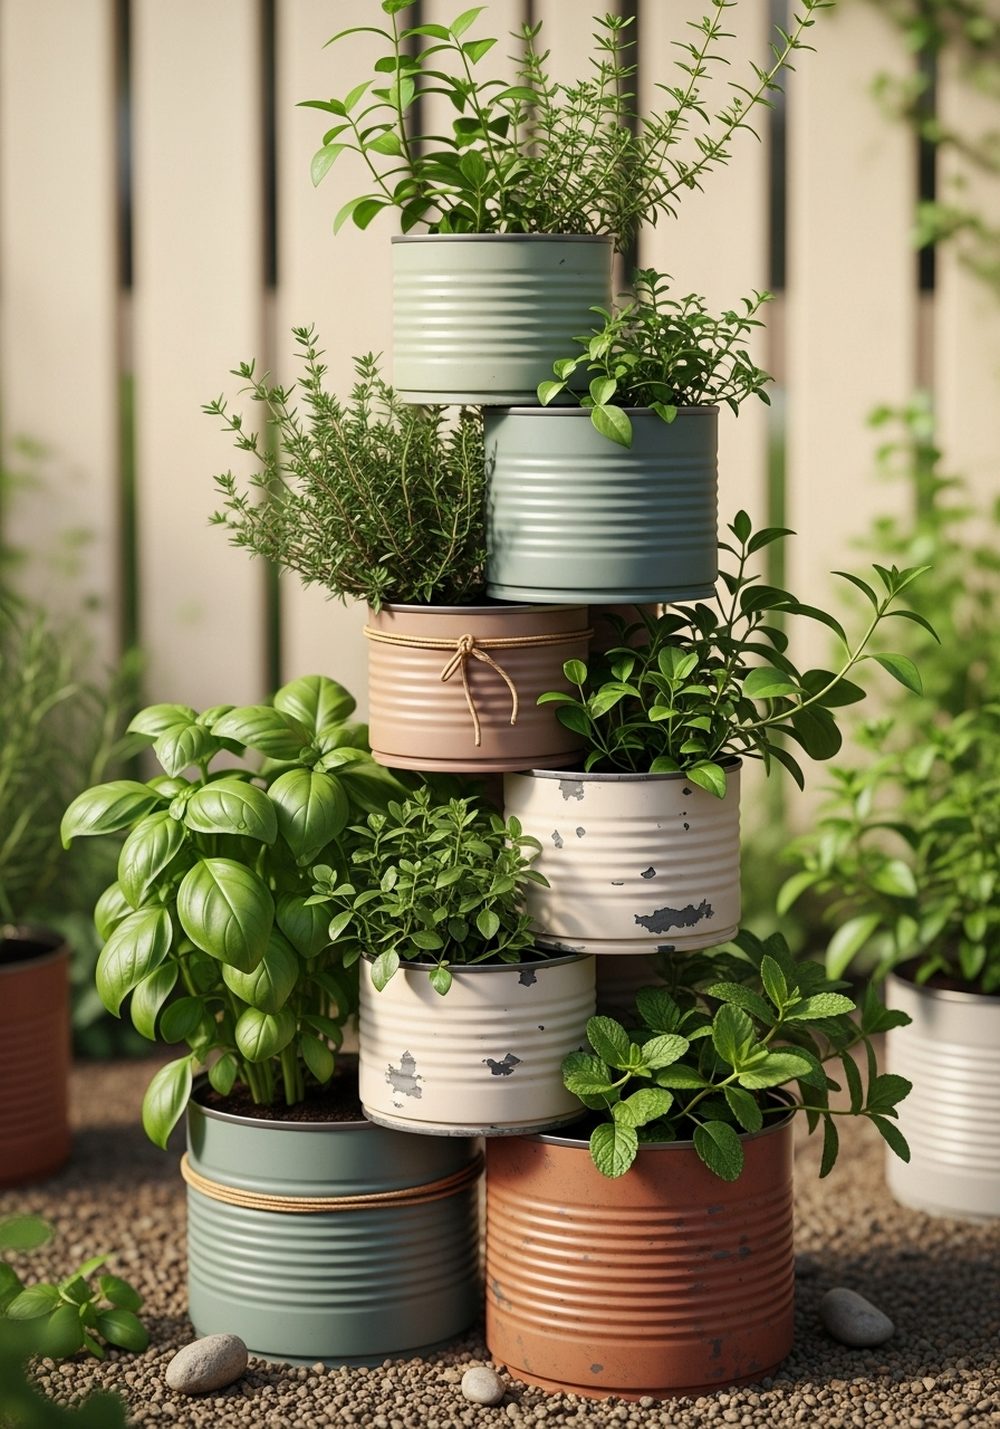
Turn a small corner into a vertical herb garden by stacking painted tin cans into a simple tower. Drill drainage holes in each can, paint them in calming garden shades, then stack them by screwing them into a central wooden pole or fixing them to a slim frame. Fill with soil and tuck in herbs like basil, parsley, and mint. The mix of green foliage and soft-colored cans adds instant charm to balconies, patios, or doorsteps.
- Best For: Small patios, balconies, and narrow corners where floor space is limited.
- Budget Tip: Use leftover wall paint or tester pots instead of buying special outdoor paint.
- Styling Idea: Choose three coordinating colors (one light, one mid, one dark) for a simple, modern look.
- Practical Note: Place thirstier herbs near the bottom where water naturally drains down.
- Care & Maintenance: Refresh the paint once a year if cans start to rust, and trim herbs often to keep them compact.
2. Painted Tin Can Lantern Pathway
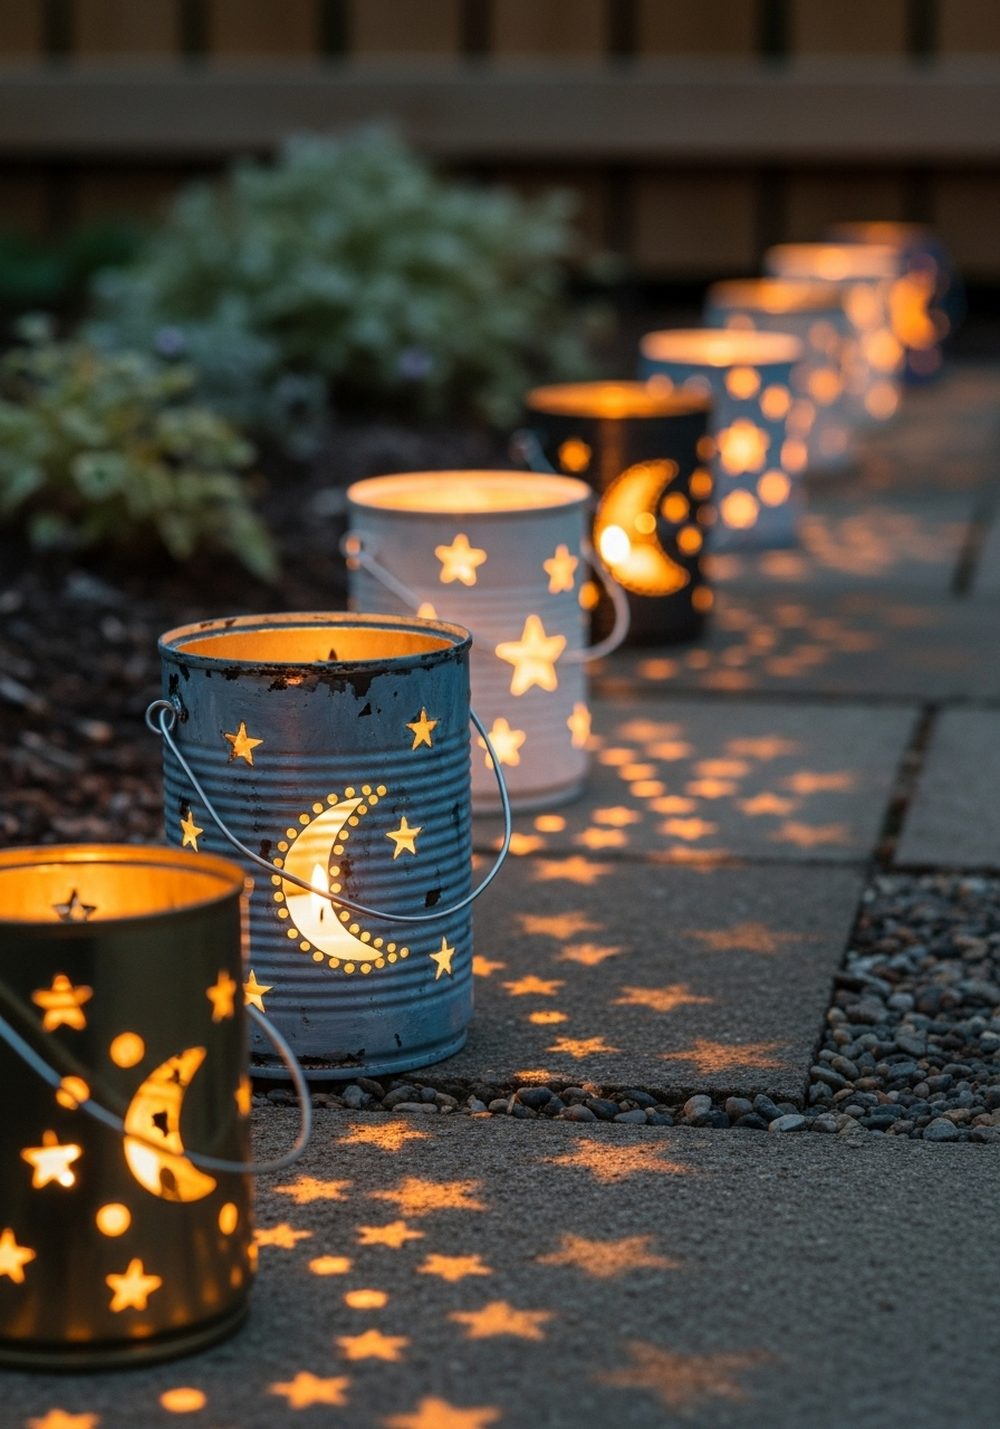
Tin cans make surprisingly beautiful lanterns once you punch simple patterns into them. Clean and dry your cans, then use a hammer and nail to create stars, stripes, or random dotted designs. Paint the outside, pop in tealights or LED candles, and line them along a garden path or around a seating area. At night, the light spills through the tiny holes, creating a magical, starry glow that makes even the simplest garden feel special.
- Best For: Evening garden parties, outdoor dinners, or cozy solo nights outside.
- Budget Tip: Use battery-operated tealights from discount shops to keep things safe and reusable.
- Styling Idea: Stick to one color family (all whites, all blues, or all metallics) for a calm, cohesive look.
- Practical Note: Freeze water inside the cans before drilling; it helps the metal hold its shape while you punch holes.
- Extra Idea: Thread a few on wire handles to hang from branches as floating lights.
3. Hanging Tin Can Planter Chain
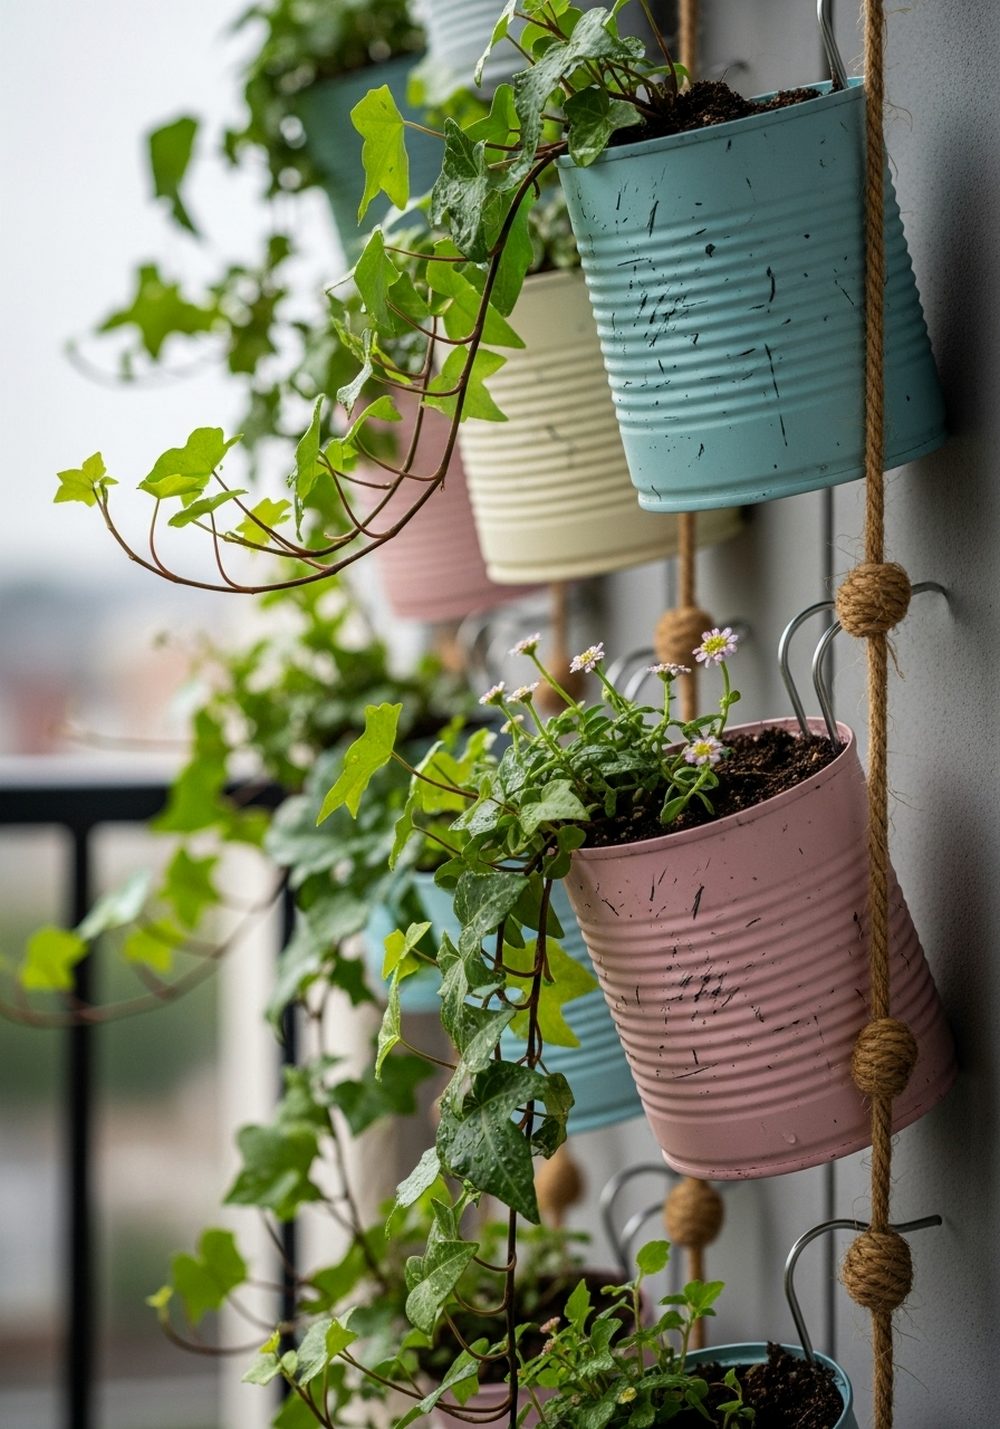
Create a vertical garden on a tiny footprint by hanging several tin cans one beneath another on sturdy rope or chain. Drill drainage holes in the bottoms and side holes for threading rope or metal rings. Paint each can or wrap in jute, then plant trailing ivy, strawberries, or small flowers. Hang your chain from a balcony rail, pergola, or sturdy hook. The layered look adds height, greenery, and movement, especially when the plants sway gently in the breeze.
- Best For: Balconies, rental spaces, or anywhere you’re short on floor space.
- Budget Tip: Use old clothesline or repurposed chain instead of buying new hanging kits.
- Styling Idea: Mix plain galvanized cans with a few painted in an accent color to keep things interesting but not busy.
- Practical Note: Keep the heaviest can at the bottom and make sure your ceiling hook is well secured.
- Care & Maintenance: Check often that the rope or chain isn’t fraying, and water slowly so it doesn’t rush through.
4. Tin Can Wall Planter Grid
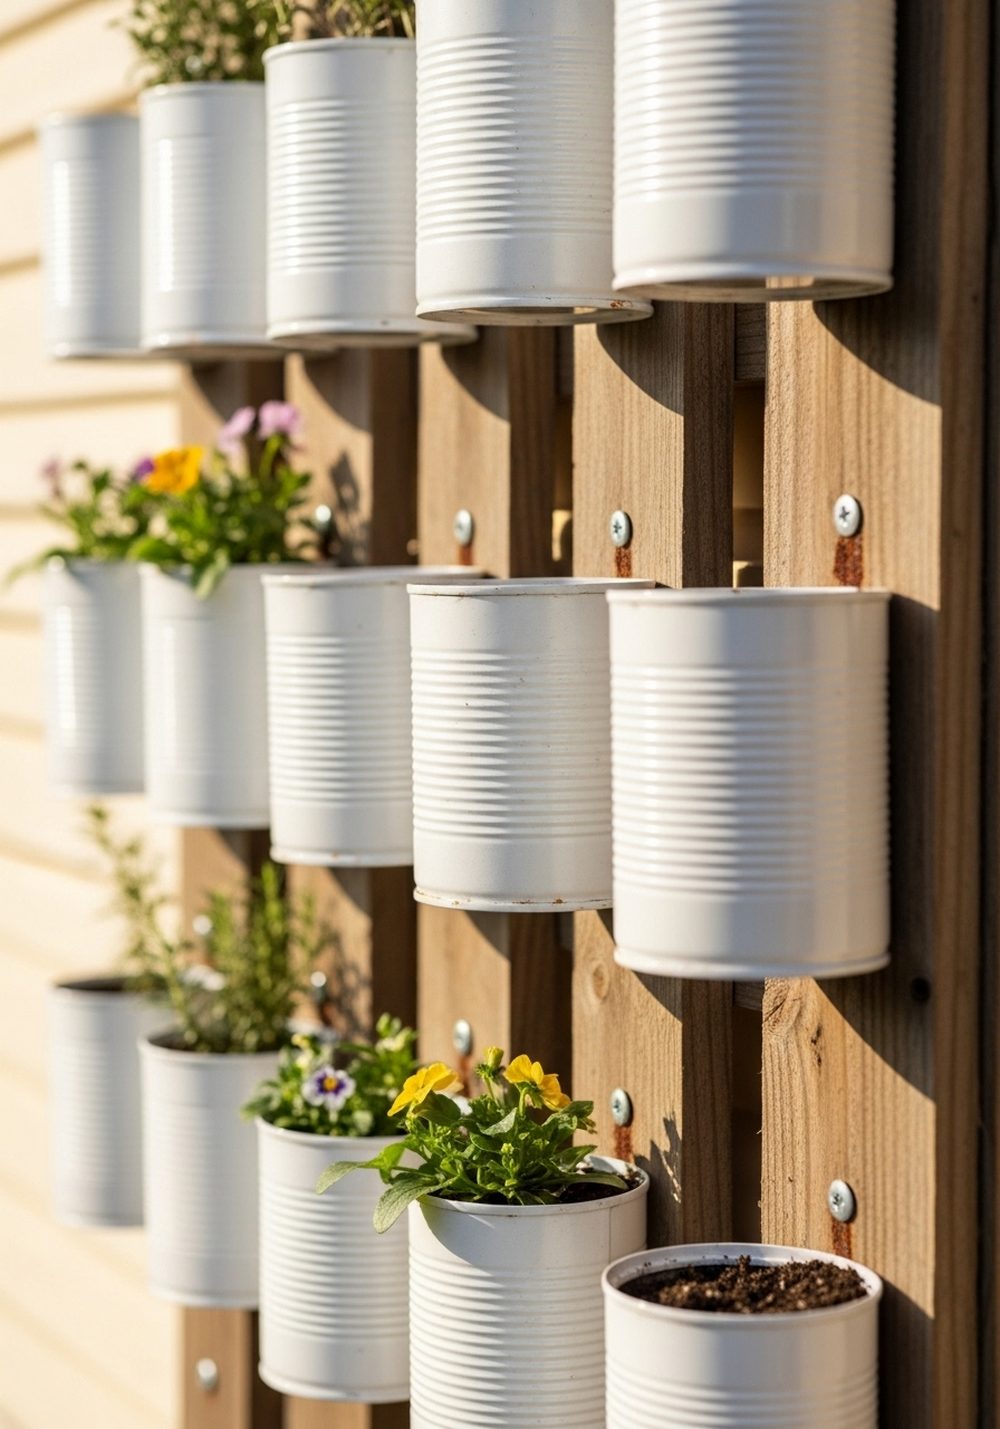
If you have a bare fence or an ugly wall, a grid of tin can planters can turn it into a living feature. Fix a piece of pallet wood or a simple frame to the wall, then screw tin cans in neat rows across it. Add drainage holes and fill with hardy plants like sedums, small herbs, or trailing flowers. The repeated shape of the cans gives a tidy, graphic look, while the plants soften everything with texture and color.
- Best For: Transforming blank fences, garages, or side walls into garden focal points.
- Budget Tip: Collect cans over time and plant them gradually instead of filling the whole grid at once.
- Styling Idea: Keep cans in one neutral tone (white, black, or zinc) and let the greenery be the color.
- Practical Note: Use lightweight potting mix and smaller plants so the wall structure isn’t overloaded.
- Care & Maintenance: Rotate plants if some spots get more sun than others to keep the whole grid looking lush.
5. Tin Can Wind Chime Mobile
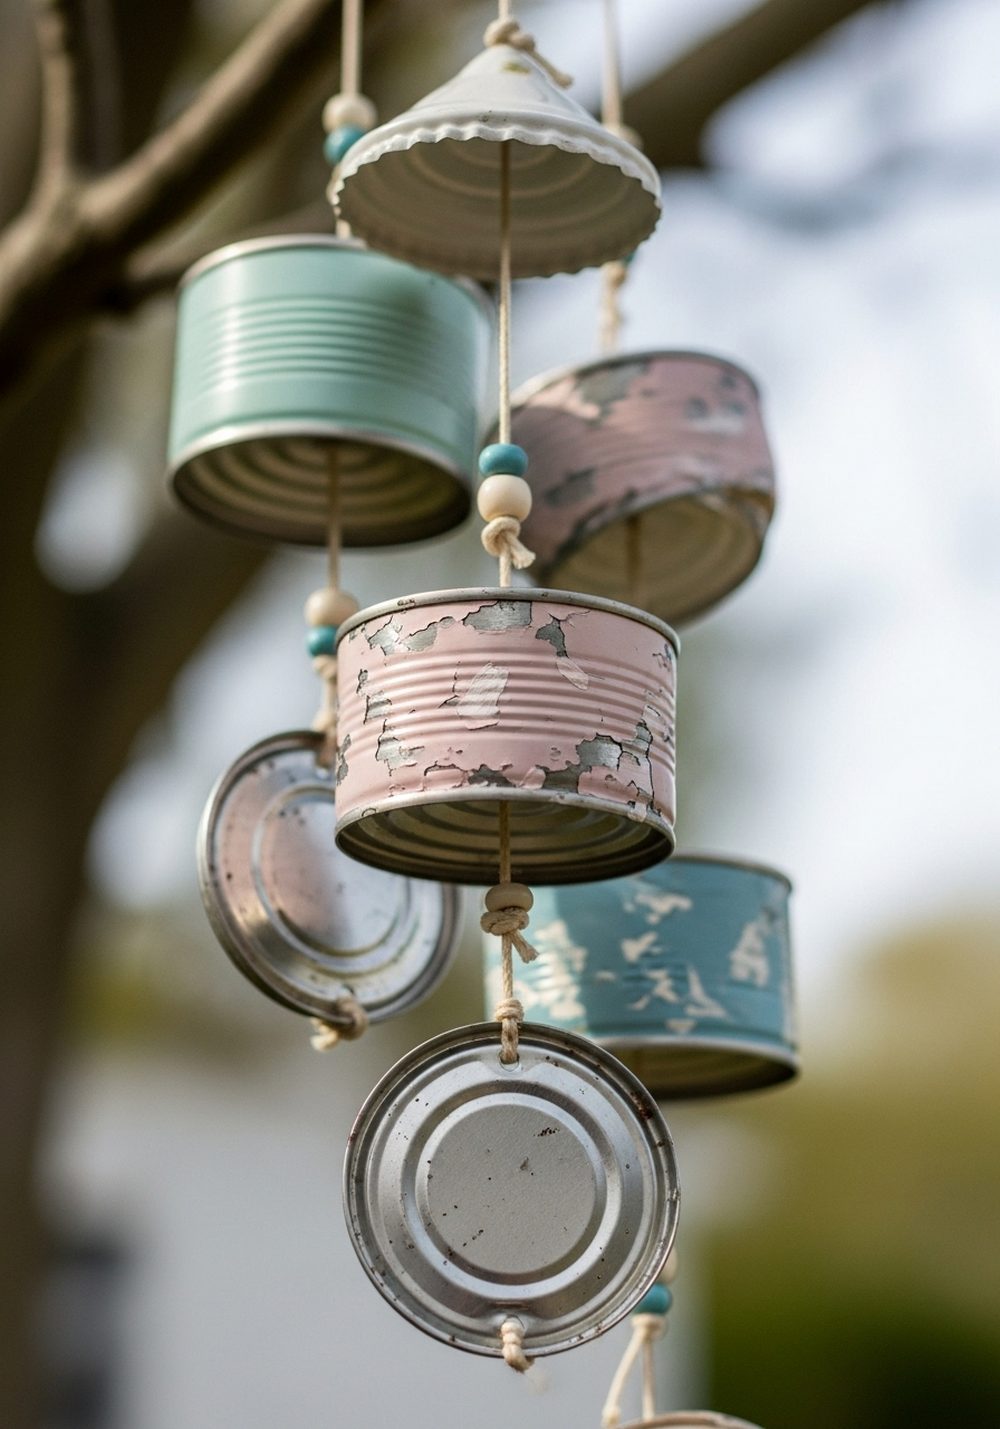
Turn tin cans into a breezy, musical mobile by combining them with lids, keys, or small metal pieces. Paint your cans in beachy or pastel tones, then hang them from a piece of driftwood, a branch, or a simple wooden bar. As the wind moves through, the cans and metal pieces gently clink together, adding soft sound to your garden. Hang the mobile where it can catch the breeze and be seen from a window or seating area.
- Best For: Adding movement and gentle sound to calm corners or meditation spots.
- Budget Tip: Use old cutlery, washers, or keys instead of buying extra chime pieces.
- Styling Idea: Choose colors inspired by the sea (soft blues, whites, sandy beige) for a coastal garden vibe.
- Practical Note: Hang it where it won’t knock against windows or walls during stronger winds.
- Care & Maintenance: Check knots and hooks seasonally to ensure nothing rusts through or falls.
6. Tin Can Tabletop Flower Vases

For instant rustic charm on an outdoor table, turn tin cans into sweet little vases. Cover them with burlap, lace, ribbon, or twine, securing everything with hot glue or double-sided tape. Fill with seasonal flowers—daisies, roses, or wildflowers from the garden—or even simple greenery. A cluster of cans at different heights makes a relaxed centerpiece that works for everyday coffee breaks or special occasions like birthdays and summer dinners.
- Best For: Garden parties, casual outdoor coffee spots, or picnic-style tables.
- Budget Tip: Use whatever you already have—old fabric scraps, leftover ribbon, or cut-up jute bags.
- Styling Idea: Stick to one material theme (all lace, all burlap, or all twine) for a cohesive, intentional look.
- Practical Note: Slip a small glass jar inside each can if you’re worried about rust or water leaks.
- Extra Idea: Mix in a few cans holding cutlery or napkins for a complete outdoor table setup.
7. Rustic Tin Can Utensil & Tool Caddy
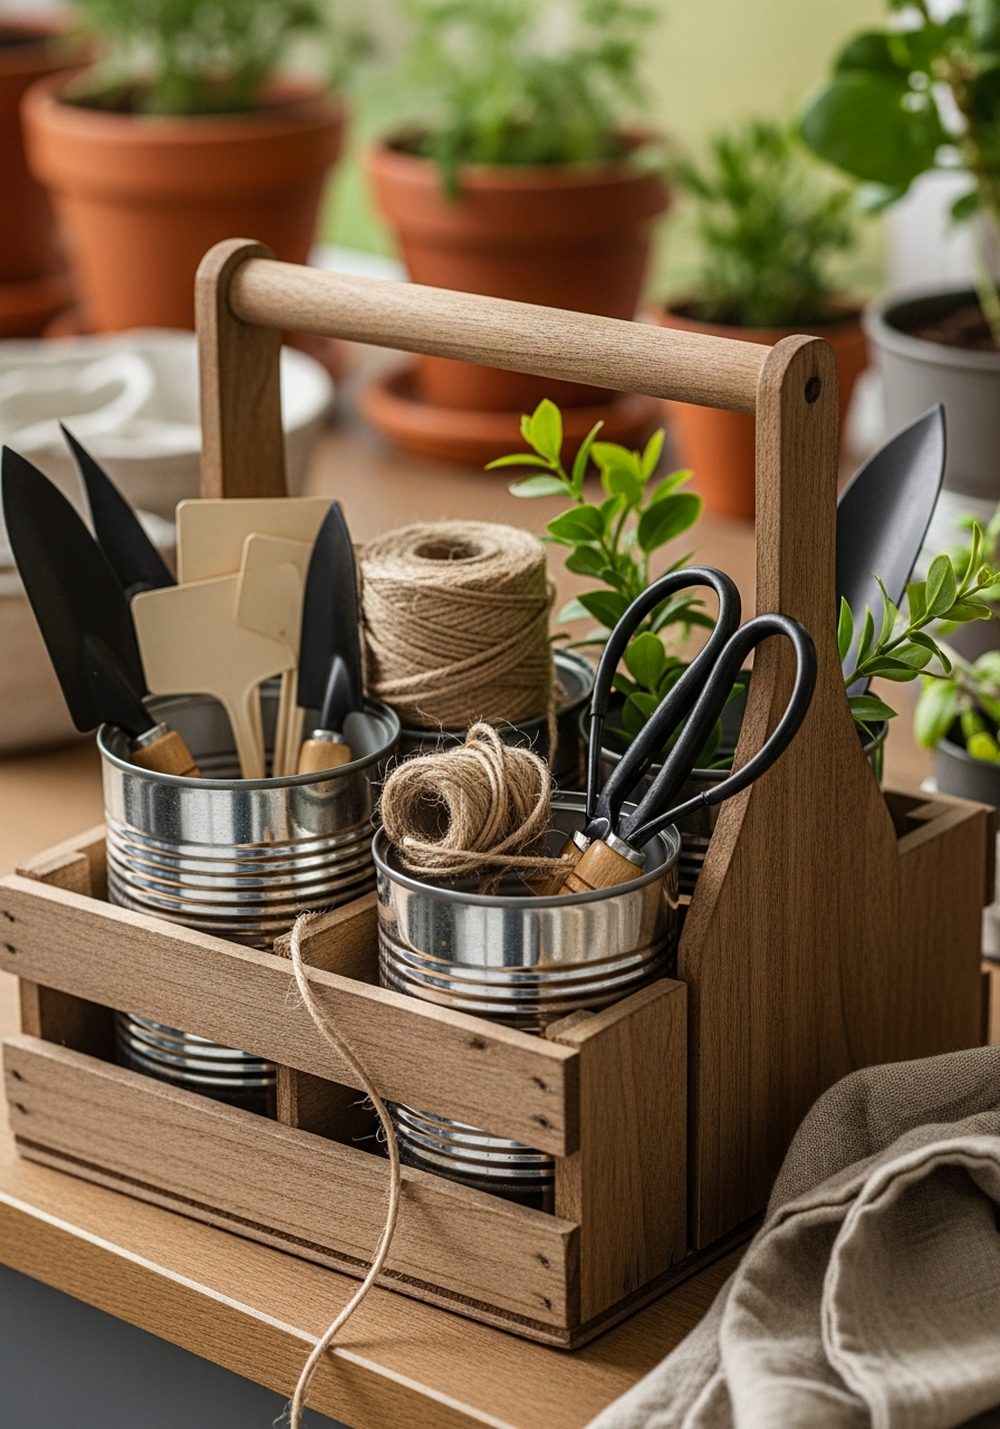
Keep your garden tools or picnic utensils tidy with a tin can caddy. Arrange several cans inside a wooden crate or screw them together in a cluster. Use them to store hand trowels, plant labels, scissors, twine, or outdoor cutlery. Place the caddy near your potting bench, barbecue, or outdoor dining area. The mix of raw metal and worn wood looks charmingly rustic and makes it easy to grab exactly what you need.
- Best For: Gardeners who like everything organized and within easy reach.
- Budget Tip: Use an old fruit crate or wooden box instead of buying a new carrier.
- Styling Idea: Leave cans unpainted for an industrial look, or lightly whitewash them for a softer cottage feel.
- Practical Note: Label the cans with simple tags so everyone knows what goes where.
- Care & Maintenance: Shake out soil and wipe cans occasionally so tools stay clean and rust-free.
8. Tin Can Bird Feeder Trio
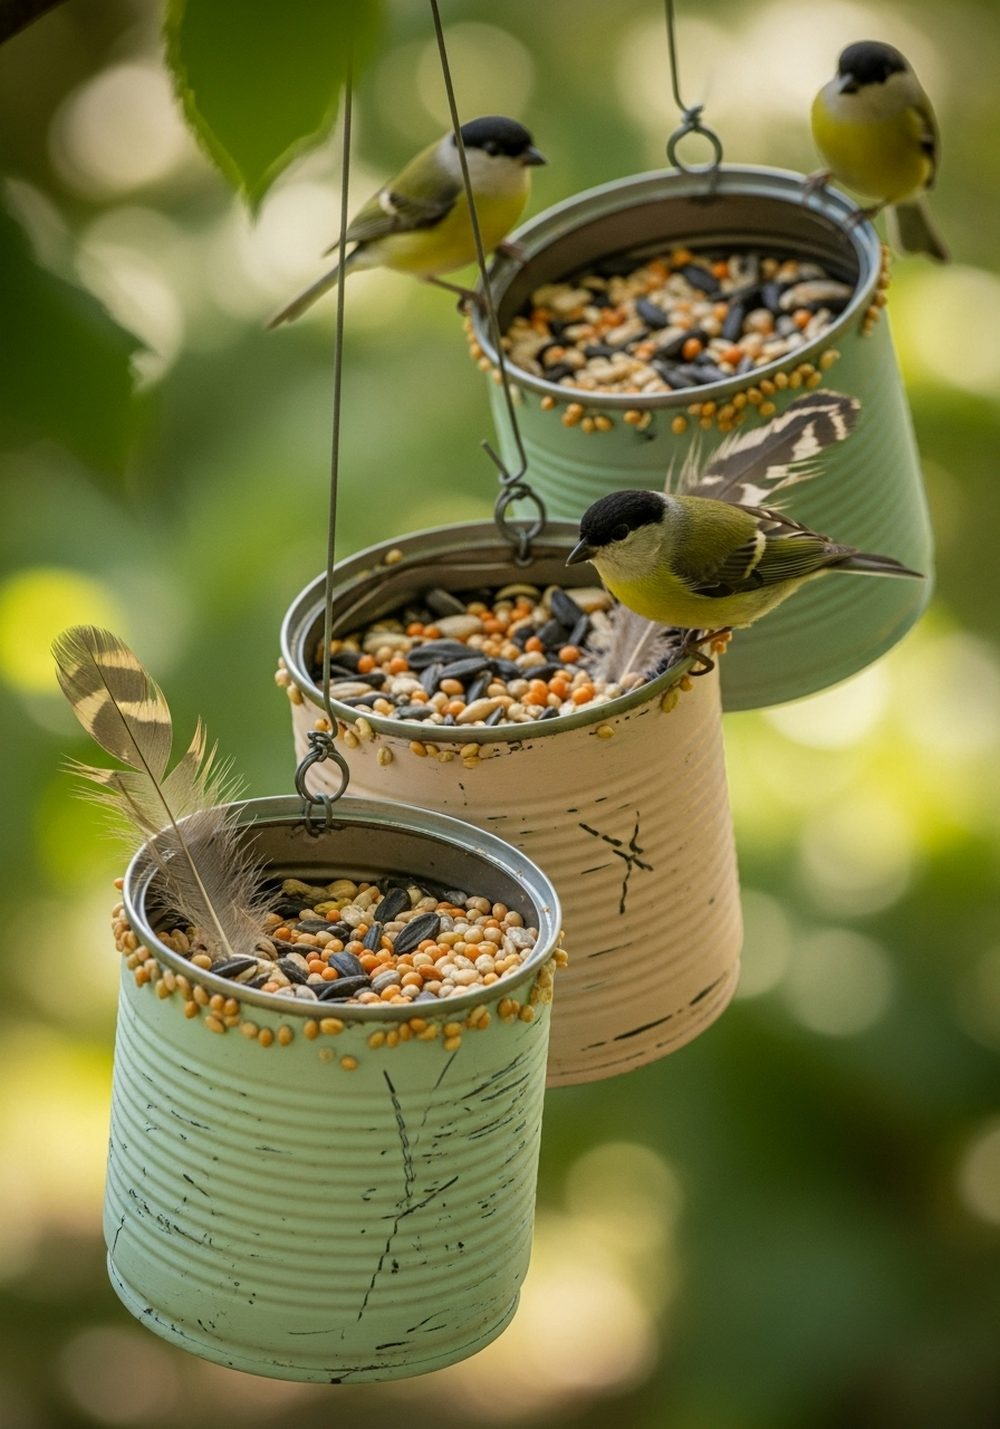
Invite birds into your garden with a set of tin can bird feeders. Lay each can on its side, secure it to a branch or rail, and fill it with birdseed. Add a small perch by gluing a stick across the opening. Painting the cans in gentle garden shades helps them blend into the greenery while still looking decorative. Watching birds come and go will bring life and movement to your outdoor space.
- Best For: Wildlife-friendly gardens, family gardens, and nature-loving kids.
- Budget Tip: Hang the cans with twine or wire you already own and use basic seed mixes.
- Styling Idea: Choose nature-inspired colors like moss green, sky blue, and soft brown.
- Practical Note: Position feeders where birds feel safe—away from heavy foot traffic and lurking cats.
- Care & Maintenance: Clean the cans and replace old seed regularly to keep visiting birds healthy.
9. Tin Can Fairy Garden Planter
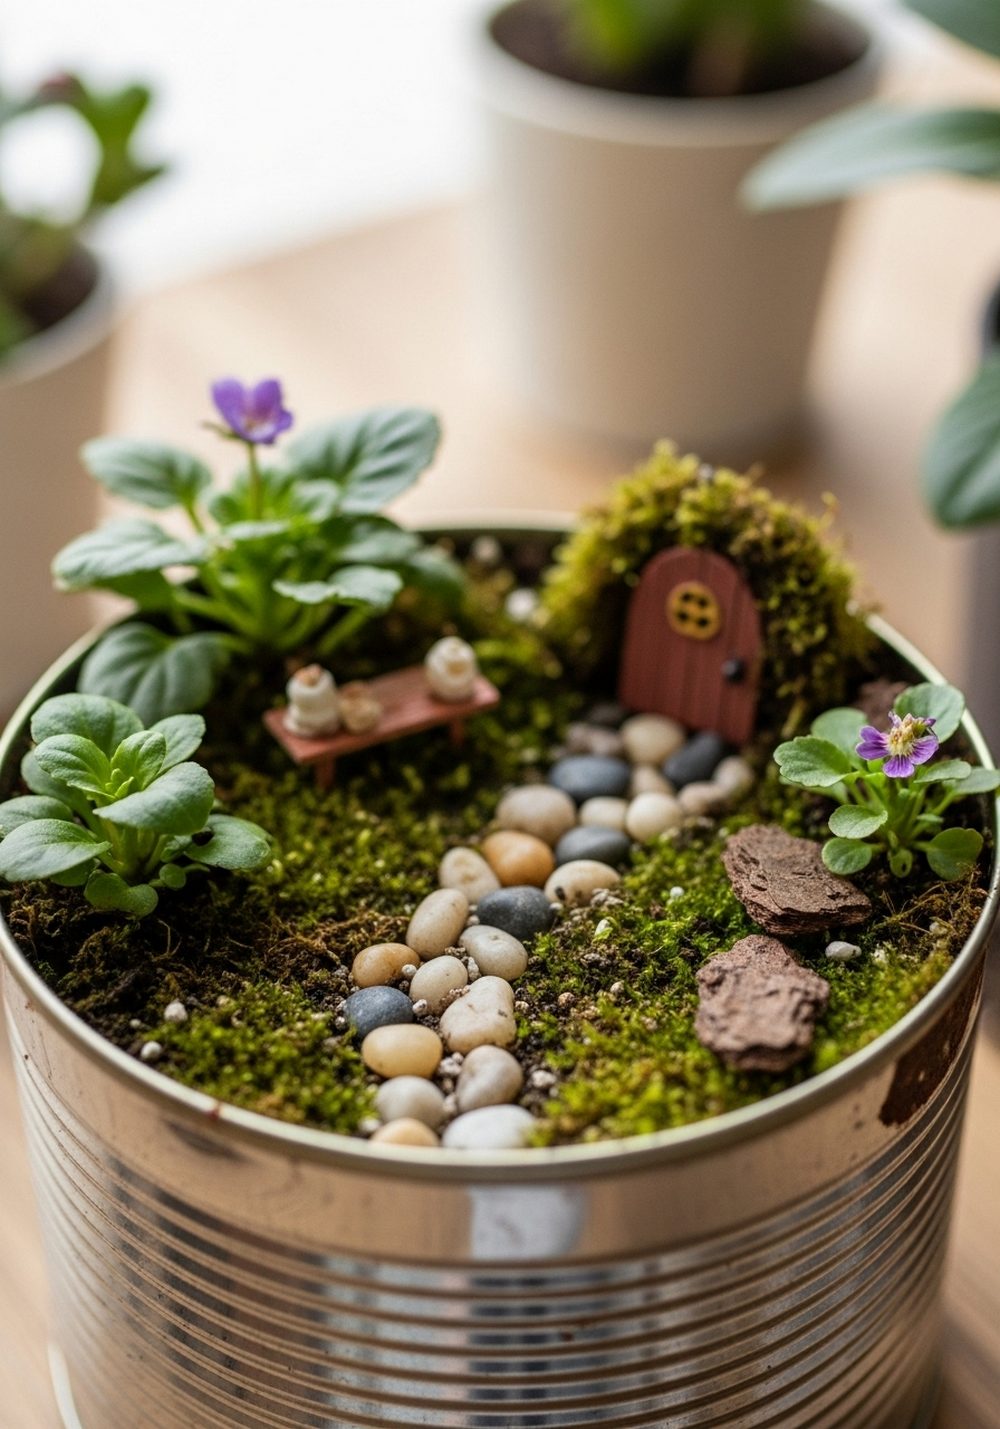
Turn a wide tin can into a tiny world by creating a fairy garden. Fill the can with potting mix and moss, then add miniature furniture, a tiny door, pebble paths, and small plants like thyme or baby tears. The contrast between rugged metal and delicate miniatures feels whimsical and fun, especially for kids. Place it on a step, table, or tree stump where people can lean in and spot new little details each time.
- Best For: Families, kids, or anyone who loves playful, imaginative decor.
- Budget Tip: Make your own fairy accessories from pebbles, twigs, and bottle caps instead of buying miniatures.
- Styling Idea: Keep the can in a neutral shade and let the tiny details and plants provide the color.
- Practical Note: Choose small, slow-growing plants so the fairy scene doesn’t get swallowed too quickly.
- Extra Idea: Add a tiny battery tea light for magical evening glow.
10. Tin Can Mini Water Feature
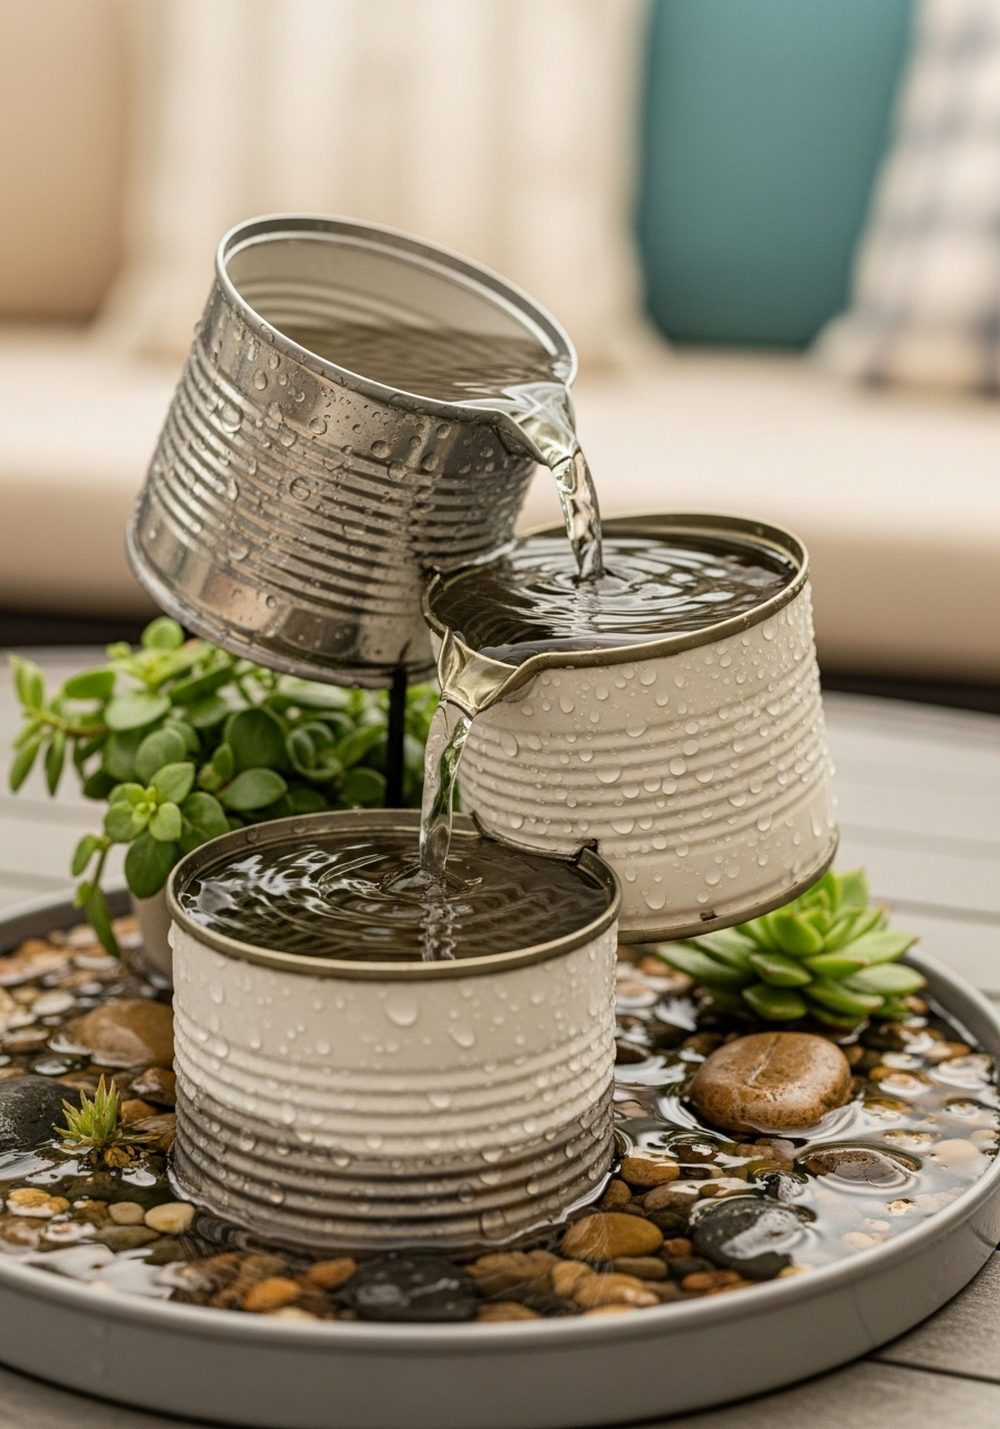
With a few stacked tin cans and a small pump, you can create a gentle trickling water feature. Arrange different-sized cans so water flows from the top can down into the next, finishing in a larger can or bowl at the bottom. Surround the base with pebbles and tuck in small plants. The sound of water instantly makes the space feel calmer, and the mix of shiny metal, water, and greenery looks wonderfully refreshing.
- Best For: Patios, small courtyards, or relaxation corners that need a soothing focal point.
- Budget Tip: Use a simple solar pump and repurposed containers instead of buying a full fountain kit.
- Styling Idea: Keep the cans mostly unpainted for a minimalist, industrial look softened by plants.
- Practical Note: Make sure the base container is watertight and on a stable, level surface.
- Care & Maintenance: Top up water regularly and clean the pump to prevent algae build-up.
Conclusion
Tin cans might be some of the most overlooked treasures in your recycling bin, but in the garden they can become lanterns, planters, organizers, and tiny works of art. With a bit of paint, a few holes, and some imagination, you can turn “trash” into pieces that add light, height, texture, and personality to your outdoor space. Start with one easy idea—maybe a lantern or herb tower—and let your growing collection of cans shape the garden of your dreams.
FAQs
1. Do I need special paint for decorating tin cans for the garden?
Outdoor or metal paint will last the longest, especially in wet weather, but you can absolutely use leftover acrylic or wall paint if you seal it with a clear top coat. Lightly sanding the can first helps the paint grip. If your cans are mostly under cover, even basic paint will hold up reasonably well.
2. How can I stop tin cans from rusting outside?
Make sure your cans are fully dry before painting, drill drainage holes so water doesn’t sit inside, and finish with a clear outdoor sealant if possible. Keeping them slightly raised off the ground and avoiding constant standing water also slows down rust. A little bit of patina can actually add to the rustic charm.
3. Are these tin can projects safe for renters?
Yes, most are very renter-friendly. Focus on hanging or freestanding pieces rather than drilling into walls you don’t own. Use over-door hooks, balcony rail clamps, or freestanding frames. Lanterns, tabletop vases, and caddies are especially easy to move when you leave.
4. What’s the easiest tin can garden project for beginners?
Painting a few cans and using them as simple herb or flower pots is the easiest place to start. You just need drainage holes, paint, soil, and plants. From there, you can move on to lanterns, hanging planters, or a small wall grid once you’re comfortable using a drill and hammer.
5. Can I mix tin can decor with regular terracotta and ceramic pots?
Definitely. In fact, the contrast in textures makes everything look more interesting. Use tin cans as accents among your existing pots—maybe a cluster of three painted cans beside a large terracotta container. Try repeating one color from your cans elsewhere in the garden to tie the look together.
6. Are tin can garden ideas suitable for very small balconies?
Yes. Vertical projects like hanging chains, wall grids, and herb towers are perfect for tiny balconies because they take up minimal floor space. Choose compact plants, avoid very heavy arrangements, and secure everything well so it’s safe in windy weather. Even one or two tins can add a lot of personality to a small space.