9 Simple Tin Can Flower Pot Crafts For Kids That Look Adorable
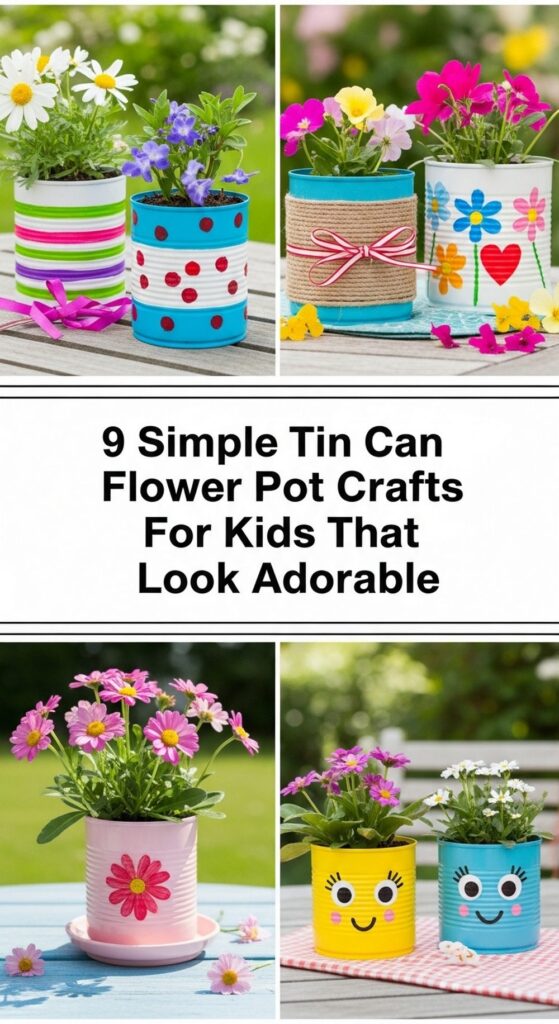
If your kids love getting messy with paint and glue, tin cans are about to become your new favorite craft supply. With just a few recycled cans, some basic art materials, and a bit of imagination, children can create the sweetest little flower pots to brighten windowsills, balconies, and garden corners.
These tin can flower pot crafts are simple enough for a rainy afternoon and cute enough to keep on display. You’ll find easy painting ideas, fun characters, and projects that use things you already have at home. Best of all, kids get to proudly see their creations “grow” when you add flowers or herbs.
Quick List
- Rainbow-Striped Tin Can Flower Pots
- Cute Animal Face Tin Can Planters
- Polka Dot Party Tin Can Pots
- Garden Monster Tin Can Flower Friends
- Chalkboard Label Tin Can Herb Pots
- Lace And Ribbon Tin Can Flower Vases
- Nature Collage Tin Can Planters
- Button Mosaic Tin Can Flower Pots
- Hanging Tin Can Flower Pot Mobile
1. Rainbow-Striped Tin Can Flower Pots
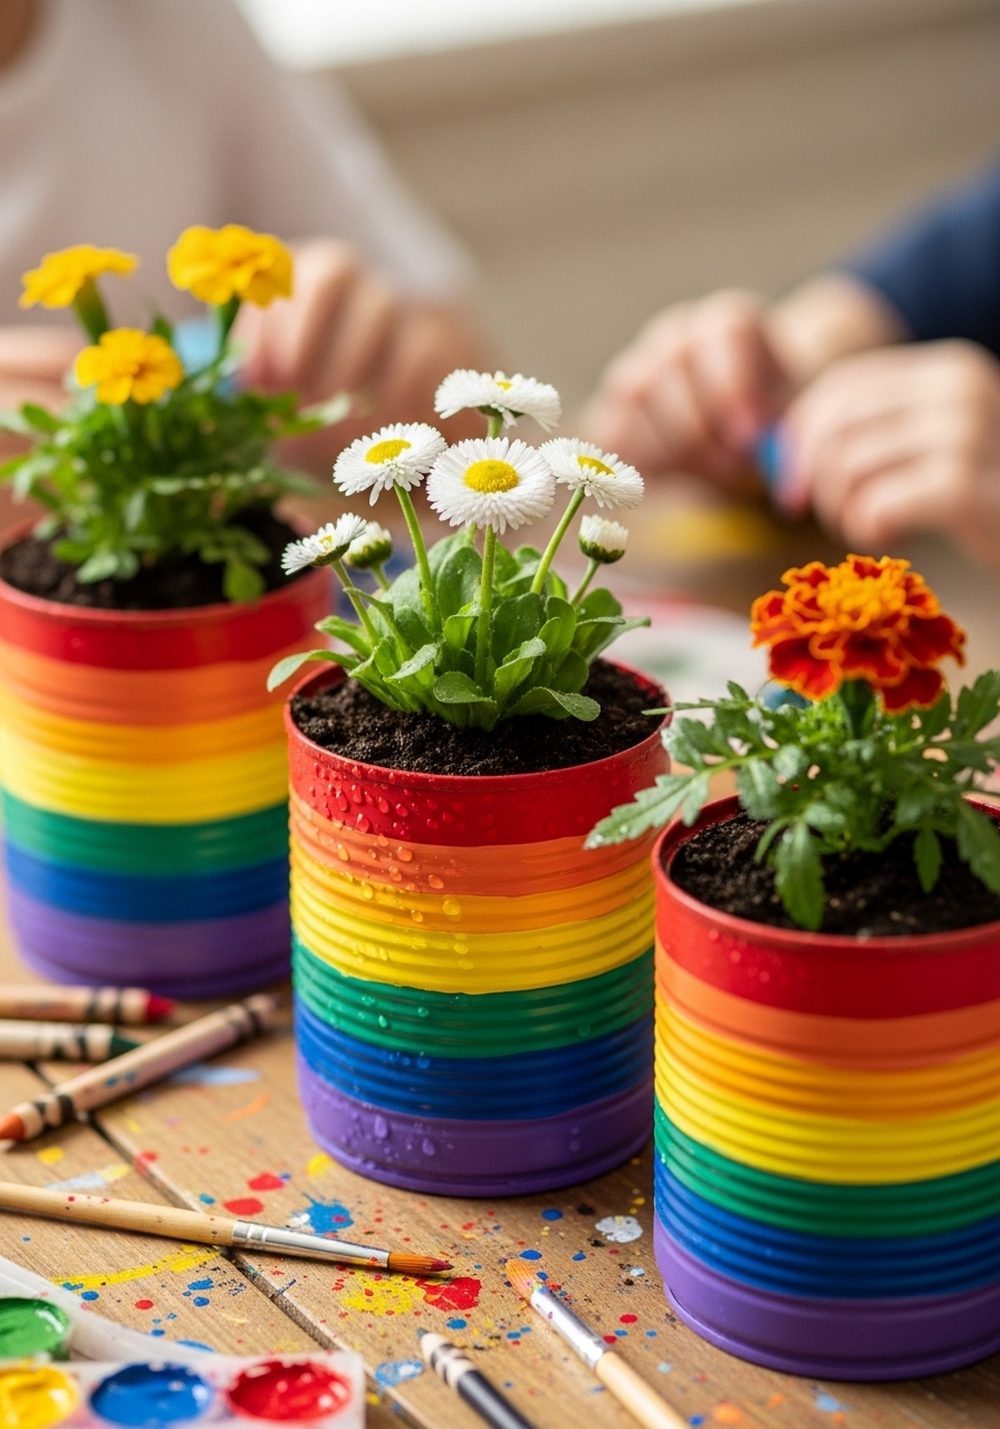
Let kids turn plain tin cans into cheerful rainbow pots that light up any shelf or windowsill. Start by carefully sanding sharp edges and adding a coat of white primer so the colors pop. Then help children paint thick, bright stripes all around the can using craft paints or leftover wall paint. Once dry, add a few drainage holes, a layer of pebbles, and potting soil, then tuck in small flowers or herbs. The rainbow bands make the greenery look extra fresh and fun.
- Best For: Windowsills, kitchen counters, and kids’ bedroom plants.
- Budget Tip: Use leftover house paint and cans from the recycling bin to keep costs almost zero.
- Styling Idea: Stick to classic rainbow order or try pastel “ice cream” shades for a softer look.
- Practical Note: Seal the paint with a clear, child-safe varnish if the pots will live outdoors.
2. Cute Animal Face Tin Can Planters
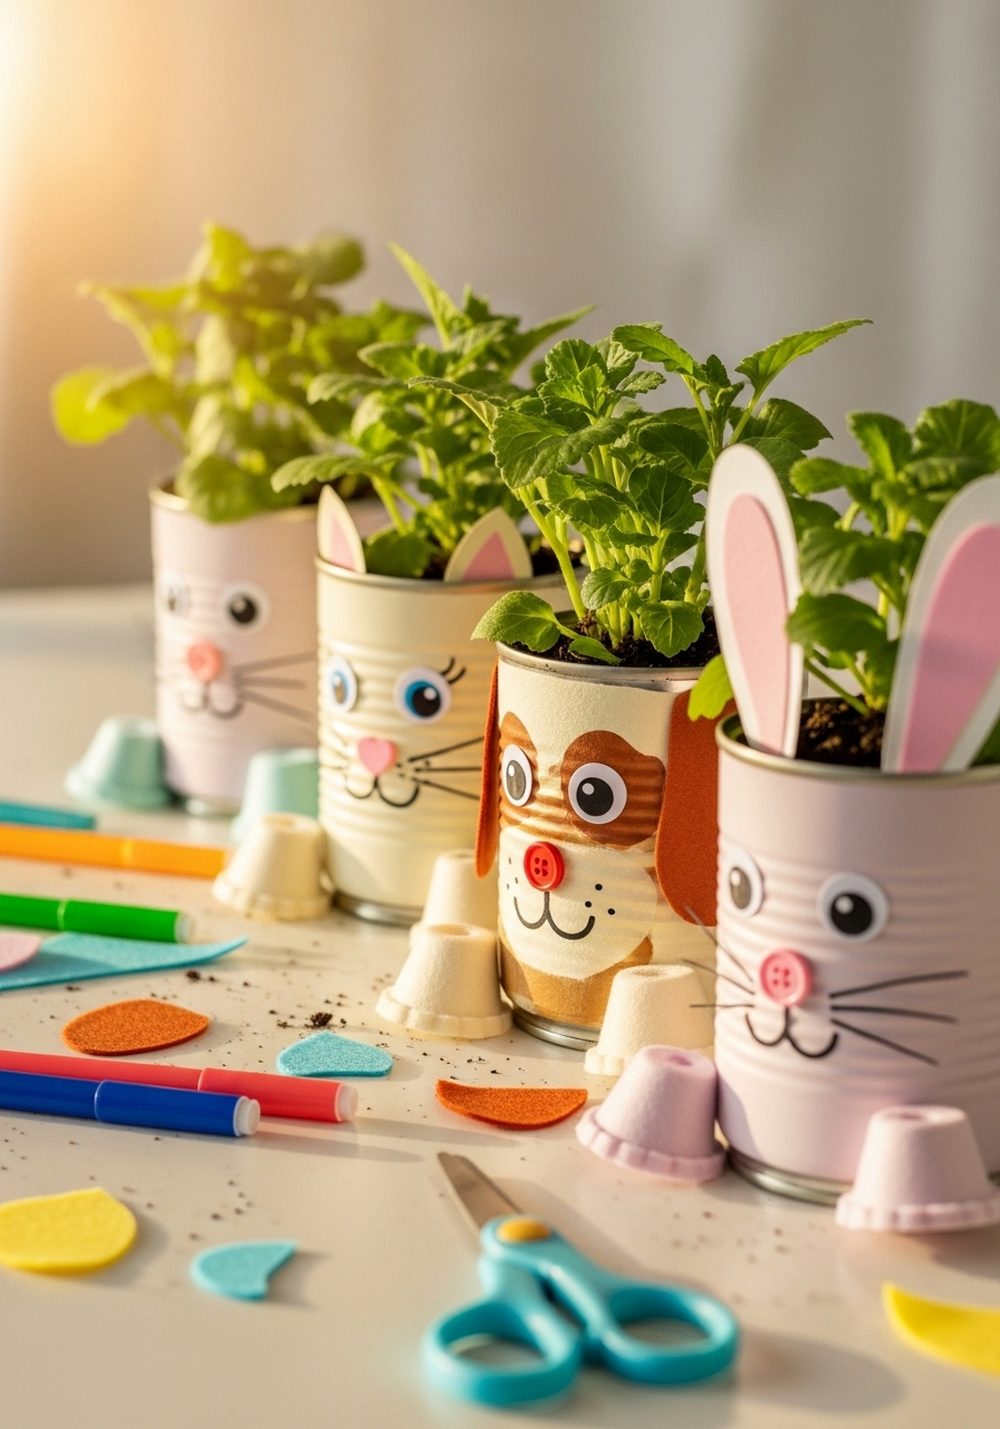
Kids love anything with a friendly face, so turning tin cans into animals is always a hit. Paint each can a base color, such as orange for a fox or gray for a kitten, then add simple features: eyes, nose, whiskers, and smile. Paper or felt ears can be glued to the rim, and plants become “hair.” Think grassy plants for spiky hedgehogs or trailing ivy for a lion’s mane. This project is playful, quick, and packed with personality, perfect for a mini zoo on the porch.
- Best For: Animal-loving kids and themed garden corners.
- Budget Tip: Use scrap paper, felt offcuts, and old buttons for features instead of buying new supplies.
- Styling Idea: Create a matching “family” of animals in coordinating colors and line them along a step.
- Practical Note: Choose hardy, forgiving plants so kids can help water without worrying too much.
3. Polka Dot Party Tin Can Pots
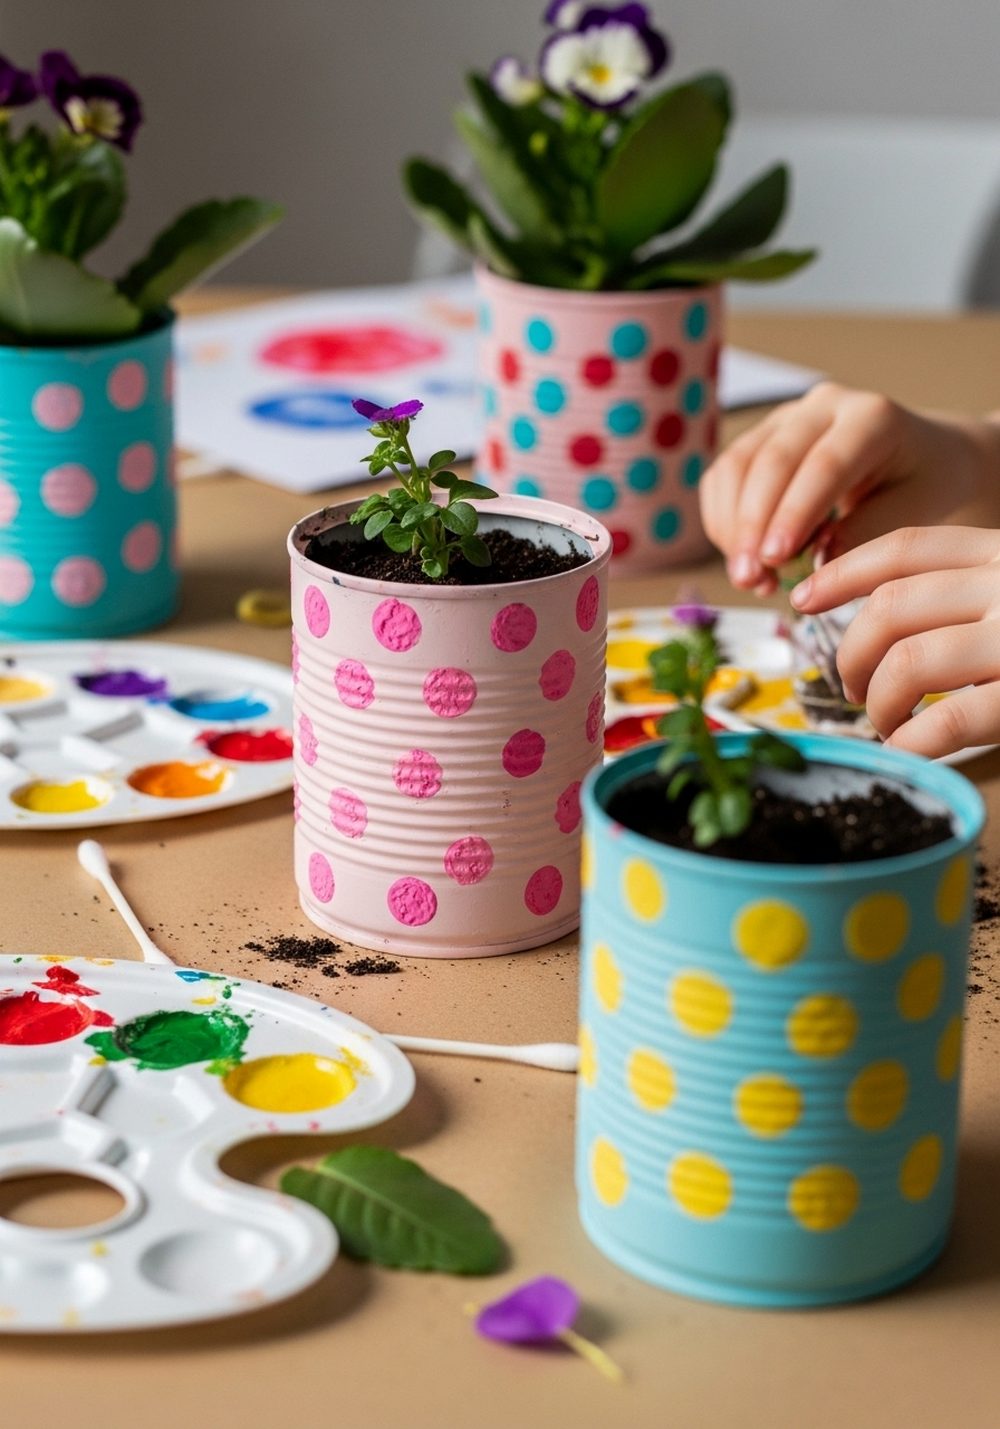
Polka dots make everything look like a party, and they’re easy for small hands to paint. After priming and painting each can in a solid color, let kids dip cotton buds, pencil erasers, or fingertip-sized sponge pieces into contrasting paint and dab on neat circles. They can play with one color for a simple look or sprinkle dots in a rainbow mix. The dotted cans look especially cute with compact flowers in white or yellow, which stand out against the playful patterns.
- Best For: Brightening dull corners, patio tabletops, and birthday party decor.
- Budget Tip: Use homemade dabbers (cotton buds, cut-up sponges) instead of special brushes.
- Styling Idea: Try a two-color theme, like navy with white dots, for a slightly more grown-up look.
- Care & Maintenance: Wipe the cans with a damp cloth now and then to keep the dots looking fresh.
4. Garden Monster Tin Can Flower Friends
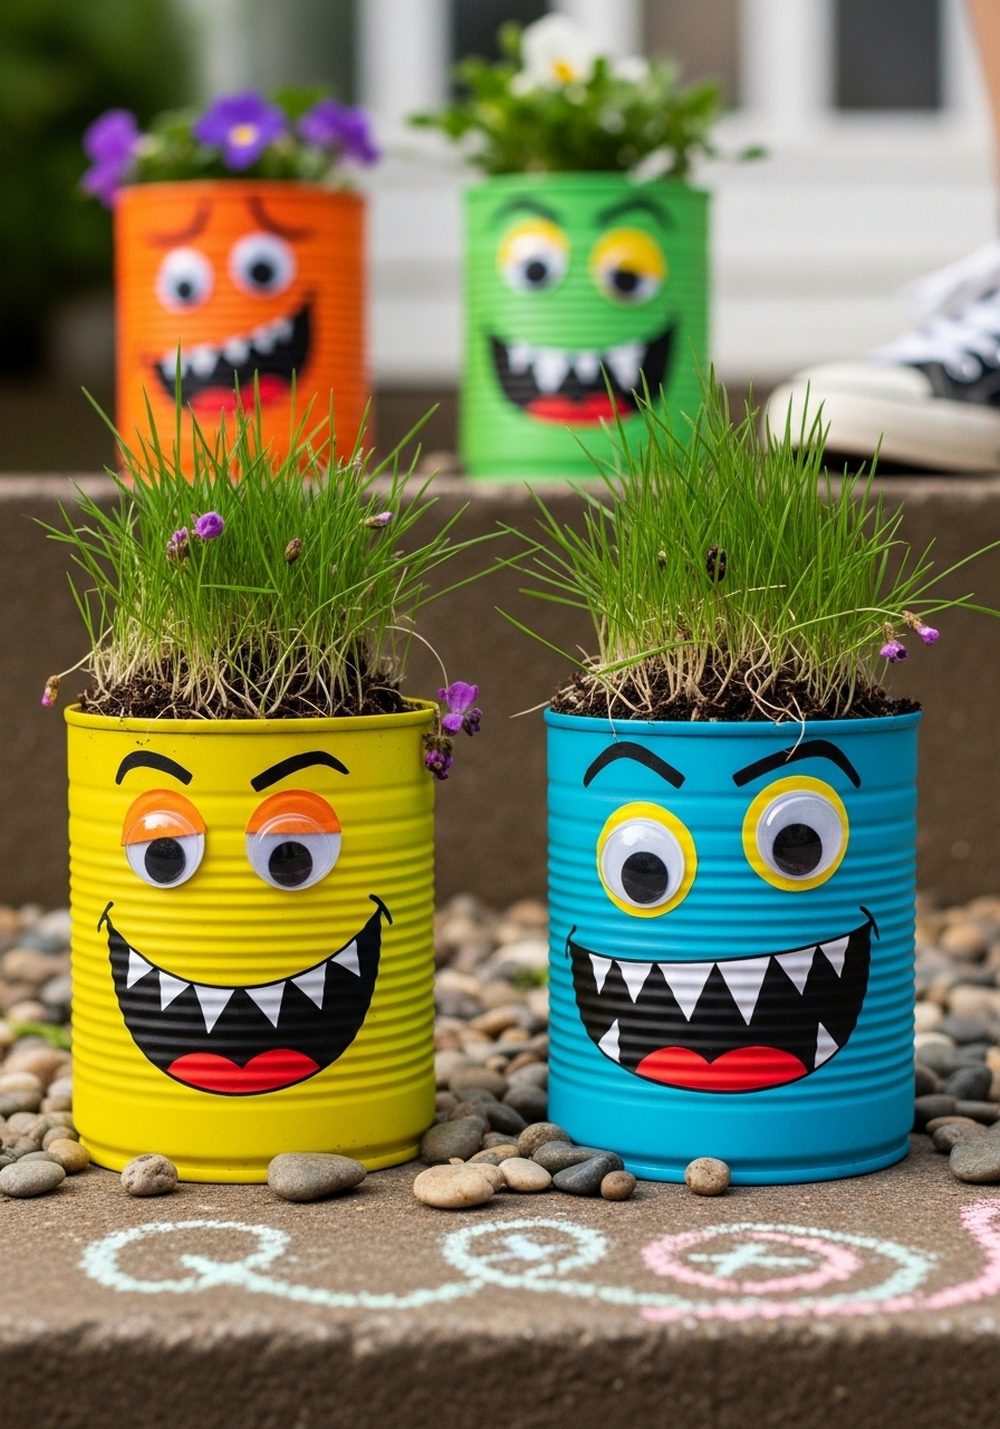
Invite a crew of friendly “monsters” into the garden with these silly, colorful pots. Kids can paint the cans in bold neon or bright primary colors, then add big googly eyes, funny eyebrows, and jagged paper or foam teeth around the rim. Spiky grasses, wild-looking herbs, or plants with fuzzy leaves make perfect monster “hair.” Arrange the monster cans on a step, wall, or around a sandpit and watch kids invent stories and games around their new garden friends.
- Best For: Playful family gardens and kids’ outdoor play areas.
- Budget Tip: Cut teeth and tongues from cereal boxes painted white and red instead of buying foam.
- Styling Idea: Give each monster a theme—sleepy, silly, surprised—so their faces show different moods.
- Practical Note: Secure googly eyes firmly and supervise younger children while gluing small pieces.
5. Chalkboard Label Tin Can Herb Pots
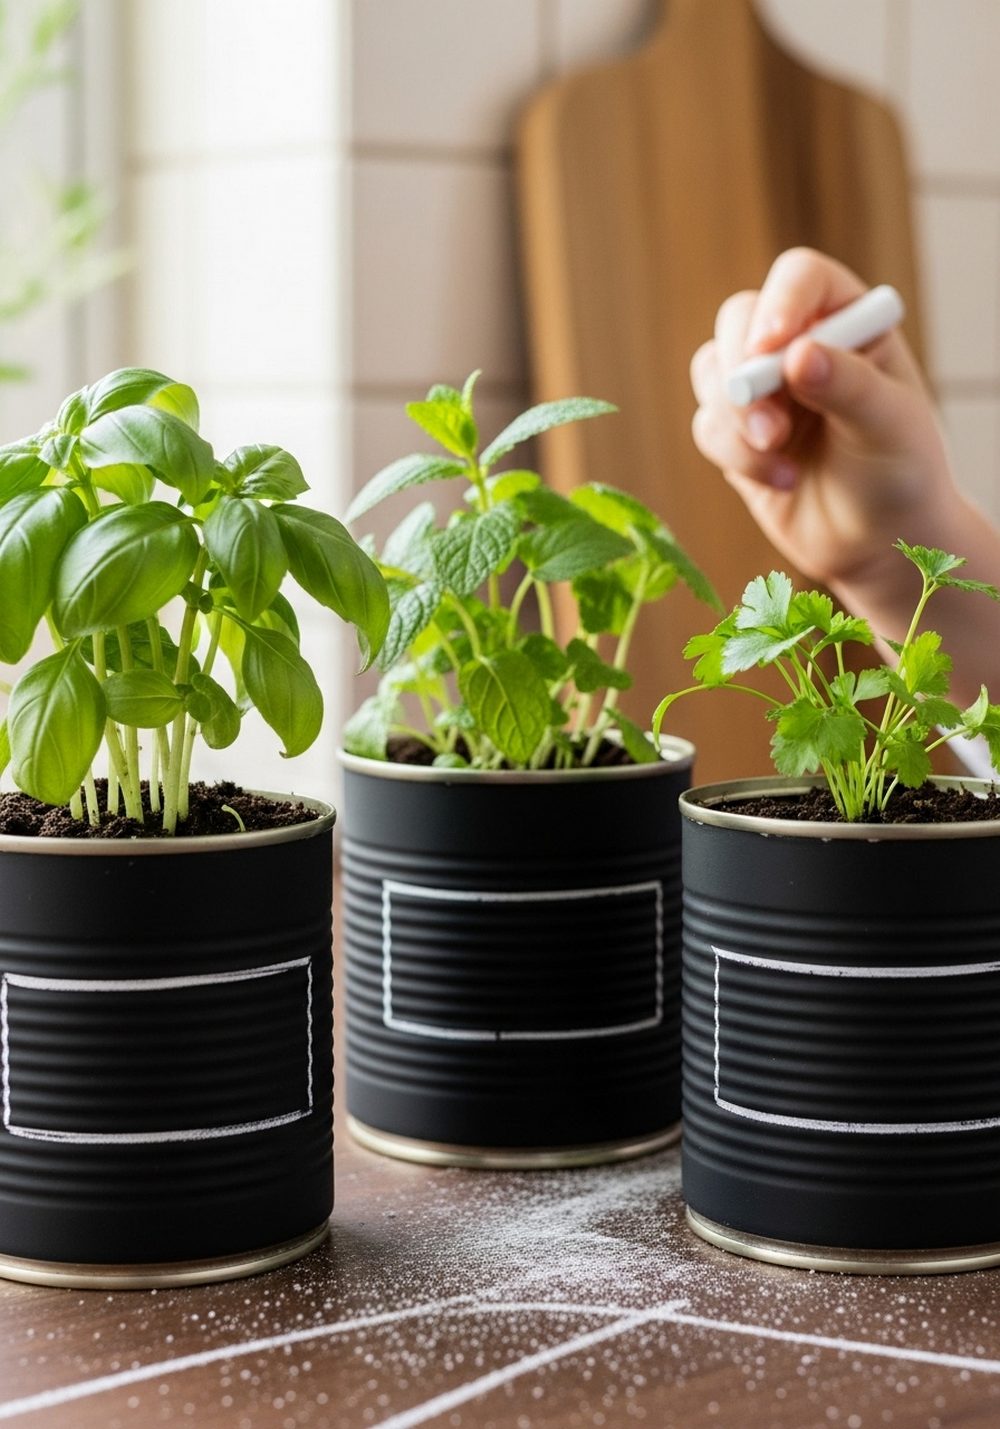
These chalkboard-style cans are both adorable and practical, especially for tiny herb gardens kids can help manage. Paint the cans in chalkboard paint or matte black, leaving a neat rectangle or band for writing. Once dry, kids can label each pot with the herb name, draw little pictures, or even write who is in charge of watering. The best part is the writing can be wiped off and changed whenever they like, making it a project that grows along with their plants.
- Best For: Kitchen windowsills and balcony herb gardens.
- Budget Tip: If you don’t have chalkboard paint, use black matte paint and a white paint pen for permanent “chalk” art.
- Styling Idea: Keep all cans the same dark color; let the herbs’ green leaves and white chalk stand out.
- Care & Maintenance: Re-draw labels if rain or watering splashes blur them, and refresh the paint when needed.
6. Lace And Ribbon Tin Can Flower Vases
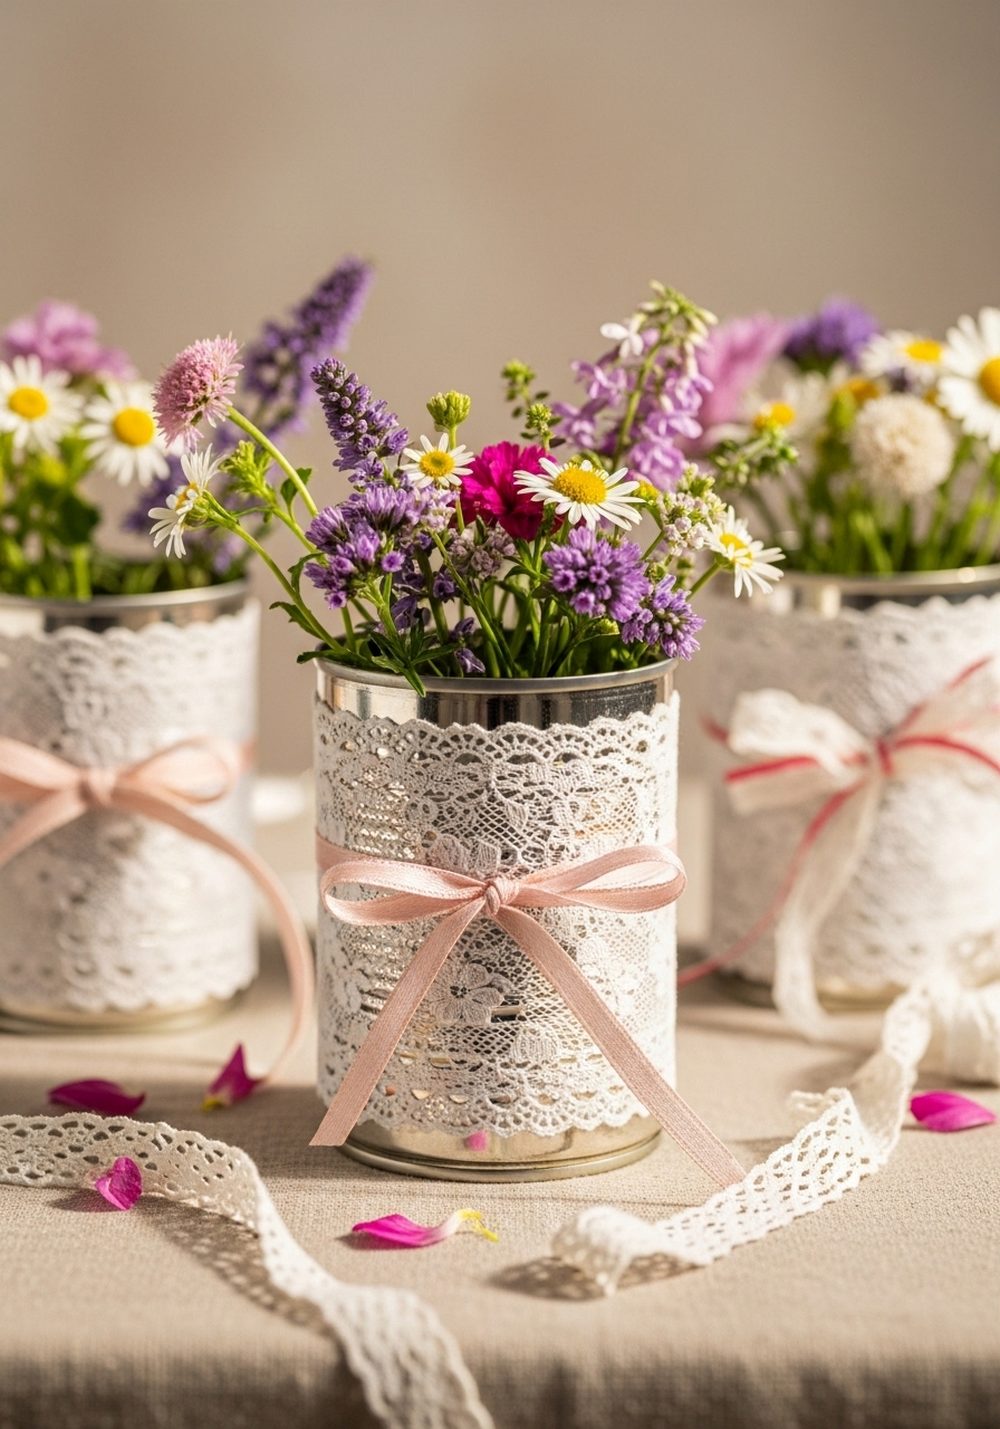
For a softer, pretty look, lace and ribbon transform tin cans into charming mini vases. Once the can is safe and clean, wrap it in a strip of lace and secure it with double-sided tape or glue, then finish with a tied ribbon bow. Kids will enjoy choosing colors and patterns, from pastel ribbons to bright stripes. Fill the cans with fresh or faux flowers for instant table decor, perfect for tea parties, birthdays, or Mother’s Day brunch.
- Best For: Special occasions, gift-giving, and indoor decor.
- Budget Tip: Use leftover fabric scraps, lace from old garments, and saved ribbon from gift wrap.
- Styling Idea: Choose one main color (like blush pink or soft blue) and mix different lace textures in that shade.
- Practical Note: If using fresh flowers, slip a glass jar or plastic cup inside the can to hold water safely.
7. Nature Collage Tin Can Planters

Turn a walk in the park into craft supplies with nature collage cans. Have kids collect small leaves, petals, bark pieces, and flat pebbles. Back at home, coat the outside of the can in white or brown paint for a neutral base, then brush on glue and press the natural treasures into place. The result is a textured, earthy planter that feels like a tiny piece of the forest. It’s a lovely way to connect outdoor exploring with creativity and gardening.
- Best For: Kids who love nature walks and exploring outside.
- Budget Tip: Everything except glue and paint can be found outdoors, making this extremely low-cost.
- Styling Idea: Keep the color palette natural—greens, browns, and creams—for a calm, woodland feel.
- Care & Maintenance: Keep these planters in a sheltered spot so delicate leaves and petals last longer.
8. Button Mosaic Tin Can Flower Pots
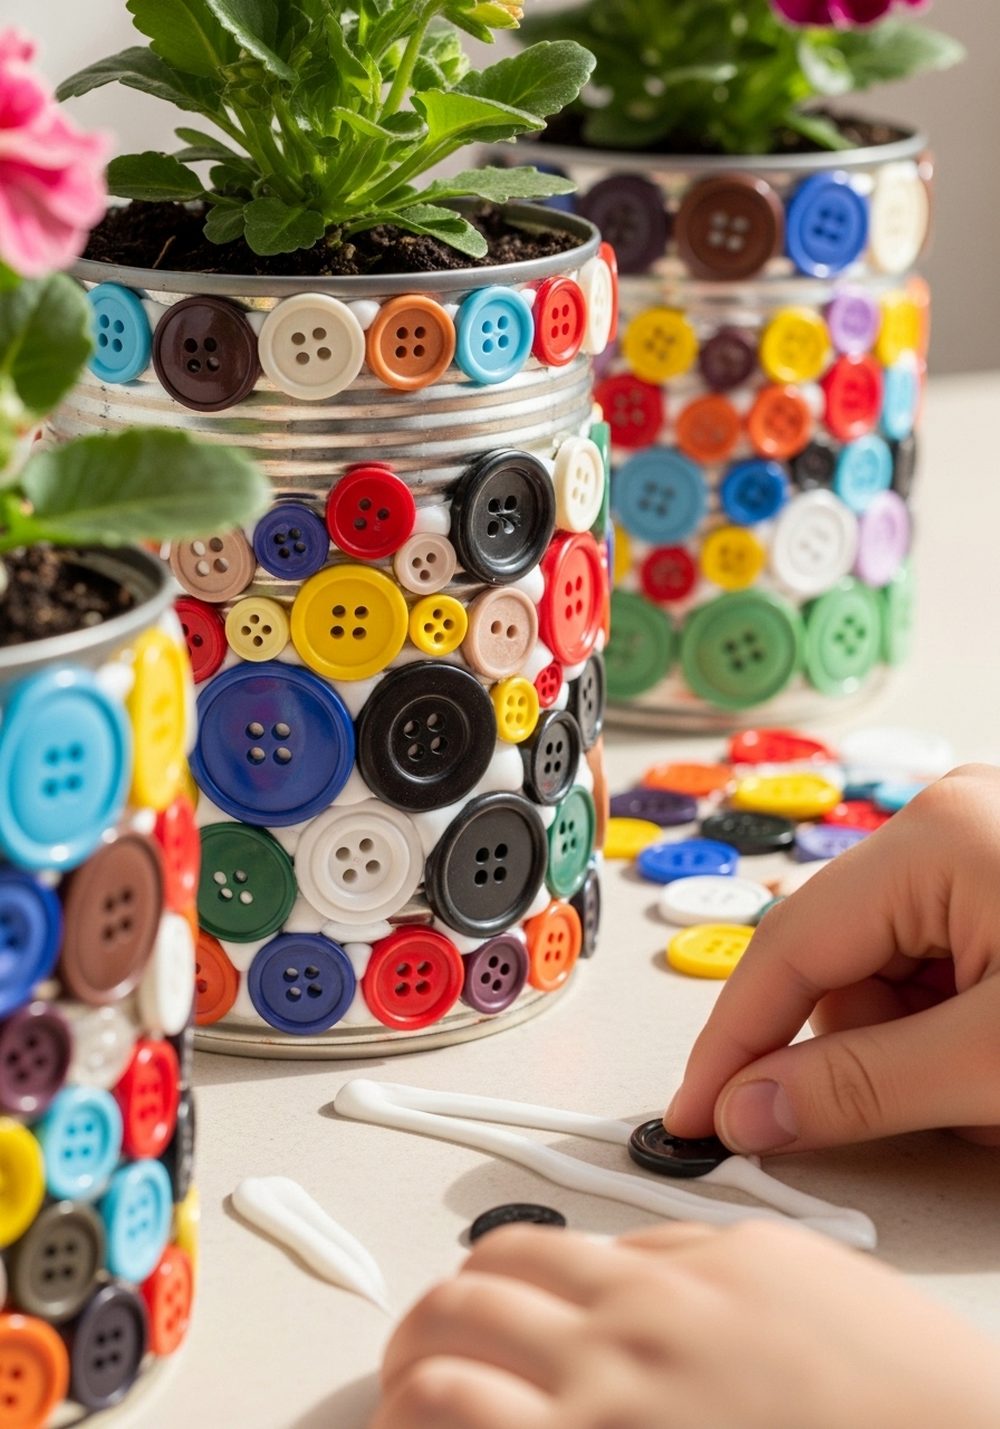
Buttons in every color and size become sparkly, textured “tiles” when glued onto tin cans. Start with a painted base color, then let kids arrange buttons in stripes, spirals, or random clusters around the can. This is a peaceful, focused project that’s great for improving fine motor skills. When the glue dries, the finished pots catch the light beautifully and look extra sweet with small flowers or succulents inside. It’s a lovely way to use up that mysterious button jar.
- Best For: Rainy-day crafting and kids who like detailed, hands-on projects.
- Budget Tip: Ask friends and family for spare buttons or salvage them from worn-out clothes.
- Styling Idea: Stick to one color family (like blues and greens) or mix brights for a joyful rainbow effect.
- Practical Note: Help children apply glue in small sections so buttons don’t slide around too much.
9. Hanging Tin Can Flower Pot Mobile
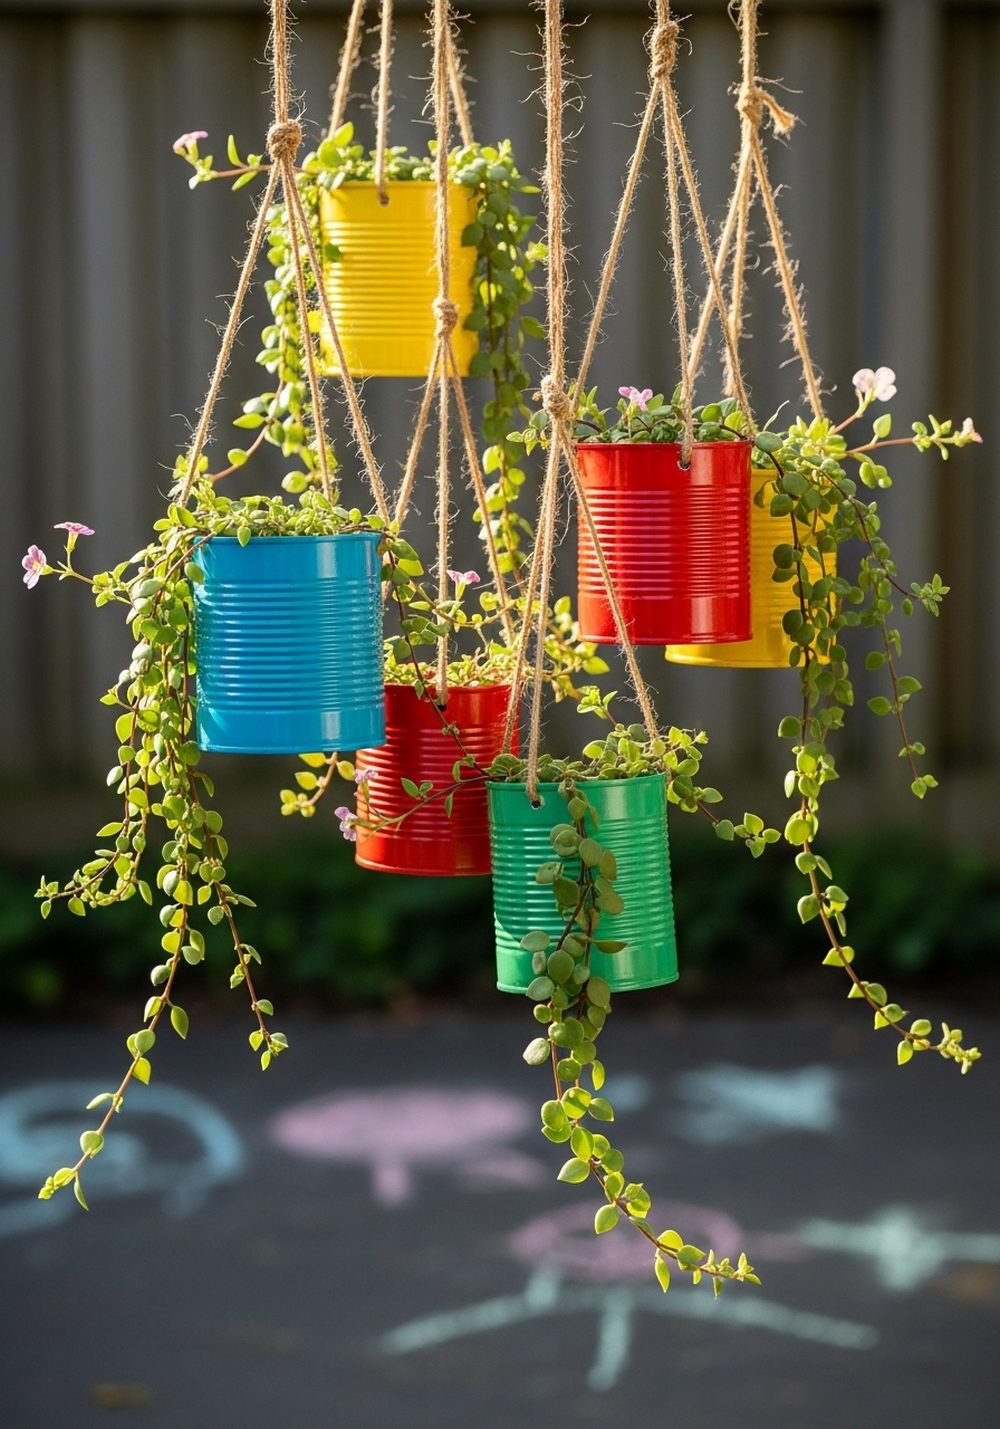
A mobile made from small tin can pots is a fun way for kids to decorate vertical space. Use lightweight cans, paint them in matching or coordinating colors, and attach sturdy twine or rope securely through drilled holes. Hang them at different heights from a wooden dowel, branch, or metal ring. Plant trailing plants or use faux flowers so kids can watch them sway gently in the breeze. Hang the mobile in a sheltered spot where children can admire their work from below.
- Best For: Porches, balconies, and sheltered garden corners.
- Budget Tip: Use found branches and leftover string instead of buying special hanging hardware.
- Styling Idea: Choose a theme, like ocean blues or sunset colors, so all the cans feel like one set.
- Practical Note: Make sure all knots are tight and hang the mobile safely out of reach of very small children.
Conclusion
With a few saved cans and simple supplies, your kids can turn recycling into adorable, long-lasting garden and home decor. These projects are easy to adapt to any age, season, or color scheme and give children a chance to see their artwork “come alive” with plants and flowers. Start with one idea that fits the supplies you already have, then add more over time until your home is filled with their bright, handmade tin can creations.
FAQs
Q1. How can I make tin can flower pots safe for kids to handle?
First, carefully smooth any sharp edges with sandpaper or a metal file, and make sure there are no jagged lids. An adult should handle any drilling for drainage holes. You can also line the inside with a plastic pot or cup so children don’t need to touch the metal much while planting and watering.
Q2. What kind of paint works best on tin cans for kids’ crafts?
Acrylic craft paint or leftover water-based wall paint usually sticks well to cleaned, dry cans. A quick coat of primer helps colors look brighter and last longer. Choose non-toxic, child-friendly paints and add a clear sealer if the pots will sit outside in sun or rain.
Q3. Do we need to use real plants, or can we use fake flowers?
You can use either. Real plants are great for teaching kids about watering and growth, but faux flowers are lighter, less messy, and easier to manage for very young children. A nice compromise is to use real herbs on a windowsill and fake flowers in hanging or mobile-style projects.
Q4. Are tin can flower pot crafts suitable for small balconies or apartments?
Yes, they’re perfect for small spaces. Most of these ideas work beautifully on narrow windowsills, balcony railings, or compact shelves. Just choose smaller cans, avoid heavy plants, and use saucers or trays underneath to catch drips if you’re indoors.
Q5. How can I keep costs low when making these crafts with a group of kids?
Ask families to bring clean cans and any spare buttons, ribbon, or craft scraps from home. Buy basic supplies like glue and paint in larger, shared containers. Choose one or two simple projects—such as polka dots or animal faces—so you don’t need lots of different materials.