
20 Fairy Light Pathway Ideas With Flower Borders

Fairy light pathways are one of the easiest ways to make your garden feel magical after dark. When you pair soft, warm lights with flower-filled borders, even a simple route to the shed or seating area becomes a little journey, not just a shortcut.
This collection of 20 ideas focuses on pathways outlined by fairy lights and softened by flowers: cottage borders, woodland edges, modern gravel lines, and everything in between. Each idea is realistic, gentle on the budget, and adaptable to different garden sizes. Whether you’re lighting the front walk, a side path, or a tiny loop around a single bed, you’ll find inspiration to turn everyday steps into twinkling evening walks.
Quick List
- Arched Fairy Light Welcome Path
- Twinkling Timber Edging With Cottage Flowers
- Fairy Light Gravel Curve With Purple Border
- Lantern-Post Fairy Lights With White Flower Edges
- Stepping Stone Fairy Light Meadow Path
- Pergola-To-Patio Twinkle Path With Roses
- Side-Yard Fairy Light Fence Path With Ferns
- Brick Path With Bottle Fairy Lights And Edged Border
- Fairy Light Arch Tunnel With Mixed Flower Beds
- Low Hedge Fairy Light Edge With Soft Pastel Flowers
- Rustic Log-Edged Fairy Light Path With Wildflowers
- Fairy Light Stair Path With Trailing Flowers
- Gravel Crescent Fairy Path With White And Silver Flowers
- Potted Border Fairy Light Path To A Bench
- Raised Bed Fairy Light Boardwalk With Herb Flowers
- Fairy Light Stone Slab Path With Structural Planting
- Front Garden Fairy Light Path With Formal Borders
- Woodland Bark Path With Fairy Lights And Fern Edges
- Deck-To-Garden Fairy Light Step Path With Summer Annuals
- Circular Fairy Light Path Around A Flower Island Bed
Arched Fairy Light Welcome Path

A series of simple arches wrapped in fairy lights instantly turns your main path into a little tunnel of glow. Position metal or wooden arches at a comfortable height and space, then wind warm white lights around each one. Keep the flower borders below fairly low so the arches remain the main structure—lavender, catmint, cosmos, and low roses work beautifully. By day, it’s a soft, romantic walkway; by night, it feels like a special entrance just for you.
- Best For: Front paths and key routes to seating areas.
- Budget Tip: Start with two or three arches and add more over time.
- Styling Idea: Stick to one light color and a gentle flower palette for a calm look.
- Practical Note: Ensure arches are firmly fixed so wind doesn’t twist cables.
Twinkling Timber Edging With Cottage Flowers

Running fairy lights along timber edging is subtle but effective. Fix a simple string just above the boards using small clips or hooks, then let cottage flowers spill forward—foxgloves, daisies, hardy geraniums, and poppies. The lights highlight the edge so guests know where to walk, while the flowers soften the line. It’s especially charming along slightly curved paths where the twinkle follows every bend.
- Best For: Informal paths through cottage-style borders.
- Budget Tip: Use solar lights so you don’t need to worry about sockets.
- Styling Idea: Mix tall and low flowers so the light skims different heights.
- Practical Note: Keep lights high enough to avoid strimmer or mower damage.
Fairy Light Gravel Curve With Purple Border

A curved gravel path edged with purple flowers looks lovely, but add a low fairy light string and it really comes alive at dusk. Keep the planting to a purple and green theme—lavender, salvia, verbena—and let the lights sit just inside the border on short stakes. The gravel reflects a little of the glow, while the flowers become deeper and more dramatic in low light. It’s a good way to make a simple side route feel intentional.
- Best For: Side paths or routes to a garden seat.
- Budget Tip: Use one long light string rather than lots of short ones to avoid joins.
- Styling Idea: Add a dark metal bench at the end of the curve to echo the rich tones.
- Practical Note: Make sure stakes are flexible enough not to snap if stepped on.
Lantern-Post Fairy Lights With White Flower Edges

Short posts with lanterns create a lovely “guard of honor” along a path. Hang small lanterns with fairy lights inside from each post and let low white flowers—alyssum, candytuft, small daisies—run along the ground between. White petals bounce light well, so the flower edges look bright without needing intense bulbs. This setup is perfect for front gardens or entrances where you want a clear, pretty route for visitors.
- Best For: Front walks and guest entrances.
- Budget Tip: Use simple jam-jar style lanterns with battery lights inside.
- Styling Idea: Keep post and lantern colors to one neutral (black, white, or wood).
- Practical Note: Space posts so you can still easily clear snow or sweep leaves.
Stepping Stone Fairy Light Meadow Path

Stepping stones across lawn or long grass look whimsical, but can be hard to see at night. Low fairy light stakes popped between stones solve the problem and add charm. Surround the path with a meadow-style border—low grasses, clover, daisies—rather than crisp edging. The effect is of a dotted line of light, with softer planting around. It’s ideal if you like your garden a bit wild but still want safe evening paths.
- Best For: Informal gardens and routes to tucked-away nooks.
- Budget Tip: Use solar marker lights, then wrap the tops with fairy lights for extra sparkle.
- Styling Idea: Choose stones big enough that they feel like little islands in the “meadow.”
- Practical Note: Keep grass trimmed just low enough that stones and lights stay visible.
Pergola-To-Patio Twinkle Path With Roses

An overhead string of fairy lights linking house and pergola feels like a little festival line in your own garden. Hang one or two strong strings high overhead, then edge the ground path with low rose and sage planting. As you walk, you’re under a gentle canopy of light and beside fragrant flowers. This layout works beautifully for evening dinners, making the journey from kitchen to seating area feel special every time.
- Best For: Gardens with a clear route from house to pergola or seating.
- Budget Tip: Use a single main string and supplement with a few ground stakes if needed.
- Styling Idea: Choose pale roses so they glow softly in the light.
- Practical Note: Fix overhead lights high enough for easy walking and barrow access.
Side-Yard Fairy Light Fence Path With Ferns

Side yards can feel like service spaces; lights and planting transform them. Run a fairy light string along the fence—either at the top or mid-height—and plant a border of ferns, hostas, and shade flowers at ground level. The light washes down the fence and picks out leaf shapes without being harsh. Walking to the bins or shed suddenly feels like passing through a small, softly lit gallery of greenery.
- Best For: Narrow, shaded side paths.
- Budget Tip: Combine a basic, long string of lights with second-hand pots if in-ground planting is tricky.
- Styling Idea: Keep flowers mostly white here for maximum impact in low light.
- Practical Note: Protect cables from rubbing against rough timber by using clips or trunking.
Brick Path With Bottle Fairy Lights And Edged Border

Recycled bottles used as tiny glowing pillars add a quirky touch. Sink them into the soil along one side of a brick path and fill each with a mini fairy light string or a battery tea light wrapped in wire lights. On the other side, keep a neat, low flower border—thrift, alpines, little geraniums—so the brickwork and bottles stand out. This idea suits smaller, more intimate paths where you can appreciate each detail up close.
- Best For: Short paths near seating areas or doors.
- Budget Tip: Collect bottles over time and use inexpensive battery lights.
- Styling Idea: Stick to clear glass for a softer, more unified glow.
- Practical Note: Make sure the setup is stable, especially if kids or pets are about.
Fairy Light Arch Tunnel With Mixed Flower Beds

A run of arches over a path is an easy way to create drama. Wrap each arch in fairy lights and let climbers—roses, clematis, honeysuckle—twine up during the day. The borders on either side can be deep, mixed plantings with tall perennials, shrubs, and grasses. At night, the whole tunnel glows while the flowers around it become dark silhouettes. It’s a stunning main route to a garden seating area or lawn.
- Best For: Longer paths that act as a main garden feature.
- Budget Tip: Use simple metal arches and let plants and lights do the heavy lifting.
- Styling Idea: Repeat a few key flower colors along the length for harmony.
- Practical Note: Choose robust, outdoor-rated lights and avoid tangling them with vigorous climbers.
Low Hedge Fairy Light Edge With Soft Pastel Flowers

A low hedge makes a perfect perch for lights. Thread fairy lights along the top of the hedge and plant a narrow border in front with gentle pastel flowers—cosmos, campanula, pastel snapdragons. The hedge provides a dark green background that makes the lights pop without being glaring. The pastel blooms add daytime charm and reflect subtle color at night. It’s a neat way to soften very straight, formal lines.
- Best For: Front gardens or more structured layouts.
- Budget Tip: Use one continuous string across the hedge rather than multiple shorter ones.
- Styling Idea: Keep the flower palette to three pastel shades max for calmness.
- Practical Note: Remove the lights when performing any heavy hedge-trimming.
Rustic Log-Edged Fairy Light Path With Wildflowers
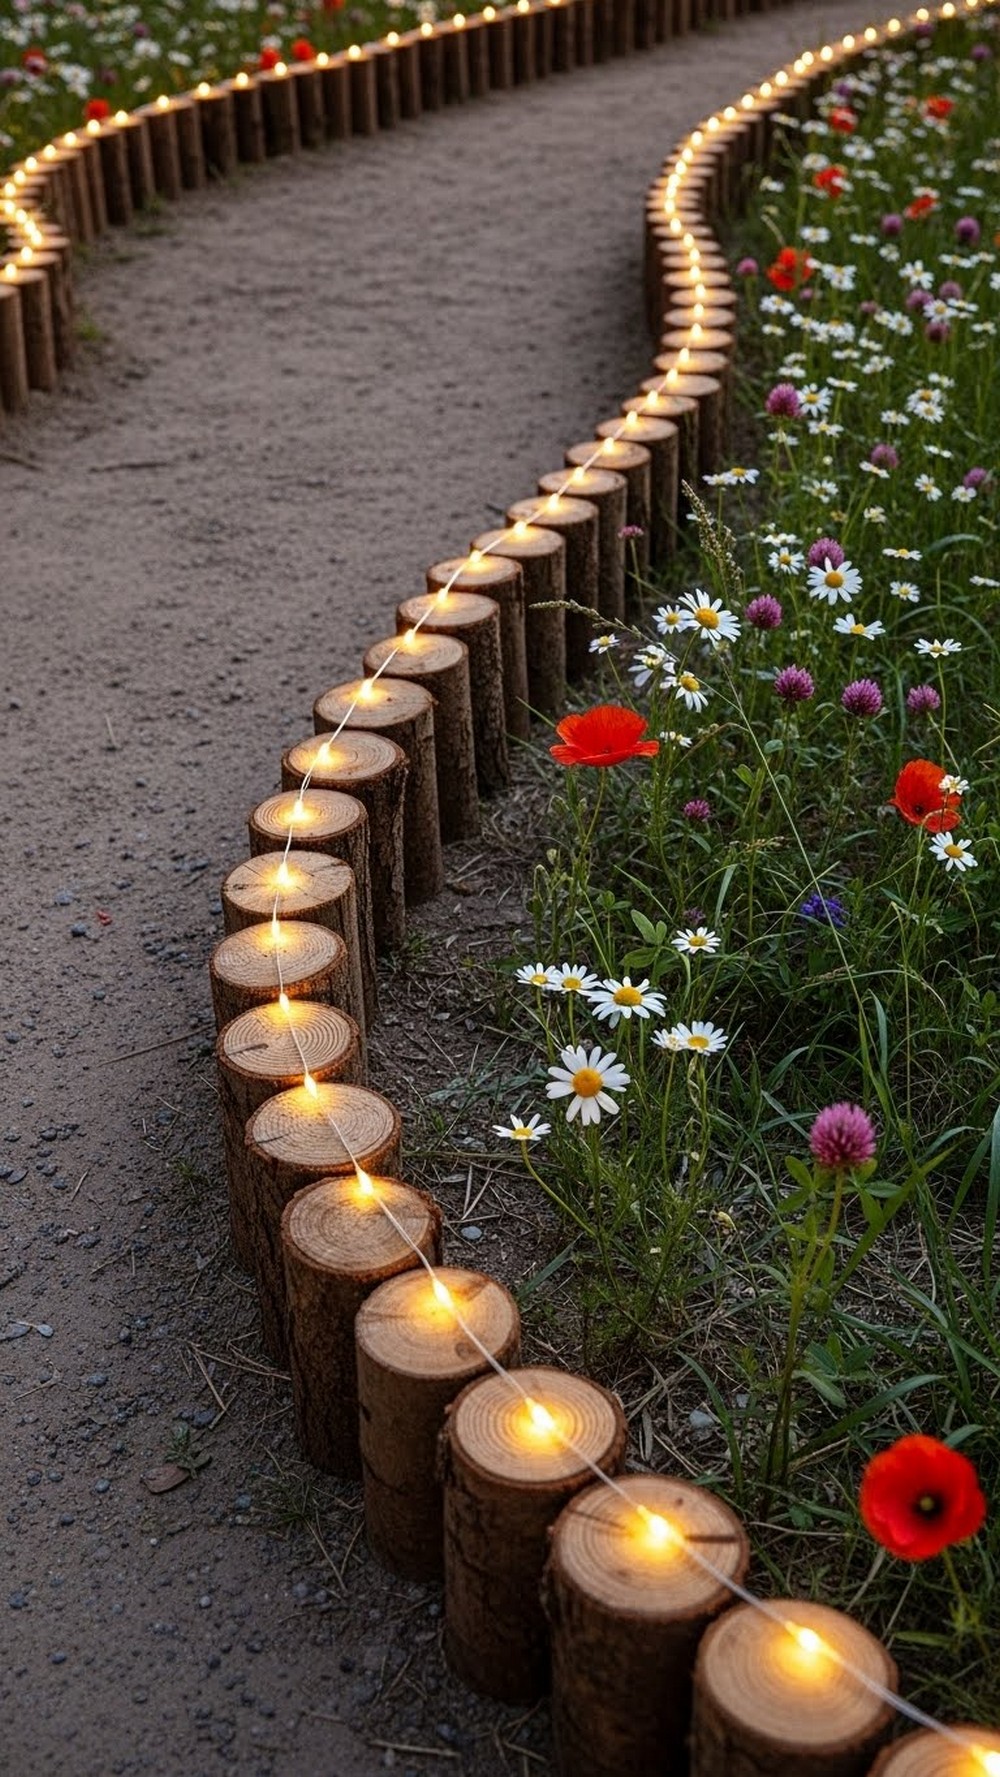
Log edging feels instantly natural, and fairy lights bring it quietly to life. Fix a string just along the top of the logs and sow or plant a wildflower strip just beyond: poppies, cornflowers, yarrow, oxeye daisies. The path itself can be simple bark or gravel. At night, you see the gentle zigzag of glowing logs and just the suggestion of meadow beyond. It’s informal and pretty, perfect for a cottage or wildlife-friendly garden.
- Best For: Informal plots and wildlife gardens.
- Budget Tip: Use prunings and small logs from your own or friends’ trees.
- Styling Idea: Allow a bit of “mess”—self-seeded flowers add to the charm.
- Practical Note: Check that lights and logs don’t create a trip hazard along narrow paths.
Fairy Light Stair Path With Trailing Flowers

Steps can feel hazardous at night; lighting them makes them both safer and prettier. Run fairy lights along the underside of each tread or along a handrail, and flank the stair with trailing plants—campanula, ivy, creeping thyme, small petunias. The light picks out each step edge while highlighting cascades of foliage and flowers. This is especially effective if your garden is on a slope and the stairs are a key way to move around.
- Best For: Sloping gardens and terraced spaces.
- Budget Tip: Combine motion-sensor step lights with decorative fairy lights.
- Styling Idea: Stick to a single flower color for a tidy, modern look.
- Practical Note: Ensure all electrics are outdoor-rated and placed well away from pooling water.
Gravel Crescent Fairy Path With White And Silver Flowers

A crescent path looks lovely skimming one side of a lawn or patio. Lay gravel and edge it with a discrete strip, then run fairy lights along the outer edge on low stakes. Plant the outside border with white and silver plants—gaura, silver artemisia, white verbena, dusty miller. The palette glows beautifully in artificial light. From the house, you’ll see a soft arc of brightness with ghostly pale flowers beyond. It’s especially nice as a backdrop to evening seating.
- Best For: Curving edges around patios or lawns.
- Budget Tip: Focus planting on the most visible part of the crescent if funds are tight.
- Styling Idea: Add a single, slightly taller plant as a focal point along the curve.
- Practical Note: Position lights so lawn mowers won’t catch them when you edge.
Potted Border Fairy Light Path To A Bench

If digging borders isn’t possible, use pots. Line one side of a path with varied containers, then thread fairy lights between them, looping around handles and stems. Fill pots with a mix of upright and trailing flowers—dahlias, geraniums, lobelia, ivy—so the display looks full by day and gently lit by night. Place a simple bench at the end so the whole route has a clear destination. This idea is perfect for rental gardens or paved yards.
- Best For: Patios, courtyards, and rented spaces.
- Budget Tip: Use inexpensive plastic pots hidden in baskets or crates.
- Styling Idea: Choose one main pot color and let plants provide the variety.
- Practical Note: Consider where cables run when moving pots around for watering.
Raised Bed Fairy Light Boardwalk With Herb Flowers

A narrow boardwalk between raised beds feels special already; adding fairy lights turns it into a tiny nighttime walkway. Fix lights along the outer bed edges, pointing down toward the planks, so the path glows but the bulbs stay hidden. Plant herbs and their flowers—basil, chives, thyme, borage—and enjoy the scent as you walk. It’s a lovely way to access vegetable or herb beds for an evening harvest.
- Best For: Kitchen gardens and allotment-style plots near the house.
- Budget Tip: Use simple strip lights or rope lights for a continuous edge.
- Styling Idea: Let some herbs spill slightly over the edges for softness.
- Practical Note: Leave enough space in the boardwalk for carrying watering cans or baskets.
Fairy Light Stone Slab Path With Structural Planting

If you prefer a more modern look, keep the path and planting minimal. Use large stone slabs with gravel between and add fairy lights via neat, low stakes between some of the stones. Border the path with structural elements—clipped shrubs, ornamental grasses, repeats of one or two perennials. At night, the light dots emphasize the geometry while leaves and seed heads catch glints. It’s understated but very effective.
- Best For: Contemporary gardens and simple layouts.
- Budget Tip: Use fewer, bigger slabs rather than many small ones.
- Styling Idea: Keep all fairy lights warm white for a calm, cohesive vibe.
- Practical Note: Ensure stakes are robust enough not to fall over onto the path.
Front Garden Fairy Light Path With Formal Borders

In a formal front garden, fairy lights can soften and highlight structure. Run a discreet string along the inside of low hedges that flank the path, letting the foliage hide the cables. Plant the beds with repeated shrubs and seasonal bloom—roses, tulips, lavender—for a classic feel. At night, the hedge tops glow gently, and the path is clearly visible for visitors. It adds charm without undermining the formal design.
- Best For: Symmetrical or formal-style front gardens.
- Budget Tip: Use timer plugs or built-in timers so lights come on automatically.
- Styling Idea: Keep lights subtle; the architecture of the planting is the star.
- Practical Note: Avoid bright, flashing modes—steady glow is kinder on the eyes here.
Woodland Bark Path With Fairy Lights And Fern Edges

A bark path under trees benefits hugely from a little light. Place short stakes with fairy lights along one side so they cast side light onto the path’s surface. Plant ferns, foxgloves, and other woodland flowers along both edges. The lights make bark chips glimmer and highlight fronds and tall flower spikes in a gentle way. This is a great choice for the “far” end of a garden, making it feel inviting rather than forgotten at night.
- Best For: Shady, tree-lined parts of the garden.
- Budget Tip: Mix inexpensive solar lights with a shorter string of fairy lights.
- Styling Idea: Keep colors mainly green and white for a tranquil woodland look.
- Practical Note: Bark moves; top up occasionally so stakes stay at the right height.
Deck-To-Garden Fairy Light Step Path With Summer Annuals

Where deck meets garden, a short lit path makes the transition feel smooth. Outline each deck step with fairy lights under the nosing, then continue along a short ground path with low light stakes. Plant summer annuals in borders alongside—cosmos, marigolds, zinnias, snapdragons—for lots of color by day. The lights then pick out their shapes at night, and the steps down feel obvious and safe during evening entertaining.
- Best For: Entertaining spaces that flow from indoors to out.
- Budget Tip: Focus lights on the main deck steps if the path is short.
- Styling Idea: Use colorful pots on the deck that echo border flowers below.
- Practical Note: Keep cables away from door thresholds to avoid trips.
Circular Fairy Light Path Around A Flower Island Bed

A circular path around a central bed gives you a true “walk around the garden” feel without needing lots of space. Edge the circle neatly, lay a path, and run fairy lights along the inner edge so they shine onto the flowers. Fill the island with layered planting—low groundcover, medium perennials, taller shrubs or a small tree. At night, the bed becomes a glowing centrepiece. Slowly circling it is a lovely, calming evening ritual.
- Best For: Medium lawns or central features in compact gardens.
- Budget Tip: Start with a half circle against a fence if space is tight.
- Styling Idea: Plant something fragrant in the island so the scent drifts over the lit path.
- Practical Note: Leave a small “off-ramp” from the circle to reach other garden parts easily.
Conclusion
Fairy light pathways with flower borders turn ordinary garden routes into little journeys worth taking slowly. Whether you prefer a neat front walk, a woodland trail, or a simple gravel curve, a combination of soft light and thoughtful planting can make your garden feel welcoming long after the sun goes down. Start with one path—maybe the one you use most at night—and outline it with a few lights and some forgiving flowers. As you see how it transforms the space, you can extend the glow and grow your borders, creating a night-time garden that feels gentle, inviting, and just a touch magical.
FAQs
1. Are fairy lights safe to use outdoors along paths?
Yes, as long as they’re rated for outdoor use and properly installed. Look for weatherproof strings, use suitable extension leads, and keep plugs in covered, protected outlets. Solar and battery options avoid cables altogether and are ideal for simple path edging.
2. What flowers work best beside fairy-lit paths?
Choose plants that either reflect light well or offer interesting silhouettes. White and pale blooms, silver foliage, grasses, and airy flowers like gaura or cosmos all look great at night. In shade, ferns and hostas catch side light beautifully. Prioritize plants that suit your soil and light first, then think about color.
3. How do I stop fairy lights from looking messy in daylight?
Keep cables tidy and use simple runs rather than lots of criss-crossing strings. Tuck wires into hedges, along edging, or behind low stakes. Opt for warm white lights with small bulbs—they’re less intrusive when off and blend better with plant material.
4. Do fairy lights bother wildlife or neighbours?
Soft, warm, non-flashing lights are usually gentle enough for both. Avoid very bright, cool-toned lights and flashing modes, especially near bedrooms or boundary fences. Timers help ensure lights aren’t on all night long, giving wildlife and neighbours a proper dark period.
5. What’s the easiest fairy light pathway idea for beginners?
Start with a short, straight section: run a solar fairy light string along one path edge using small stakes or clips, and add a few easy flowers like lavender or hardy geraniums alongside. Once you’ve seen how it looks and how the plants grow, you can extend the lights and borders in stages without a huge upfront project.


