22 Rustic Wooden Crate Planter Display Ideas

Wooden crates are one of those simple things that can completely change the feel of a garden. A few rough boards, a bit of stacking and shuffling, and suddenly you’ve got raised beds, plant shelves, mini herb stations, and cosy little vignettes that look like they’ve always been there. They’re perfect if you love a relaxed, cottagey, or farmhouse look—and especially handy if you’re renting or short on space.
In this post, you’ll find 22 rustic wooden crate planter display ideas for patios, porches, balconies, side yards, and shady corners. Each one is realistic, easy to adapt, and budget-friendly. Start with a couple of old crates, add some pots or compost, and let your garden grow up, out, and upwards.
Quick List
- Stacked Herb Crate Staircase
- Front Door Crate Tower Welcome
- Wall-Mounted Crate Shelf Garden
- Crate Ladder Lean-To Display
- Crate-and-Bench Combo Seating Planter
- Wheelbarrow-and-Crate Mobile Garden
- Crate Centerpiece On Patio Table
- Crate Veggie Micro Plot
- Crate Flower Bar Along A Fence
- Window-Height Crate Planter Shelf
- Tiered Corner Crate Display
- Crate Planters On An Old Pallet Base
- Hanging Crate Planter Trio
- Crate Herb-and-Tea Station
- Shade-Loving Crate Planter Under A Tree
- Fairy Garden Crate Display
- Crate Planters On Garden Steps
- Rail-Hugging Balcony Crate Planters
- Crate Planter And Tool Storage Combo
- Crate Drinks-And-Flower Bar For Parties
- House-Number Crate Planter For The Porch
- Seasonal Swap Rustic Crate Station
Stacked Herb Crate Staircase

Stacking crates like steps is an easy way to create a vertical herb garden. Place the largest crate on the ground, a medium one at the back, and a smaller one on top, slightly offset so each layer is visible. Line the crates if needed, fill with pots or compost, and plant herbs you use most. The staggered heights make watering and harvesting simple, and the rustic wood frames all that fresh green beautifully.
- Best For: Small patios, courtyards, and balconies.
- Budget Tip: Use basic plastic pots hidden inside the crates to make replanting easier.
- Styling Idea: Add simple handwritten labels or slate tags for each herb.
- Practical Note: Leave a little breathing room between plants so air can circulate.
Front Door Crate Tower Welcome

A crate tower next to the door is like a mini garden greeting. Stack two or three crates securely, alternating the direction they face so each “cubby” can hold different plants or decor. Pop in pots of seasonal flowers, a small lantern, and maybe a doormat-matching cushion on the lowest level. It instantly softens a plain entrance and can be changed through the year without redesigning the whole porch.
- Best For: Front steps and porches that need a focal point.
- Budget Tip: Use hardy evergreens on one level so you only swap out a couple of pots seasonally.
- Styling Idea: Echo your front door color in at least one pot or plant.
- Practical Note: Anchor the stack or screw crates together if it’s a windy spot.
Wall-Mounted Crate Shelf Garden

Crates fixed to a wall make chunky, rustic shelves. Secure them flat against the wall, open side facing out, and treat each one as a little still-life box. Mix trailing plants with a few decorative pieces like jars, candles (safe ones), or small watering cans. The shelves create height without cluttering the floor and give you a lovely backdrop for a bench or bistro set.
- Best For: Bare brick or timber walls near seating areas.
- Budget Tip: Use fewer crates and leave some space between so each feels intentional.
- Styling Idea: Stick to a tight color palette for pots so the overall look stays calm.
- Practical Note: Make sure your fixings can handle the weight of wet compost and pots.
Crate Ladder Lean-To Display

Lean a pair of stacked crates against a wall like a relaxed ladder. The top crate can hold lighter, trailing plants; the lower crate heavier pots or decor. This is a great way to add height where you don’t want to drill into the wall. You can slide the display aside if you need access and refresh the contents whenever you like.
- Best For: Shed walls, garages, or plain fence sections.
- Budget Tip: Use one or two showy plants at eye height and fill the rest with cheaper greenery.
- Styling Idea: Add a string of fairy lights around the crates for evening charm.
- Practical Note: Stabilize the base with bricks or a hidden wedge so nothing slips.
Crate-and-Bench Combo Seating Planter

Crates at each end of a bench act as rustic armrests and planters in one. Fix them to the bench frame or place them snugly against the ends so they feel intentional, not tacked on. Fill them with soft, non-spiky plants—lavender, daisies, low grasses—so you can happily brush against them. The crates visually widen the bench and make your seating nook look more like a finished “zone.”
- Best For: Small patios and porches where you want a cosy seat.
- Budget Tip: Use an old indoor bench given a weatherproof finish.
- Styling Idea: Match cushion colors to the flowers in the crate for a pulled-together look.
- Practical Note: Leave a gap at the back of crates so water doesn’t sit against the bench.
Wheelbarrow-and-Crate Mobile Garden

Dropping crates into a wheelbarrow turns it into a movable display. Line the barrow, then use crates as neat compartments for pots or direct planting. You can group herbs in one crate, flowers in another, and move the whole lot to chase the sun or make space for a gathering. It’s also a smart way to give older, slightly battered barrows a second life.
- Best For: Flexible layouts and occasional parties.
- Budget Tip: Use inexpensive seedlings and let them bulk up in place.
- Styling Idea: Add a small chalkboard or hanging sign on the barrow handle.
- Practical Note: Don’t overload; check you can still safely move the barrow when needed.
Crate Centerpiece On Patio Table

A crate as a long table centrepiece keeps all your bits together and makes the table feel dressed even between meals. Drop in a mix of herbs, small flowering pots, and a candle or two. You can lift the whole crate off when you need full table space. It’s especially handy if your patio table lives outside year-round and you want something that can stand up to the weather.
- Best For: Outdoor dining tables and coffee tables.
- Budget Tip: Use hardy herbs that can live in these pots for most of the season.
- Styling Idea: Stick to greens and whites for a calm, “bistro” style.
- Practical Note: Choose a crate that doesn’t block conversation across the table.
Crate Veggie Micro Plot

Treat each crate as a tiny raised bed and line them up like a row of allotment plots. Use deep crates, line with landscape fabric, fill with good compost, and plant one crop per crate. Label each with a simple marker. It’s a gentle, low-commitment way to try growing veg without digging up the lawn, and the rustic timber makes even a utilitarian row look charming.
- Best For: Beginners, renters, and small gardens.
- Budget Tip: Focus on high-reward crops like salad leaves, dwarf beans, or cherry tomatoes.
- Styling Idea: Use matching labels or painted crate fronts for a neat look.
- Practical Note: Make sure crates have drainage holes and sit on feet or bricks to avoid rot.
Crate Flower Bar Along A Fence

A row of crates against a fence acts like a rustic flower bar. Mix upright crates with ones on their sides to get height variations. Each crate can host one or two key plants, with trailing types at the edges. The fence becomes the “back wall,” so you can keep the front clear and easy to reach. It’s a lovely way to cover a plain fence without committing to permanent beds.
- Best For: Rental gardens and paved yards.
- Budget Tip: Start with fewer crates and space them out, then fill the gaps later.
- Styling Idea: Keep pot colours neutral and let flowers provide the brightness.
- Practical Note: Leave enough room between crates for airflow and easy watering.
Window-Height Crate Planter Shelf

A window-height crate shelf opposite or beneath a window gives you greenery right where you’ll see it most. Mount crates on posts or a simple frame so they sit at the exact level of the sill. Fill with a mix of herbs, flowers, and maybe a small lantern. From the inside, it feels like a lush, rustic balcony box; from outside, it’s a neat feature that doesn’t require drilling into walls.
- Best For: Ground-floor windows and basement light wells.
- Budget Tip: Use recycled timber for the supporting posts or frame.
- Styling Idea: Choose scented plants if the window opens near a seating spot.
- Practical Note: Check that the structure doesn’t block light or emergency access.
Tiered Corner Crate Display

Tiering crates in a corner gives you a mini plant theatre. Start with two or three on the ground, then add one or two on top, gradually stepping them back. Put taller plants at the top, medium in the middle, and trailers along the bottom. This works brilliantly where a wall meets a fence or where a downpipe makes a corner tricky to plant directly.
- Best For: Awkward, unused patio corners.
- Budget Tip: Use existing pots inside crates rather than filling every box with compost.
- Styling Idea: Group plants by colour per tier—a pink level, a white level, a foliage level.
- Practical Note: Avoid stacking so high that crates become difficult to reach or unstable.
Crate Planters On An Old Pallet Base

Pallet plus crates equals instant rustic platform. Lay the pallet flat and arrange crates in a way that suits your space—clustered to one side, spread evenly, or all pushed to the back. Use the gaps between crates for extra pots or lanterns. The raised base helps with drainage and makes the display feel like one piece of garden furniture rather than scattered boxes.
- Best For: Gravel or concrete areas that need a focal point.
- Budget Tip: Leave some pallet boards bare and use them as mini shelves for smaller pots.
- Styling Idea: Paint all crate edges in a muted shade while leaving sides natural.
- Practical Note: Check the pallet is solid and free from splinters or protruding nails.
Hanging Crate Planter Trio

Suspending crates adds drama without using floor space. Hang three crates vertically from strong hooks using chains or rope, making sure they’re balanced. Fill them with lightweight containers and trailing plants to keep the overall load low. The stacked layers draw the eye upwards and look especially good against a plain wall or between pergola posts.
- Best For: Porches, pergolas, and balconies with good overhead structure.
- Budget Tip: Use smaller crates or cut down larger ones to reduce weight.
- Styling Idea: Use the same plant repeated across all three crates for a strong look.
- Practical Note: Always test weight and fixings before fully planting up.
Crate Herb-and-Tea Station

Turn a crate into a rustic little tea bar by combining plants and mugs. Place the crate on its side, use the top as a serving surface, and fill the inside with herb pots for brewing—mint, lemon balm, chamomile, lemon verbena. Keep a tray with a teapot and cups handy. It’s a nice way to connect your plants with how you actually use them and makes outdoor tea breaks feel more intentional.
- Best For: Patios near the kitchen door.
- Budget Tip: Grow herbs from seed or small plug plants to fill lots of pots.
- Styling Idea: Add a small chalkboard or tag naming your favourite blends.
- Practical Note: Keep the station in light shade to stop herbs drying out too quickly.
Shade-Loving Crate Planter Under A Tree

Under-tree areas can be awkward; crates let you place plants where roots make digging tricky. Cluster a few crates of different sizes and angles, then plant with shade lovers like ferns, hostas, heucheras, and ivy. The crates lift foliage closer to eye level so you can appreciate textures and colours instead of just seeing bare soil.
- Best For: Under mature trees or big shrubs.
- Budget Tip: Divide existing shade plants to fill the crates instead of buying lots.
- Styling Idea: Keep pots mostly green and white for a cool, woodland feel.
- Practical Note: Water regularly—tree roots will compete hard for moisture.
Fairy Garden Crate Display
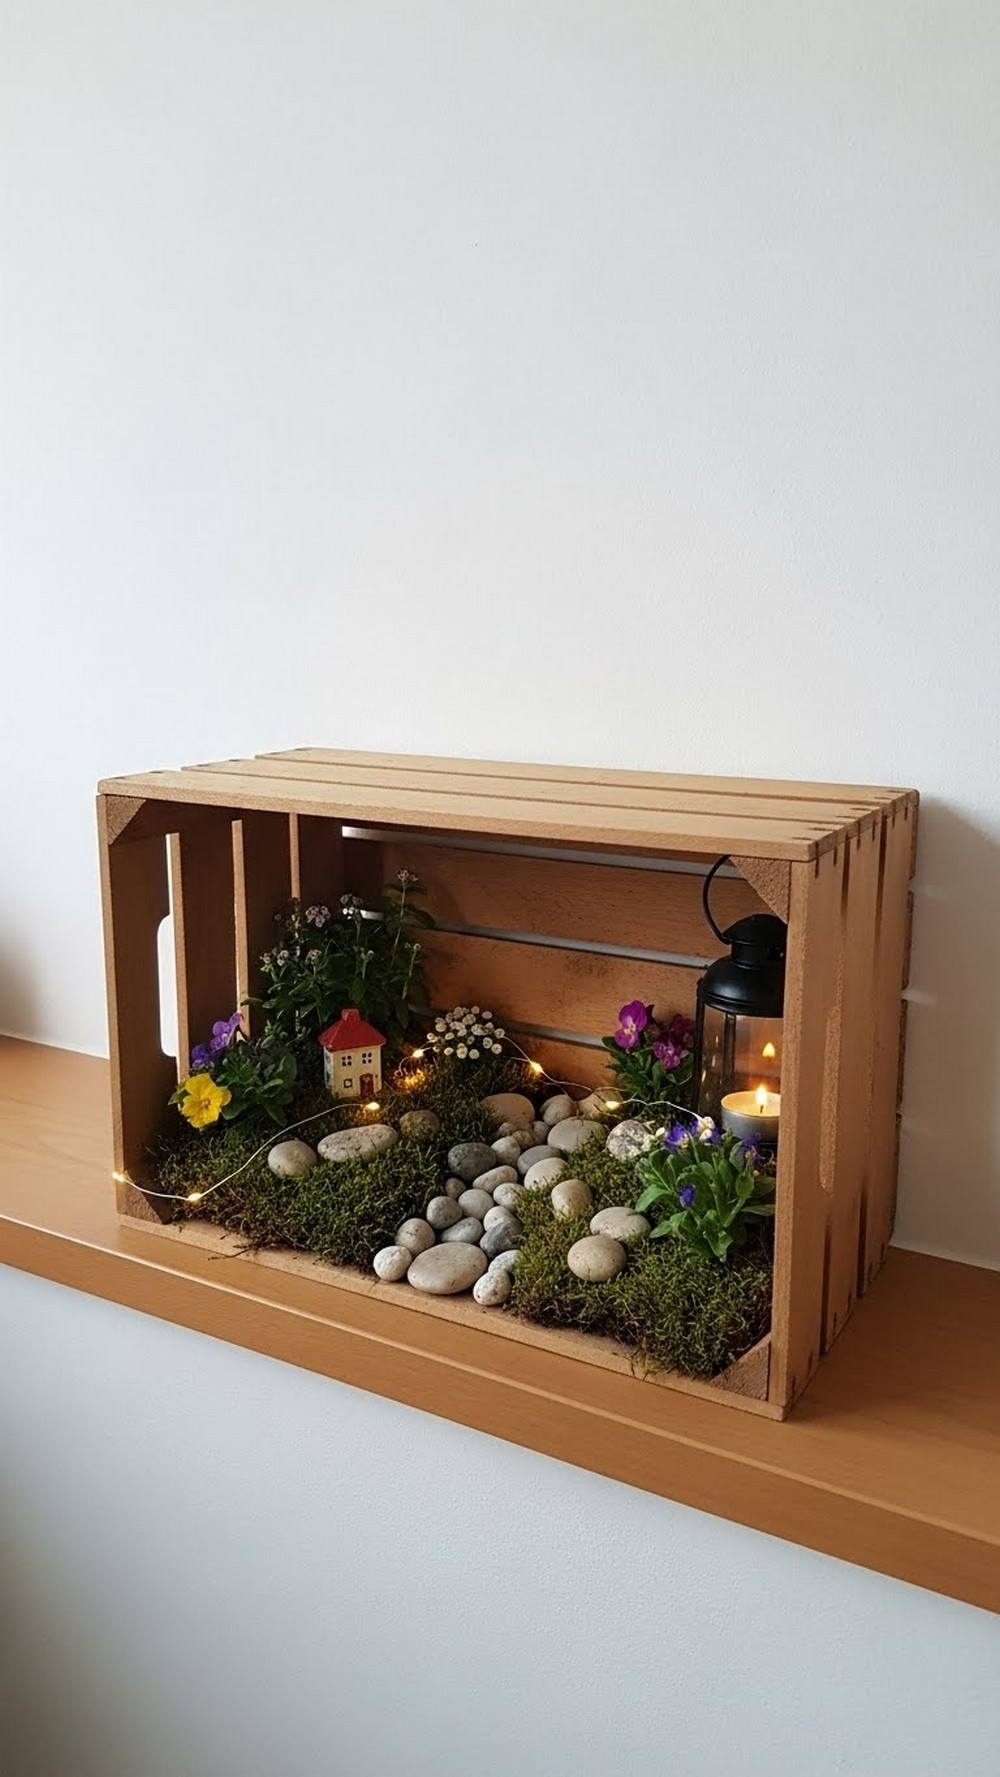
Using a crate as a frame for a miniature garden is brilliant if you like detail. Fill the base with compost or a shallow tray, add moss, small plants, tiny stones for paths, and a few miniature accessories—little houses, benches, or toadstools. Because the crate is portable, you can move it to a table for closer viewing or bring it under cover in bad weather.
- Best For: Kids’ corners, tabletops, and more playful gardens.
- Budget Tip: Use offcuts of plants and found objects (pebbles, sticks) rather than buying decor.
- Styling Idea: Add a small battery tealight for a gentle, magical glow at dusk.
- Practical Note: Choose slow-growing plants so the scene doesn’t overrun in weeks.
Crate Planters On Garden Steps

Crates staggered up steps echo the rhythm of the rise and fall. Place one crate per step on one side only, so the tread stays clear. Fill with trailing and bushy plants to soften the edges, and maybe dedicate one crate to herbs near the kitchen. The structure of the steps keeps everything orderly, while the crates add warmth and character.
- Best For: Steps between house and garden or different terrace levels.
- Budget Tip: Use one large pot per crate instead of lots of little ones.
- Styling Idea: Match plant colours loosely to any railings or nearby doors.
- Practical Note: Keep crates tucked in snugly so nobody trips on corners.
Rail-Hugging Balcony Crate Planters

Crates on a balcony give you soil depth and a rustic look in one go. Line crates well, drill drainage holes, and fix them securely against the railing using brackets or strong ties. Plant with compact flowers, herbs, and trailing plants that can spill over without becoming too heavy. From indoors, you’ll see a band of greenery; from outside, it reads as a mini wooden window box.
- Best For: Balconies and roof terraces.
- Budget Tip: Focus planting on the most visible crate if your budget is tight.
- Styling Idea: Use one crate purely for foliage to break up lots of flower colour.
- Practical Note: Always check weight limits and secure everything firmly in windy areas.
Crate Planter And Tool Storage Combo

An upright crate by the shed door can hold both plants and hand tools. Use the top section as a planter or spot for pots, and the lower section fitted with hooks or smaller boxes for trowels, gloves, twine, and labels. It looks nicer than a plastic caddy and keeps essentials where you actually use them. Add one bright plant to the top to lift the whole corner.
- Best For: Working gardens and small sheds.
- Budget Tip: Use jars or tins inside the crate for sorting small items.
- Styling Idea: Paint tool handles in a matching colour for a coordinated look.
- Practical Note: Keep sharp tools tucked away so they’re not visible or reachable by small children.
Crate Drinks-And-Flower Bar For Parties
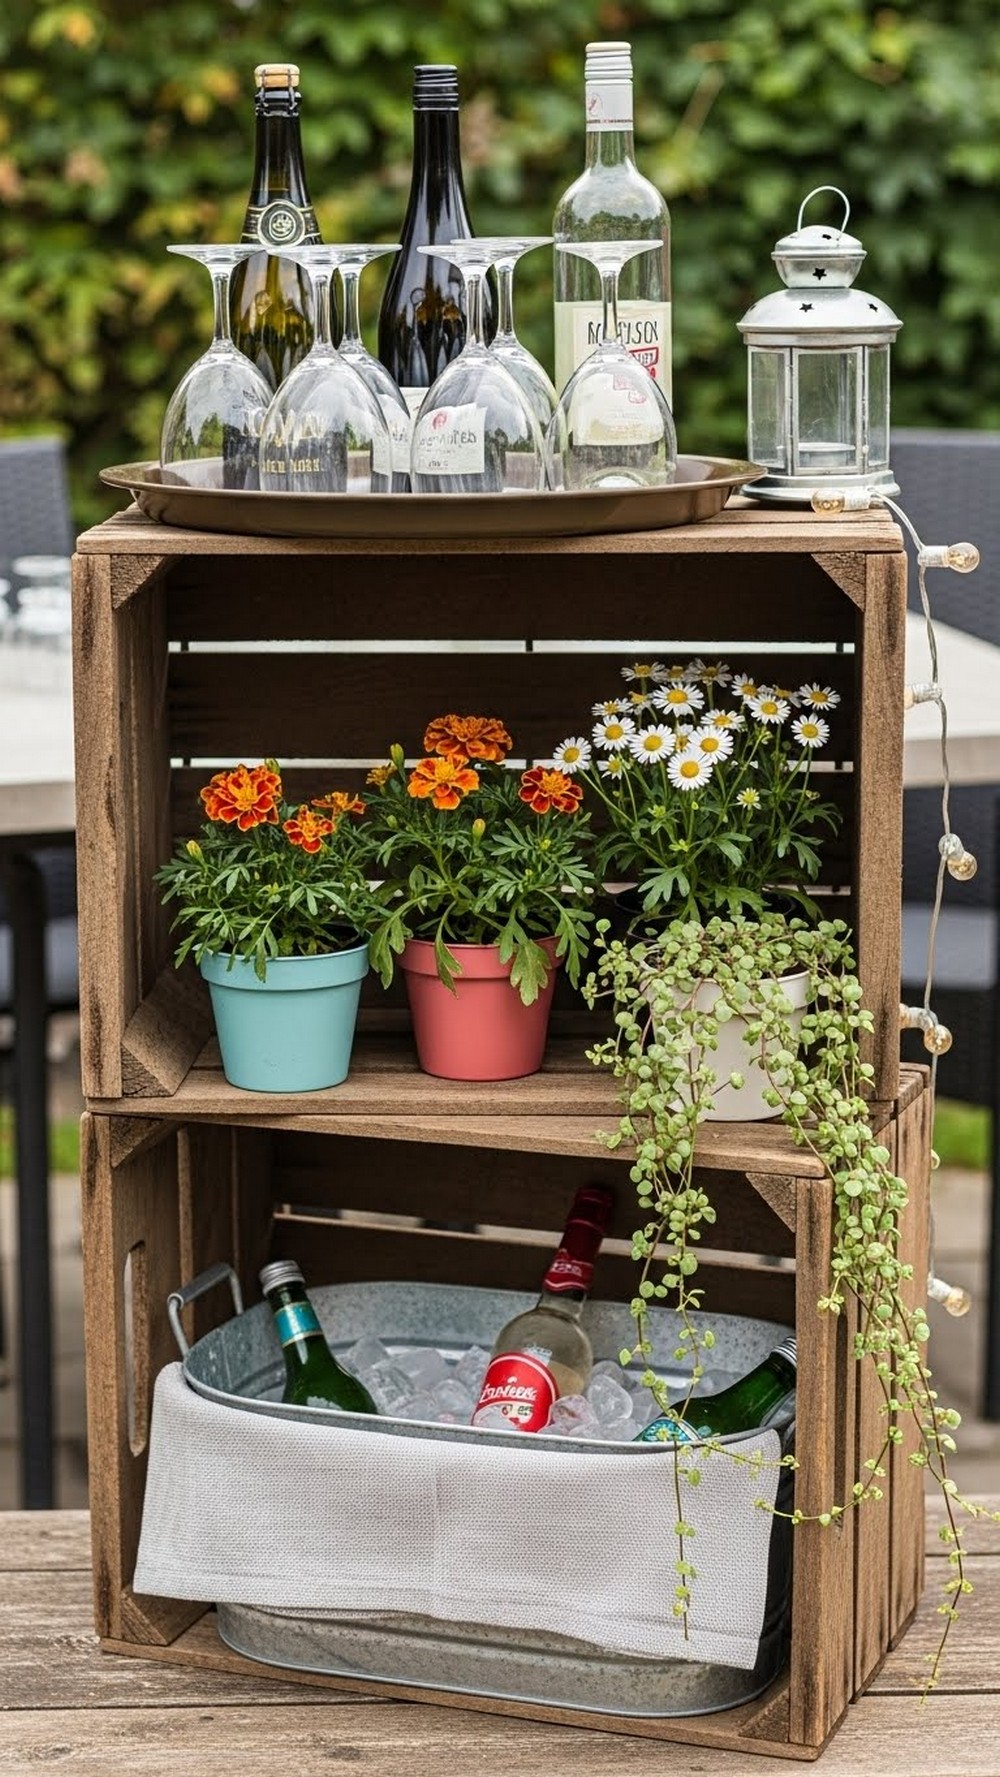
Crates stacked as a drinks bar look charming at gatherings. Use the top for bottles, glasses, and a jug of water; the lower crate for an ice bucket or storage; and tuck flowers and trailing plants in gaps along the side. Once the party’s over, the setup can go back to being a plant display. It saves you hauling an indoor trolley in and out and fits nicely with relaxed, rustic decor.
- Best For: Patio parties and summer evenings.
- Budget Tip: Use one statement flower arrangement and support it with foliage from the garden.
- Styling Idea: Add a simple linen cloth or runner over part of the top crate for softness.
- Practical Note: Keep the bar somewhere level and out of the main traffic route.
House-Number Crate Planter For The Porch

Putting your house number on a crate planter makes it useful and decorative. Paint or stencil large numerals on the front, then plant inside with tough, low-maintenance plants that cope near the door—small evergreens, ivy, and seasonal colour. It acts like a mini signpost and looks warmer than a metal or plastic plaque.
- Best For: Porches and entrances where numbers are hard to spot.
- Budget Tip: Use one good, long-lasting shrub and refresh smaller plants around it as needed.
- Styling Idea: Match the number colour to your door hardware or letterbox.
- Practical Note: Position it in clear view from the street without blocking access.
Seasonal Swap Rustic Crate Station

A fixed crate display that changes contents with the seasons keeps your garden feeling fresh. Use the same crates year-round and simply rotate what’s inside: spring bulbs and primroses, summer geraniums and herbs, autumn gourds and chrysanthemums, winter evergreens and lanterns. It’s like having a permanent stage where each season takes a turn as the star.
- Best For: Highly visible spots like patios by doors or main paths.
- Budget Tip: Reuse some plants—like evergreen shrubs—and update with a few seasonal extras.
- Styling Idea: Add one or two non-plant props per season (tiny pumpkins, lanterns, shells).
- Practical Note: Plan storage space for off-season decor and any delicate items.
Conclusion
Rustic wooden crates are incredibly forgiving: a bit scuffed, a bit mismatched, and they still look right at home in the garden. Whether you stack them into towers, tuck them under trees, hang them from a pergola, or line them up like tiny vegetable plots, they add warmth, texture, and height in an easy, low-commitment way. Start with one simple idea—maybe a herb staircase or a front-door crate tower—and see how quickly you start spotting new corners that could use a crate or two. Over time, you’ll build a garden that feels collected, personal, and quietly charming.
FAQs
1. Do wooden crates need special treatment before planting in them?
It helps. Check for any rough splinters or protruding nails, and sand if needed. Line crates with landscape fabric or plastic with drainage holes to protect the wood and keep soil from washing out. If you want them to last longer outdoors, a clear wood preservative or stain (suitable for planters) on the outside only can slow down rot.
2. Can I use any old crate as a planter?
Most plain wooden crates are fine, but be cautious with heavily painted or treated ones if you’re growing edibles. Avoid crates that smell strongly of chemicals or have unknown residues. When in doubt, use pots inside the crate rather than filling it directly with compost, especially for herbs and vegetables.
3. How do I stop crate displays from looking messy?
Give them a bit of structure. Keep to a simple colour palette for pots and flowers, and repeat the same plants across different crates. Don’t feel you must fill every gap—some negative space helps the display breathe. Group crates in clear shapes (rows, tiers, L-shapes) rather than scattering them randomly.
4. What plants work best in wooden crate planters?
Compact plants that don’t need huge root depth are ideal: herbs, salad leaves, small annuals, trailing plants, and dwarf shrubs. For larger crates, you can grow vegetables like tomatoes, peppers, or bush beans, as long as the soil is deep and you feed regularly. In shade, ferns, hostas, and heucheras do well in crate displays.
5. How can I move crate planters if they get heavy?
Use lighter compost mixes, keep plants in smaller pots inside the crate, or place crates on wheeled plant stands so they can be rolled instead of lifted. For larger, heavier crates, decide on a permanent home before filling them, and use smaller portable crates for the spots you like to change up more often.