
10 Mosaic Stepping Stone Ideas You Can Make In A Weekend
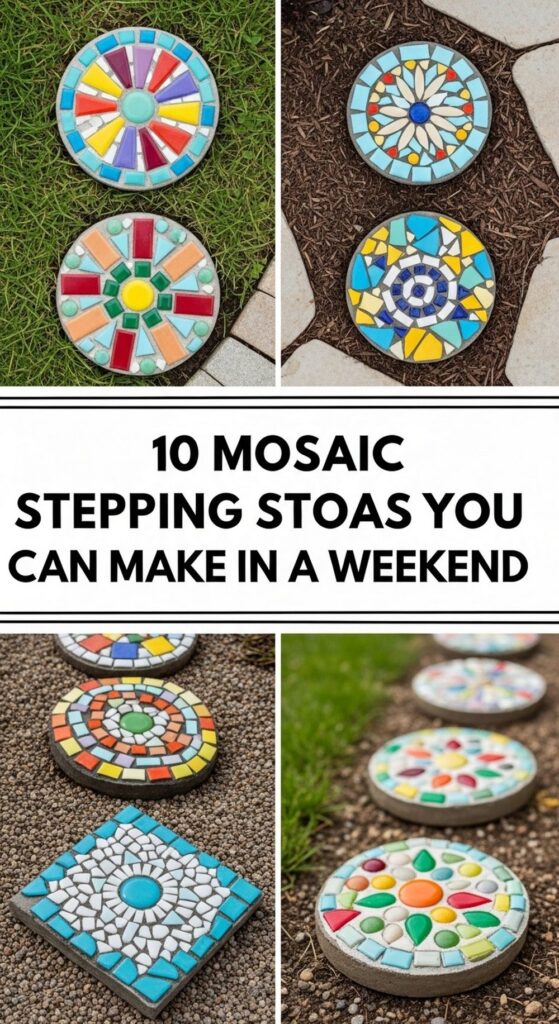
If you’ve ever wished your garden path felt a little more magical, mosaic stepping stones are a fast, fun way to get there. They add color, pattern, and personality, and the best part is you can make them yourself in just a couple of days. No fancy equipment, no big budget, and no expert skills required.
Whether you’re a home gardener, a renter who wants removable decor, or someone with a tiny backyard that needs a focal point, these ideas will help. You’ll find simple weekend projects using broken dishes, pebbles, glass gems, and recycled bits you probably already have. By Sunday evening, you could have a beautiful, custom path that feels completely your own.
Quick List
- Broken China Cottage Mosaic Stepping Stone
- River Pebble Spiral Mosaic Stepping Stone
- Leaf Imprint And Glass Gem Fusion Stone
- Family Handprint Memory Mosaic Stone
- Sunburst Pattern Patio Mosaic Stepping Stone
- Mandala-Inspired Round Mosaic Stepping Stone
- Numbered Garden Path Mosaic Stones
- Floral Motif Mosaic Stepping Stone Set
- Glow-In-The-Dark Garden Mosaic Stepping Stone
- Recycled Bottle Cap And Tile Mosaic Stone
1. Broken China Cottage Mosaic Stepping Stone
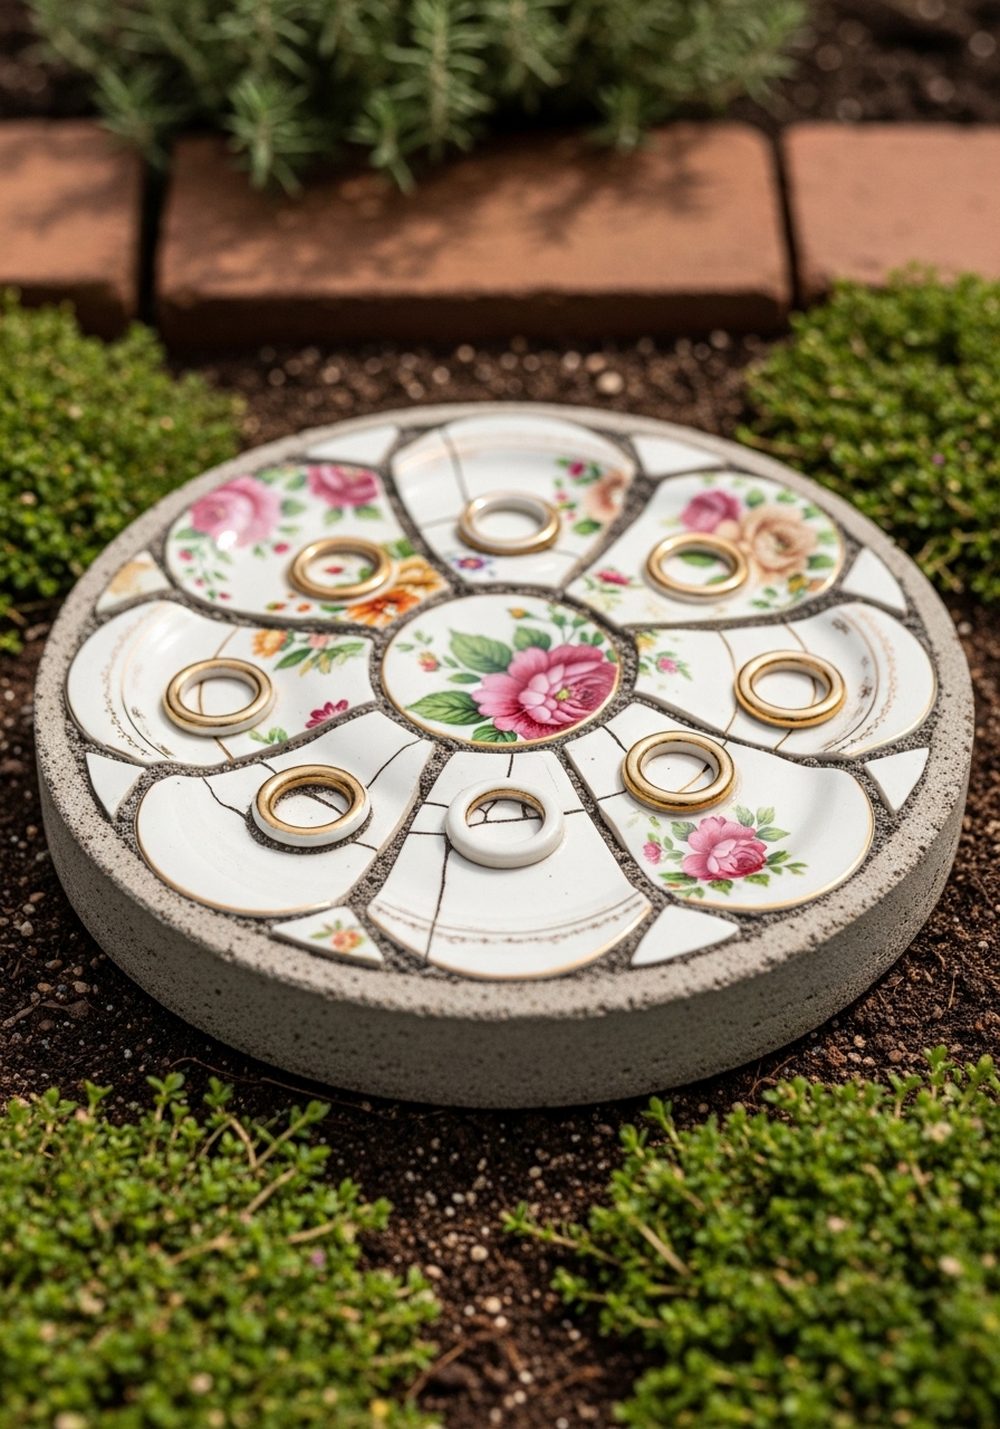
Turn chipped teacups and old plates into a charming cottage-style stepping stone. Snip or gently break the china into manageable pieces, then press them into a shallow concrete mold, arranging florals and patterns into a loose ring or simple central motif. Once grouted, the mix of glossy surfaces, faded prints, and tiny chips looks beautifully weathered. Nestle the finished stone into soil or mulch so the delicate flowers in the pattern sit against fresh green leaves.
- Best For: Cottage-style gardens, herb beds, and romantic borders.
- Budget Tip: Use thrift-store plates or your own broken pieces instead of buying tiles.
- Styling Idea: Stick to a color family, like blue and white or pastel florals, for a calm look.
- Practical Note: Avoid very sharp edges; sand or bury them slightly in the concrete.
2. River Pebble Spiral Mosaic Stepping Stone
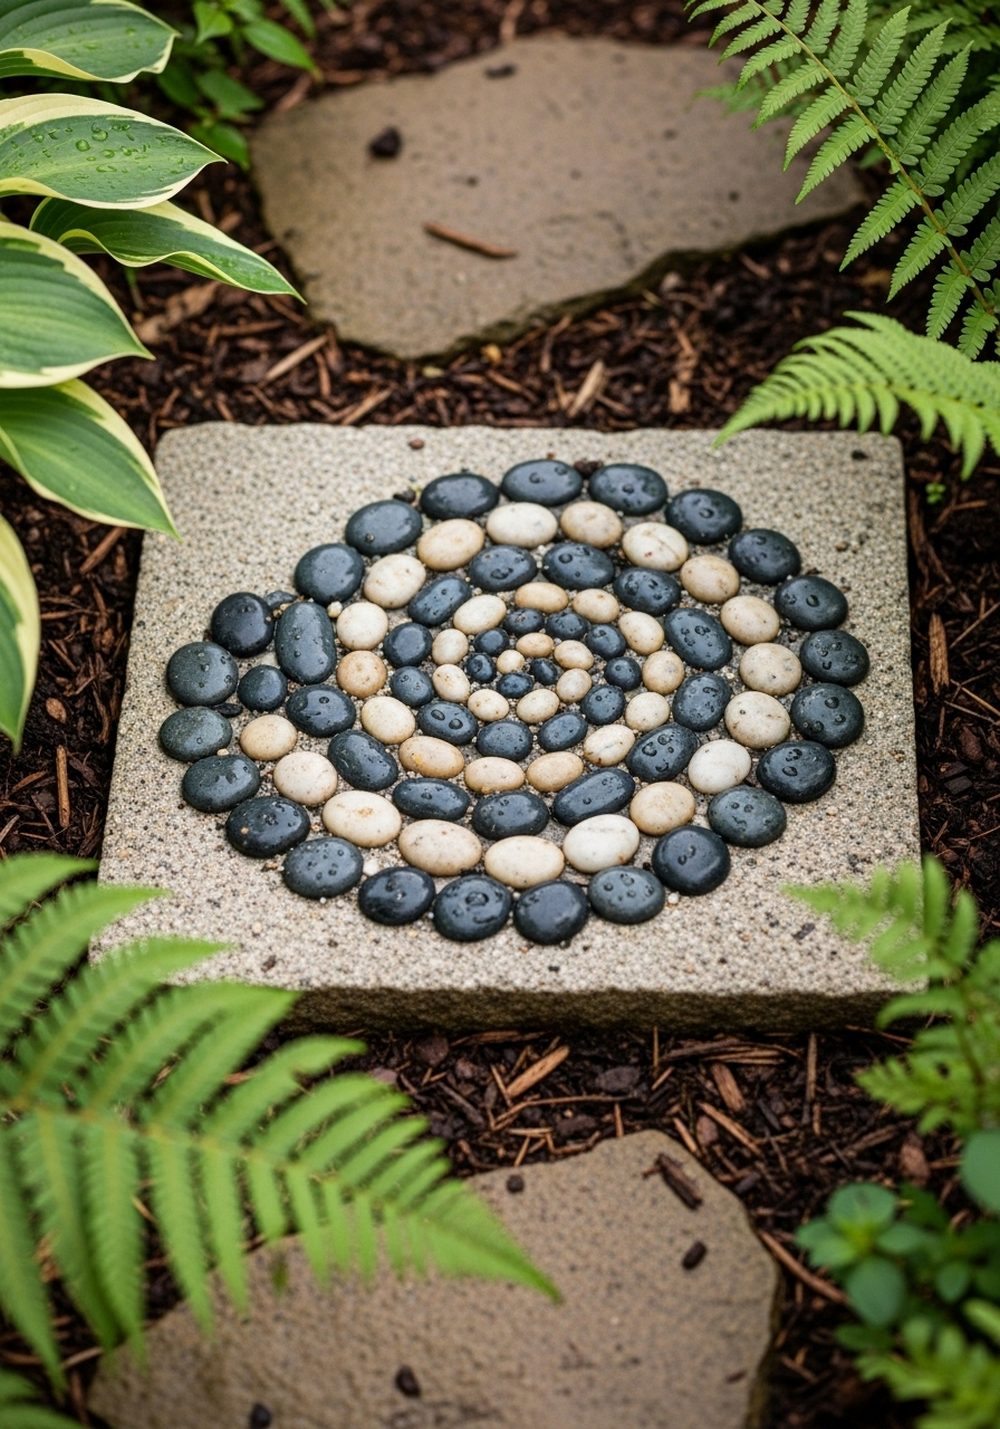
This design uses smooth river pebbles to create a relaxing spiral pattern. Fill a mold with concrete, then press pebbles in from the center outwards, alternating light and dark stones for a subtle contrast. The result looks like something you’d find in a zen garden: simple, tactile, and naturally beautiful. It works especially well along shaded paths mixed with ferns, hostas, and bark mulch, where the pebbles’ soft shine stands out.
- Best For: Shady paths, woodland corners, and calm, minimalist gardens.
- Budget Tip: Collect pebbles from craft stores or garden centers in bulk bags.
- Styling Idea: Use three tones (light, medium, dark) to give the spiral depth.
- Practical Note: Press pebbles deeply so they sit firmly and don’t rock underfoot.
3. Leaf Imprint And Glass Gem Fusion Stone

Combine the softness of nature with a hint of sparkle by pairing a leaf imprint with glass gems. Press a fern or large leaf into wet concrete to capture the delicate veins, then lift it away and border the imprint with glass gems in shades of green or blue. Once cured, the stone looks like a fossil framed in jewels. Set it where dappled light can catch the glass and the textures of the leaf remain visible.
- Best For: Shady seating areas, woodland beds, and under shrubs.
- Budget Tip: Use inexpensive craft-store glass gems and leaves from your own garden.
- Styling Idea: Keep the gem colors close to leaf tones for a gentle, natural look.
- Care & Maintenance: Brush off soil occasionally so the leaf detail stays crisp.
4. Family Handprint Memory Mosaic Stone
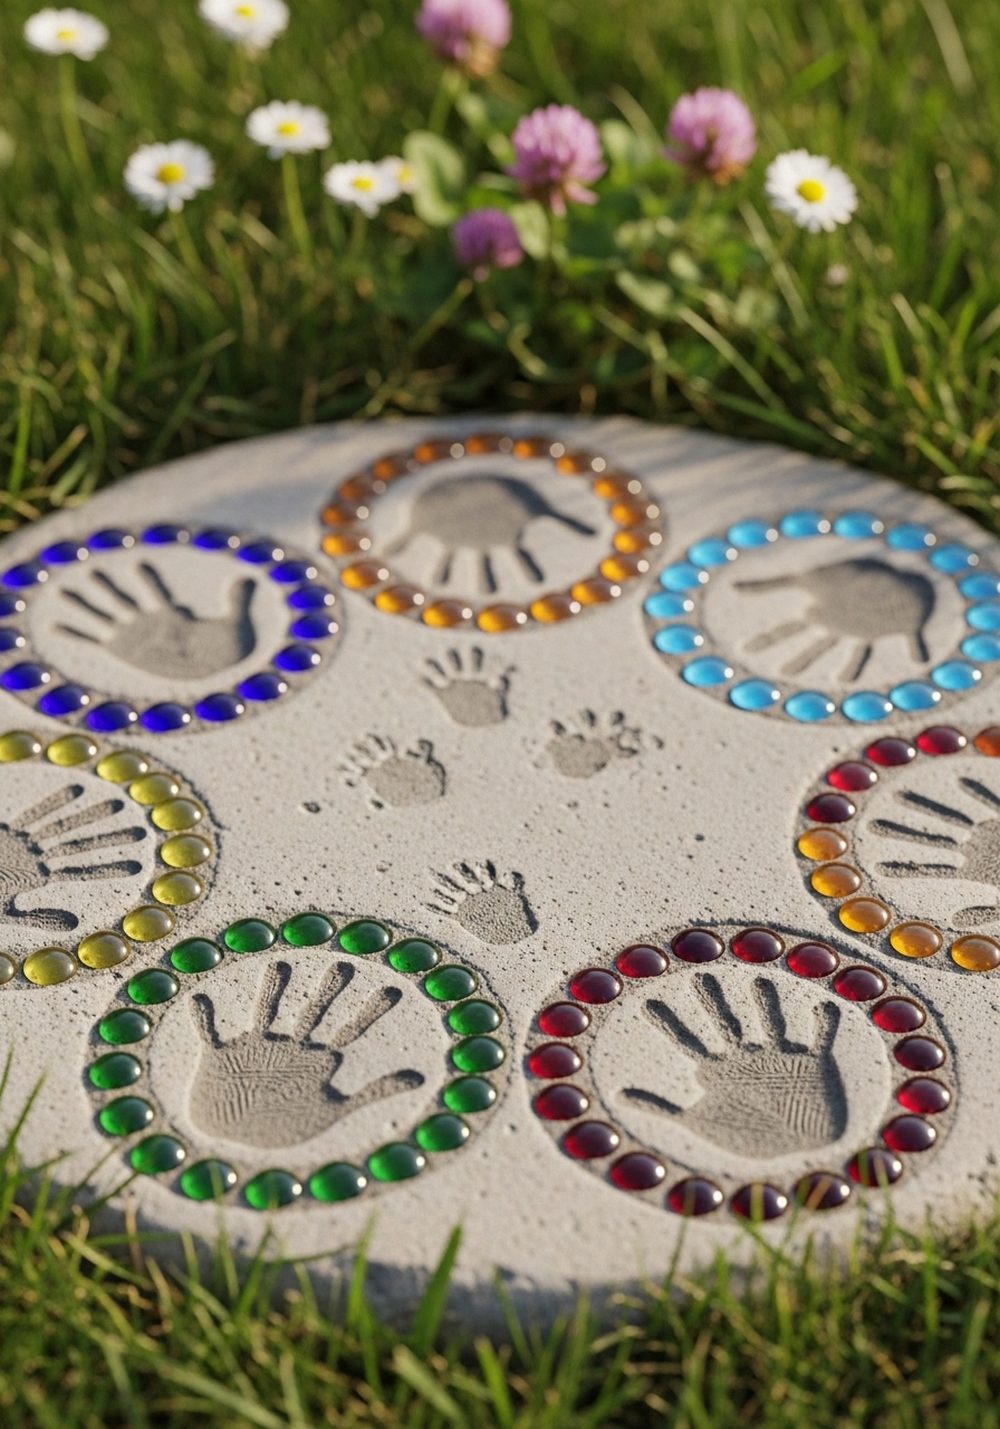
Turn a simple stone into a sweet family keepsake you’ll walk past every day. While the concrete is still soft, press each family member’s hand into the surface, spacing them around the edge. Outline each print with a ring of tiles or glass gems in that person’s “signature” color. Once set, the impressions and mosaics will last for years. Place it near the patio or along a path so it becomes part of everyday life.
- Best For: Family gardens, play areas, and near back doors.
- Budget Tip: Use leftover tiles, beads, or gems from other craft projects.
- Styling Idea: Choose one color per person to create a rainbow ring around the stone.
- Practical Note: Write the date lightly with a stick in one corner before it sets.
5. Sunburst Pattern Patio Mosaic Stepping Stone
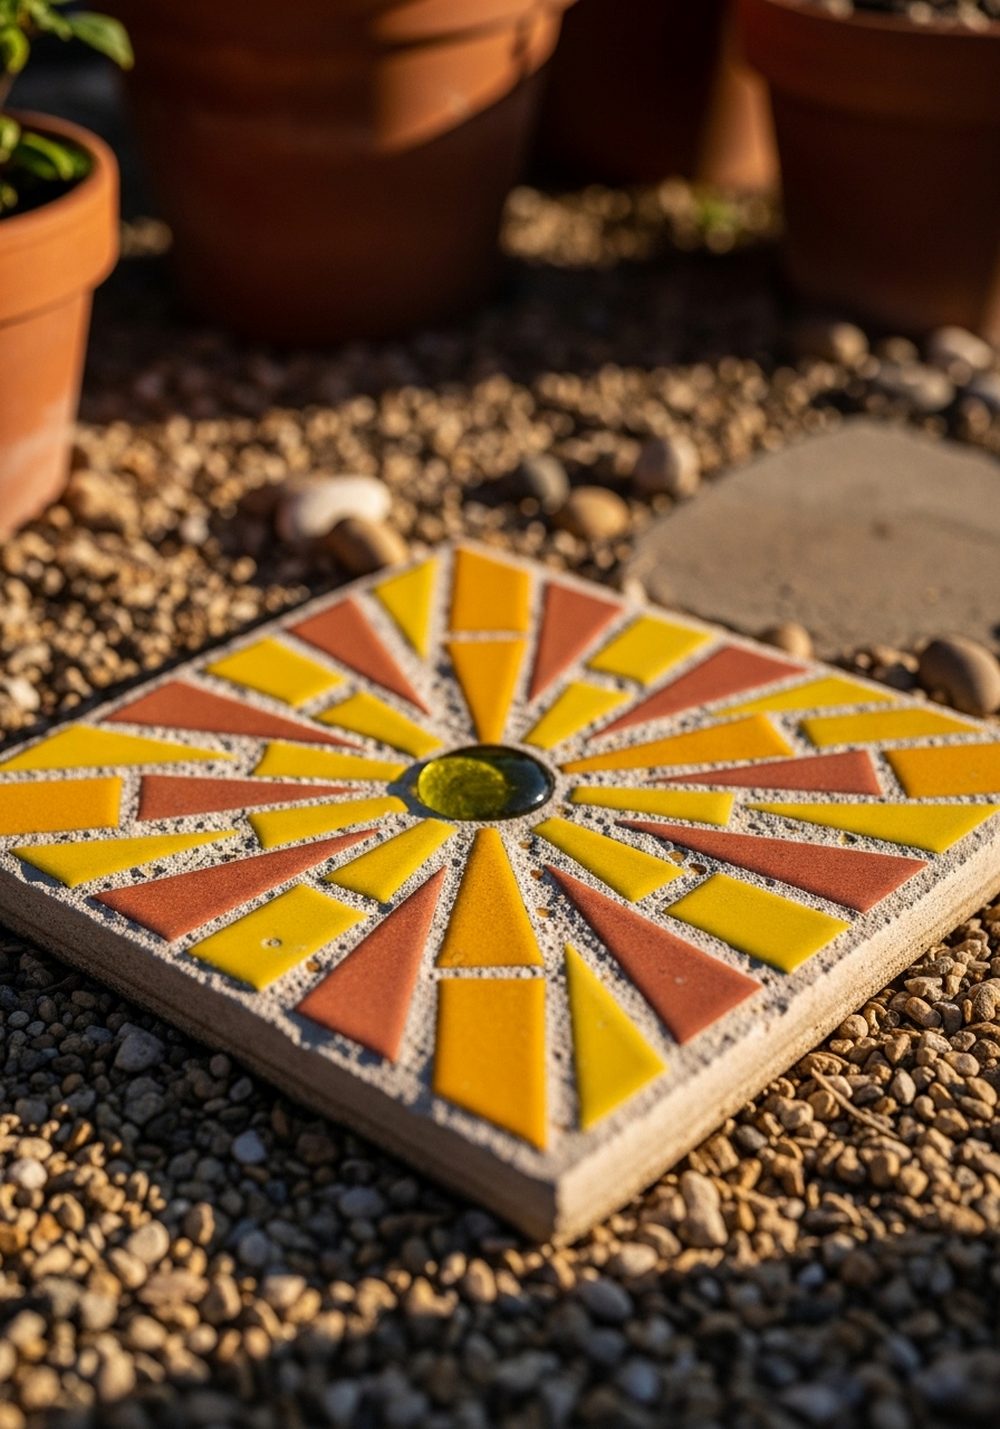
A sunburst mosaic instantly adds energy and warmth to a path or patio. Use triangular or wedge-shaped tiles in yellows, oranges, and terracotta radiating from a gem or contrasting tile circle in the center. Arrange them in rays before pouring or as you press them into freshly poured concrete. The bold design looks especially striking against gravel or plain pavers, and glows beautifully in late-afternoon light.
- Best For: Sunny patios, seating areas, and along south-facing paths.
- Budget Tip: Buy a small box of discounted tiles and mix with a few glass gems.
- Styling Idea: Pair with terracotta pots and warm-toned cushions for a coordinated look.
- Practical Note: Keep the stone surface fairly smooth so chairs and feet move comfortably.
6. Mandala-Inspired Round Mosaic Stepping Stone
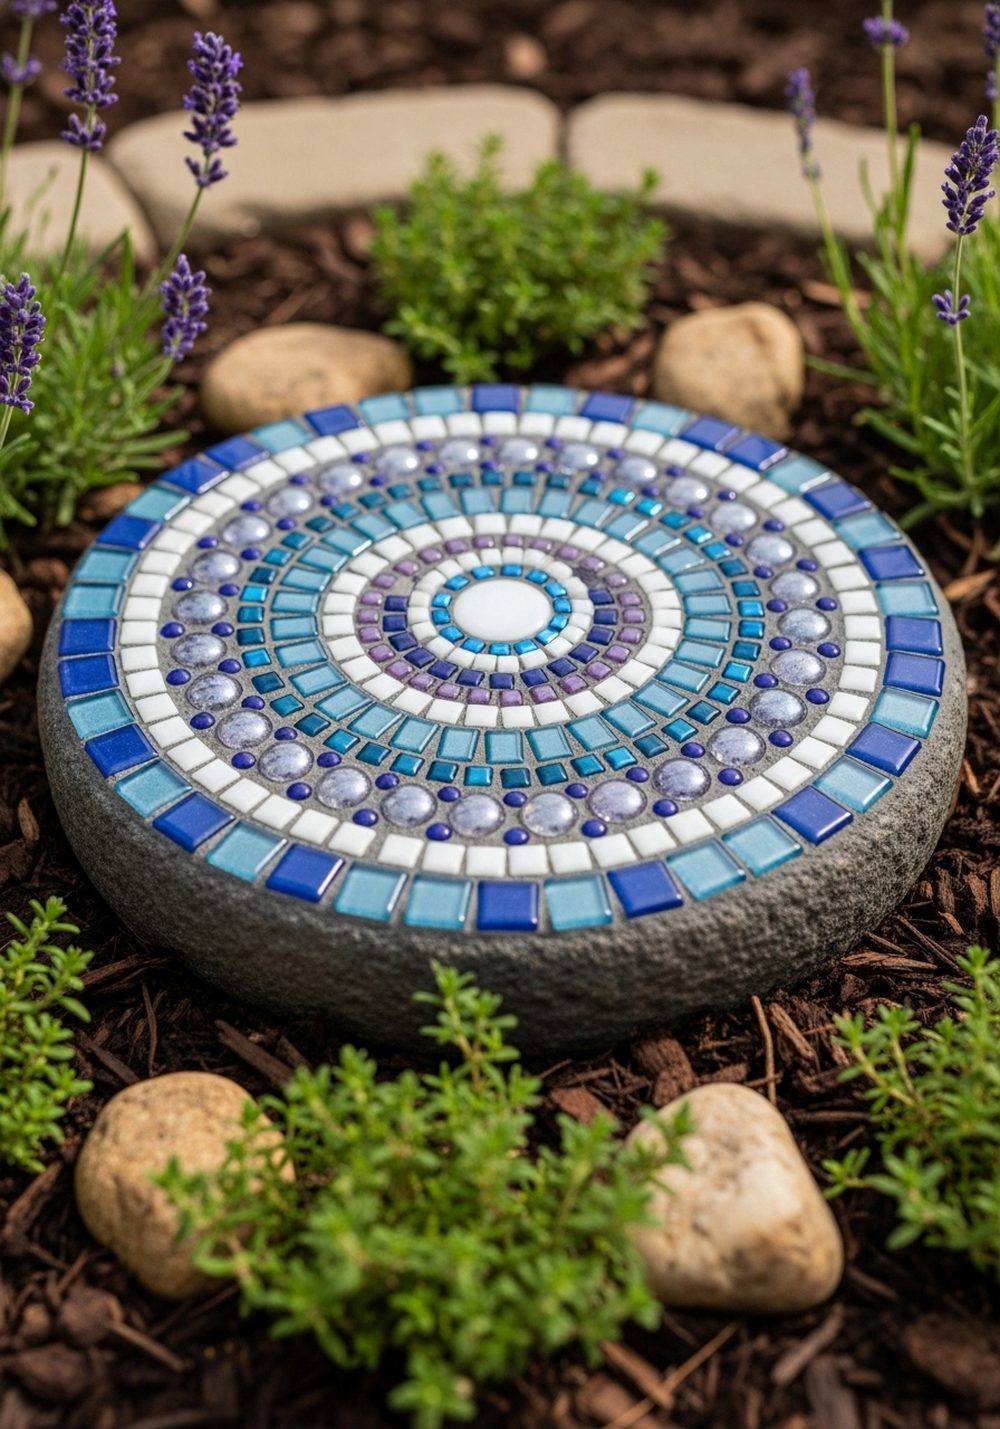
If you enjoy patterns, a mandala-style stone is a satisfying weekend project. Start from the center of a round mold and build outwards using small square tiles and beads in rings. Repeat colors and shapes to create a calm, balanced design that draws the eye inward. The finished stone becomes a natural focal point when placed at the end of a path or in the middle of a herb spiral, especially when surrounded by low plants.
- Best For: Meditation corners, focal points, and circular beds.
- Budget Tip: Use tiny tile sheets or cut larger tiles into small pieces to save money.
- Styling Idea: Stick to two or three colors for a serene, cohesive pattern.
- Care & Maintenance: Hose off occasionally to keep the details crisp and bright.
7. Numbered Garden Path Mosaic Stones
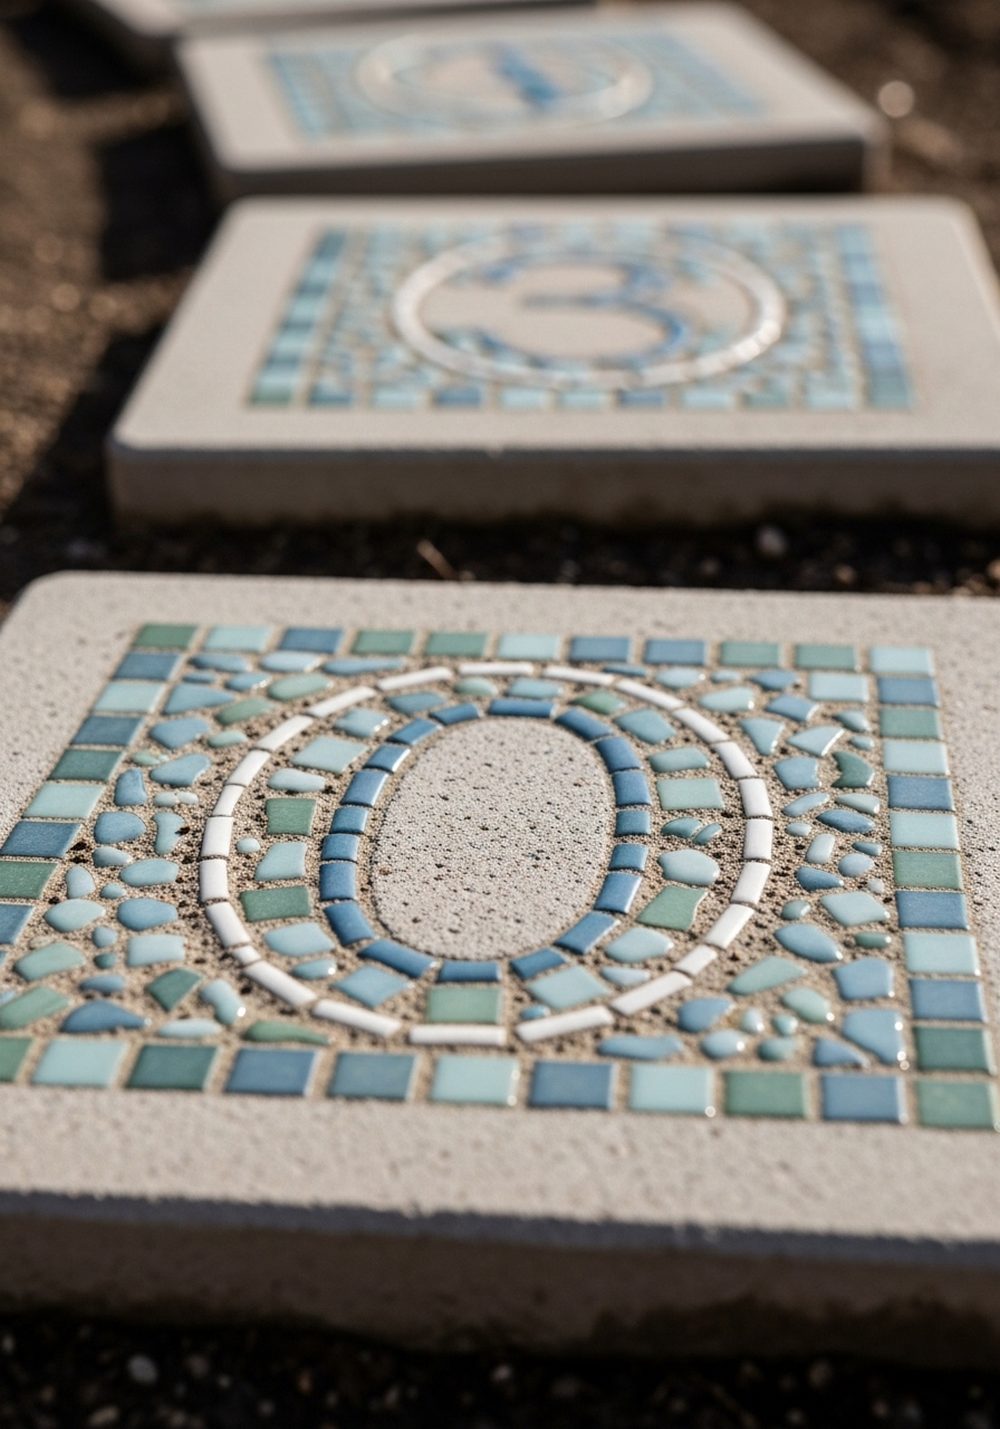
Numbered stones are practical and decorative at the same time. Use contrasting tile and glass pieces to create large numbers on each stone—either counting along a path or spelling out a house number by the gate. The bold shapes make it easy for guests to spot the way, while the mosaic texture adds interest. This idea works nicely in modern gardens where you want a touch of fun without too much fuss.
- Best For: Front paths, children’s play trails, and rental gardens.
- Budget Tip: Keep numbers simple and use leftover tile offcuts for the shapes.
- Styling Idea: Choose a neutral background and bright numbers so they stand out.
- Practical Note: Make the numbers large and clear so they’re readable from a distance.
8. Floral Motif Mosaic Stepping Stone Set
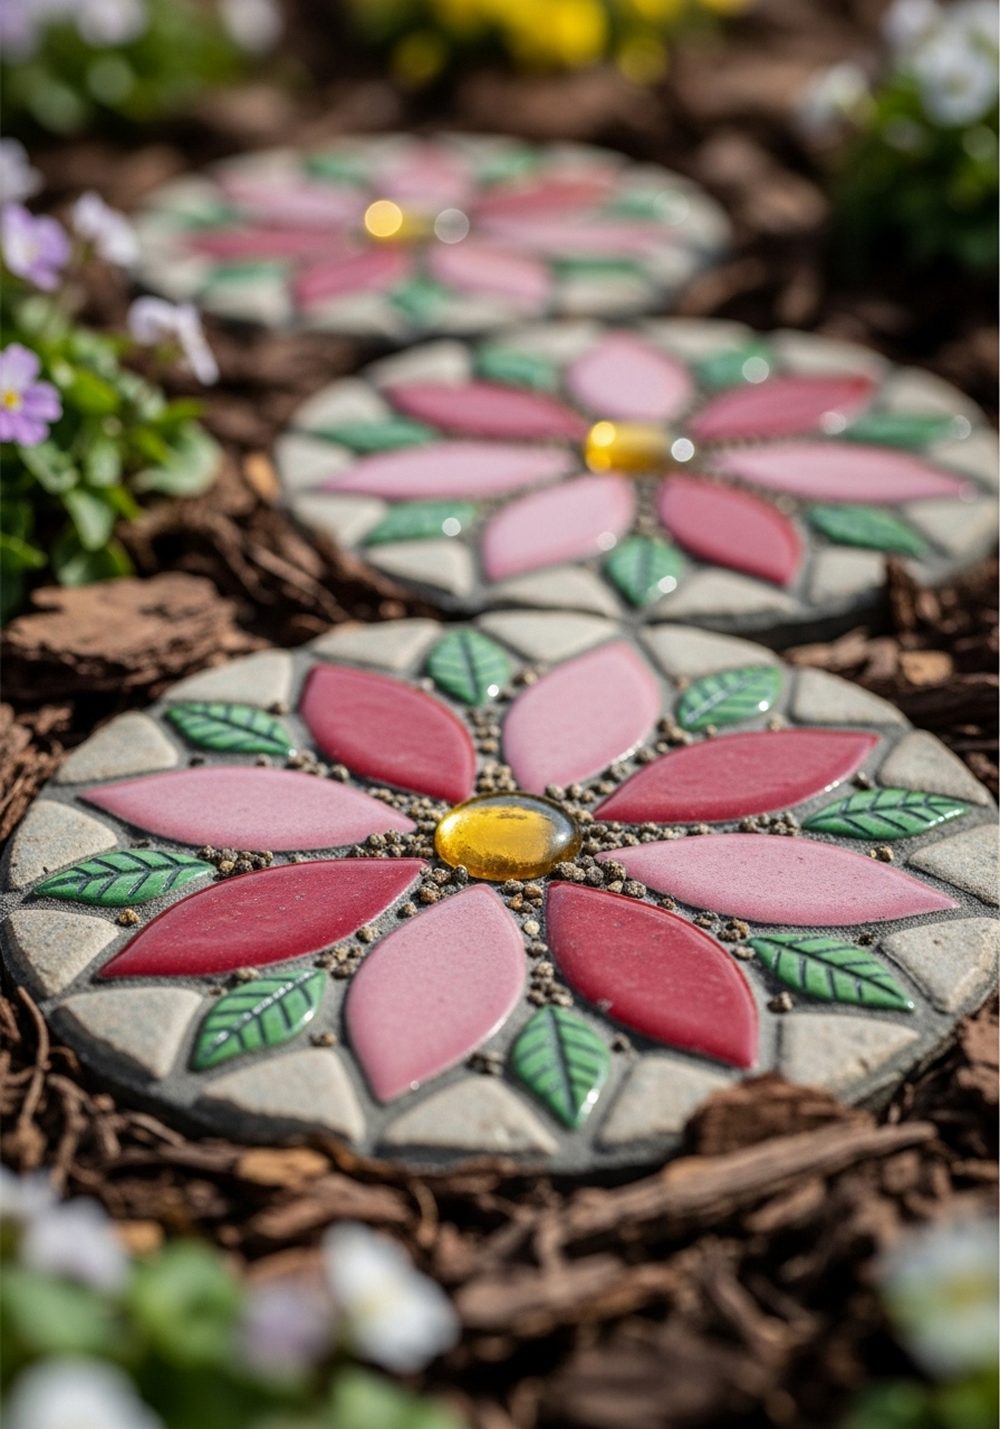
Instead of one stone, make a small set, each with a simple flower motif. Use petal-shaped pieces or cut tiles into petals and arrange them around a bright center gem. Vary the flower colors on each stone—one pink, one blue, one yellow—then scatter them along a path or around a seating nook. They’ll look like a permanent patch of blossoms that stays cheerful even when plants are out of bloom.
- Best For: Borders, children’s gardens, and near patios or benches.
- Budget Tip: Cut basic white tiles and paint them with outdoor craft paints if needed.
- Styling Idea: Repeat one leaf shape or background color across all stones to tie them together.
- Care & Maintenance: Place stones slightly above soil level to avoid water pooling on top.
9. Glow-In-The-Dark Garden Mosaic Stepping Stone
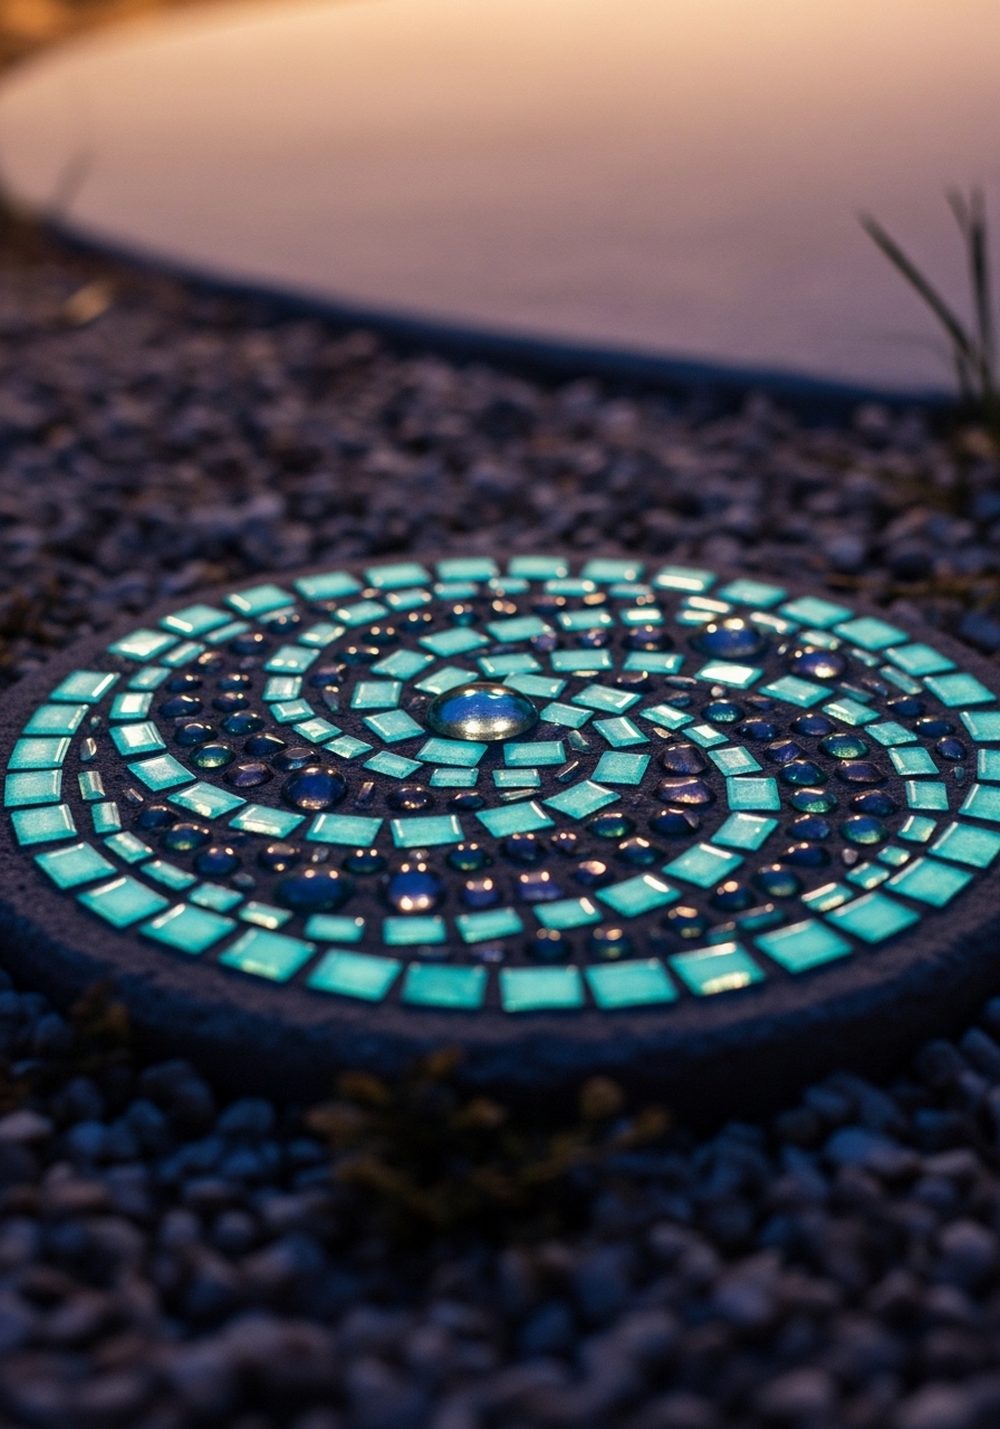
For a bit of evening magic, mix glow-in-the-dark stones or mosaic pieces into your design. Swirl them through the stone’s surface in between regular tiles or glass gems. During the day, the stone looks like any other cheerful mosaic. At night, the glowing sections trace a gentle path or pattern that guides your way. This is especially lovely near a seating area or along the route to a shed or compost corner.
- Best For: Evening seating areas, paths near doors, and kids’ gardens.
- Budget Tip: Only use a few glow pieces mixed with standard gems to keep costs down.
- Styling Idea: Combine cool blues and greens for a soft, moonlit feel.
- Practical Note: Place where the stone gets daylight so the glow pieces can recharge.
10. Recycled Bottle Cap And Tile Mosaic Stone
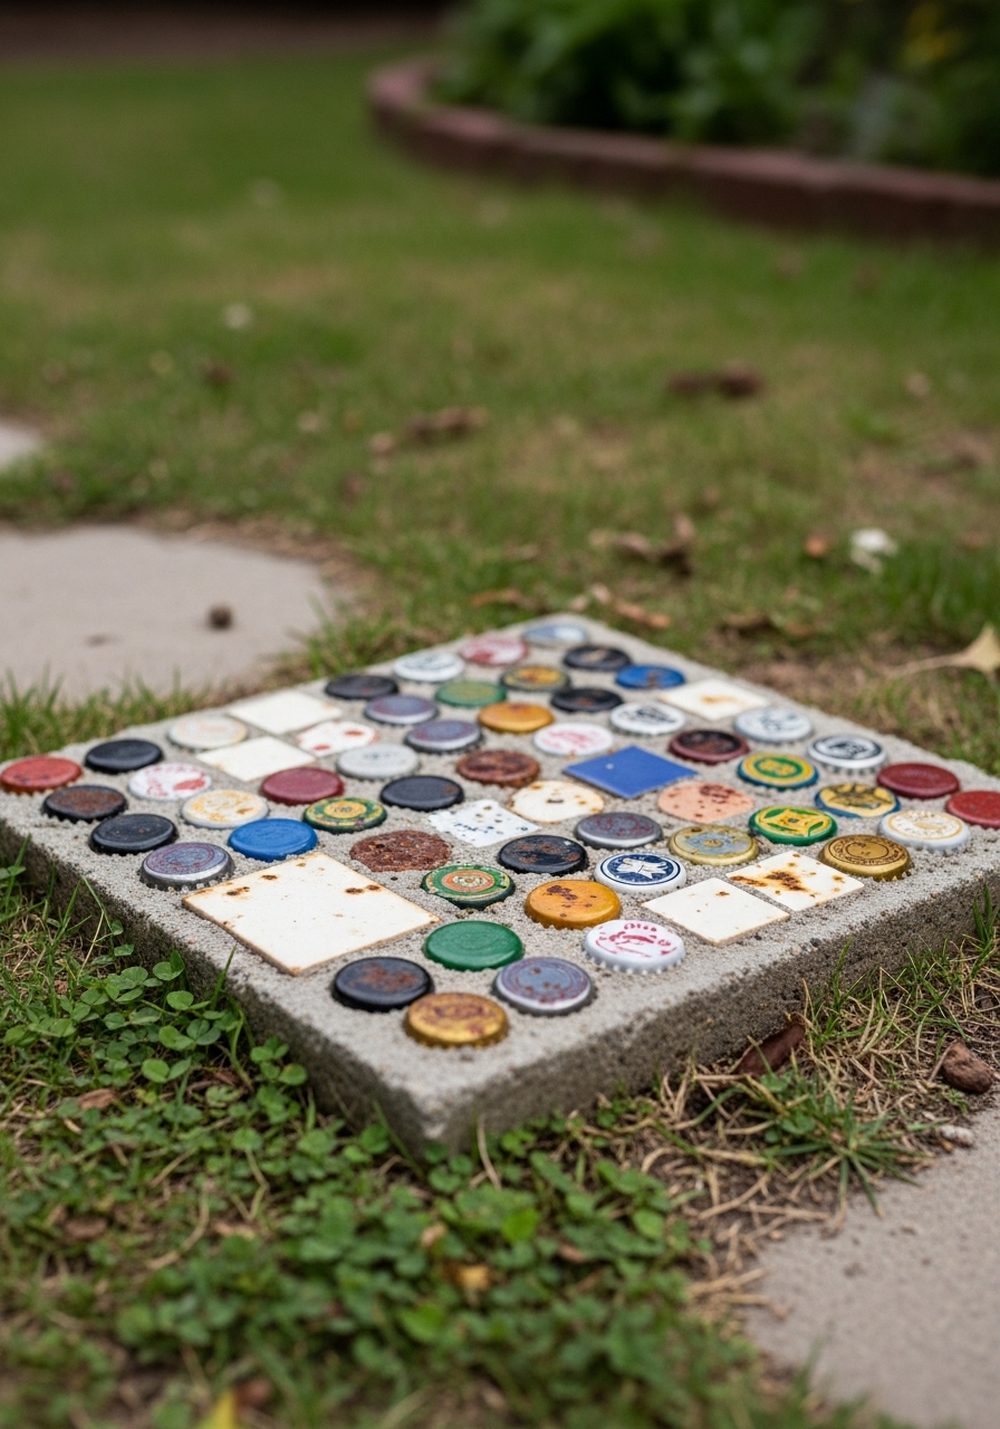
Give your garden a playful, eco-friendly touch with a stepping stone made from bottle caps and tile scraps. Press caps into the surface in loose rows or simple shapes, filling gaps with bits of tile or broken crockery. The mixed materials create a lively, textured surface that looks great in informal gardens. Kids especially enjoy spotting different colors and designs underfoot as they walk by.
- Best For: Casual backyards, veggie plots, and family gardens.
- Budget Tip: Collect caps from home and ask friends, then use leftover tile fragments.
- Styling Idea: Group similar cap colors together for stripes or polka-dot effects.
- Practical Note: Seal the stone with an outdoor sealer to help protect metal caps from rust.
Conclusion
Mosaic stepping stones are one of those rare projects that transform your garden quickly without needing a huge budget or professional help. With some simple molds, basic concrete, and a collection of small treasures, you can create a path that tells your story in color and texture. Start with one or two stones this weekend, experiment with patterns, and let your path gradually grow into a gallery of handmade pieces you’ll love walking across every day.
FAQs
1. Can I make mosaic stepping stones on a small budget?
Yes. Use broken plates, old tiles, bottle caps, and inexpensive glass gems from discount or craft stores. Concrete mix is usually quite affordable, and you can recycle plastic trays or old baking tins as molds. Starting with just one or two stones keeps the cost very manageable.
2. Are these stepping stones suitable for renters?
They can be. Instead of cementing them in place, simply set the stones on top of compacted soil or gravel. When you move, you can lift them out, rinse them off, and take them to your next home. Just avoid sinking them too deeply if you want them to be easy to remove.
3. How do I make sure my mosaic stones last in bad weather?
Use outdoor-rated materials wherever possible: exterior tiles, weather-resistant grout or mortar, and concrete formulated for outdoor use. After the stone cures fully, apply a clear outdoor sealer according to the instructions. Try to place stones where water won’t pool and where they can dry out between rainstorms.
4. Are mosaic stepping stones safe to walk on?
They are safe if you keep the surface reasonably flat and securely embed all pieces. Avoid using very sharp glass shards or objects that stick up too high. Press tiles and gems firmly into the concrete so they don’t loosen, and check the stones occasionally. If something wobbles, re-set or remove it.
5. Can I make mosaic stepping stones in a very small garden or balcony?
Definitely. Even a single decorative stone can act as a mini focal point in a container garden or on a balcony floor. Use smaller molds, like round plant saucers, and display the finished stone on top of gravel in a tray or large planter. You still get all the color and pattern without needing a long path.


