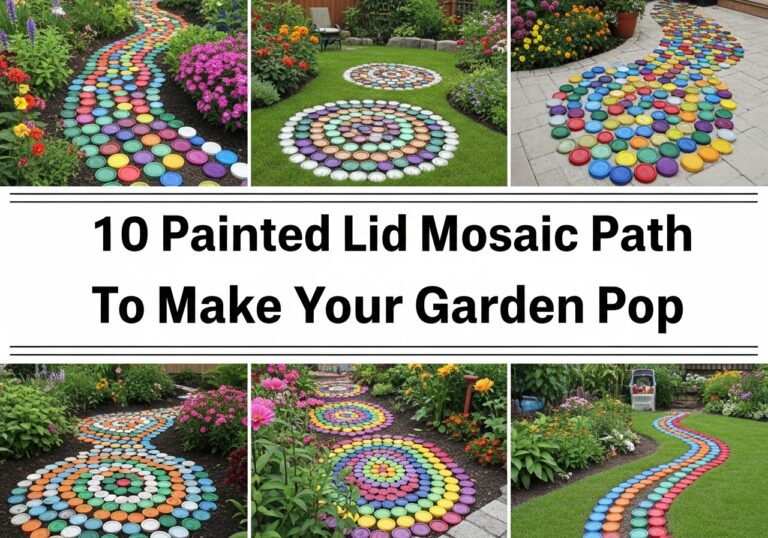
10 Mosaic Stepping Stones That Make Any Garden Path Pop

A plain garden path does its job, but a mosaic stepping-stone path turns every walk outside into a little moment of joy. Whether you have a long winding walkway, a short route to the shed, or just a few steps across a tiny yard, mosaic stones can add color, pattern, and personality without needing a full redesign.
This post is for home gardeners, renters, and small-space owners who want simple but striking upgrades. You’ll find easy ideas using broken dishes, river rocks, glass gems, shells, and even kids’ handprints. Most projects are budget-friendly, can be made gradually, and work with paths you already have. Pick one style that fits your garden’s mood and you’ll instantly make your outdoor space feel more welcoming and unique.
Quick List
- Solar Glow Glass Mosaic Stepping Stones
- Broken China Cottage Mosaic Stones
- Leaf-Imprint And Pebble Mosaic Stones
- River Rock Mandala Mosaic Steppers
- Color-Block Modern Geometric Mosaic Stones
- Kids’ Handprint Keepsake Mosaic Stones
- Herb-Label Mosaic Stepping Stones
- Sea Glass And Shell Coastal Mosaic Stones
- Whimsical Critter Mosaic Stepping Stones
- Story Path Numbered Mosaic Stepping Stones
1. Solar Glow Glass Mosaic Stepping Stones

Cover your stepping stones with a mix of glass gems, mirror pieces, and translucent tiles, then tuck a small solar puck light or solar stake beside each one. In daylight, the glass sparkles like jewels along the path. At night, the glow bounces off the glossy surfaces, creating a magical lane of light. Choose a simple pattern like rays, circles, or spirals so it’s easy to lay out, and use outdoor-grade grout to keep everything secure and weatherproof.
- Best For: Evening seating areas, paths you walk at dusk, or entertaining spaces.
- Budget Tip: Buy glass gems at discount stores and recycle old mirrors or bottles.
- Styling Idea: Use cool blues and greens for a calm mood or warm oranges and reds for a fiery sunset effect.
- Practical Note: Make sure the glass is flush with the cement so the surface stays comfortable underfoot.
- Care & Maintenance: Wipe dirt and algae off glass pieces with a soft brush a few times a year.
2. Broken China Cottage Mosaic Stones
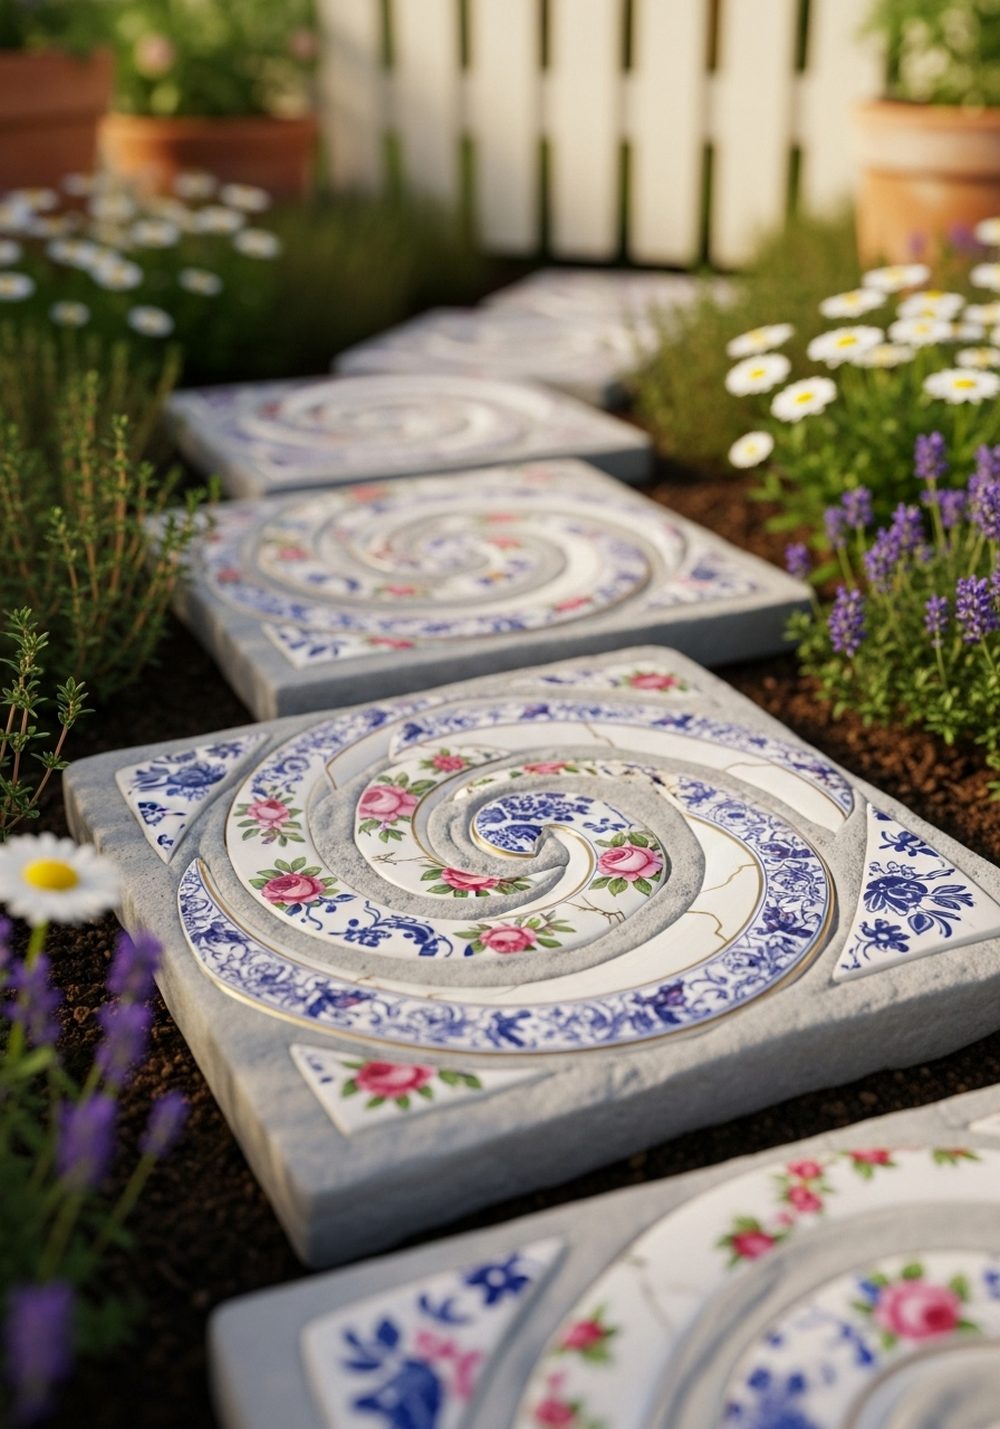
Turn chipped plates and cups into charming cottage-style stepping stones. Break old china carefully (inside a towel with a hammer), then arrange the patterned pieces into swirls, borders, or simple floral clusters on wet cement. The little scraps of roses, lacey borders, and blue willow scenes look like miniature artwork under your feet. Place these stones along a path edged with lavender, daisies, or herbs and the whole walkway instantly feels softer and more storybook-like.
- Best For: Romantic cottage gardens, vintage lovers, and flower-filled borders.
- Budget Tip: Use thrift-store plates and mugs nobody wants because of cracks or chips.
- Styling Idea: Stick to one main color family, like blue and white or pastel florals, for a pulled-together look.
- Practical Note: Keep any sharp edges slightly below the grout line so they don’t snag shoes.
- Extra Idea: Add one small “heart” stone near a bench or favorite plant as a secret feature.
3. Leaf-Imprint And Pebble Mosaic Stones

Combine nature’s own patterns with small pebble mosaics for a subtle but beautiful stepping stone. Press real leaves into wet cement to leave their veins and silhouettes, then ring each leaf shape with tiny river stones or pebbles in soft earth tones. The result is a path that feels organic and quiet, like it has always been there. This style blends especially well in shady areas where ferns, hostas, and moss create a woodland floor around the stones.
- Best For: Naturalistic gardens, shady corners, and woodland-style paths.
- Budget Tip: Collect pebbles and leaves from your own yard or local walks where it’s allowed.
- Styling Idea: Use just one type of leaf per stone for a calm, coordinated look.
- Practical Note: Choose flatter pebbles so the surface stays even and comfortable to step on.
- Care & Maintenance: Brush off fallen leaves regularly so the imprints stay visible.
4. River Rock Mandala Mosaic Steppers

Use smooth river rocks to build striking mandala patterns on your stepping stones. Start with a central pebble and work outward in rings, alternating colors or sizes to create petals, rays, and accents. Because the stones are rounded and tactile, walking the path feels grounding and soothing. Set these mandala stones into gravel or decomposed granite for a clean finish that won’t compete with the detailed designs.
- Best For: Meditation paths, quiet side yards, and minimal planting schemes.
- Budget Tip: Buy a bulk bag of mixed river rock rather than small craft packs.
- Styling Idea: Keep to neutral greys, creams, and browns for a calm, spa-like mood.
- Practical Note: Press rocks firmly into the cement and leave shallow grout gaps so they don’t wobble.
- Extra Idea: Place one larger mandala at a turn in the path as a focal point.
5. Color-Block Modern Geometric Mosaic Stones
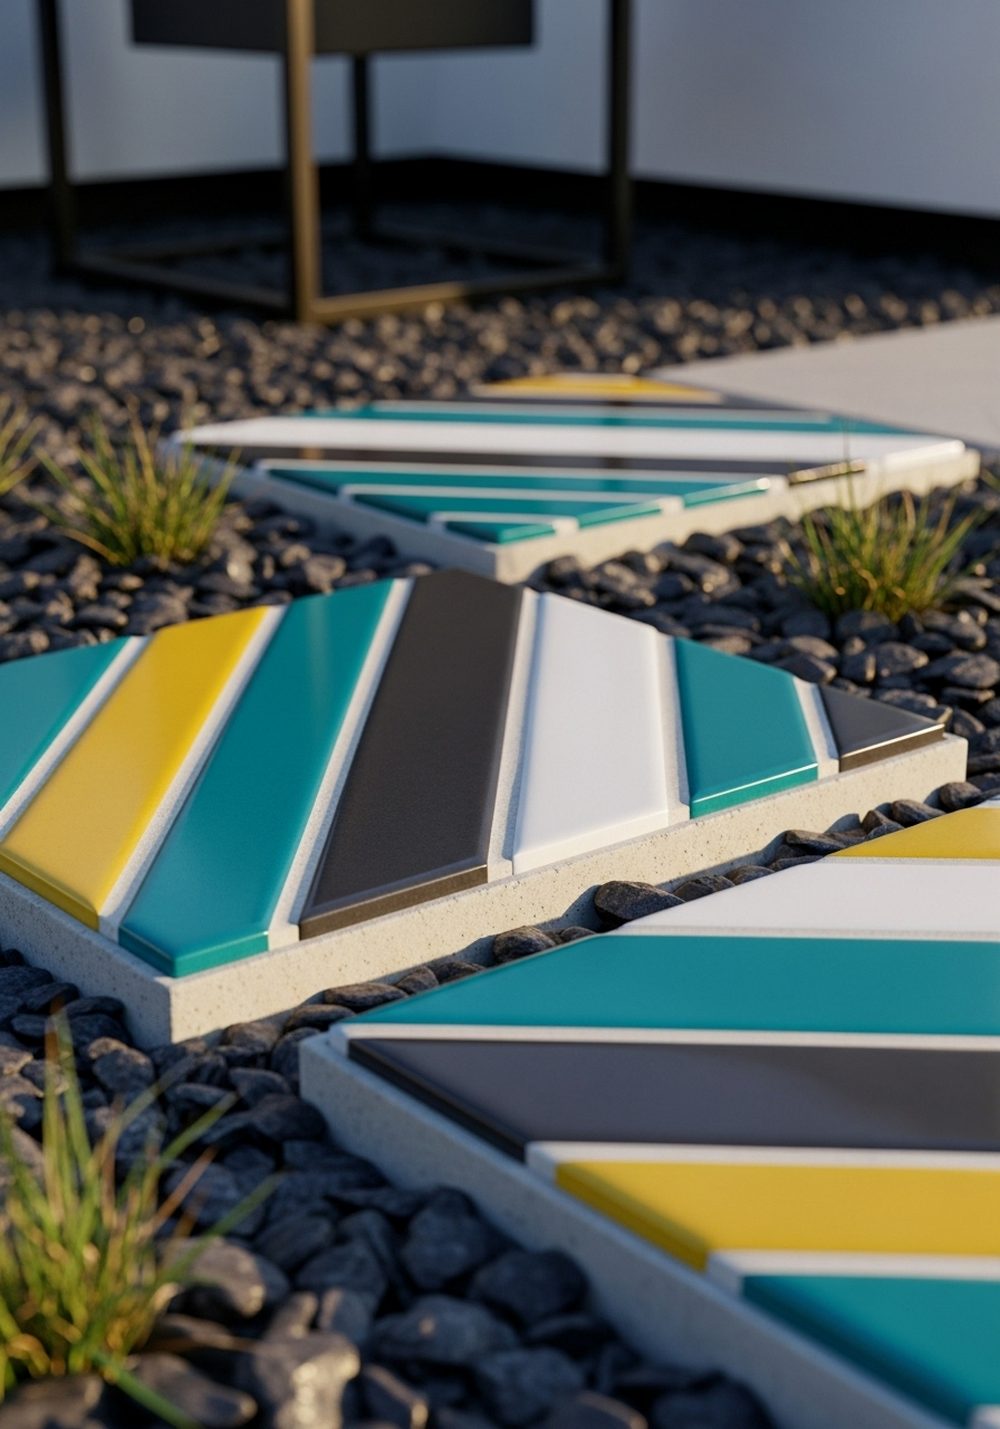
If your garden leans modern, decorate stepping stones with bold geometric blocks instead of intricate pictures. Lay down triangles, stripes, and angled bands using flat ceramic or glass tiles in two to four solid colors. Clean lines and repeating shapes make the path look intentional and stylish. This works beautifully in small urban yards or alongside simple raised beds with straight edges and metal or concrete planters.
- Best For: Contemporary spaces, balconies, and minimalist gardens.
- Budget Tip: Use leftover tiles from a kitchen or bathroom project, cutting them into simple shapes.
- Styling Idea: Choose one accent color (like mustard or teal) and mix it with two neutrals for balance.
- Practical Note: Measure and lightly sketch your design on the stone before setting tiles for crisp lines.
- Care & Maintenance: Rinse with a hose and mild soap if algae or dirt dulls the colors.
6. Kids’ Handprint Keepsake Mosaic Stones

Create a family memory lane by pressing kids’ handprints into wet cement, then framing them with colorful mosaic bits. Each child can choose their own gem colors or tiny decorations, making every stone unique. Place the stones in order along the path or cluster them near a play area or vegetable patch. Over time, you’ll love seeing how small the handprints once were, and guests will instinctively slow down to look more closely.
- Best For: Family gardens, play spaces, and grandparents’ yards.
- Budget Tip: Use simple glass gems, buttons, and broken toy pieces that would otherwise be thrown away.
- Styling Idea: Keep the background cement neutral so the handprints and colors stand out.
- Practical Note: Write the child’s name and year with a skewer in a corner before the cement sets.
- Care & Maintenance: Seal with an outdoor stone sealer if you want to protect the prints and colors longer.
7. Herb-Label Mosaic Stepping Stones
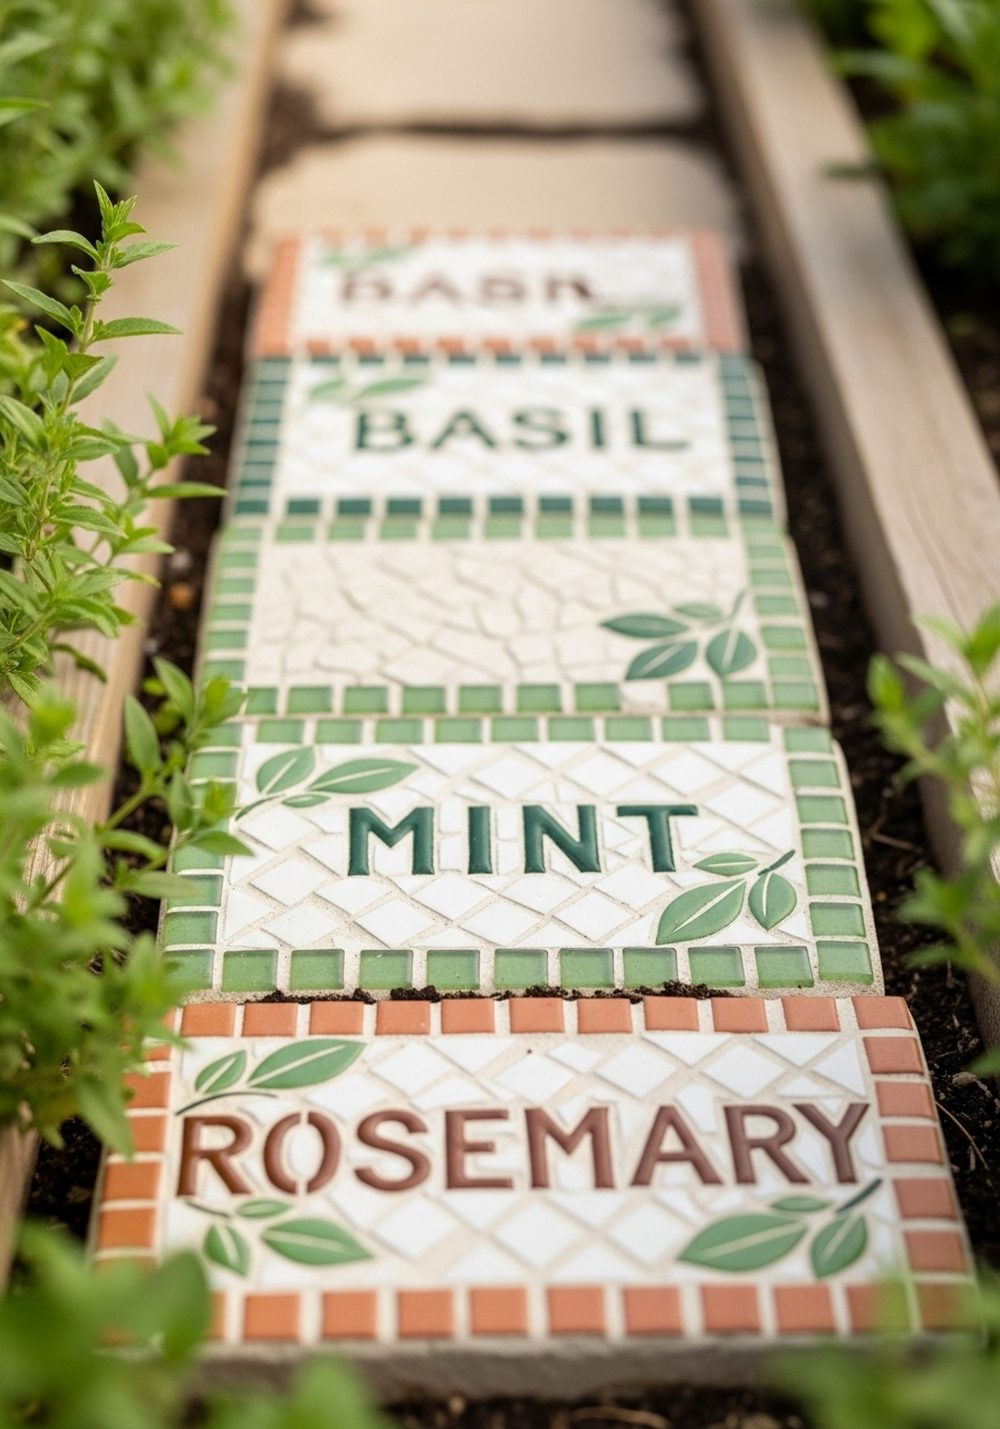
Turn path stones into practical herb labels by spelling out plant names in tiny tiles. On each stone, create a simple border, then form the letters with small squares or rectangles of contrasting color. Place “Basil,” “Thyme,” “Rosemary,” and “Mint” at the front of each patch so you can step in to harvest without trampling soil. It’s both pretty and helpful, especially if you like to cook straight from the garden.
- Best For: Kitchen gardens, raised beds, and patio herb pots.
- Budget Tip: Cut inexpensive plain tiles into narrow strips and small squares to use as letters.
- Styling Idea: Use green tones for herbs, blues for cool-weather crops, and terracotta shades for warmth.
- Practical Note: Keep letters fairly chunky so they remain readable from standing height.
- Extra Idea: Add a tiny leaf or herb sprig motif beside each word for quick recognition.
8. Sea Glass And Shell Coastal Mosaic Stones
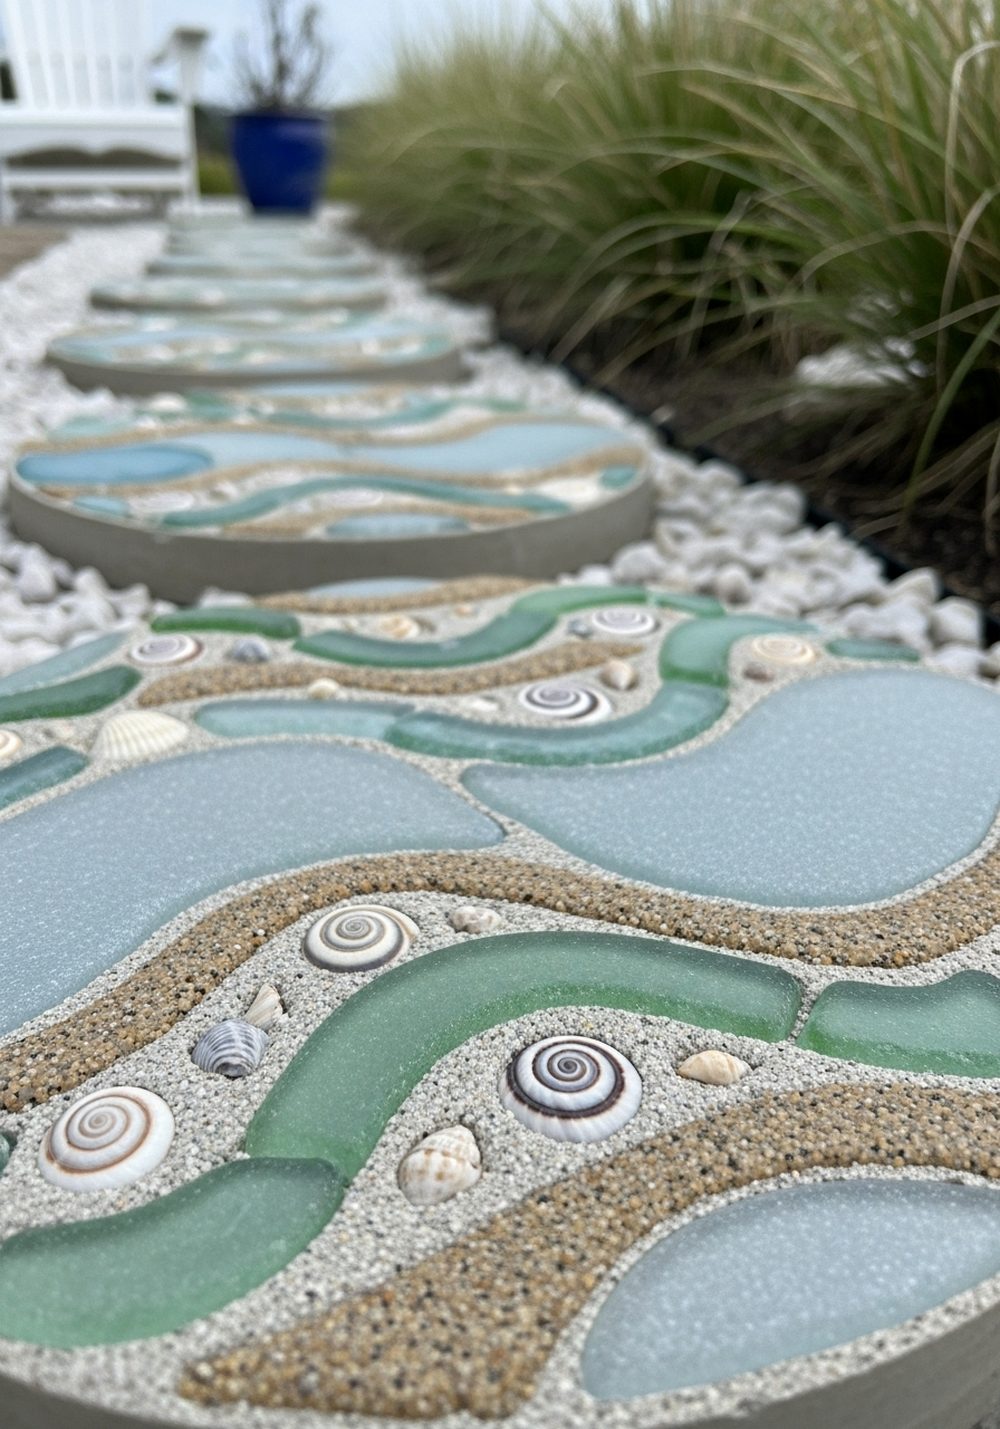
Bring a beachy feeling to your garden path with stepping stones decorated in sea glass and shells. Arrange frosted glass pieces in wave shapes, then tuck shells and small neutral tiles between them to mimic foam and sand. This look works well with grasses, white gravel, and blue or grey planters, creating a light, breezy atmosphere even far from the ocean. It’s especially lovely on paths leading to a deck, hammock, or reading chair.
- Best For: Coastal-inspired gardens, pool areas, and bright sunny spots.
- Budget Tip: Mix a small amount of purchased sea glass with plain glass and shells from craft stores to keep costs down.
- Styling Idea: Stick to soft blues, greens, and sandy neutrals to keep the look relaxed rather than busy.
- Practical Note: Avoid very sharp or delicate shells that could crack underfoot.
- Care & Maintenance: Check occasionally for loose shells and reglue or regrout as needed.
9. Whimsical Critter Mosaic Stepping Stones

Add a playful touch to your path with stepping stones that feature mosaic critters. Use red and black tiles for a ladybug, bright blues and whites for a butterfly, or greens and browns for a frog or turtle. These friendly designs encourage kids to explore the garden and give visitors something fun to spot as they walk along. Scatter them between plain stones so each critter feels like a little surprise.
- Best For: Family gardens, school gardens, and whimsical flower beds.
- Budget Tip: Keep shapes simple and reuse tile offcuts and broken pieces in your designs.
- Styling Idea: Repeat the same three or four colors in all critters so the path still feels cohesive.
- Practical Note: Outline shapes first with chalk or a marker before setting tiles to keep proportions right.
- Extra Idea: Hide one “lucky” critter stone slightly off the main path as a garden treasure.
10. Story Path Numbered Mosaic Stepping Stones

Use numbered mosaic stepping stones to turn your path into a playful story route or counting game. Give each stone a large, bold number in bright tiles, then add small symbols that match your garden style: stars, leaves, hearts, or arrows. Children can hop from one number to the next, and adults will appreciate the clear, graphic look. This idea works well leading to a playhouse, shed, or favorite corner where you like to sit.
- Best For: Paths kids use, long straight routes, and educational play spaces.
- Budget Tip: Keep symbols simple and reuse the same tile colors across all numbers.
- Styling Idea: Choose one base background color for every stone so the numbers really pop.
- Practical Note: Make sure numbers are large enough to read from a couple of steps away.
- Extra Idea: Add a “Start” and “Finish” stone at each end to complete the story.
Conclusion
Mosaic stepping stones are a wonderfully creative way to turn an ordinary path into a personal, colorful feature. Whether you love soft cottage florals, modern geometric patterns, or playful designs for kids, there’s a style that will fit your garden and your budget. Start with one or two stones in a key spot, see how they transform the mood, and then build your path piece by piece. Over time, you’ll have a walkway that’s not just practical, but full of memories and meaning.
FAQs
1. Are mosaic stepping stones expensive to make?
They don’t have to be. Many materials can be recycled or sourced cheaply, like broken dishes, leftover tiles, or glass gems from discount shops. The main cost is usually cement or premade stepping-stone forms. If you create your stones gradually, you can spread out spending and still end up with a very special path.
2. Can renters use mosaic stepping stones without damaging the yard?
Yes. You can simply lay mosaic stones on top of compacted soil, gravel, or mulch without cementing them permanently. When you move, you can lift the stones and take them with you. Just make sure the ground is reasonably level so they don’t rock or trip anyone.
3. How do I make sure mosaic stones survive bad weather?
Use outdoor-rated adhesive and grout, and choose tiles, glass, or stones that won’t absorb much water. Sealing the finished surface with an exterior stone or tile sealer helps protect against frost damage and fading. Also, avoid very delicate or porous materials if you live in an area with heavy freezes or intense sun.
4. What are the easiest mosaic designs for beginners?
Simple borders, stripes, and random scatter patterns are very forgiving. You can start by covering just the edges of a stone or creating a basic sunburst with glass gems. Avoid tiny, complicated pictures at first; once you’re comfortable setting and grouting tiles, you can move on to critters, mandalas, or lettering.
5. Are mosaic stepping stones safe to walk on?
They are safe as long as the surface is fairly flat and sharp edges are covered with grout. Press pieces firmly into the cement so they don’t protrude too much. When you finish grouting, wipe thoroughly so there are no raised blobs. Test the stone with different shoes to make sure it feels stable and comfortable.
6. Can I add plants around mosaic stepping stones without hiding them?
Absolutely. Low-growing groundcovers like creeping thyme, Irish moss, or short sedums work beautifully around stones and won’t cover the designs. Keep plants slightly back from the center so the patterns stay visible. A mix of greenery and colorful mosaics makes the path look lush but still easy to walk.