12 Night Garden Mood Lights Using Simple Glass Jar Lanterns

If you love the idea of a softly glowing garden after dark but don’t want to spend a fortune on fancy fixtures, simple glass jar lanterns are your best friend. They’re easy to make, endlessly customizable, and gentle on your budget.
In this guide, you’ll find twelve practical ways to turn plain jars into magical night garden mood lights. Whether you have a small balcony, a rental courtyard, or a full backyard, these ideas will help you create cozy paths, twinkling trees, and welcoming corners that feel warm, personal, and beautifully lit.
Quick List
- Classic Tea Light Jars Along The Path
- Hanging Jar Lanterns In The Trees
- Rustic Rope-Wrapped Jar Lanterns
- Frosted Glass Jar Lanterns For Soft Glow
- Color-Tinted Jar Lights With Glass Paint
- Floating Candle Jars For Water Features
- Tabletop Jar Lantern Centerpieces
- Wall-Mounted Sconce-Style Jar Lanterns
- Fairy Light-Filled Jar Lanterns
- Jar Lanterns On Stair And Step Edges
- Seasonal Jar Lanterns With Natural Fillers
- Jar Lantern Chandelier Over The Patio
1. Classic Tea Light Jars Along The Path

Line a garden path or balcony edge with simple glass jars and tiny tea lights for an instant night-time mood upgrade. Just clean out jam or sauce jars, pop a candle or LED tea light inside, and space them evenly along your route. The glass protects the flame from wind, while the warm glow hugs the ground and highlights plants, gravel, or pavers. It’s a simple, romantic effect that’s perfect for evenings outdoors, even in the smallest spaces.
- Best For: Narrow paths, balcony edges, and small courtyards.
- Budget Tip: Use recycled food jars and inexpensive tea lights or LEDs.
- Styling Idea: Choose jars of similar shape for a neat, modern look, or mix sizes for a more relaxed cottage feel.
- Practical Note: Place jars where they won’t be kicked or tripped over, especially on busy paths.
- Care & Maintenance: Blow out real candles after use or swap to battery lights for worry-free nights.
2. Hanging Jar Lanterns In The Trees

Turn your trees or pergola into a twinkling canopy by hanging glass jar lanterns from branches. Wrap wire or strong twine tightly around the jar necks to create simple handles, then hang them at varied heights so the lights float in the foliage. Pop in candles or LED lights and you’ll have a magical overhead glow that flickers through the leaves. It feels like a mini fairy forest and makes any evening gathering feel special.
- Best For: Mature trees, pergolas, or strong balcony railings.
- Budget Tip: Use twine, jute, or thin wire you already have; keep jars light and simple.
- Styling Idea: Cluster more jars in one area for a dramatic focal point above a seating or dining spot.
- Practical Note: Make sure branches or hooks are strong enough and jars hang securely, especially in windy areas.
- Care & Maintenance: Check knots and wires regularly and store jars indoors during storms.
3. Rustic Rope-Wrapped Jar Lanterns

Give your jars a cozy, rustic twist by wrapping them in rope or jute. Start at the bottom, glue the rope as you wind it around the jar, and leave gaps near the top so light can shine through. When lit, the glow filters through the spaces between the fibers, creating a warm, textured effect. These lanterns look lovely on steps, near a back door, or grouped by a bench. They feel handcrafted and instantly add character.
- Best For: Country-style gardens, patios, and relaxed seating areas.
- Budget Tip: Use basic garden twine or leftover rope; even partial wrapping looks great.
- Styling Idea: Combine rope-wrapped jars with plain glass ones for contrast.
- Practical Note: Avoid placing rope too close to open flames; use LED tea lights if jars feel enclosed.
- Care & Maintenance: Keep rope dry when possible to avoid mould; bring them in during heavy rain.
4. Frosted Glass Jar Lanterns For Soft Glow

For a dreamy, diffused light, turn your jars into frosted lanterns. You can use frosted spray paint, Epsom salt, or glass frost medium to cloud the glass. Once dry, add a candle or LED and enjoy the gentle, misty glow. These lanterns are perfect when you want mood light without bright points, and they look especially pretty along walls, on tables, or tucked among pots near a seating area. The softened light feels calm and spa-like.
- Best For: Relaxing corners, zen-style gardens, or near hot tubs and water features.
- Budget Tip: Use inexpensive Epsom salt with glue for a frosted effect on recycled jars.
- Styling Idea: Add simple white or metallic details around rims for a clean, modern mood.
- Practical Note: Don’t frost the inside of the jar; keep it clear so you can clean and replace lights easily.
- Care & Maintenance: Wipe gently with a damp cloth; avoid scrubbing the frosted surface too hard.
5. Color-Tinted Jar Lights With Glass Paint

Bring subtle colour into your night garden by tinting jars with glass paint or a DIY mixture of food colouring and glue. Soft blues, greens, and ambers look beautiful when lit from within, casting coloured pools of light on tables and paving. Arrange jars in small groups or a rainbow line along a shelf or wall. The effect is playful but still gentle, and you can choose shades that suit your outdoor cushions, planters, or flowers.
- Best For: Entertaining areas where you want a fun, party-ready look.
- Budget Tip: Use cheap craft paint on thrifted jars; a little colour goes a long way.
- Styling Idea: Choose one or two colours for a more sophisticated scheme instead of every shade.
- Practical Note: Keep paint on the outside of jars only, so the inside stays safe and easy to clean.
- Care & Maintenance: Hand-wash gently; avoid harsh scrubbers that might scratch the paint.
6. Floating Candle Jars For Water Features

If you’re lucky enough to have a pond, large bowl, or even a big metal tub, floating jar lanterns can turn it into a glowing water feature. Use smaller jars or partially submerge larger ones, each with a floating candle inside. As the water moves slightly, the light shimmers and reflects on the surface, creating a calming flicker. Surround the container with plants, stones, or shells to build a little night-time focal point in your garden.
- Best For: Ponds, water bowls, or large basins on patios and balconies.
- Budget Tip: Repurpose any wide-mouthed jars and simple floating candles.
- Styling Idea: Add flower heads, petals, or slices of citrus in the water for an extra decorative touch.
- Practical Note: Never leave floating candles unattended, especially if children or pets are nearby.
- Care & Maintenance: Refresh water regularly and clean jars if algae or residue builds up.
7. Tabletop Jar Lantern Centerpieces

Transform your outdoor table with a cluster of jar lanterns as an easy centerpiece. Mix tall and short jars, some plain and some wrapped with lace, twine, or ribbon. Fill them with tea lights or tiny LED candles and arrange them on a tray or directly on the table. The layered heights and different textures create an intimate, candlelit effect that’s perfect for dinners, drinks, or quiet reading outside. It instantly makes any table feel styled and welcoming.
- Best For: Outdoor dining tables, coffee tables, and bistro sets.
- Budget Tip: Use whatever jars you have and dress them with scraps of ribbon, fabric, or doilies.
- Styling Idea: Stick to one theme—like all clear glass with white lace—for a more polished look.
- Practical Note: Keep flames low and away from overhanging branches, napkins, and fabrics.
- Care & Maintenance: Store decorated jars indoors to protect lace and ribbons from weather.
8. Wall-Mounted Sconce-Style Jar Lanterns

Create your own wall sconces by fixing jars onto a fence or wall. You can screw simple hooks, brackets, or wooden planks into the surface, then hang jars by their necks or perch them safely inside holders. Once they’re up, drop in candles or LED lights to cast a warm halo of light across the wall. This trick adds height to your lighting and turns plain fence panels into a glowing feature after dark.
- Best For: Bare fences, side walls, and balcony railings.
- Budget Tip: Use inexpensive metal hooks and scrap wood; even a single jar per panel makes a difference.
- Styling Idea: Line jars in a neat row for a modern look, or stagger them at different heights for a more relaxed style.
- Practical Note: Secure fixtures properly and choose spots sheltered from heavy wind.
- Care & Maintenance: Check screws and hooks often; remove jars before any major fence repairs or painting.
9. Fairy Light-Filled Jar Lanterns
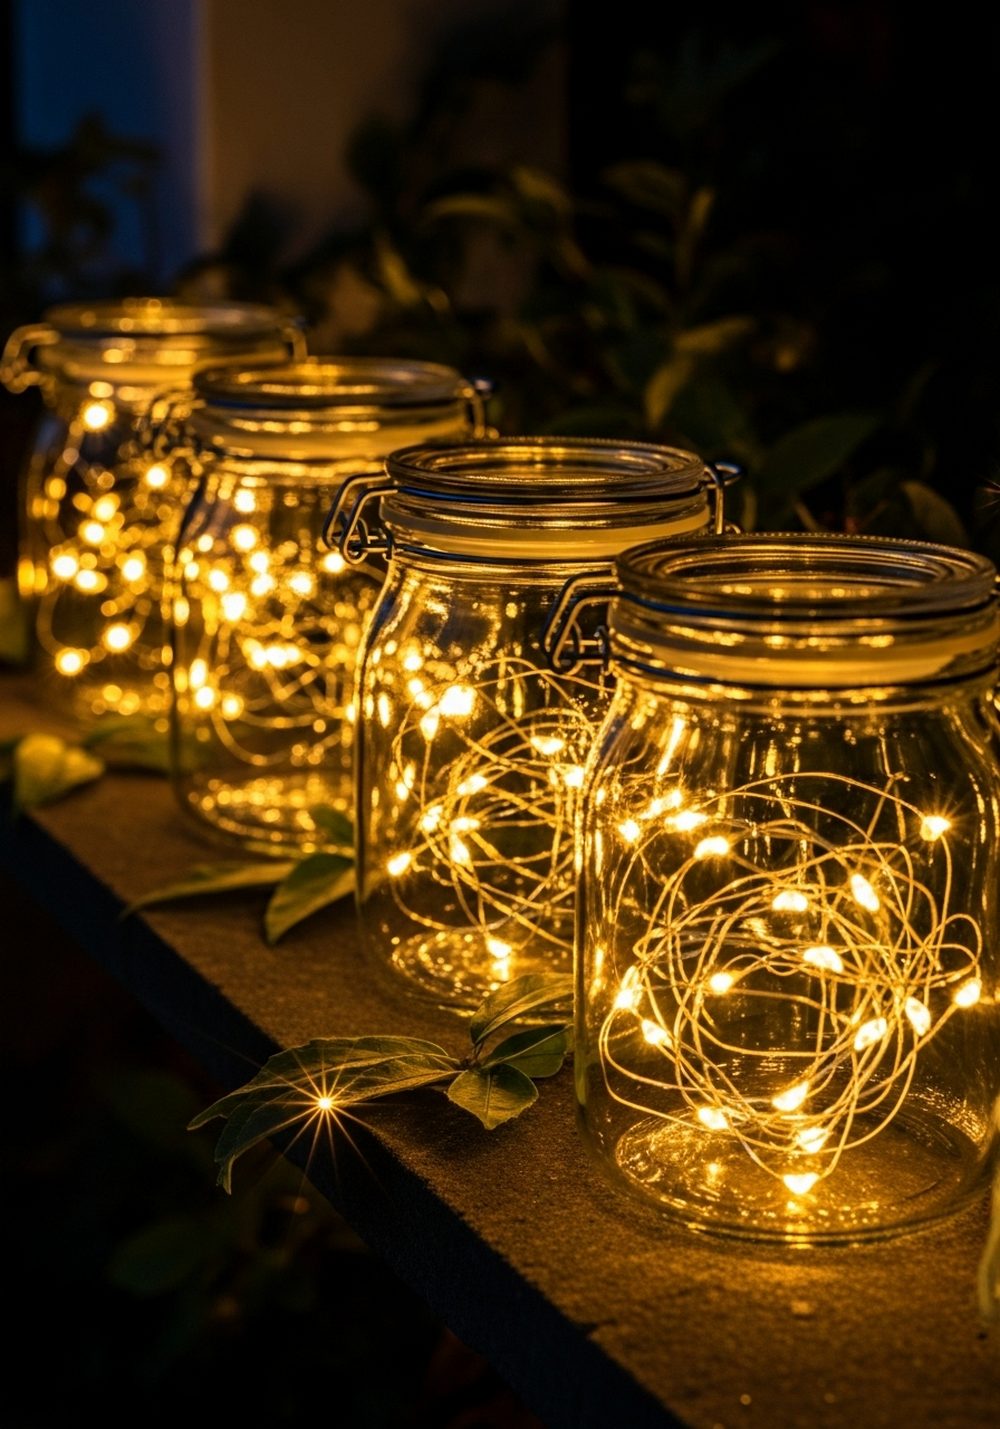
For a brighter, sparkle-filled look, swap candles for fairy lights inside your jars. Just coil a string of battery-operated micro LEDs into each jar and tuck the battery pack behind or beneath. The result is a jar full of tiny stars that glow steadily all evening with no open flame. Line them on steps, shelves, window sills, or cluster them in a dark garden corner to create a magical, twinkly feature that feels like a mini light installation.
- Best For: Families with kids, rentals where open flames aren’t ideal, and long evenings outside.
- Budget Tip: One long string of fairy lights can be divided or looped through several jars.
- Styling Idea: Use clear, simple jars so the tiny lights become the star of the show.
- Practical Note: Choose warm white lights for a softer, cosy glow rather than harsh, cool tones.
- Care & Maintenance: Replace batteries as needed and keep jars dry to protect wiring.
10. Jar Lanterns On Stair And Step Edges

If you have steps leading to your garden, patio, or balcony, jar lanterns are a lovely way to highlight each level at night. Place jars on the outer edge or in the corner of each step, keeping them out of the main walking line. The lights help guide people safely while adding an elegant, layered effect as the glow climbs upward or downward. Even a handful of jars can make your stairs look suddenly “finished” and intentional.
- Best For: Garden steps, porch stairs, and entryways.
- Budget Tip: Use a small number of jars on key steps if you don’t have enough for every level.
- Styling Idea: Match jar style to your home—simple straight-sided jars for modern, curved ones for traditional.
- Practical Note: Ensure jars are stable and won’t roll if accidentally nudged.
- Care & Maintenance: Bring jars inside in icy weather so they don’t crack from temperature changes.
11. Seasonal Jar Lanterns With Natural Fillers

Use your jars to celebrate the seasons by filling them with natural materials around a central light. In spring, think blossom, moss, and small feathers; in summer, dried herbs and shells; in autumn, colourful leaves and acorns; in winter, pinecones and berries. Place a candle or LED in the middle or on top so the fillers glow softly from inside. These lanterns look beautiful on shelves, steps, and side tables and keep your decor fresh all year round.
- Best For: Garden shelves, side tables, and porch displays.
- Budget Tip: Gather fillers from your own garden or local walks.
- Styling Idea: Stick to one colour palette per season for a more cohesive look.
- Practical Note: Keep flammable fillers away from real flame; use LEDs if materials sit close to the light.
- Care & Maintenance: Replace natural items when they fade, dry out, or start to shed.
12. Jar Lantern Chandelier Over The Patio

For a real wow factor, bundle several jar lanterns together as a DIY chandelier over your seating or dining area. Suspend jars at different heights from a branch, beam, or metal hoop using twine or wire. Fill each one with a candle or fairy lights, then sit back as the whole cluster glows like a hanging constellation. It instantly defines the space below, turning a simple patio or balcony into a cosy “room” for evenings outside.
- Best For: Patios, decks, pergolas, and covered balconies.
- Budget Tip: Start with a small cluster and add more jars over time as you collect them.
- Styling Idea: Keep all jars the same style for a sleek look, or mix shapes for boho charm.
- Practical Note: Hang safely and high enough that no one bumps their head; consider only LEDs if space is tight.
Conclusion
With nothing more than a few glass jars, simple lights, and some creative placements, you can turn your night garden into a warm, welcoming retreat. These ideas work in tiny spaces and large yards alike, and most can be done with recycled jars and low-cost lighting. Start with one corner—maybe a path, a table, or a tree—and build from there. Each little lantern you add will make your outdoor space feel more magical and more like home.
FAQs
1. How can I make glass jar lanterns on a really small budget?
Reuse jars from jam, sauces, or coffee instead of buying new ones. Simple tea lights or basic battery LEDs are usually inexpensive, and you can decorate with things you already own—twine, leftover ribbon, or small stones. Focus on one feature, like a path or a table, instead of trying to light the whole garden at once.
2. Are jar lanterns safe for renters and balconies?
Yes, as long as you use them carefully. On balconies, it’s often safer to choose battery-operated lights instead of real candles, especially in windy or tight spaces. Avoid drilling into walls if you’re renting; instead, hang jars from railings, over-door hooks, or free-standing plant stands that you can take with you when you move.
3. What are the lowest-maintenance jar lighting options?
Battery-operated LED tea lights or fairy lights are the easiest. They don’t blow out in the wind, don’t produce soot, and don’t need constant attention. Choose warm white LEDs for a soft glow, and keep spare batteries handy. You can leave the jars in place and simply switch the lights on and off as needed.
4. Can I use these ideas in a very small garden or no-grass courtyard?
Absolutely. Many of these jar lantern ideas work beautifully in tiny spaces. Try hanging jars from railings, lining them on window sills, or clustering them on a small table. Even a single tree, pole, or shelf can become a feature when you add a few glowing jars. Focus on vertical space if floor space is limited.
5. How do I mix jar lanterns with plants without harming them?
Keep open flames away from delicate foliage by leaving a small gap between jars and plant leaves. LEDs are a good choice close to plants because they don’t heat up as much. Avoid resting hot jars directly on soil or mulch, and place them on stones, bricks, or saucers instead. This keeps things safer and neater.
6. What’s the easiest idea for beginners to try first?
The simplest starting point is lining a short path or balcony edge with plain jars and tea lights or LEDs. There’s almost no crafting involved—just clean the jars, add a light, and space them evenly. Once you see how much difference this makes to your space at night, you can experiment with hanging jars, colours, or frosted finishes later.