10 Painted Tin Can Planters That Look Expensive

Tin can planters are one of those rare DIY projects that can look surprisingly high-end with just a few smart finishing touches. If you’re decorating a small patio, balcony, porch, or garden corner on a budget, painted cans can deliver that “styled” look without buying new pots. The key is choosing elevated colors, clean lines, and finishes that mimic pricier materials like ceramic, concrete, or aged metal. Below are ten easy styles that feel intentional and polished, plus simple tips to help your paint job look smooth, durable, and truly expensive.
Quick List
- Champagne Gold Minimal Can Planters
- Matte Black With Brass Rim “Designer” Look
- Two-Tone Neutral Color Block Set
- Stone-Effect Textured “Concrete” Finish
- Soft White “Ceramic” Gloss With Micro-Crack Detail
- Muted Sage Green Cottage Garden Set
- Faux Terracotta Can Planters
- Navy Blue With White Pinstripes (Hamptons Vibe)
- Warm Metallic Copper With Patina Touches
- Monochrome Greige With Raised Stencil Pattern
1. Champagne Gold Minimal Can Planters

A soft champagne gold instantly makes a simple tin can feel like a boutique cachepot. Clean the can well, lightly sand it, then apply a primer and two thin coats of satin metallic paint. Keep the styling minimal: one plant per can and a small cluster of three looks intentional and pricey. Set them on stone steps, a sleek shelf, or beside a chair so the gentle sheen catches daylight without looking flashy.
- Best For: Modern patios, small balconies, and entry steps.
- Budget Tip: Paint a set of 3–5 cans at once to use up primer and avoid extra purchases.
- Styling Idea: Pair with white flowers and light stone or pale wood for an airy look.
- Care & Maintenance: Touch up chips quickly to keep the finish looking smooth.
2. Matte Black With Brass Rim “Designer” Look

Matte black is instantly sophisticated, and a thin brass rim reads like designer hardware. Paint the can matte black, then use a small brush (or a paint pen) to add a crisp metallic line at the top edge. Keep plants architectural—upright greens and a trailing accent look curated. This style works especially well on narrow shelves where the rim detail is easy to see.
- Best For: Balcony ledges, railing shelves, and modern garden corners.
- Budget Tip: Use a tiny amount of metallic paint just for the rim instead of coating the whole can.
- Styling Idea: Stick to a black + brass + deep green palette for a luxe mood.
- Practical Note: Seal the rim so watering doesn’t dull the metallic line.
3. Two-Tone Neutral Color Block Set

Color blocking in calm neutrals makes tin cans look like coordinated decor pieces. Choose two shades (like greige and cream), tape a straight line, and paint in thin coats for crisp edges. Group several together in a row to mimic an expensive matching planter set. This one looks especially good with herbs because the tidy look pairs well with practical planting.
- Best For: Kitchen porch steps, herb stations, and small decks.
- Budget Tip: Use leftover wall paint samples for the two colors.
- Styling Idea: Keep the line at the same height on every can for a “store-bought” feel.
- Care & Maintenance: Add a clear sealant so the tape-line edge stays sharp.
4. Stone-Effect Textured “Concrete” Finish

A faux-concrete finish gives you that trendy, sculptural planter look without buying heavy pots. After priming, apply a textured paint or dab on a thicker topcoat with a sponge to build subtle grit. Keep the color in the warm gray family so it reads like real stone. Succulents and lavender look especially convincing in this finish, especially with a little pebble top-dressing.
- Best For: Modern gardens, gravel paths, and minimalist patios.
- Budget Tip: Texture one statement can and mix it with plain painted cans to stretch supplies.
- Styling Idea: Pair with black metal, pale wood, and silvery plants for a clean mood.
- Practical Note: Add drainage holes so moisture doesn’t sit in the base.
5. Soft White “Ceramic” Gloss With Micro-Crack Detail

A glossy white “ceramic” look feels bright, fresh, and expensive—especially on a small bistro table. Paint the can in clean white, then seal with a glossy topcoat for that glazed shine. If you like detail, add faint crackle as a subtle texture (keep it light so it doesn’t look busy). White flowers and soft green foliage keep the whole arrangement looking intentional and elegant.
- Best For: Small patios, café-style corners, and shaded porches.
- Budget Tip: Use one gloss topcoat across multiple cans for a consistent, high-end finish.
- Styling Idea: Add a linen runner and simple glassware to elevate the scene.
- Care & Maintenance: Wipe gently—gloss shows dirt more than matte finishes.
6. Muted Sage Green Cottage Garden Set

Muted sage feels calm and classic, and it blends beautifully with herbs and cottage flowers. Paint the cans in an eggshell finish so they look soft rather than shiny. Lightly distress just the edges (very little) if you want a vintage touch, then cluster them by a bench or basket. This style is less “perfect,” but still looks expensive because the color choice feels curated.
- Best For: Cottage gardens, porch benches, and relaxed seating areas.
- Budget Tip: A single quart of paint can cover many cans with thin coats.
- Styling Idea: Combine sage green with cream textiles and warm wood tones.
- Care & Maintenance: Seal if they’ll be rained on—sage can fade without protection.
7. Faux Terracotta Can Planters

Terracotta is timeless, and a layered paint approach makes tin look surprisingly clay-like. Use a warm base coat, then sponge on slightly darker and lighter terracotta tones for depth. Keep the finish matte so it reads like real clay. These planters look especially expensive grouped on brick steps or next to real terracotta pots, where the look blends seamlessly.
- Best For: Front steps, sunny patios, and Mediterranean-style plantings.
- Budget Tip: Mix a little brown into orange paint rather than buying multiple terracotta shades.
- Styling Idea: Pair with marigolds, basil, rosemary, and earthy gravel.
- Practical Note: Add a simple saucer if you’re placing them on wood.
8. Navy Blue With White Pinstripes (Hamptons Vibe)

Navy with crisp white stripes feels tailored and coastal, like something from a design shop. Paint the can navy, let it cure, then tape thin lines for pinstripes and paint them white. Keep the stripes evenly spaced for that polished look. White flowers and trailing plants make the contrast pop, especially on a white railing or pale shelf.
- Best For: Railings, balcony shelves, and bright patios.
- Budget Tip: Do stripes on only the front-facing side to save time and tape.
- Styling Idea: Add white cushions and natural rope or woven textures for the mood.
- Care & Maintenance: Seal well—navy can show scuffs quickly without a topcoat.
9. Warm Metallic Copper With Patina Touches
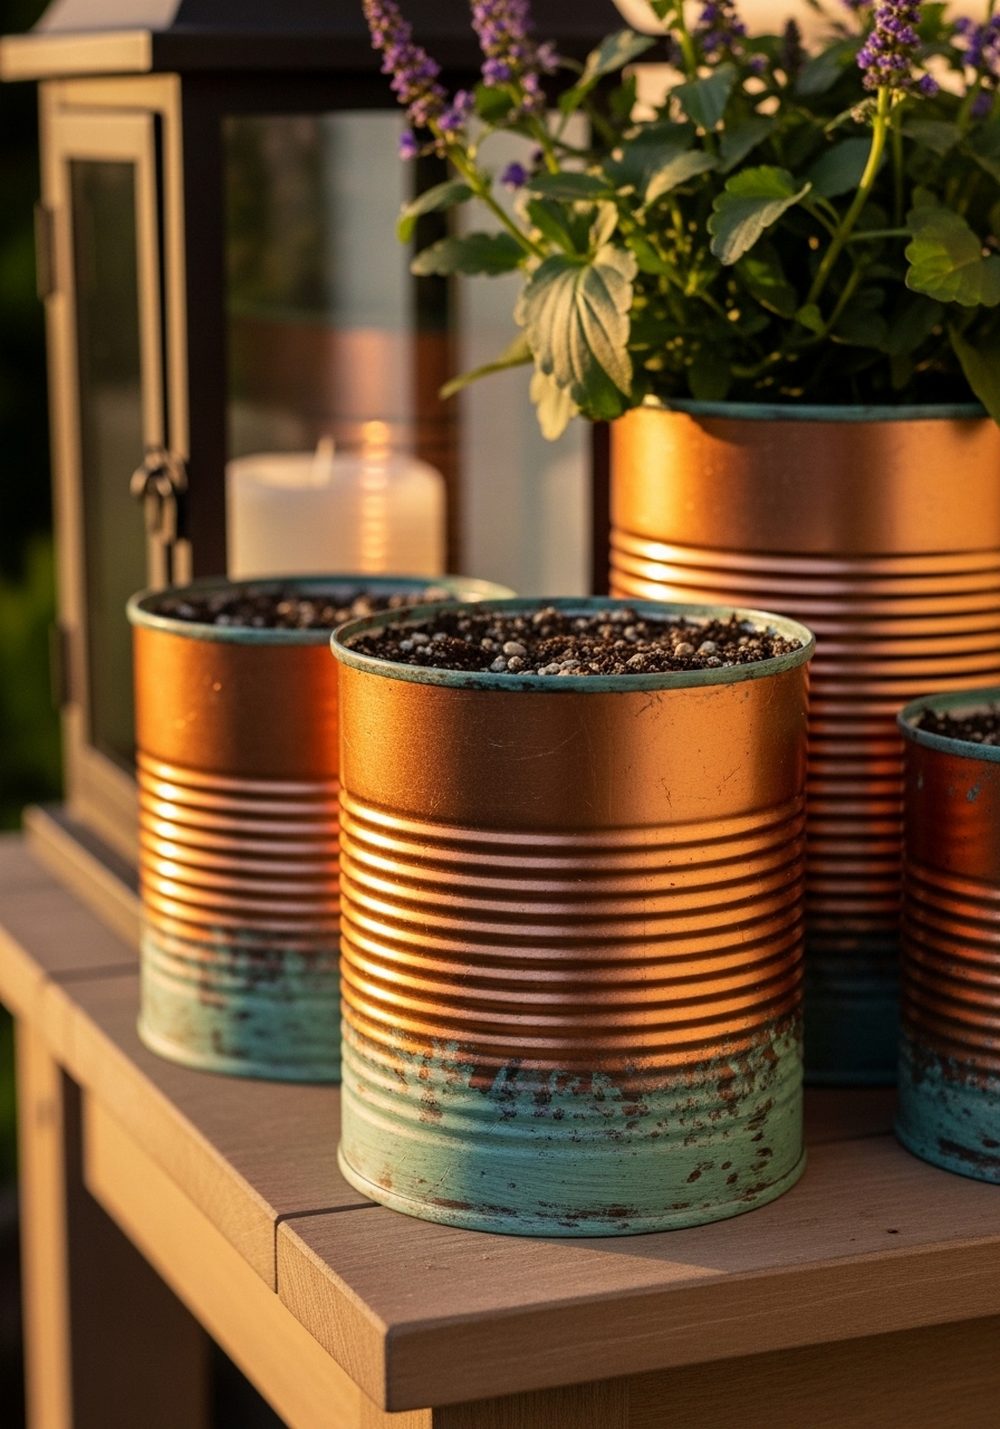
Copper looks rich right away, and a tiny patina detail can make it feel artisan and aged. Paint the can copper, then lightly add teal-green near the base and rim using a sponge for a believable patina. Keep it subtle—less looks more expensive here. Deep green foliage and a few purple blooms make the copper glow, especially near lantern light in the evening.
- Best For: Evening seating areas, patios with wood furniture, and fall styling.
- Budget Tip: Patina only one or two cans as accents in a larger group.
- Styling Idea: Pair with warm wood, amber glass, and soft lighting for a luxe vibe.
- Practical Note: Use a sealant to stop the patina effect from rubbing off.
10. Monochrome Greige With Raised Stencil Pattern

A monochrome raised pattern feels like textured ceramics you’d buy at a home store. Paint the can greige, then use a stencil and a thicker paint application (or stencil paste) to create a subtle raised motif. Keep the design tone-on-tone so it looks refined, not crafty. Place these in a neutral seating area and use compact greenery so the texture is the star.
- Best For: Modern-neutral patios, entryways, and minimalist garden nooks.
- Budget Tip: Reuse one stencil across many cans for a coordinated set.
- Styling Idea: Mix with linen, stone, and pale wood for a calm, expensive mood.
- Care & Maintenance: Seal to protect the raised pattern from chips and water.
Conclusion
Painted tin can planters can look genuinely expensive when you focus on finish, color, and clean details. Whether you love modern matte black, soft cottage sage, or faux concrete texture, the “high-end” effect comes from consistency and thoughtful styling. Start by making a small set of three in one finish, then build a coordinated collection over time. A few well-placed planters can instantly make your outdoor space feel more designed.
FAQs
1) How do I make painted tin cans look smooth and not streaky?
Clean and lightly sand the surface, use a good primer, and apply multiple thin coats rather than one thick coat. Let each coat dry fully before the next. A final clear sealant helps even out the sheen and hides minor brush marks.
2) What’s the best way to add drainage to tin can planters?
Use a nail and hammer or a drill to create several holes in the bottom. Add a thin layer of small stones only if you’re also using well-draining soil (stones alone don’t replace drainage). Always place the can on a saucer if it’s sitting on wood.
3) Can renters use these without making a mess outdoors?
Yes. Paint them over cardboard or a drop cloth, and choose small cans that fit on a tray. Use non-permanent hooks or a shelf that rests on a railing rather than drilling anything into walls.
4) How do I keep the paint from peeling in rain or heat?
Use exterior-grade primer and paint if possible, then seal with a weather-resistant clear coat. Keep planters slightly sheltered (under an eave or on a covered balcony) for the longest life. Touch up chips early to stop peeling from spreading.
5) What are the easiest “expensive” colors for beginners?
Matte black, warm greige, soft white, and muted sage are the most forgiving and look elevated quickly. They hide small imperfections and make greenery look richer. Add one crisp detail—like a rim line or a two-tone block—to push it into “designer” territory.