14 Recycled Old Boot Fairy Garden Planter Ideas
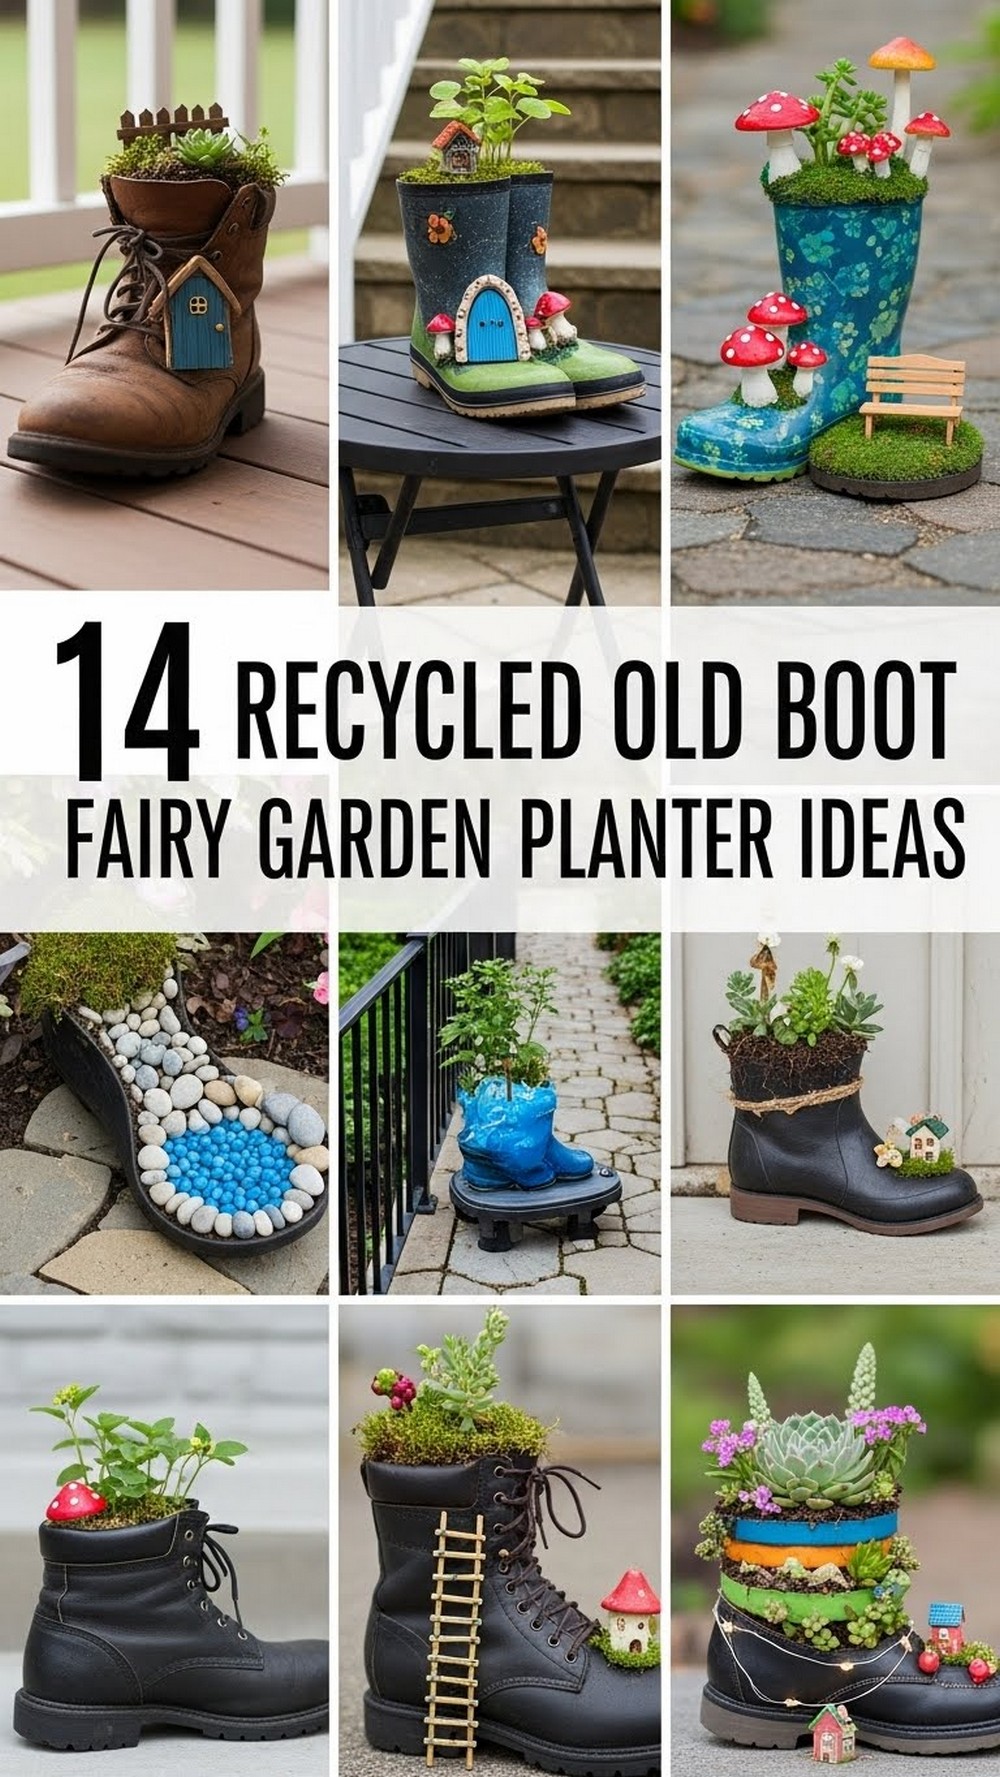
Got a pair of old boots you can’t quite throw away? They’re perfect for a tiny world of moss, mini houses, and twinkly details. Old boots already look wonderfully weathered, and that lived-in look is exactly what makes fairy gardens feel believable and charming.
In this post, you’ll find fourteen creative ways to turn worn boots, wellies, and work shoes into enchanting fairy planters. These ideas work for front steps, balconies, shady corners, and family backyards. You’ll get simple setup tips, budget-friendly tricks, and styling ideas that bring just enough magic to your garden without needing a full makeover.
Quick List
Quick List Of Garden Decor Ideas
- Mossy Doorstep Fairy Boot Planter
- Enchanted Forest Pair Of Boot Houses
- Tiny Cottage Village In A Work Boot
- Rainbow Kids’ Wellie Fairy Garden
- Lantern-Lit Pathway Boot Fairy Pot
- Hanging Fairy Boot Planter On A Fence
- Rustic Farmyard Fairy Boot Trough
- Storybook Window-Sill Boot Fairy Scene
- Teacup And Boot Fairy Café Corner
- Watering-Can Spill Boot Fairy Pond
- Night-Sky Glow-In-The-Dark Fairy Boot
- Mini Dragon Guard Fairy Boot Planter
- Secret Garden Gate Old Boot Planter
- Balcony Rail Fairy Boot Micro Garden
Mossy Doorstep Fairy Boot Planter
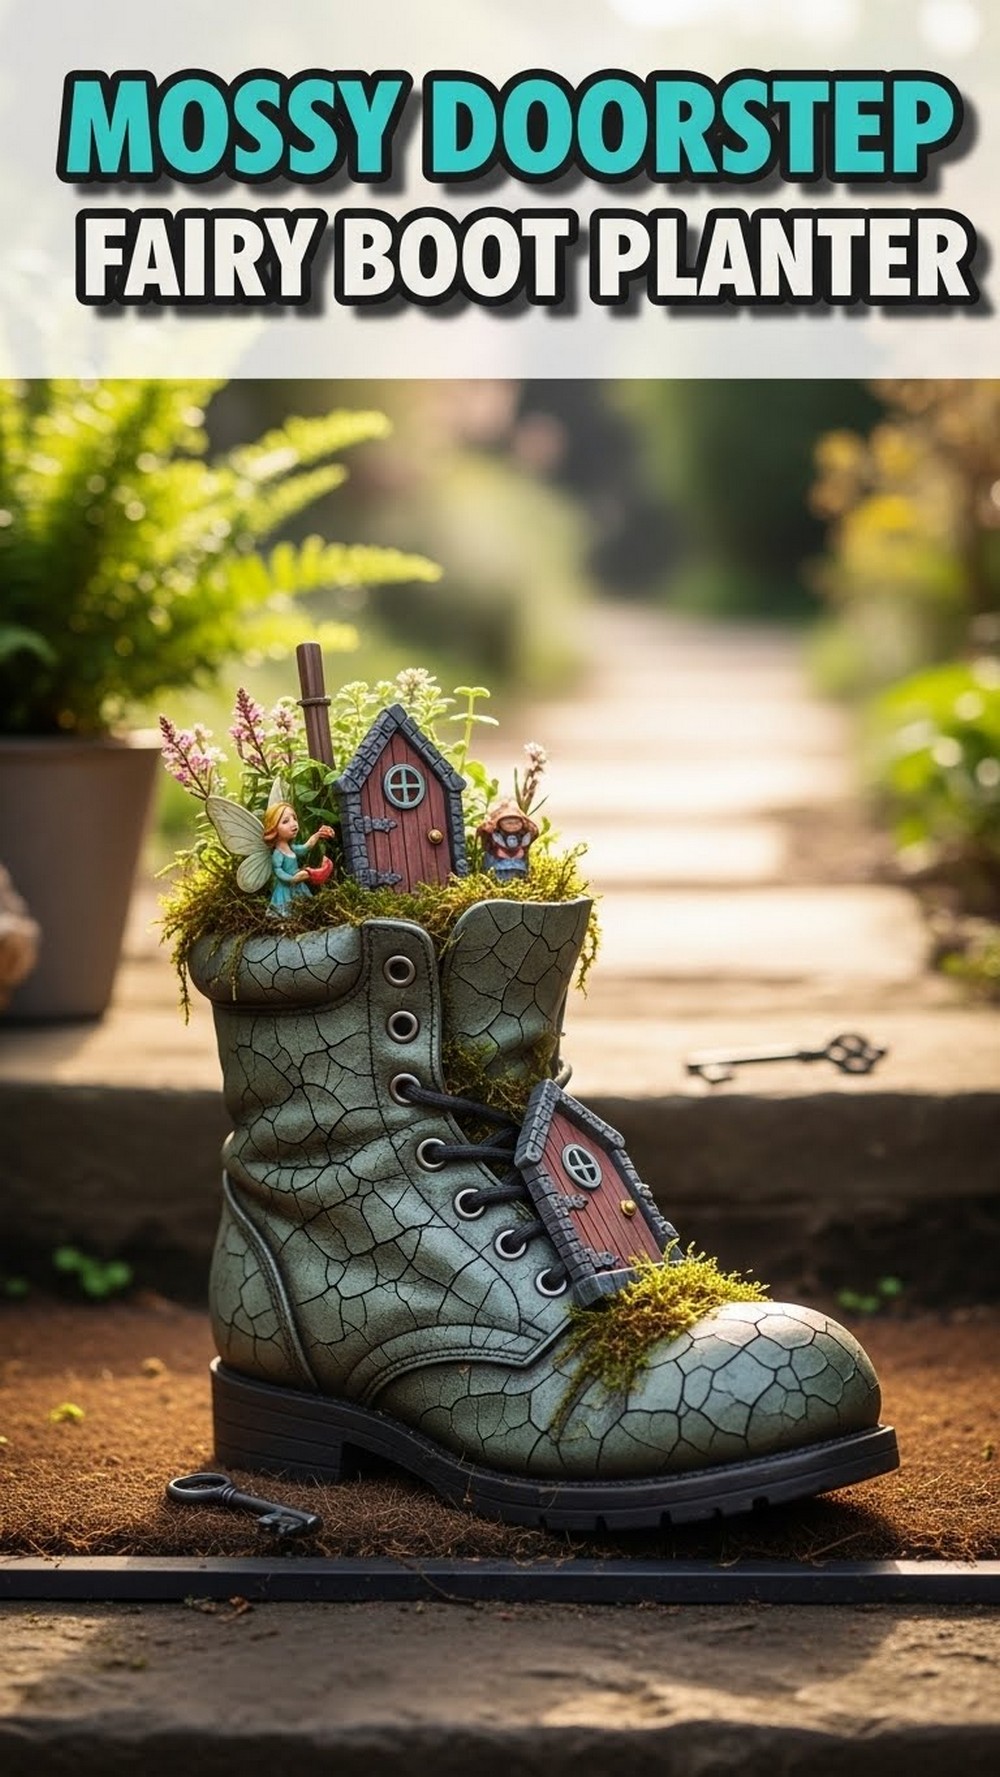
Give your front step a little storybook moment with a mossy old boot turned into a fairy planter. Stuff the boot with soil, tuck in low-growing plants, then add tiny doors, windows, and a sprinkle of moss around the tongue and seams. Nestle it beside your doormat or on the edge of the step so it looks like a tiny resident lives there, coming and going while you sleep.
- Best For: Front doors, side entrances, and porch steps.
- Budget Tip: Use self-seeded groundcovers or moss scraped from other pots instead of buying new plants.
- Styling Idea: Choose soft greens and browns so the boot feels like part of the landscape, not a loud ornament.
- Practical Note: Drill a few holes in the sole for drainage before planting.
- Care & Maintenance: Trim plants lightly so they don’t block the fairy door details.
Enchanted Forest Pair Of Boot Houses
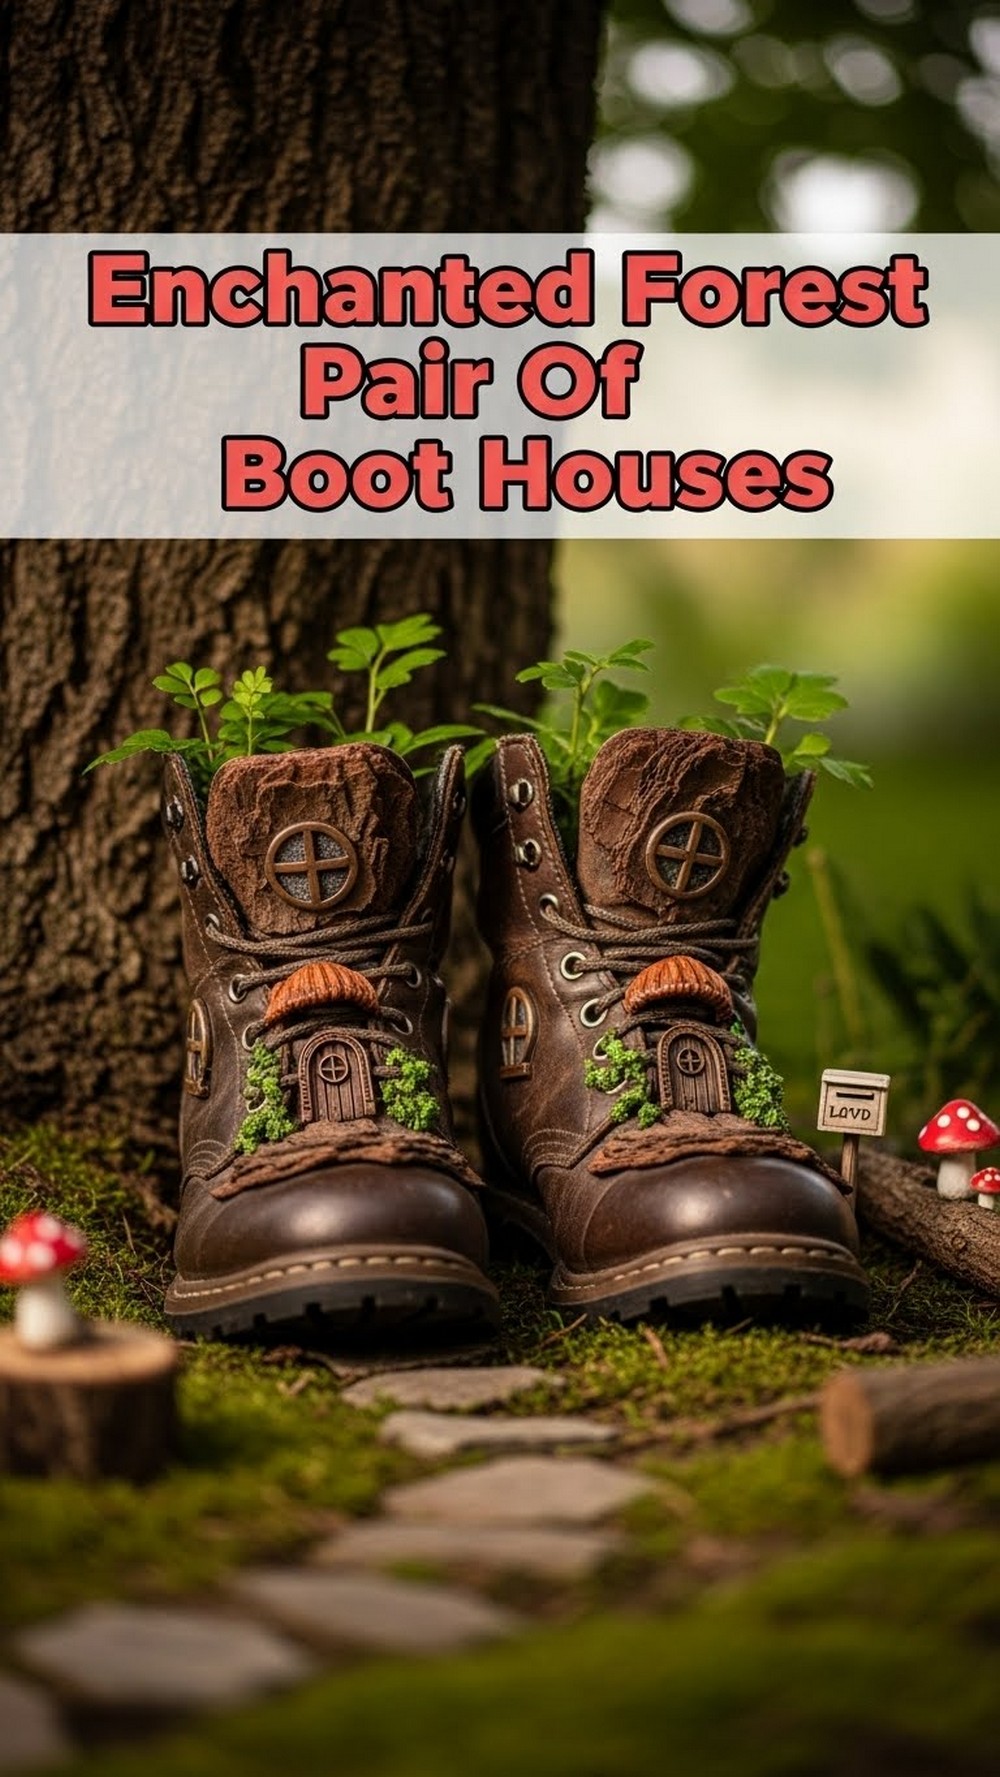
Turn two battered boots into a tiny forest neighbourhood at the base of a tree or in a shady border. Plant ferns, tiny hostas, or woodland groundcovers inside, then glue on little windows, doors, and bark shingle roofs. Add a pebble path winding between the two, plus a few miniature mushrooms or animals for character. The tree trunk behind becomes the perfect backdrop, like a deep forest hill.
- Best For: Shady corners under trees or tall shrubs.
- Budget Tip: Collect pebbles, bark, and twigs from your garden instead of buying fairy accessories.
- Styling Idea: Keep everything in woodland colours—mossy greens, soft browns, and stone greys.
- Practical Note: Use plants that enjoy the same shade and moisture levels as the tree above.
- Care & Maintenance: Top up soil yearly as it settles and replace any rotted décor pieces with fresh finds.
Tiny Cottage Village In A Work Boot
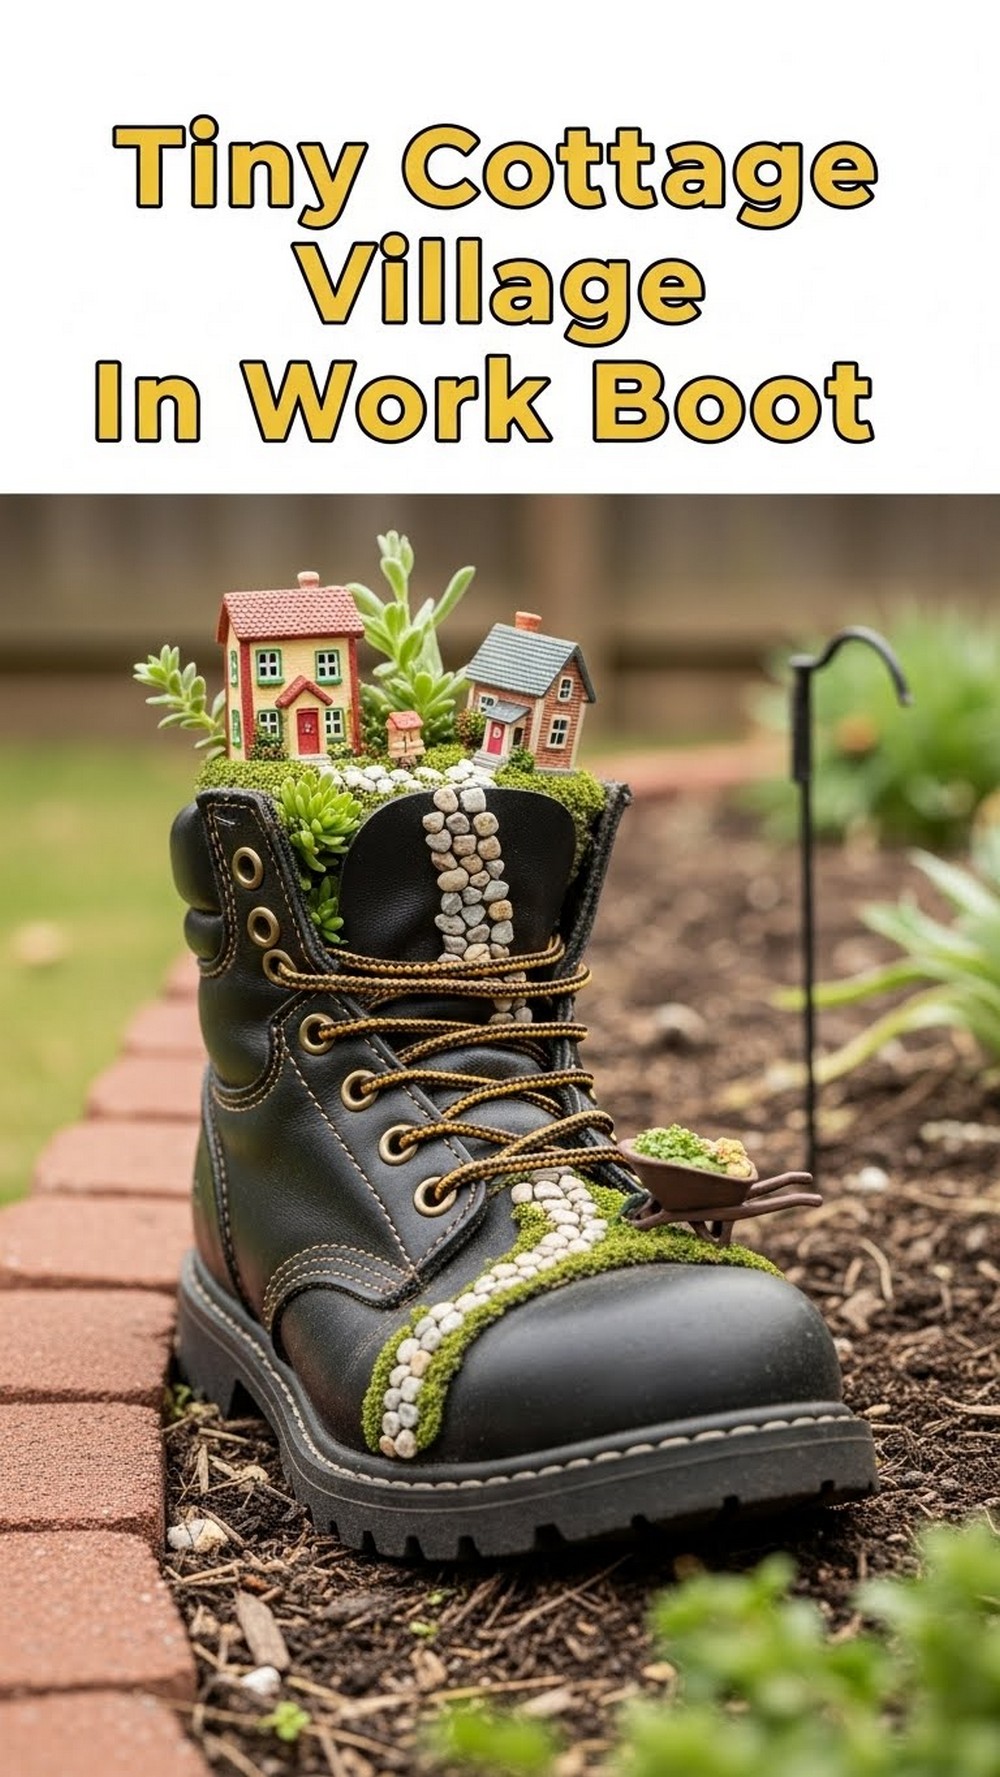
A big old work boot has loads of room for a tiny cottage village. Fill it with soil and create terraces using small stones, then slot in miniature cottages made from painted stones, corks, or little wooden blocks. Plant creeping thyme or baby’s tears to spill between the “houses,” and add a super-small gravel path leading out through the laces. It feels like an entire fairy street tucked into one planter.
- Best For: Sturdy front steps, low walls, or a raised bed edge.
- Budget Tip: Make your own “cottages” from painted pebbles rather than buying ready-made fairy houses.
- Styling Idea: Use soft pastels for cottage roofs for a gentle village feel.
- Practical Note: Choose compact plants so they don’t overwhelm the tiny buildings.
- Care & Maintenance: Trim back any overgrowth that hides key details like doors and chimneys.
Rainbow Kids’ Wellie Fairy Garden
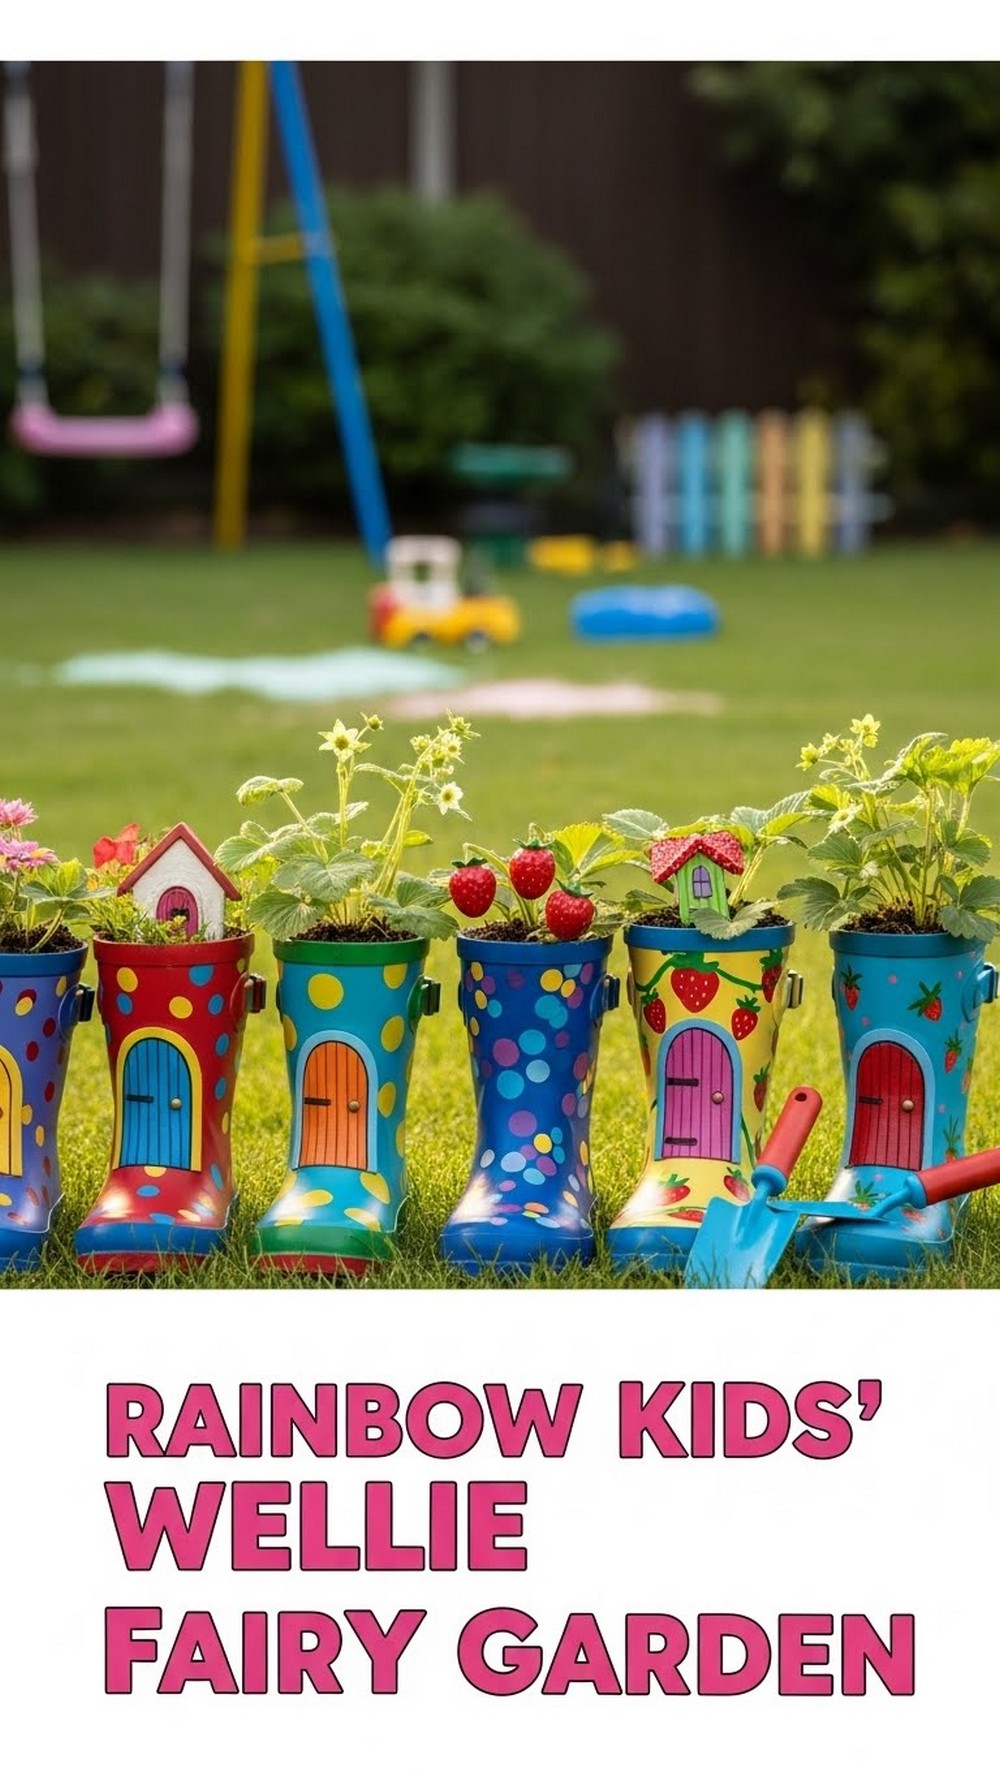
If you have outgrown children’s wellies, line them up and turn each one into a fairy garden dedicated to a different colour. Fill them with soil and let kids choose small plants, stones, and fairy pieces to match their chosen shade. A rainbow row along the edge of a path or play area looks bright and happy, and children will love checking “their” boot for new growth and fairy visits.
- Best For: Family backyards, play corners, and school gardens.
- Budget Tip: Use leftover craft paint and homemade decorations made from twigs and recycled lids.
- Styling Idea: Paint a simple cloud or rainbow sign to sit above the line of boots.
- Practical Note: Anchor wellies by burying a little of the heel so they don’t topple when watered.
- Care & Maintenance: Involve the kids in watering and seasonal replanting to keep them engaged.
Lantern-Lit Pathway Boot Fairy Pot
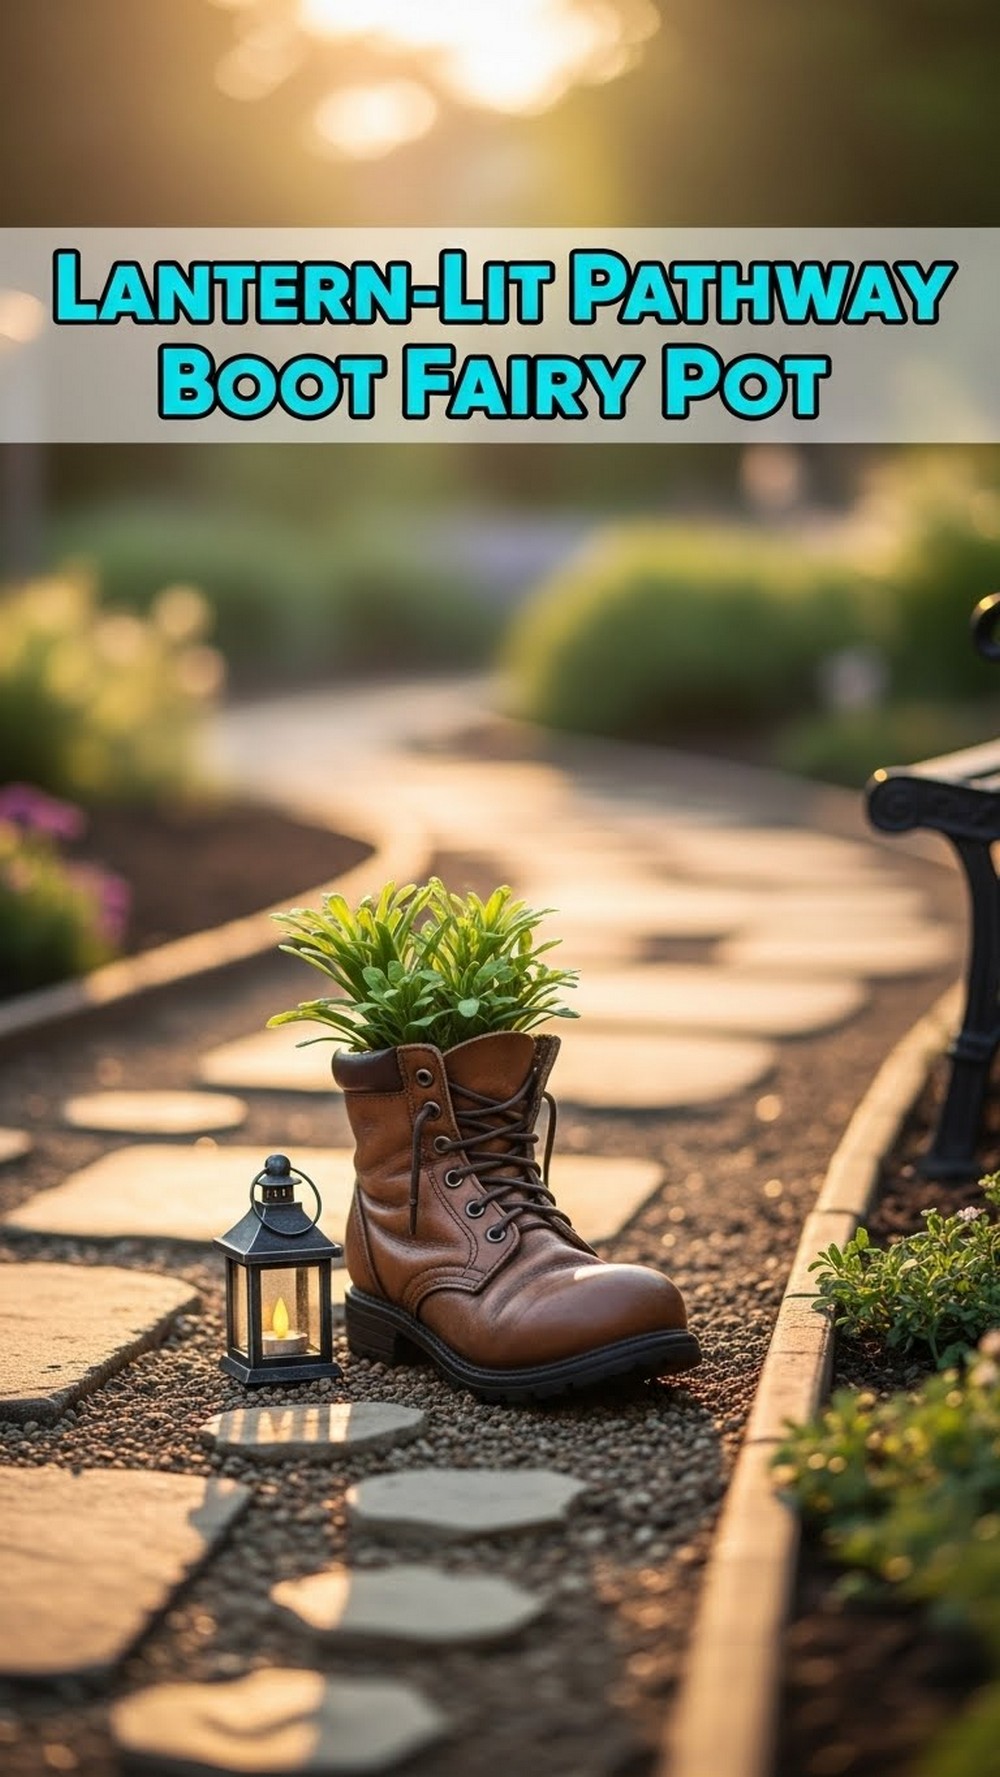
Place a single fairy boot planter beside a small lantern along your garden path to create a cosy, welcoming glow at night. Fill the boot with tiny plants and a miniature door, then stand a solar or battery lantern close by so it casts a warm light over the scene. Repeat this every few metres along the path if you have more boots, turning your walkway into a soft, glowing fairy trail.
- Best For: Garden paths, driveway edges, or routes to sheds and greenhouses.
- Budget Tip: Start with one boot-and-lantern pair, then slowly add more along the path.
- Styling Idea: Choose lanterns in the same metal finish to keep the look pulled together.
- Practical Note: Place boots where feet and mower wheels won’t constantly knock them.
- Care & Maintenance: Check batteries or solar panels regularly and replace plants if they get leggy.
Hanging Fairy Boot Planter On A Fence
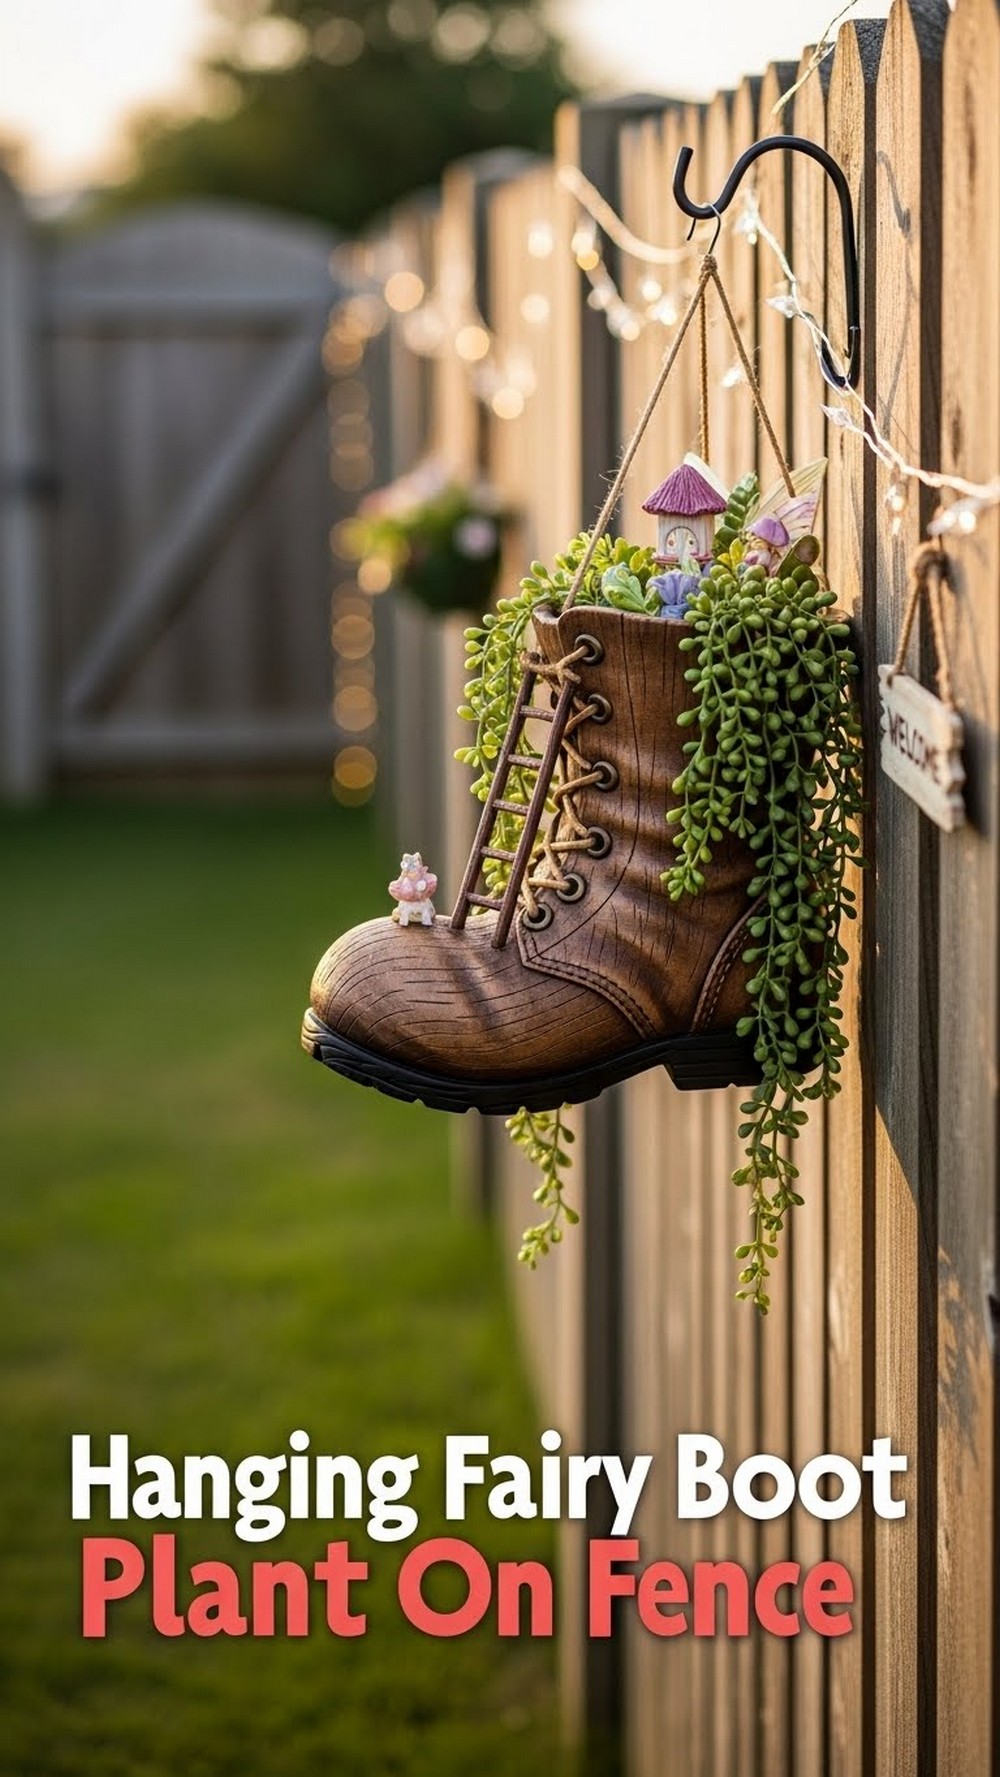
Give a plain fence panel some personality by hanging an old boot planter from a sturdy hook. Plant trailing ivy, small flowers, and a few fairy accents like a ladder or tiny swing hanging from the sole. The vertical height makes the boot feel like a little treehouse on your fence, and it’s easy to reposition if you rearrange the garden. Add one or two more boots if you like the look.
- Best For: Small gardens with lots of vertical fence space.
- Budget Tip: Use old belts or rope as hanging straps instead of buying special brackets.
- Styling Idea: Paint the boot in a colour that echoes your fence or garden furniture.
- Practical Note: Make sure the hook is fixed into a strong section of the fence, not rotten wood.
- Care & Maintenance: Water gently so you don’t splash the fence constantly and cause staining.
Rustic Farmyard Fairy Boot Trough
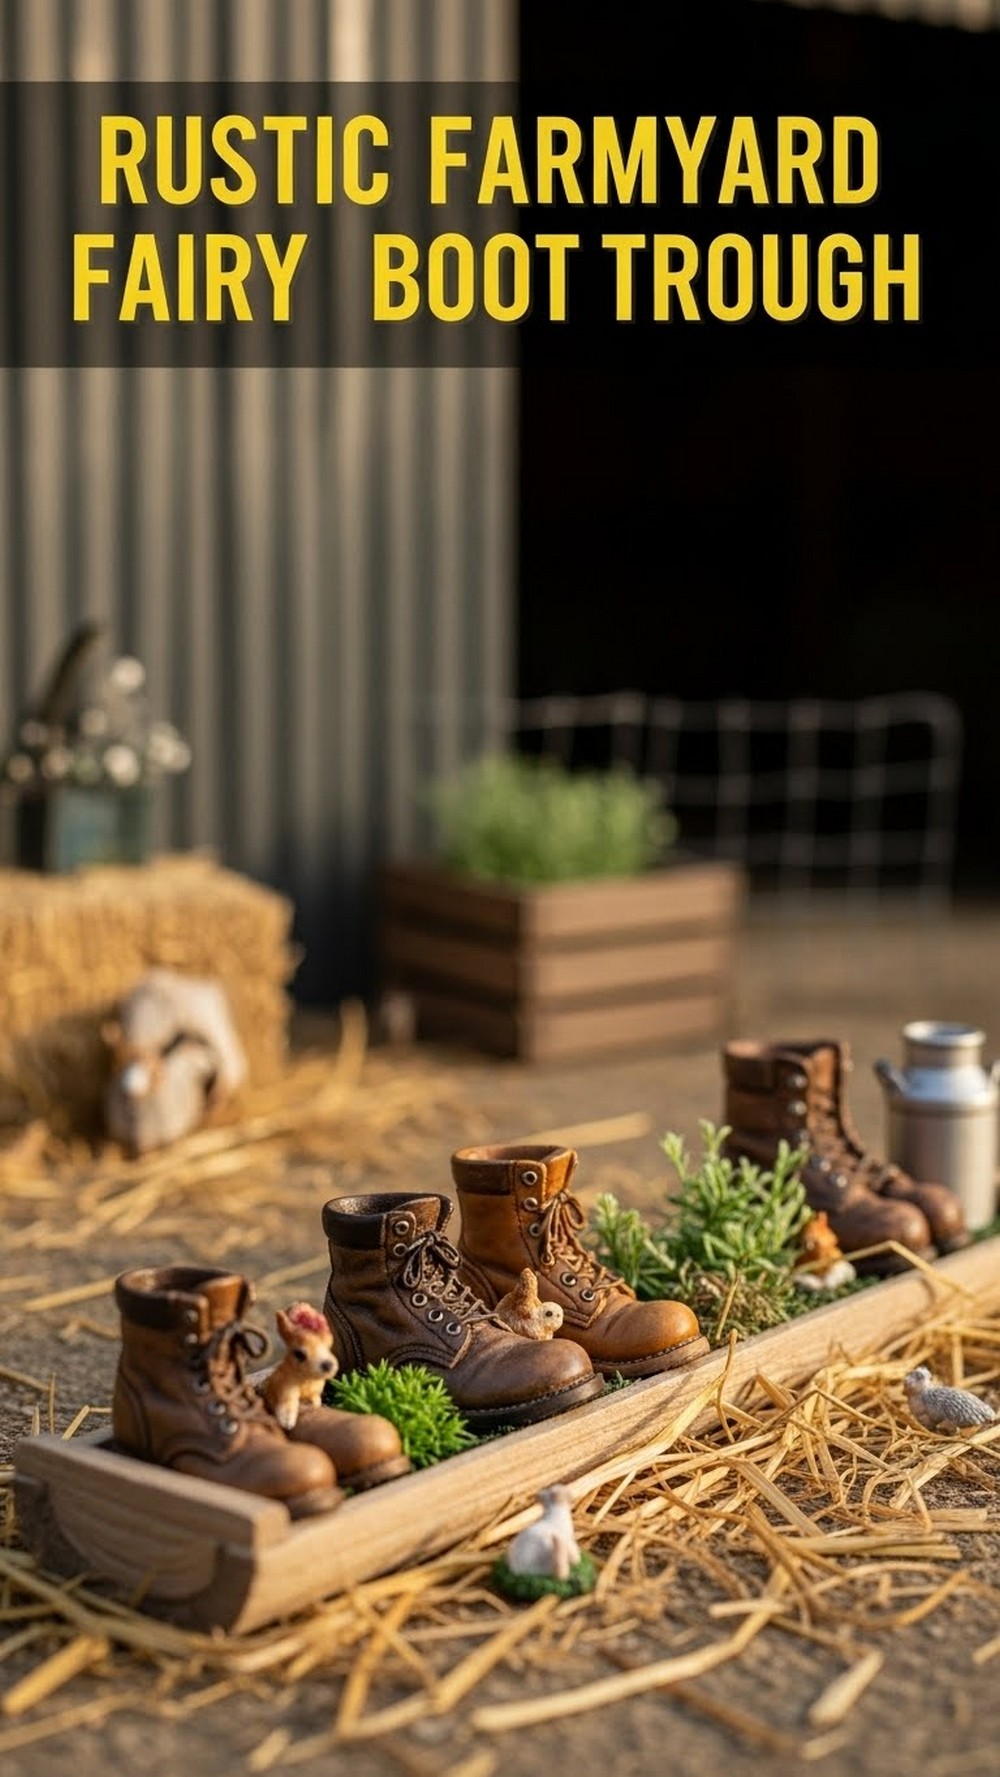
Line up several old work boots along a low wall or bed edge and link them together with straw, tiny animals, and a miniature fence to create a farmyard-style fairy trough. Plant each boot with small herbs, grasses, or sedums to mimic paddocks and fields. The worn leather and scuffs look perfectly at home with the farm theme, and the whole setup adds a sense of story to a simple, rustic garden corner.
- Best For: Country-style gardens, sheds, or allotment plots.
- Budget Tip: Use toy animals from a charity shop and scrap wood for fences and gates.
- Styling Idea: Add a tiny “Farm” sign on a stick at one end of the boot line.
- Practical Note: Place the boots on a level surface so they stand straight and drain properly.
- Care & Maintenance: Replace straw or hay as it weathers and gets messy.
Storybook Window-Sill Boot Fairy Scene
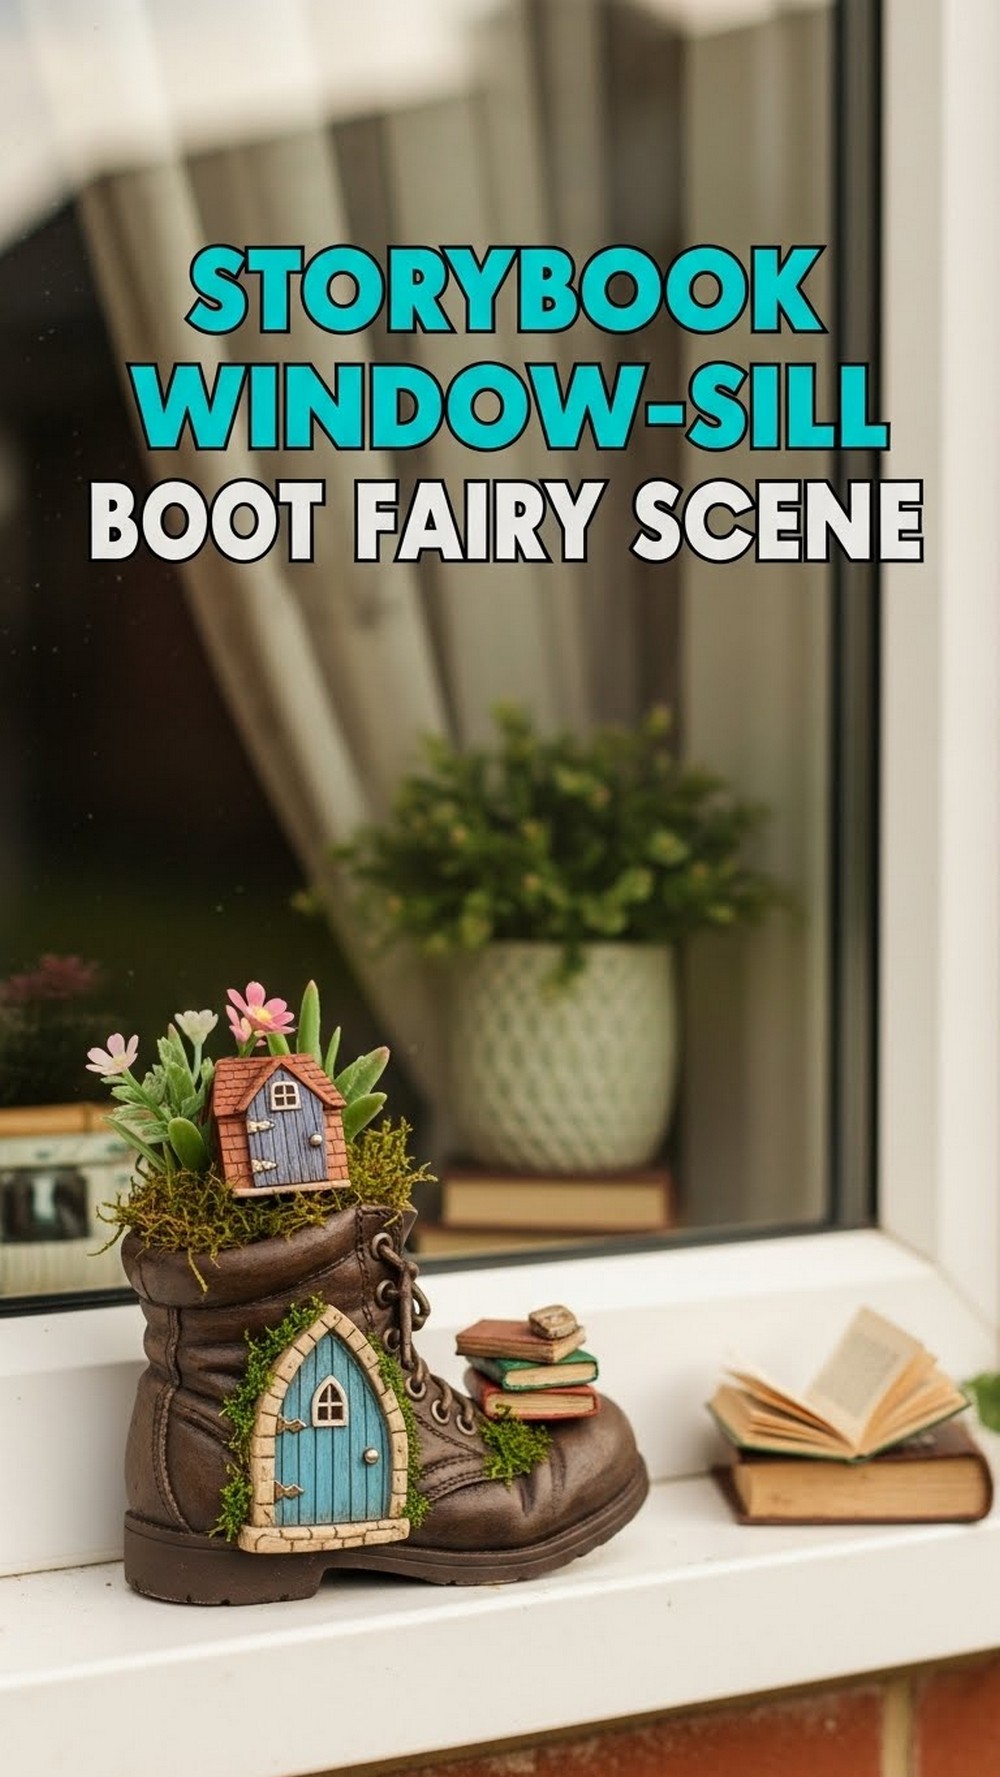
Perch a small boot fairy garden on an exterior window sill to create a scene you can enjoy from inside and out. Plant low-growing moss and miniature flowers, add a tiny book stack or scroll, and maybe a little “reading chair” made from twigs. The window frame behind feels like the backdrop to a story, especially if it’s near a cosy reading spot indoors.
- Best For: Kitchen windows, reading nooks, or garden rooms.
- Budget Tip: Make fairy books from folded, painted cardboard tied with string.
- Styling Idea: Echo the colours of your curtains or kitchenware in the fairy accessories.
- Practical Note: Ensure the boot doesn’t block the window from opening safely.
- Care & Maintenance: Wipe the sill occasionally and check that drainage holes aren’t leaking onto a wall.
Teacup And Boot Fairy Café Corner

Create a tiny fairy café by pairing an old boot planter with miniature teacups on a small patio or table. Fill the boot with plants and add a “café” sign, then set tiny cups, saucers, and tables (made from bottle tops or pebbles) around it. It’s a charming decoration near your own outdoor coffee spot and adds a little sense of play to an otherwise ordinary corner.
- Best For: Patios, deck corners, or beside a garden bench.
- Budget Tip: Use cracked teacups and saucers that are no longer fit for real drinks.
- Styling Idea: Keep everything in soft floral colours to mimic real café china.
- Practical Note: Glue tiny items like cup handles in place so they don’t blow away.
- Care & Maintenance: Bring the most delicate china pieces indoors over winter if frost is an issue.
Watering-Can Spill Boot Fairy Pond
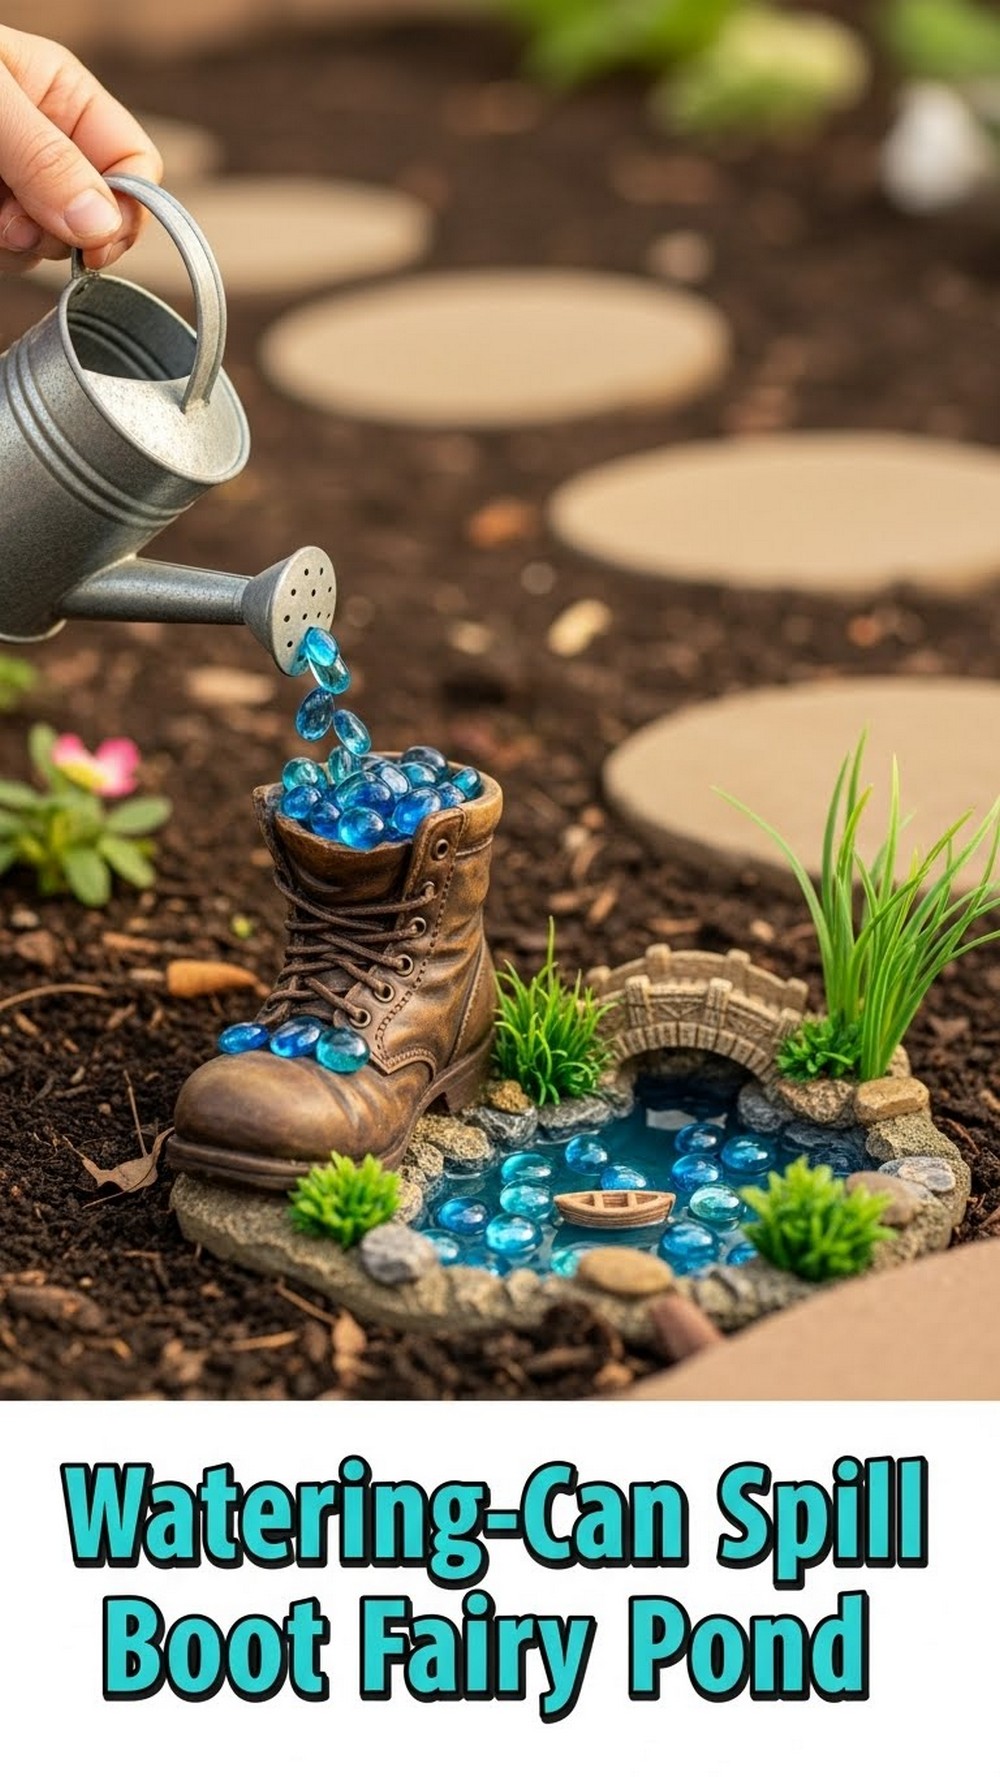
Set a small watering can above an old boot planter and let a “stream” of blue glass pebbles or marbles appear to pour into a miniature pond scene inside the boot. Add a tiny bridge, reeds, and a few fairy creatures at the water’s edge. It looks like a magical stream feeding a secret little pool, especially if you surround the base with more pebbles and plants.
- Best For: Raised beds, rockeries, or edges of gravelled areas.
- Budget Tip: Use old marbles, coloured stones, or even painted pebbles for the water effect.
- Styling Idea: Add a tiny wooden sign that says “Pond” or “Do Not Disturb The Fairies”.
- Practical Note: Secure the watering can well so it doesn’t topple in wind.
- Care & Maintenance: Rinse the “water” stones occasionally to keep them bright.
Night-Sky Glow-In-The-Dark Fairy Boot
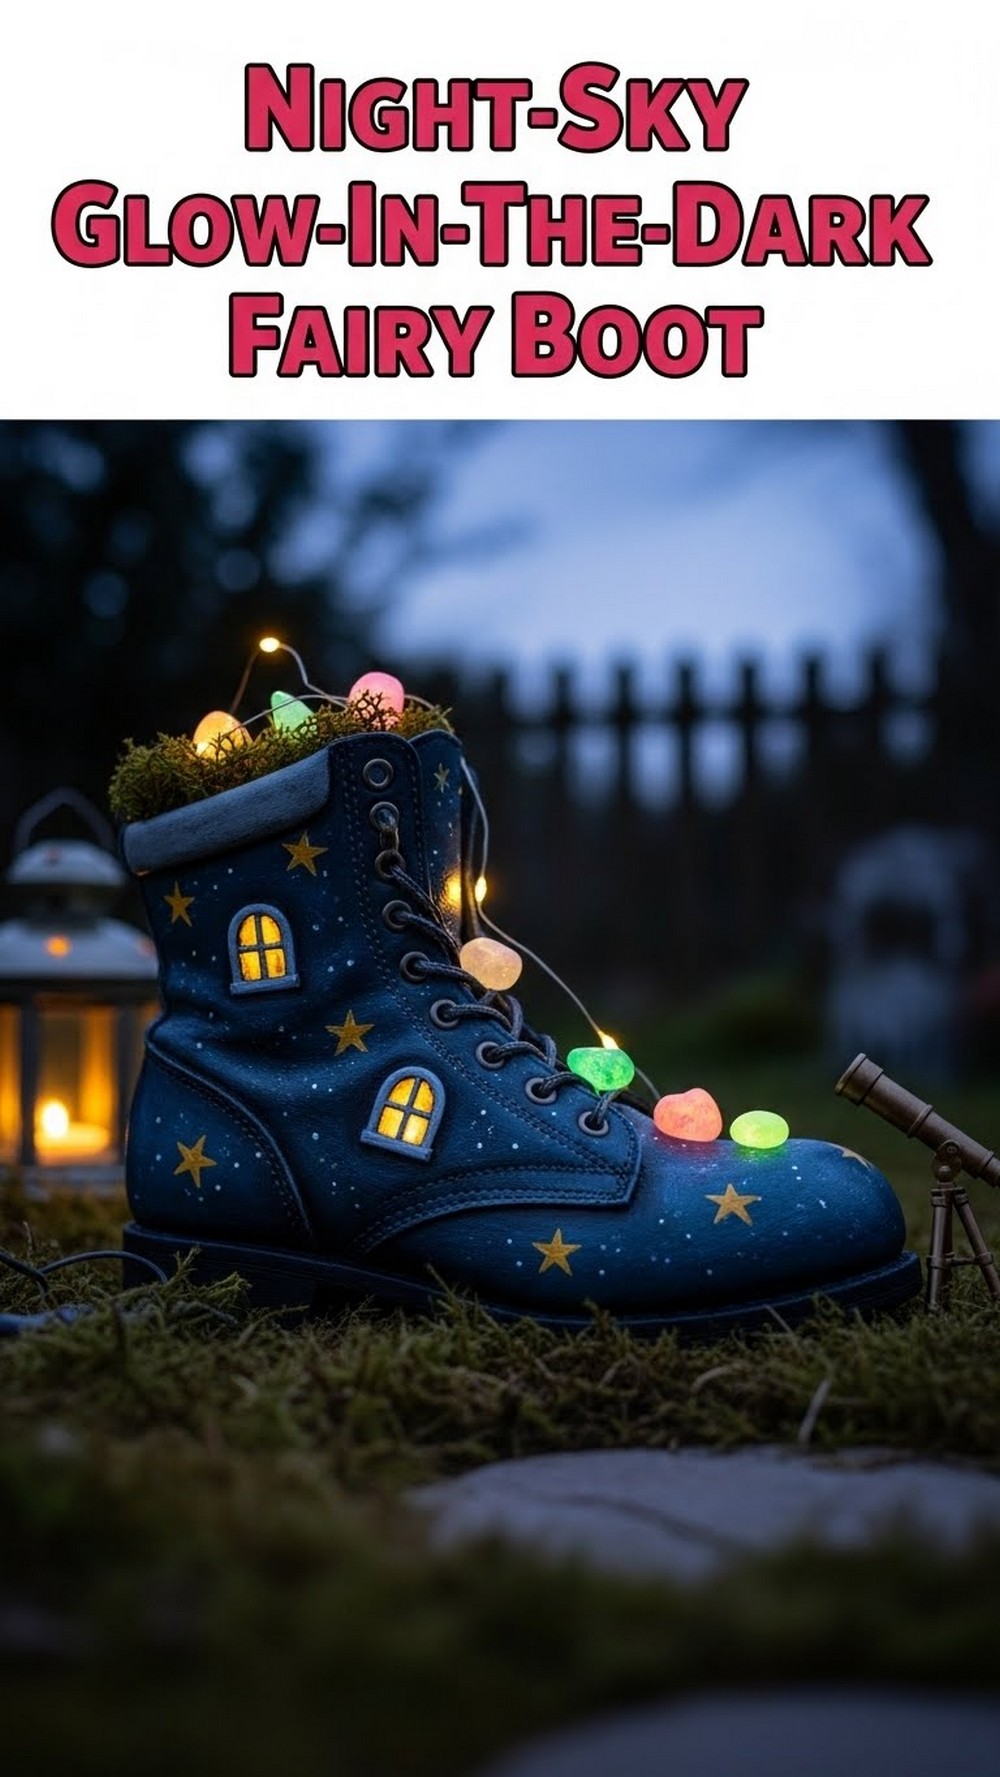
Paint an old boot in dark blue or black, then dot it with tiny glow-in-the-dark stars and moons. Plant it with silver-leaf plants or white flowers and tuck in a short string of warm fairy lights. At dusk, the boot becomes a glowing night-sky house for fairies, especially if you add a tiny ladder heading up toward the “stars.” It’s a lovely feature near a seating area you use after dark.
- Best For: Evening seating spots, firepit areas, or patios.
- Budget Tip: Use inexpensive glow paint and repurpose an existing string of lights.
- Styling Idea: Pair with other night-themed elements like a moon-shaped ornament or star lantern.
- Practical Note: Keep wiring and battery packs tucked safely away from direct rain.
- Care & Maintenance: Reapply glow paint if it fades over time and replace dead bulbs promptly.
Mini Dragon Guard Fairy Boot Planter
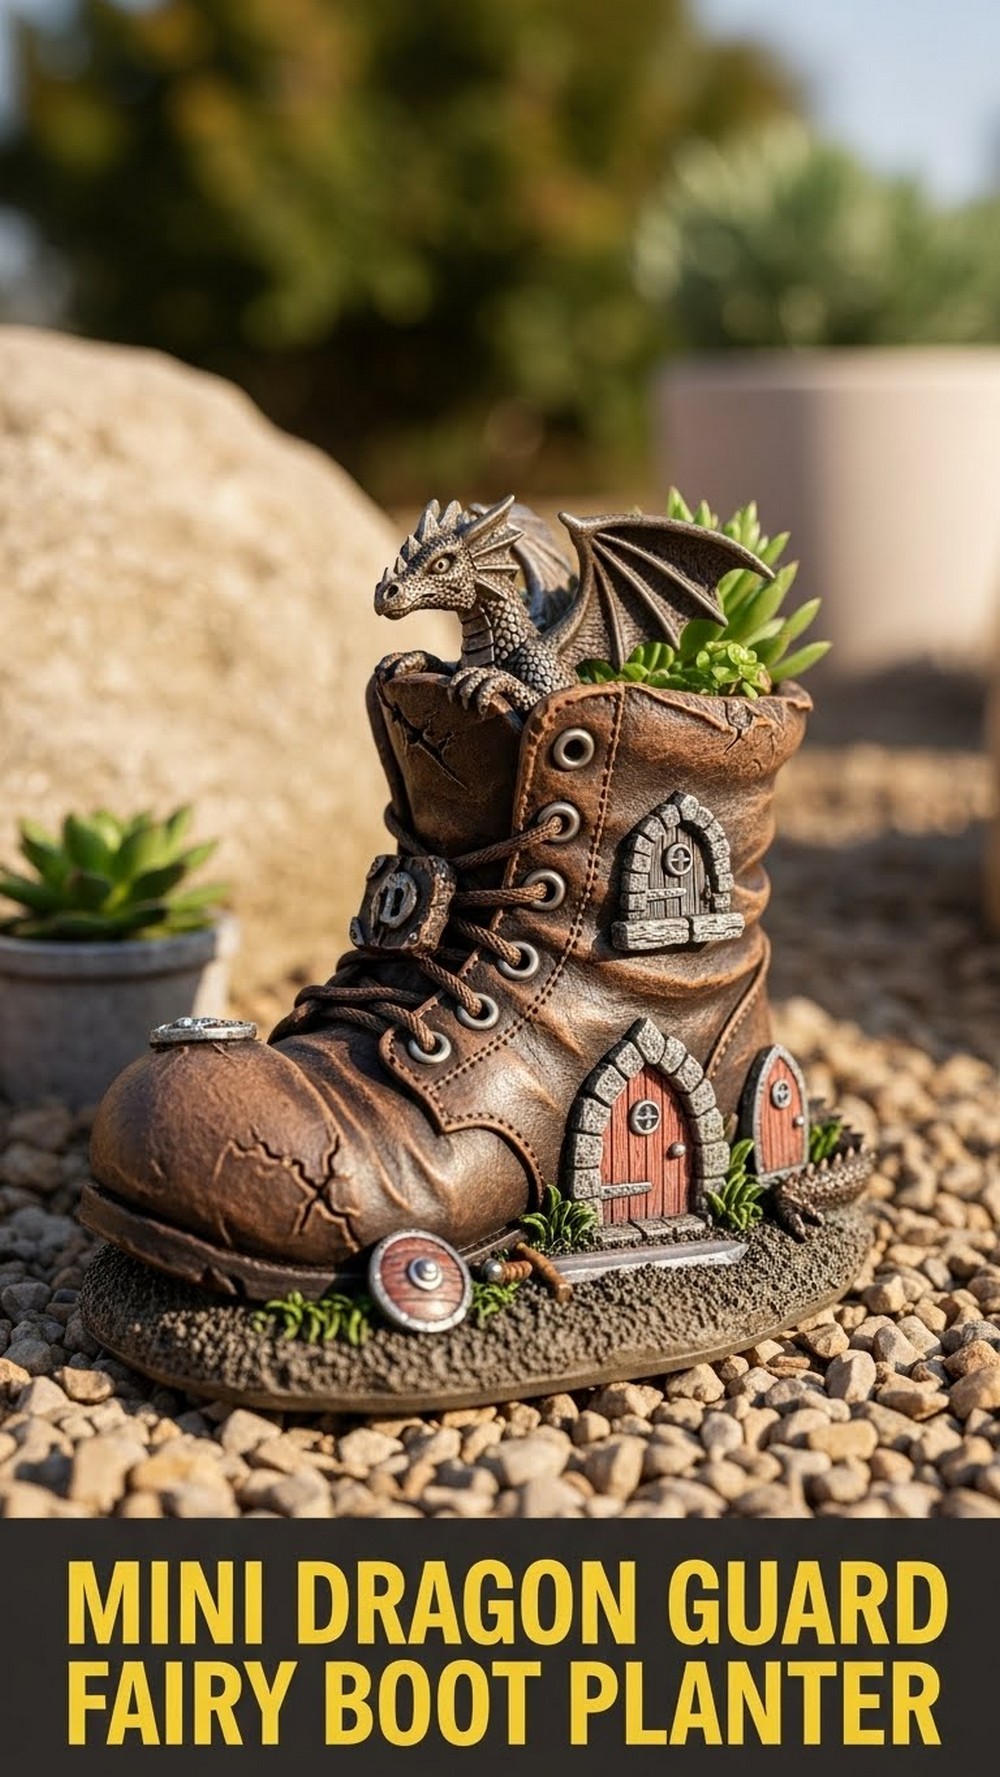
Add a touch of fantasy by placing a small dragon figurine beside or on top of your fairy boot planter. Fill the boot with tough, spiky or textured plants to give it a slightly wilder, more adventurous atmosphere. Small shields, treasure chests, or “dragon eggs” made from painted stones complete the scene. It’s a fun twist for kids or anyone who loves dragons and stories with a little edge.
- Best For: Rock gardens, gravel beds, and fantasy-loving families.
- Budget Tip: Paint your own dragon stones if you can’t find a small dragon figure.
- Styling Idea: Use metallic paints for treasure and accents to catch the light.
- Practical Note: Avoid very soft or delicate plants that might be hidden by bold props.
- Care & Maintenance: Check that heavier figures aren’t damaging or collapsing the boot.
Secret Garden Gate Old Boot Planter
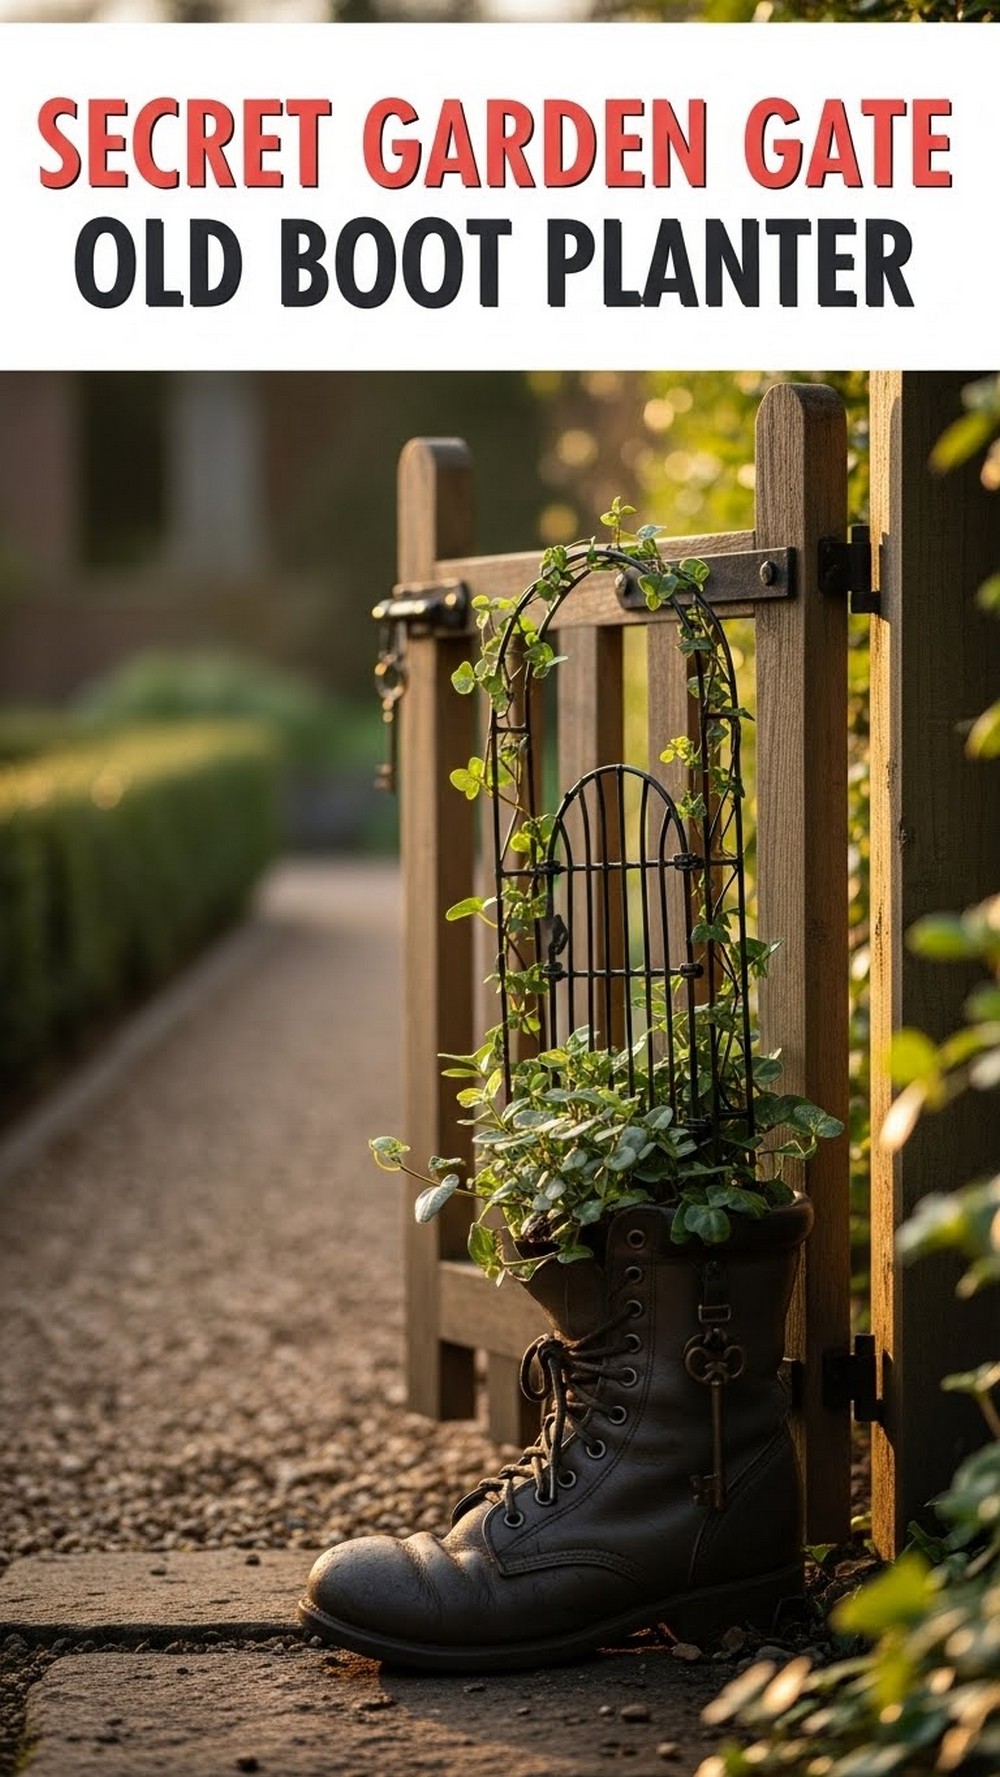
Tuck an old boot planter right beside a small garden gate or arch to mark the entrance to a “secret” area. Decorate it with a tiny gate or arch of its own, plus a miniature key, lock, or sign hinting that fairies live beyond. Climbing plants around the real gate help blur the edges, so spotting the fairy boot feels like finding a hidden clue in a story.
- Best For: Gateways between different parts of your garden.
- Budget Tip: Cut a fairy gate from scrap wood or thick cardboard and seal it with varnish.
- Styling Idea: Stick to one accent colour—like soft blue or sage green—for a calm, magical feel.
- Practical Note: Keep the boot far enough from the main path that it won’t be stepped on.
- Care & Maintenance: Check for rot in the boot regularly and move the scene into a new shoe if needed.
Balcony Rail Fairy Boot Micro Garden
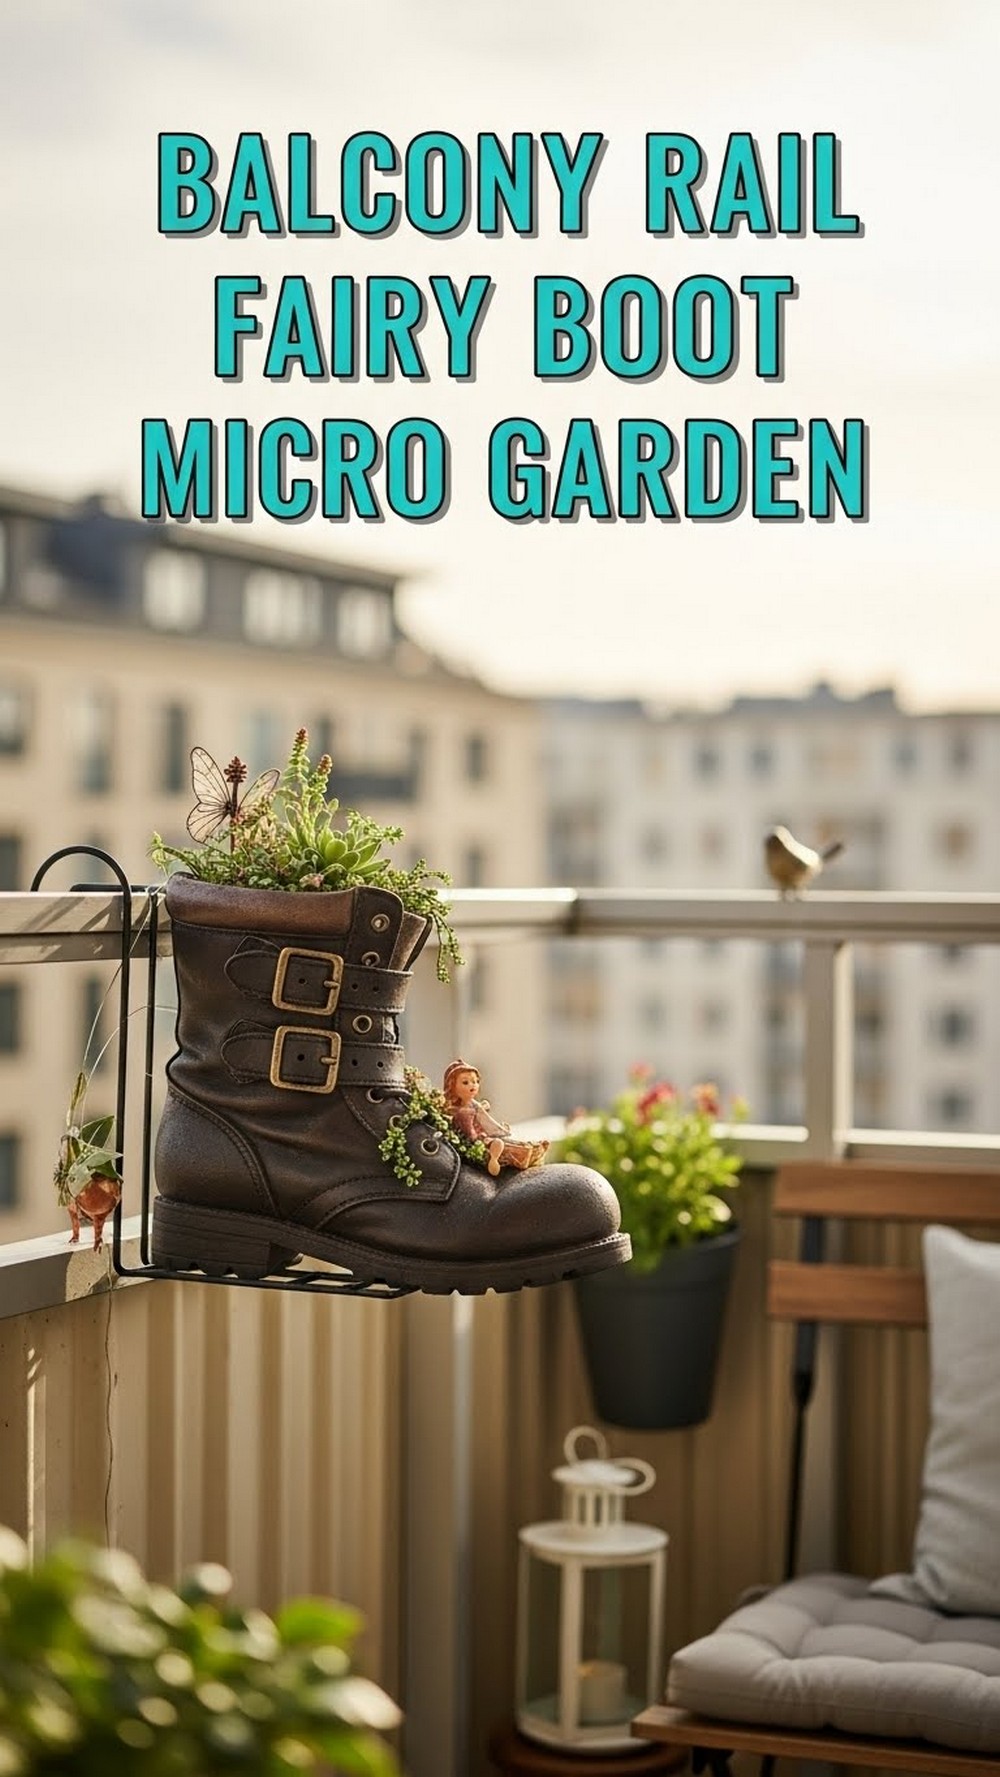
Even in a small apartment, a single fairy boot on the balcony rail can feel like a whole garden in miniature. Secure the boot to the inside of the rail with cable ties or brackets, fill it with a few tiny plants and fairy props, and create a little seating area for yourself nearby. The fairy scene becomes your view while you sip tea, giving your balcony a personal, playful touch.
- Best For: Balconies, fire escape landings, and small rental outdoor spaces.
- Budget Tip: Use cuttings from houseplants and small stones for most of the decoration.
- Styling Idea: Choose accessories that match your balcony cushions or rug for a cohesive look.
- Practical Note: Check weight limits and make sure the boot can’t fall into a neighbour’s space.
- Care & Maintenance: Water gently and frequently, as small planters dry out fast in balcony breezes.
Conclusion
Recycled old boots are ideal for fairy gardens: they’re already worn, full of character, and just the right size for tiny worlds. With a bit of soil, a few hardy plants, and some miniature details, you can turn steps, fences, gates, and balconies into magical little scenes. Start with one boot in a spot you use every day, see how it makes you smile, and then slowly build up a village of fairy planters across your garden.
FAQs
1. Do old boots need special preparation before planting?
Yes. Clean off loose dirt, then poke a few extra drainage holes in the soles if needed. You can add a thin layer of gravel at the bottom to help water drain, then fill with a good potting mix. If the boot is very cracked, line it with an old plastic bag or fabric with a few slits cut for drainage.
2. What plants work best in fairy boot planters?
Choose compact, slow-growing plants like small sedums, creeping thyme, baby’s tears, mini ferns, or dwarf flowers. Look for varieties that suit your light conditions—shade-tolerant for under trees, sun-lovers for open spots. Plants with fine textures and tiny leaves help keep the scene in scale with fairy houses and accessories.
3. Are fairy boot planters suitable for renters?
They’re perfect for renters because they’re completely portable and don’t alter the garden permanently. You can place them on steps, balconies, or next to existing beds without digging. When it’s time to move, simply pick up the boot and take your fairy world with you.
4. How can I decorate on a low budget?
Use what you already have: broken toys, bottle caps as tables, painted pebbles as houses, and sticks for fences or ladders. Old keys, scraps of fabric, and corks make excellent fairy props. Focus on one or two special details per boot rather than filling the whole thing with shop-bought miniatures.
5. How do I keep boot fairy gardens from looking messy over time?
Keep plants trimmed to scale and remove any dead leaves or broken decorations regularly. Once or twice a year, top up the soil and refresh a few key details like signs or doors. If a boot starts to fall apart, treat it as part of the story—then gently rehome the fairy village into a fresh boot or container.
6. Can these ideas work in very small spaces or balconies?
Absolutely. Many of these setups use just one or two boots and rely on vertical space, like railings or window sills. Start with the Balcony Rail Fairy Boot Micro Garden or a single boot by your door, and build up slowly as you see what your space and light can handle.