10 DIY Warm-Weathered Garden Makeover Ideas With Upcycled Finds

If you love the look of sun-faded wood, soft edges, and pieces that look like they’ve lived a life before your garden, this post is for you. A warm, weathered garden doesn’t need a big budget or brand-new décor; it just needs a bit of imagination and a few upcycled finds.
We’ll walk through simple DIY ideas using pallets, crates, old windows, jars, and other “junk” you might already have. Each idea is designed to add character, warmth, and coziness to your outdoor space, whether it’s a small patio, balcony, or full backyard. Pick one corner to start, and turn it into a beautifully worn-in, welcoming retreat.
Quick List
- Build A Weathered Pallet Sofa Lounge
- Create A Rustic Crate Potting Wall
- Turn A Vintage Ladder Into A Tiered Plant Stand
- Make A Tin Can And Jar Lantern Path
- Use A Reclaimed Window Frame As A Garden Backdrop
- Cluster Galvanized Buckets As Rustic Planters
- Style A Mismatched Chair And Bench Seating Nook
- Edge Beds With Reclaimed Bricks And Stones
- Design A Broken Terracotta Herb And Fairy Corner
- Curate A Salvaged Tool And Frame Garden Gallery
1. Build A Weathered Pallet Sofa Lounge

Turn old pallets into a relaxed outdoor sofa that looks like it’s always been part of your garden. Stack and screw together pallets to form a low base, then add a backrest with extra boards if needed. Top with thick outdoor cushions, throws, and some soft, sun-faded textiles. The rough wood contrasts beautifully with lush greenery and terracotta pots, instantly creating a warm, weathered lounge where you can read, nap, or sip evening tea.
- Best For: Patios, decks, or any corner with a wall or fence behind it.
- Budget Tip: Ask local shops for free pallets and start with just one small two-seater.
- Styling Idea: Choose cushions in sandy neutrals, soft blues, and stripes for a coastal-weathered mood.
- Practical Note: Sand rough edges and seal the wood lightly to avoid splinters and extend its life.
- Extra Idea: Add a simple crate coffee table on wheels to match the rustic look.
2. Create A Rustic Crate Potting Wall

Old wooden crates stacked or hung on a fence become an instant vertical garden with a timeworn feel. Secure larger crates horizontally as shelves and smaller ones vertically to hold pots, watering cans, and trailing plants. The wood’s faded logos and scratches add charm, and you’ll gain storage plus display space in one go. Mix in different pot sizes and a few decorative items like lanterns or jars to keep it visually interesting.
- Best For: Narrow gardens or balconies where floor space is limited.
- Budget Tip: Source cheap second-hand crates or use sturdy fruit crates from markets.
- Styling Idea: Stick to clay pots, galvanized metal, and soft green foliage for a cohesive rustic palette.
- Practical Note: Use strong brackets and screws to fix crates securely, especially on windy sites.
3. Turn A Vintage Ladder Into A Tiered Plant Stand

A worn wooden ladder is perfect for building vertical height in a warm-weathered garden. Prop it safely against a wall or fence and use each step as a little stage for pots, lanterns, and trailing plants. The patina and peeling paint create instant character. You can play with layers: herbs on lower rungs for easy picking, flowers at eye level, and pretty trailing varieties at the top to gently cascade down.
- Best For: Small patios, courtyards, or beside a door where you need slimline decor.
- Budget Tip: Look for old ladders at flea markets or online, even if they’re no longer safe for climbing.
- Styling Idea: Mix terracotta with chipped enamel mugs and small baskets to enhance the collected-over-time look.
- Care & Maintenance: Brush off dirt, check for rot, and add a clear matte seal if the wood is very fragile.
4. Make A Tin Can And Jar Lantern Path

Turn everyday tins and jars into magical path lighting that gives your garden a warm evening glow. Clean and dry the cans, then punch simple patterns or holes using a hammer and nail. Wrap wire around the tops of jars and drop in candles or battery tea lights. Line them along a gravel path or cluster them on steps and walls. When lit at dusk, the mix of glass and weathered metal looks beautifully cozy and inviting.
- Best For: Evening seating areas, entry paths, and around patios.
- Budget Tip: Save cans and jars from the kitchen; you only need candles or fairy lights to finish.
- Styling Idea: Use twine, simple ribbons, or scraps of lace to soften the tops of jars for a cottage feel.
- Practical Note: Use LED candles where wind, children, or pets might be an issue.
5. Use A Reclaimed Window Frame As A Garden Backdrop

A tired old window frame can become a dreamy focal point behind a bench, planter, or small seating area. Clean, lightly sand, and either leave the frame weathered or paint it in a soft, muted colour like sage, cream, or dusty blue. Mount it onto a fence or wall and let climbers weave through the empty panes. Add a few pots and fairy lights beneath to create a “view” even if your garden faces a plain fence.
- Best For: Bland fences, walls, or the back of a shed that needs charm.
- Budget Tip: Ask salvage yards or neighbours renovating their homes for old windows.
- Styling Idea: Combine with metal lanterns and terracotta pots for a gentle, old-world garden vibe.
- Practical Note: Remove glass for safety or ensure any remaining panes are secure and out of reach of play areas.
6. Cluster Galvanized Buckets As Rustic Planters
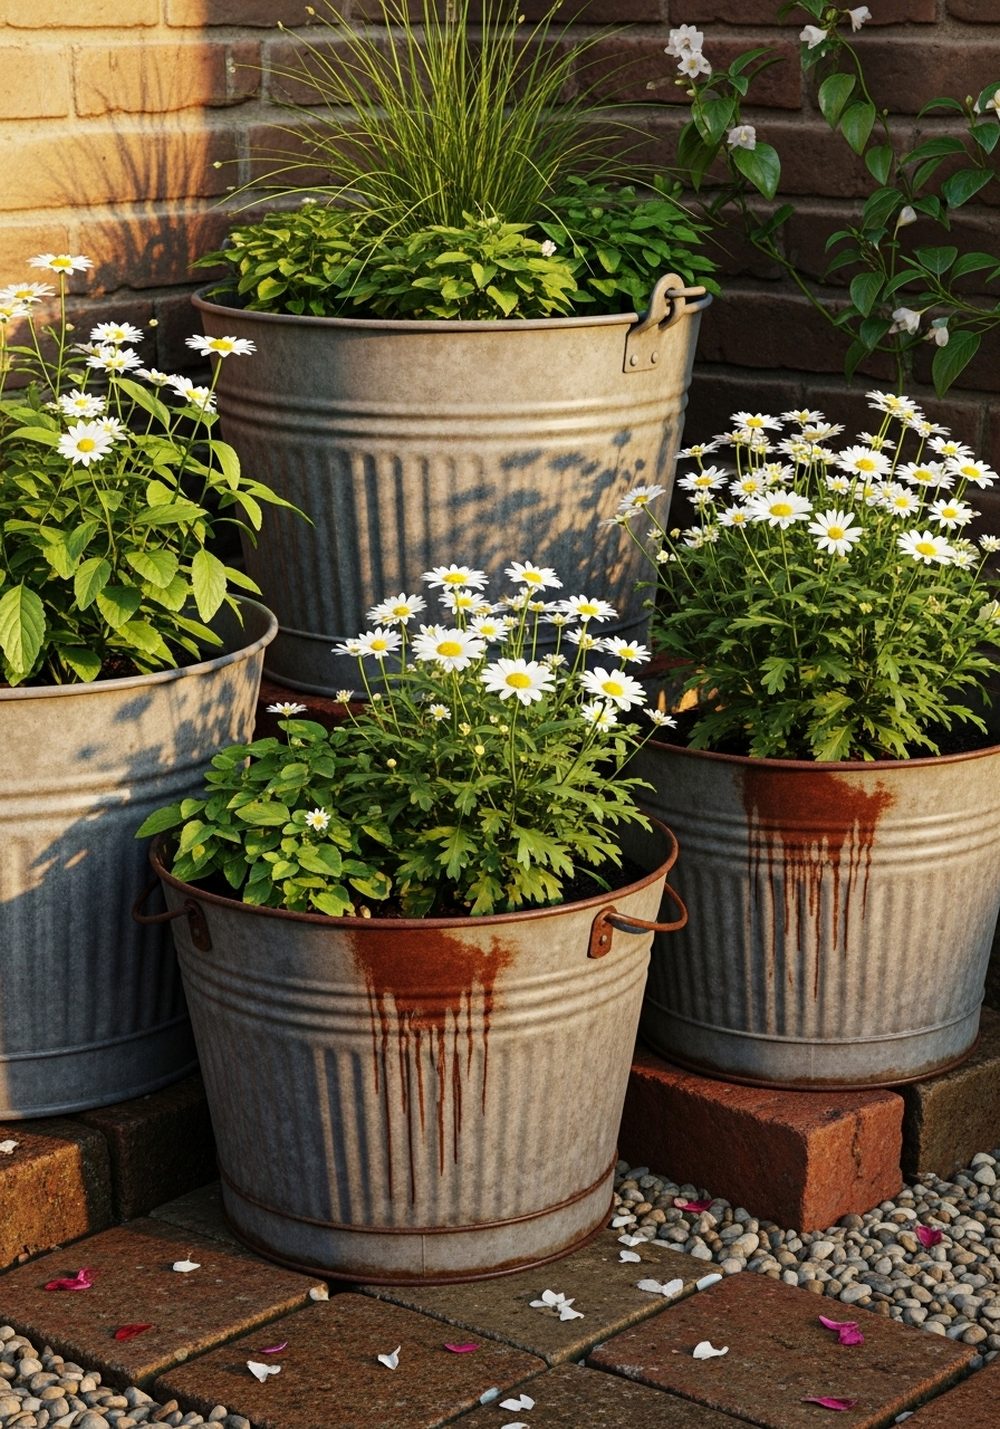
Reclaimed metal buckets and tubs are brilliant for creating an instant, weathered container garden. Group different sizes together and fill them with a mix of grasses, flowering plants, and herbs. The softened shine of old galvanized metal pairs beautifully with fresh foliage and flowers, giving that lived-in, relaxed feel. Add bricks or logs underneath some buckets to stagger the heights and make the display look more deliberate and layered.
- Best For: Corners of patios, beside steps, or framing a garden bench.
- Budget Tip: Use second-hand buckets, old laundry tubs, or paint tins with holes punched in for drainage.
- Styling Idea: Stick to a simple colour scheme—like white, lavender, and green—to keep the grouping calm and cohesive.
- Care & Maintenance: Check drainage regularly so roots don’t sit in water, and top up soil as it settles.
7. Style A Mismatched Chair And Bench Seating Nook

Gather old chairs and a short bench that have seen better days, then turn them into the cutest seating nook. Leave some pieces naturally weathered and lightly paint others in soft whites or muted colours, sanding back a little for a worn effect. Add cushions, throws, and a small table or crate in the middle. Surround the area with potted plants and maybe a lantern or two, and suddenly that forgotten corner feels like a lived-in, story-filled spot.
- Best For: Shady corners, under trees, or against a garden wall.
- Budget Tip: Collect chairs one by one from thrift shops, curbside finds, or friends clearing garages.
- Styling Idea: Mix stripes, florals, and simple plains in a warm, sun-faded palette for a cozy boho look.
- Practical Note: Check joints are solid and place on level ground so seating is safe and comfortable.
8. Edge Beds With Reclaimed Bricks And Stones
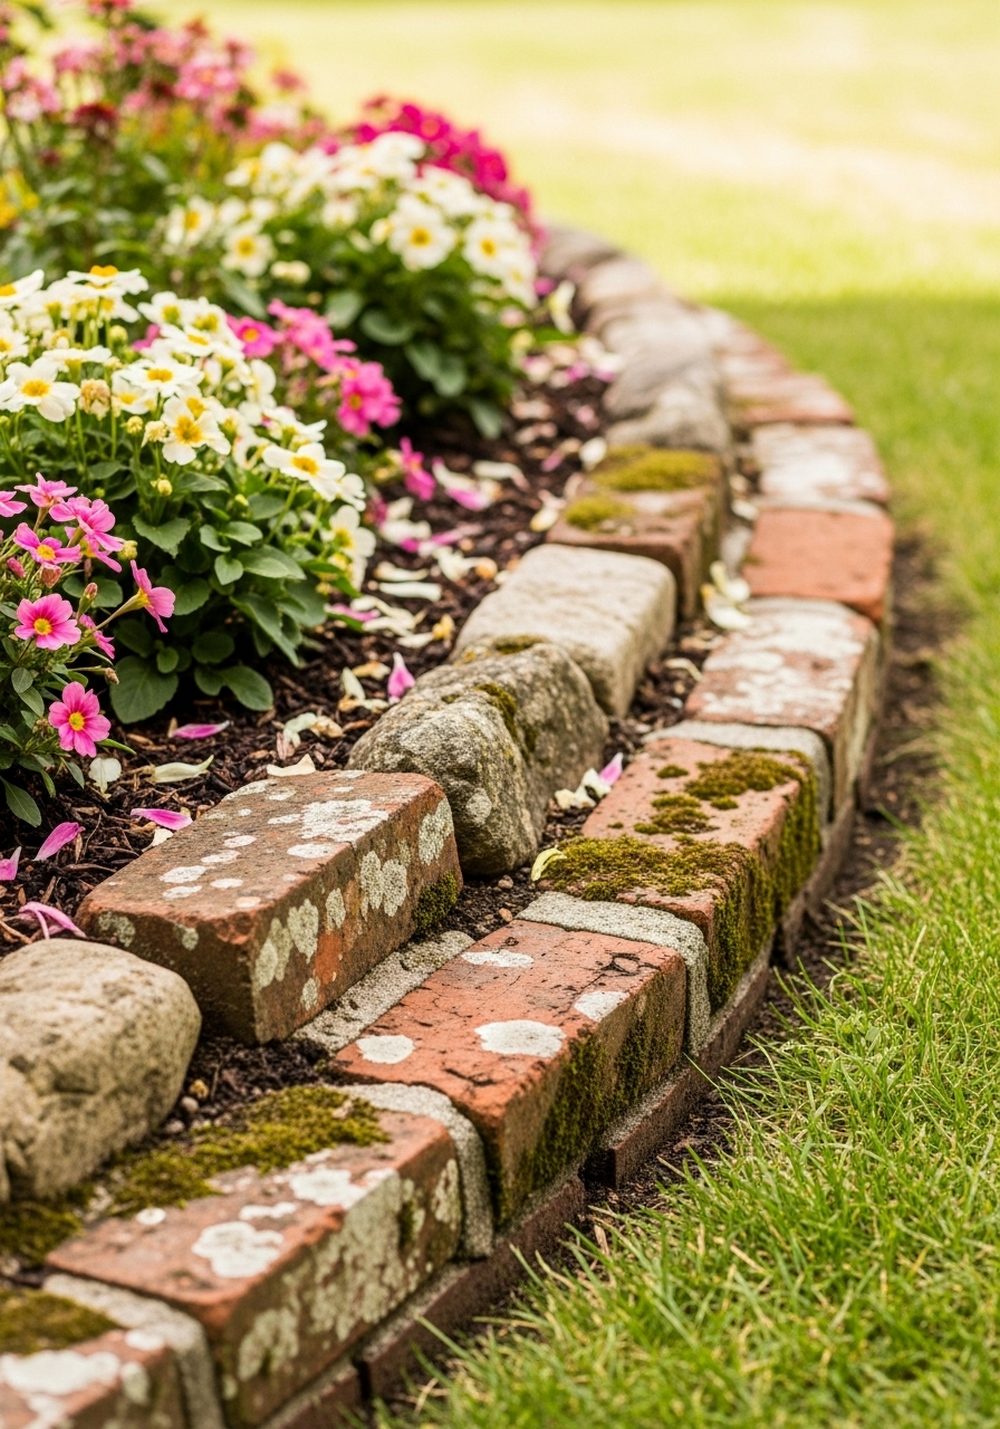
Instead of buying new edging, reuse old bricks, pavers, and stones to define flower beds and paths. Set them slightly on their sides or at varying heights to create a gently uneven, naturally weathered border. The soft, irregular line helps your garden feel older and more settled, especially when moss and creeping plants start to tuck into the gaps. It’s a simple project that instantly tidies the look of lawn edges and makes planting beds stand out.
- Best For: Traditional gardens, cottage-style spaces, and informal lawns.
- Budget Tip: Use leftover building materials or ask neighbours for unwanted bricks and rubble.
- Styling Idea: Pair warm-toned brick edging with soft pinks, whites, and deep greens in your planting for a classic look.
- Practical Note: Dig a shallow trench so edges sit firmly and are safe for walking and mowing nearby.
9. Design A Broken Terracotta Herb And Fairy Corner

Don’t throw away cracked terracotta pots—turn them into a charming herb and fairy corner. Stack broken pieces to form stepped mini terraces, filling each level with soil and planting thyme, oregano, or low-growing flowers. Tuck in tiny fairy doors, miniature furniture, or a small pebble path to create a secret world. The chipped edges and moss stains add to the warm-weathered atmosphere and make this little corner a delight for kids and adults alike.
- Best For: Small patches near seating areas or beside a path where you’ll see the details.
- Budget Tip: Use every broken pot you have and top up with a few cheap herbs from the garden centre.
- Styling Idea: Keep fairy pieces simple and natural—wood, stone, and metal look more timeless than bright plastic.
- Care & Maintenance: Trim herbs regularly so they don’t swamp the miniature details.
10. Curate A Salvaged Tool And Frame Garden Gallery

Turn an ordinary fence into an outdoor gallery using old tools, frames, and small upcycled pieces. Hang antique trowels, hand forks, and rakes inside or around empty wooden frames, mixing in small pots and trailing plants. The rust, worn handles, and chipped paint create a beautiful contrast with green foliage and flowers. Add a soft line of fairy lights or a single outdoor wall lamp to highlight the display in the evenings and give the whole area a warm glow.
- Best For: Long fences or blank shed walls you see often from the house.
- Budget Tip: Collect old tools from relatives, markets, or house clearances; they don’t need to be usable.
- Styling Idea: Limit the colour palette to wood, rust, and one accent colour so the display feels curated, not cluttered.
- Practical Note: Use strong hooks and screws, and avoid hanging heavy pieces where children play.
Conclusion
A warm-weathered garden makeover isn’t about perfection; it’s about character, softness, and stories told through old wood, faded metal, and well-loved finds. By upcycling crates, buckets, windows, and more, you can give your outdoor space a cozy, lived-in personality without spending a fortune. Start with one corner, one old chair, or one cluster of pots, then slowly build up layers over time. Your garden will grow into a place that feels uniquely and beautifully yours.
FAQs
1. How can I decorate my garden on a very small budget?
Focus on using what you already have first: old tins, jars, crates, bricks, and broken pots. Then add plants in stages, starting with hardy, affordable options like herbs and basic bedding flowers. Simple touches like lanterns, a pallet bench, or a crate wall can completely change the mood without big spending.
2. Are these upcycled ideas suitable for renters?
Yes. Many ideas are non-permanent or easy to remove and take with you. Pallet sofas, crate walls, ladder plant stands, bucket planters, and jar lanterns can all be freestanding. If you need to attach anything to a fence or wall, use minimal fixings and ask permission from your landlord first.
3. What are some low-maintenance options for a weathered look?
Galvanized bucket planters, reclaimed brick edging, and tool galleries are all fairly low maintenance. Choose tough plants like grasses, lavender, rosemary, and hardy shrubs that cope well with a bit of neglect. Use mulch in beds and containers to reduce watering and weeding while keeping everything looking neat.
4. How do I keep my garden looking weathered but not messy?
Choose a simple colour palette and repeat materials—like terracotta, galvanized metal, and soft neutrals—so everything feels intentional. Group items in clusters rather than scattering them randomly. Regularly tidy dead leaves, broken pieces, and litter, and edit out anything that doesn’t fit the warm, relaxed mood you want.
5. What ideas work best for really small spaces or balconies?
Vertical solutions shine in tiny spaces. Try a vintage ladder plant stand, a crate potting wall, jar lanterns hung on railings, and a single pallet bench or chair. Use tall, narrow planters and hanging pots to bring height without using too much floor space. Even a tiny balcony can feel rich and cozy with a few layered textures.
6. Are there any safety tips for using old materials outdoors?
Always check wood for rot and splinters, sand rough edges, and avoid sharp rusty pieces where people sit or children play. For metal items, ensure there are no sharp points sticking out at eye or hand level. If you use real candles in lanterns, place them away from flammable materials and consider LED options in breezy or busy areas.