10 Painted Tin Can Planters For Outdoor Decor
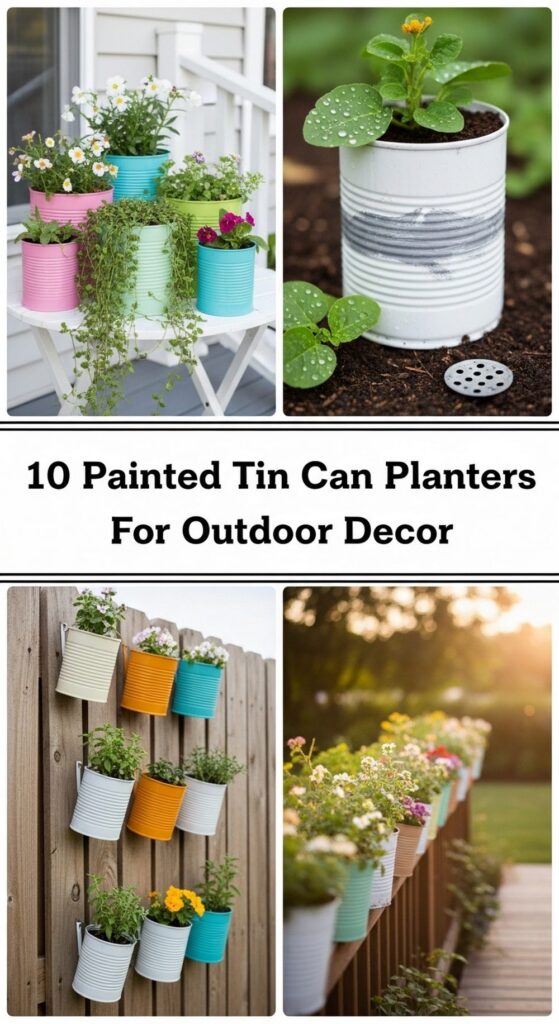
If you’ve been saving old tins from the kitchen and wondering what to do with them, this is your sign. Painted tin cans make brilliant little planters for balconies, patios, porches, and small gardens. They’re light, easy to hang, and a perfect weekend project.
In this post, you’ll find ten creative ways to turn empty cans into eye-catching outdoor decor. From rainbow herb rails to minimalist table planters, these ideas are budget-friendly and simple enough for beginners. A few coats of paint, some drainage holes, and a handful of plants can completely refresh your outdoor space and give it a fun, personal touch.
Quick List
- Rainbow Stripe Tin Can Herb Rail
- Chalkboard-Label Tin Can Kitchen Garden
- Pastel Ombre Hanging Tin Can Cluster
- Rustic Enamel-Look Tin Can Window Box
- Polka Dot Tin Can Flower Tower
- Stenciled Tin Can Numbered Planters
- Nautical Rope-Wrapped Tin Can Pots
- Boho Patterned Tin Can Lantern Planters
- Kids’ Hand-Painted Tin Can Bug Garden
- Monochrome Minimal Tin Can Table Planters
1. Rainbow Stripe Tin Can Herb Rail
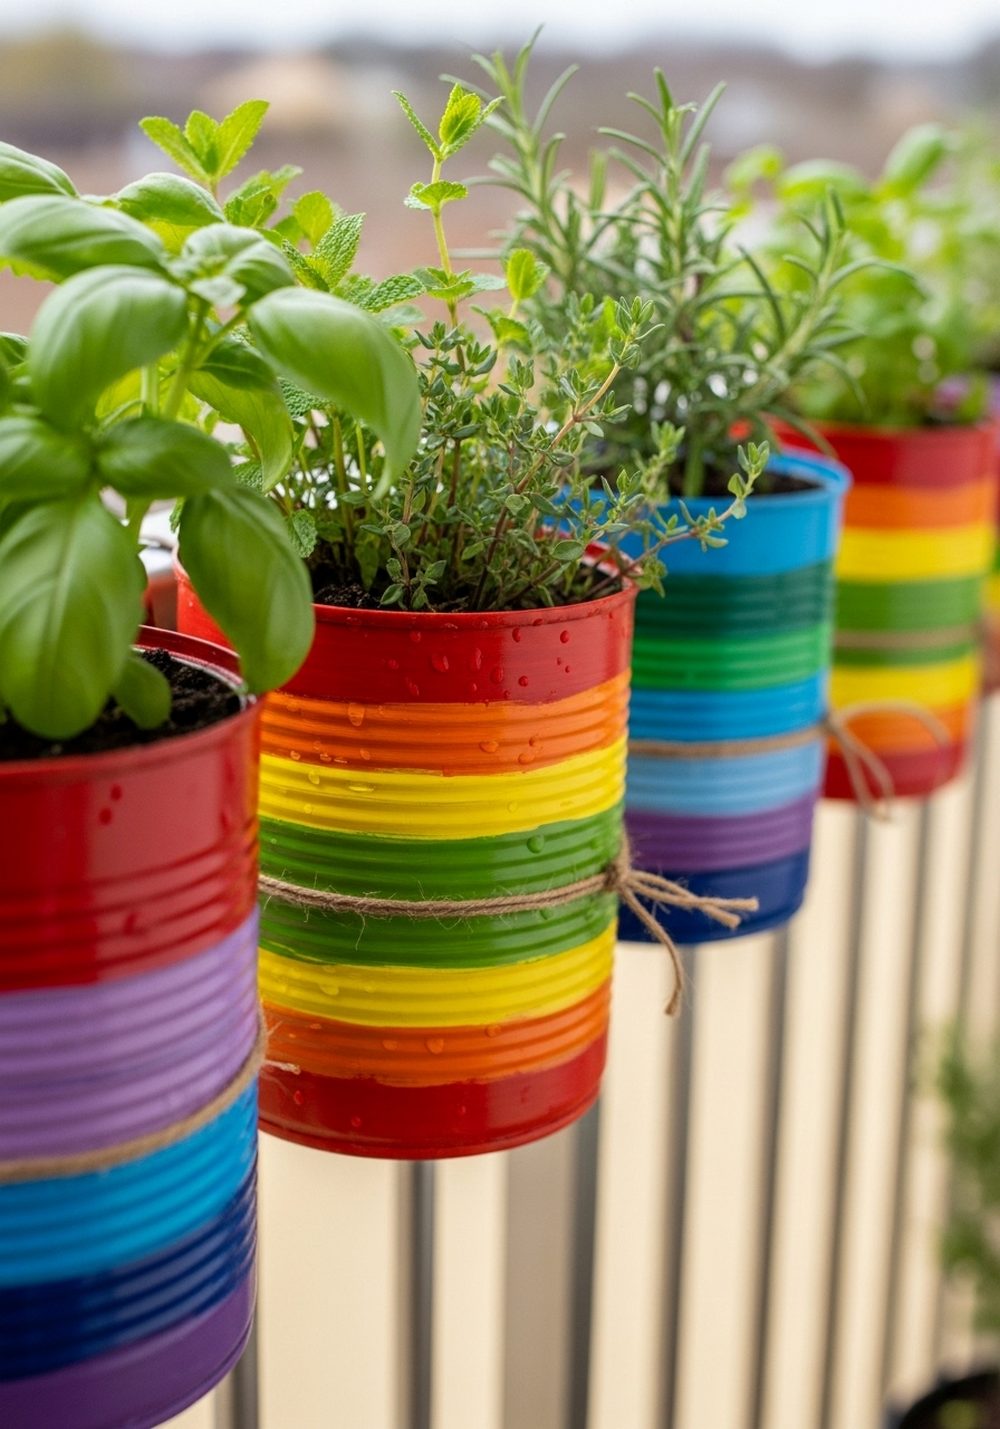
Turn a plain balcony or fence rail into a cheerful herb display with rainbow-striped tin cans. Paint each can in bright glossy bands, punch drainage holes in the bottom, and attach them to a wooden rail or directly to metal bars with hose clamps or sturdy wire. Fill with potting mix and tuck in your favourite herbs. The stripes look especially good against simple backgrounds, and the different green tones of the plants make the colours pop.
- Best For: Balconies, railings, and narrow spaces that need a bold splash of colour.
- Budget Tip: Use leftover craft paints or tester pots and free scrap wood for the rail.
- Styling Idea: Repeat the rainbow colours in seat cushions or an outdoor rug nearby.
- Practical Note: Group thirstier herbs together so watering is easier to manage.
2. Chalkboard-Label Tin Can Kitchen Garden
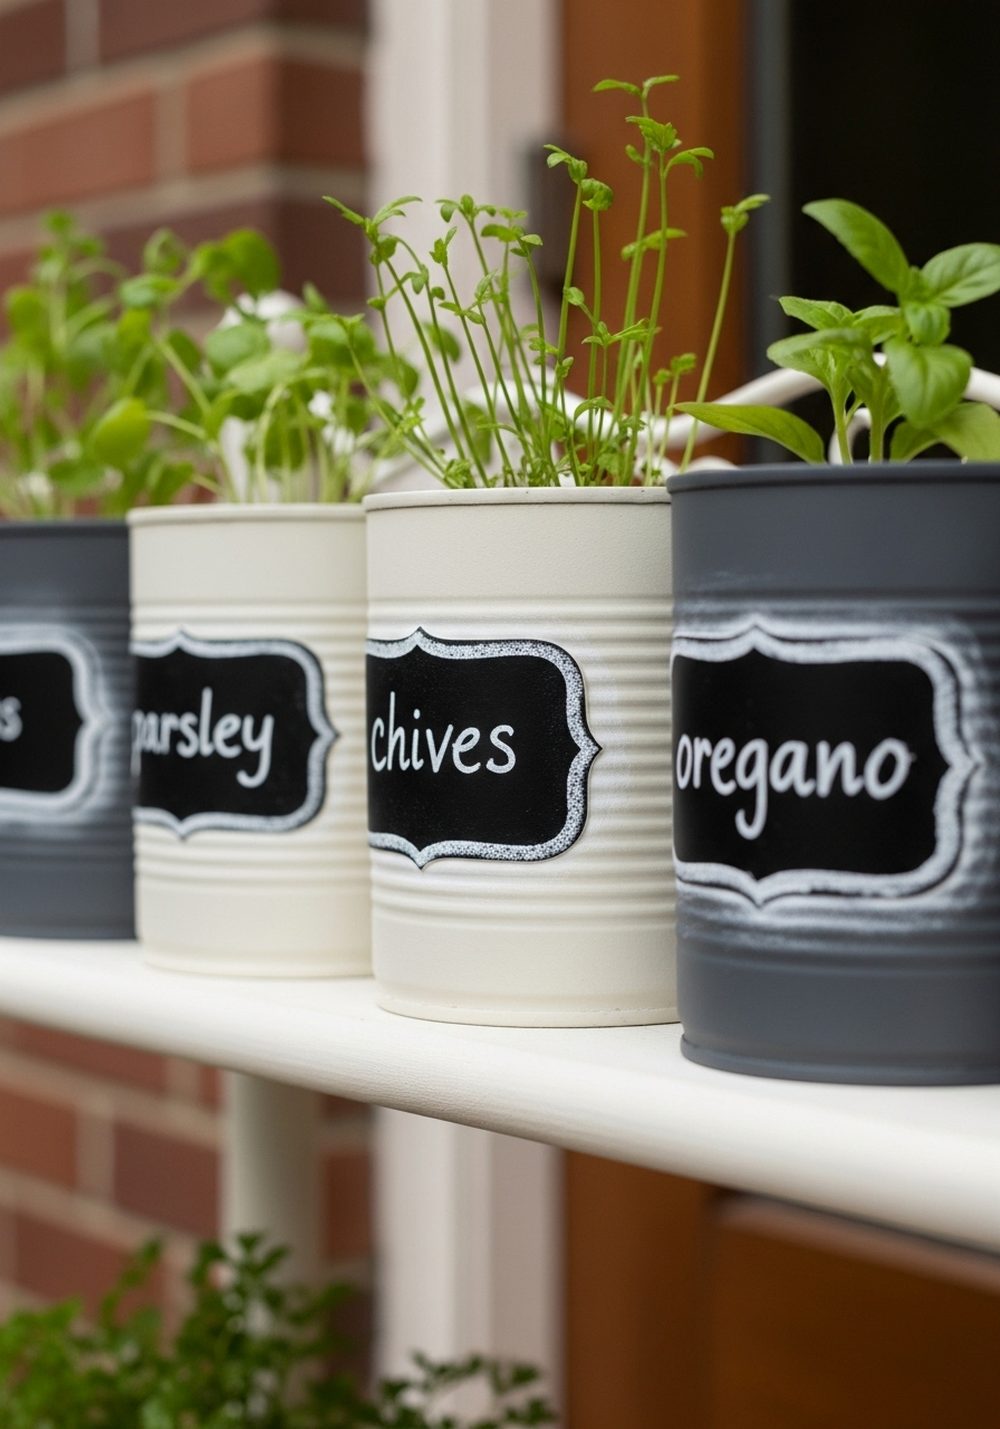
For cooks who love easy access to fresh flavours, chalkboard-label tin cans are ideal. Paint cans in neutral shades like cream or charcoal, then add a strip of chalkboard paint on one side. Once dry, write plant names in chalk and line them up on a shelf or windowsill just outside the kitchen door. The simple colours keep things calm and tidy, while the handwritten labels add charm and make it easy to swap plants as you go.
- Best For: Small patios, doorsteps, and outdoor kitchen corners.
- Budget Tip: One small tin of chalkboard paint will label lots of cans.
- Styling Idea: Keep the palette monochrome and let the green herbs be the star.
- Care & Maintenance: Rewriting labels when plants change keeps the display looking fresh.
3. Pastel Ombre Hanging Tin Can Cluster
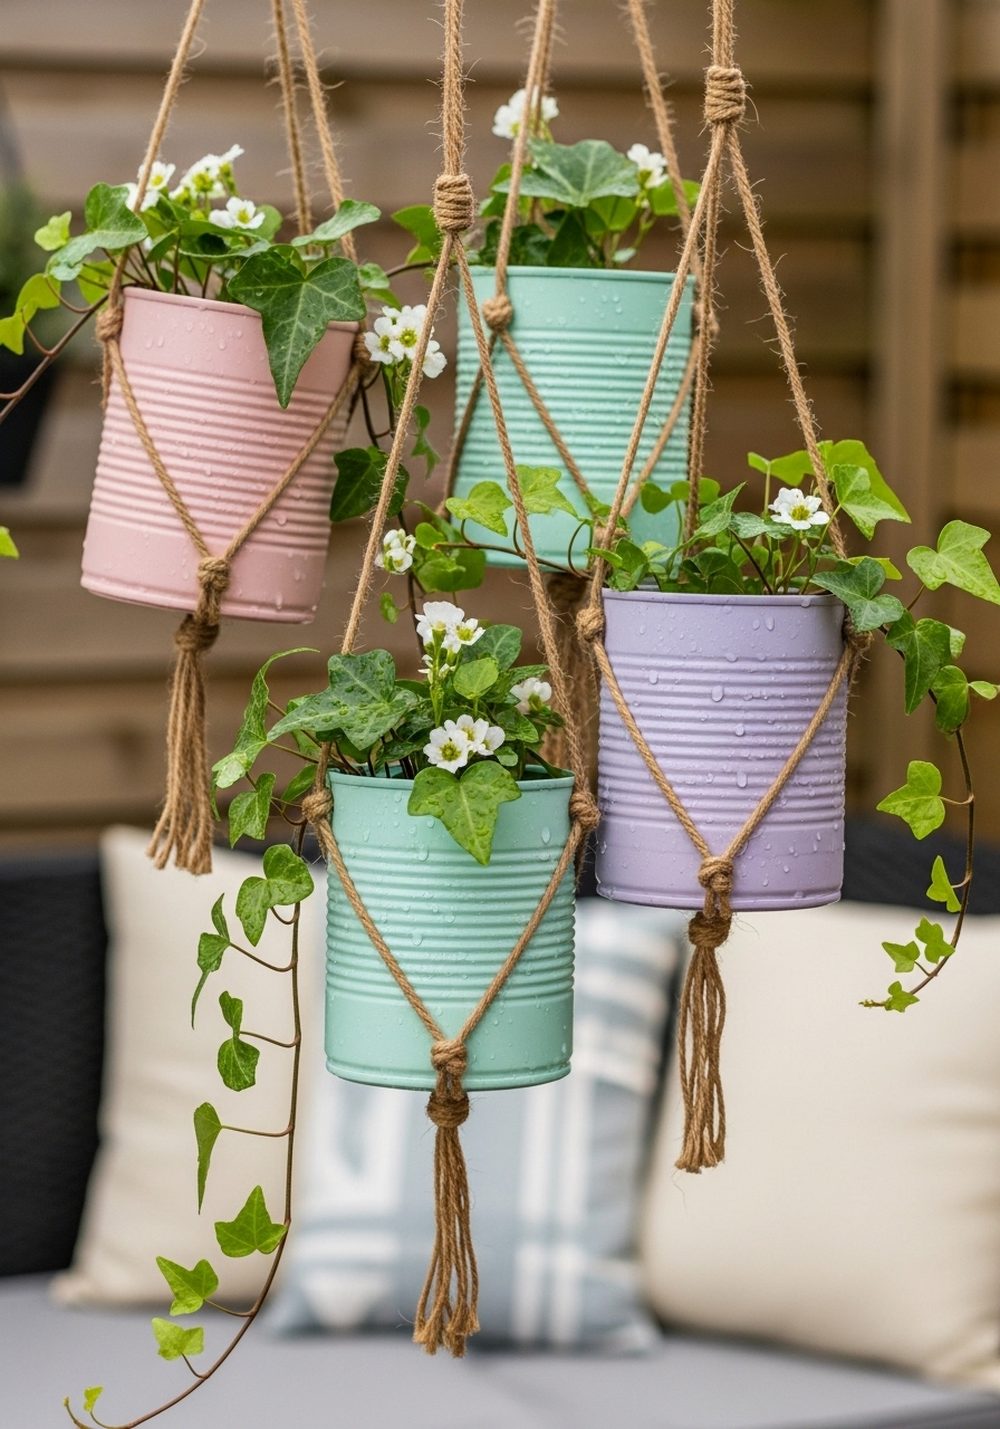
Soft pastel ombre cans look dreamy hanging in a cluster over a seating area. Choose three or four shades and blend them from darker at the bottom to paler at the top of each can. Drill two small holes near the rim, thread through jute twine, and hang them at slightly different heights from a beam, hook, or sturdy branch. Trailing plants like ivy or cascading petunias will spill over the sides and add movement when the breeze catches them.
- Best For: Creating a romantic focal point above a bench or bistro set.
- Budget Tip: Mix white paint into brighter colours to create your own pastel tones.
- Styling Idea: Match the ombre shades to outdoor cushions or a tablecloth.
- Practical Note: Check fixings regularly so the cluster stays safe in windy weather.
4. Rustic Enamel-Look Tin Can Window Box
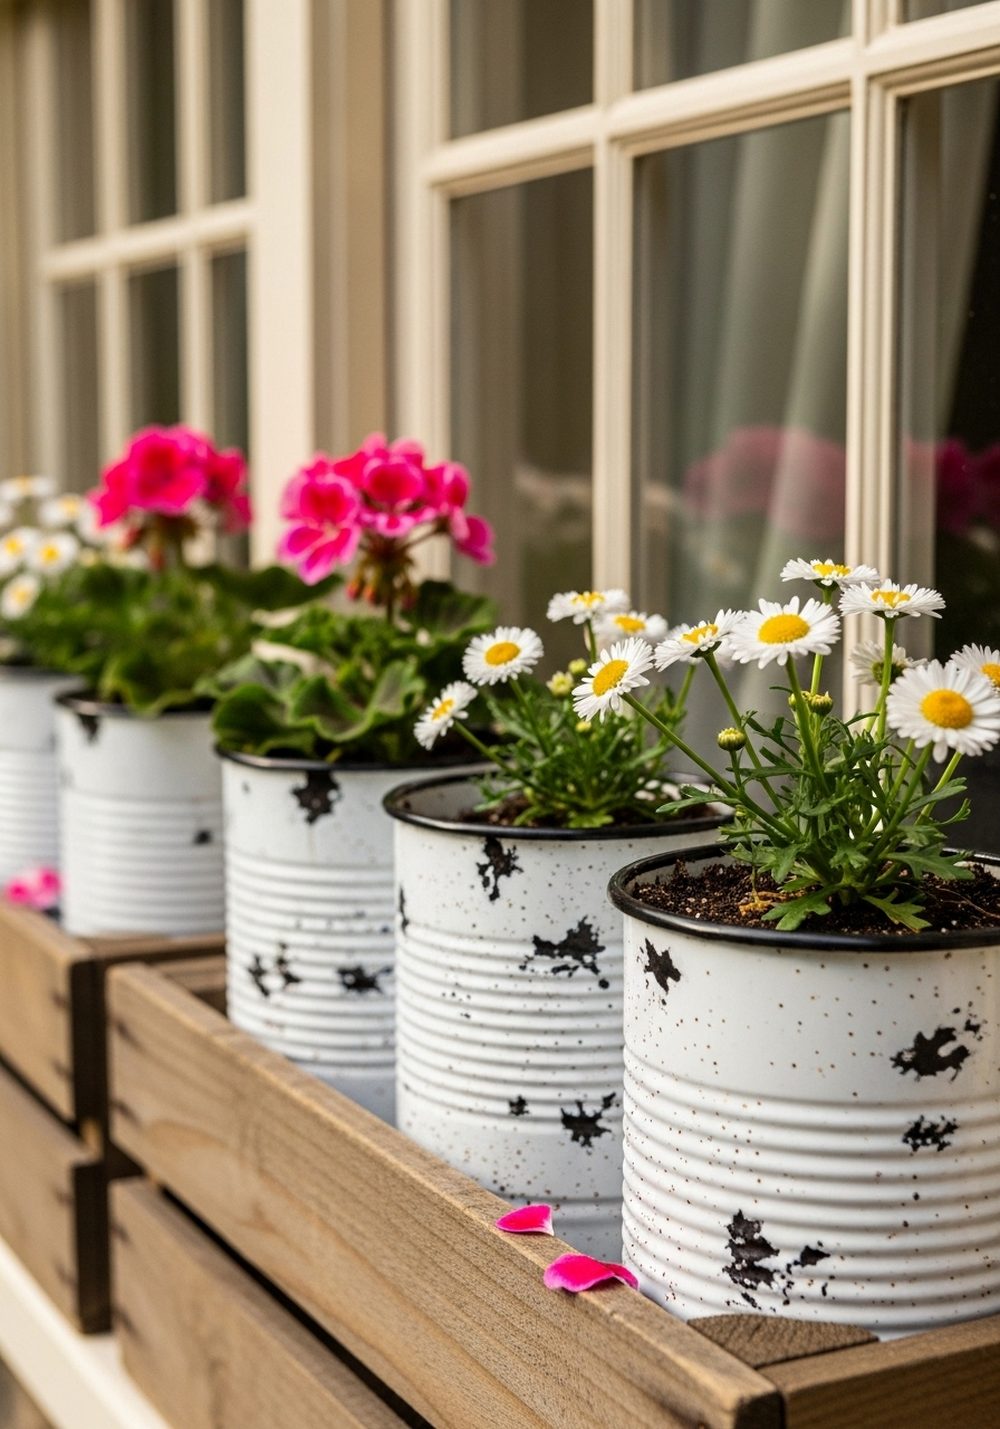
Fake the look of vintage enamel pots by painting tin cans white with a dark rim and a few “chipped” spots. Nestle a row of them inside a rustic wooden crate or metal trough, then place the whole arrangement on a windowsill, ledge, or narrow wall. Fill the cans with soft, cottage-style blooms like geraniums, pansies, or daisies. The contrast between the bright flowers and “worn” containers creates an instantly lived-in, welcoming feel.
- Best For: Cottage-style gardens, porches, and older houses with character.
- Budget Tip: Distress the paint using sandpaper instead of buying special finishes.
- Styling Idea: Add a gingham or linen runner under the crate to finish the look.
- Care & Maintenance: Lift the cans out occasionally to check drainage and prevent rot in the crate.
5. Polka Dot Tin Can Flower Tower
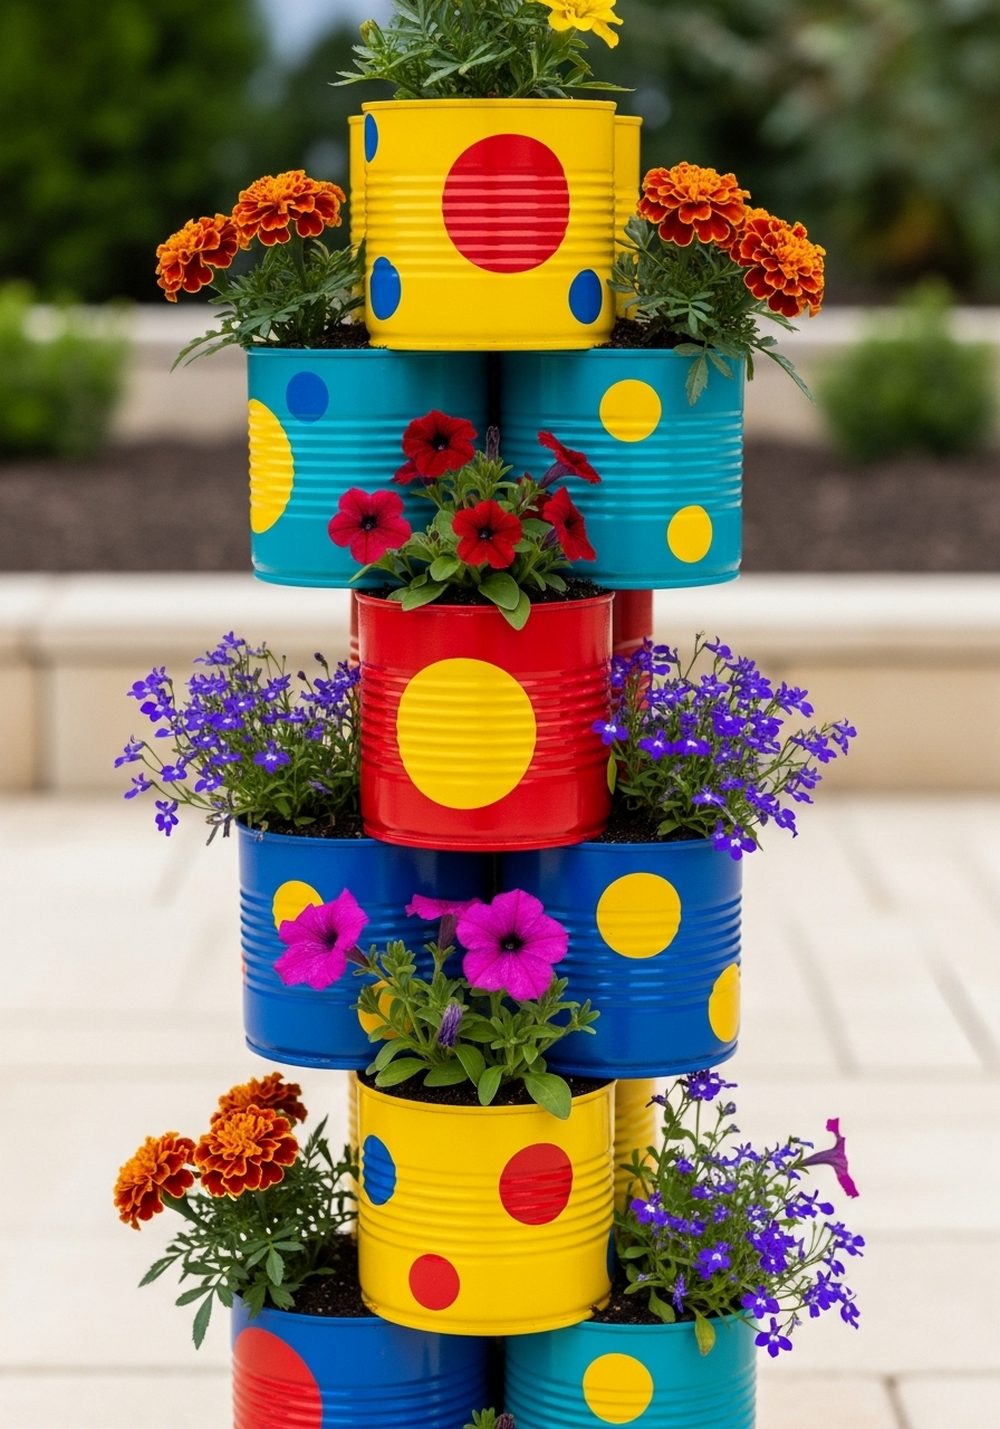
If you’re short on space but love height and colour, a polka dot flower tower is perfect. Paint each can in a different bold colour and add contrasting dots using a sponge or stencil. Stack them by threading onto a central metal rod or fixing them to a wooden post, staggering them for stability. Plant each can with colourful annuals. The tower acts like a mini totem, drawing the eye upwards and making even a tiny patio feel lively.
- Best For: Small patios, rental yards, and children’s play areas.
- Budget Tip: Use a single base colour and one accent for dots to keep paint costs down.
- Styling Idea: Repeat the polka dot theme on nearby plant markers or cushions.
- Practical Note: Anchor the base firmly so the tower doesn’t tip in strong winds.
6. Stenciled Tin Can Numbered Planters
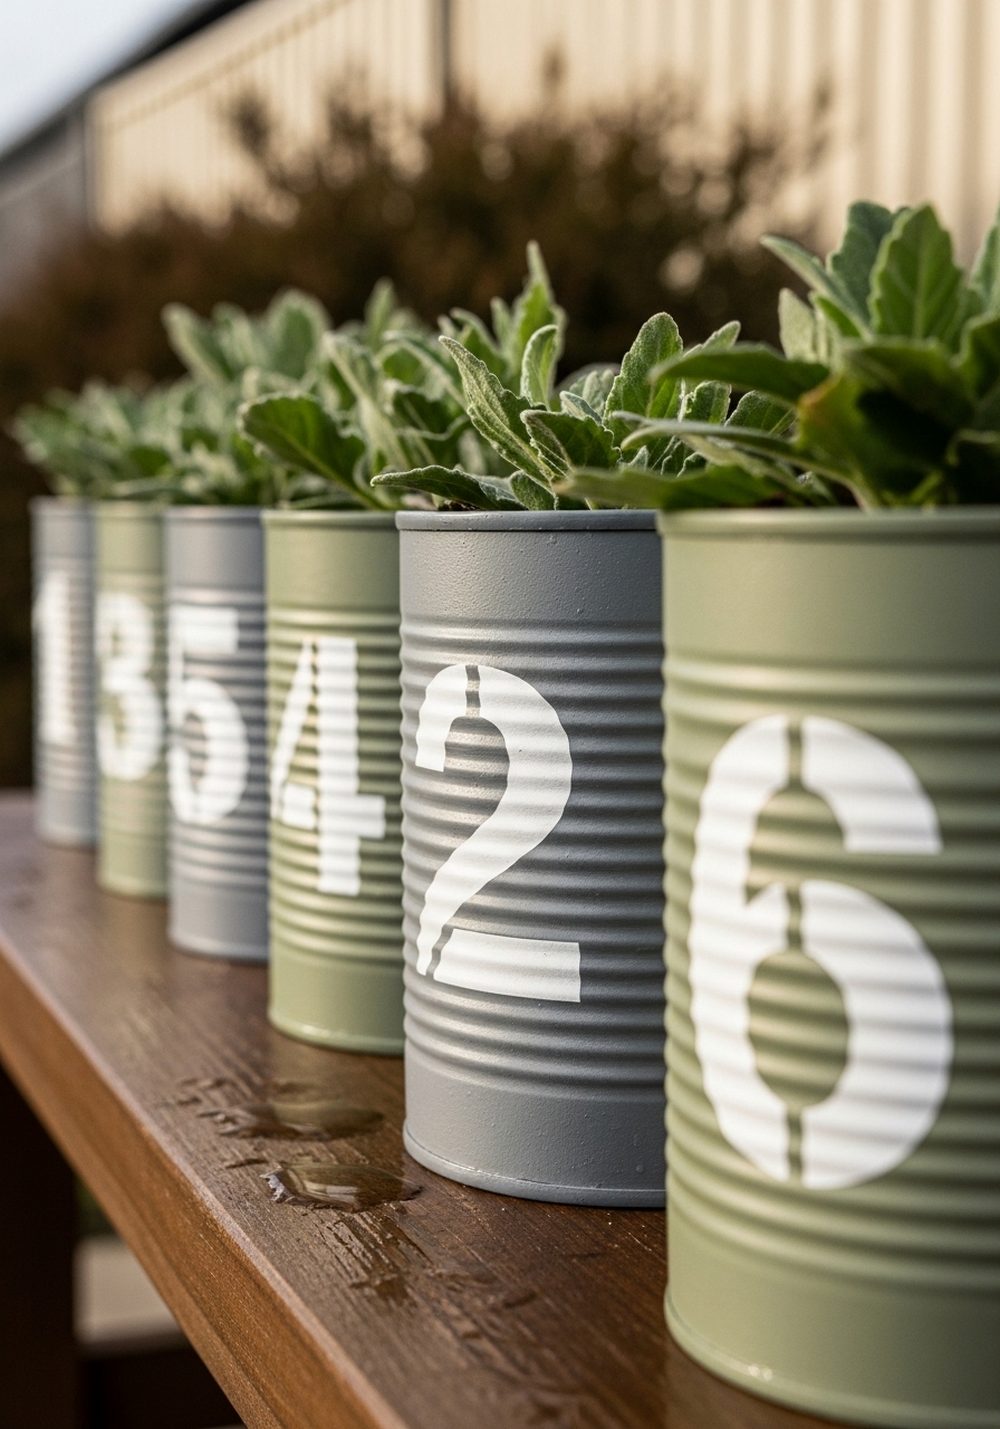
Numbered tin cans bring a fresh, orderly look to steps, shelves, or fences. Paint the cans in muted tones such as sage, stone, and soft grey, then stencil large numbers on the fronts in crisp white or black. Arrange them in sequence to display herbs, flowers, or succulents. The numbers help you remember where you planted what, and they also look brilliant in photos or when you’re labelling specific plant collections.
- Best For: Garden steps, stairways, and long window ledges.
- Budget Tip: Cut your own number stencils from cardboard instead of buying them.
- Styling Idea: Keep the colours earthy for a calm, modern feel.
- Care & Maintenance: Touch up scuffed numbers with leftover paint every season.
7. Nautical Rope-Wrapped Tin Can Pots
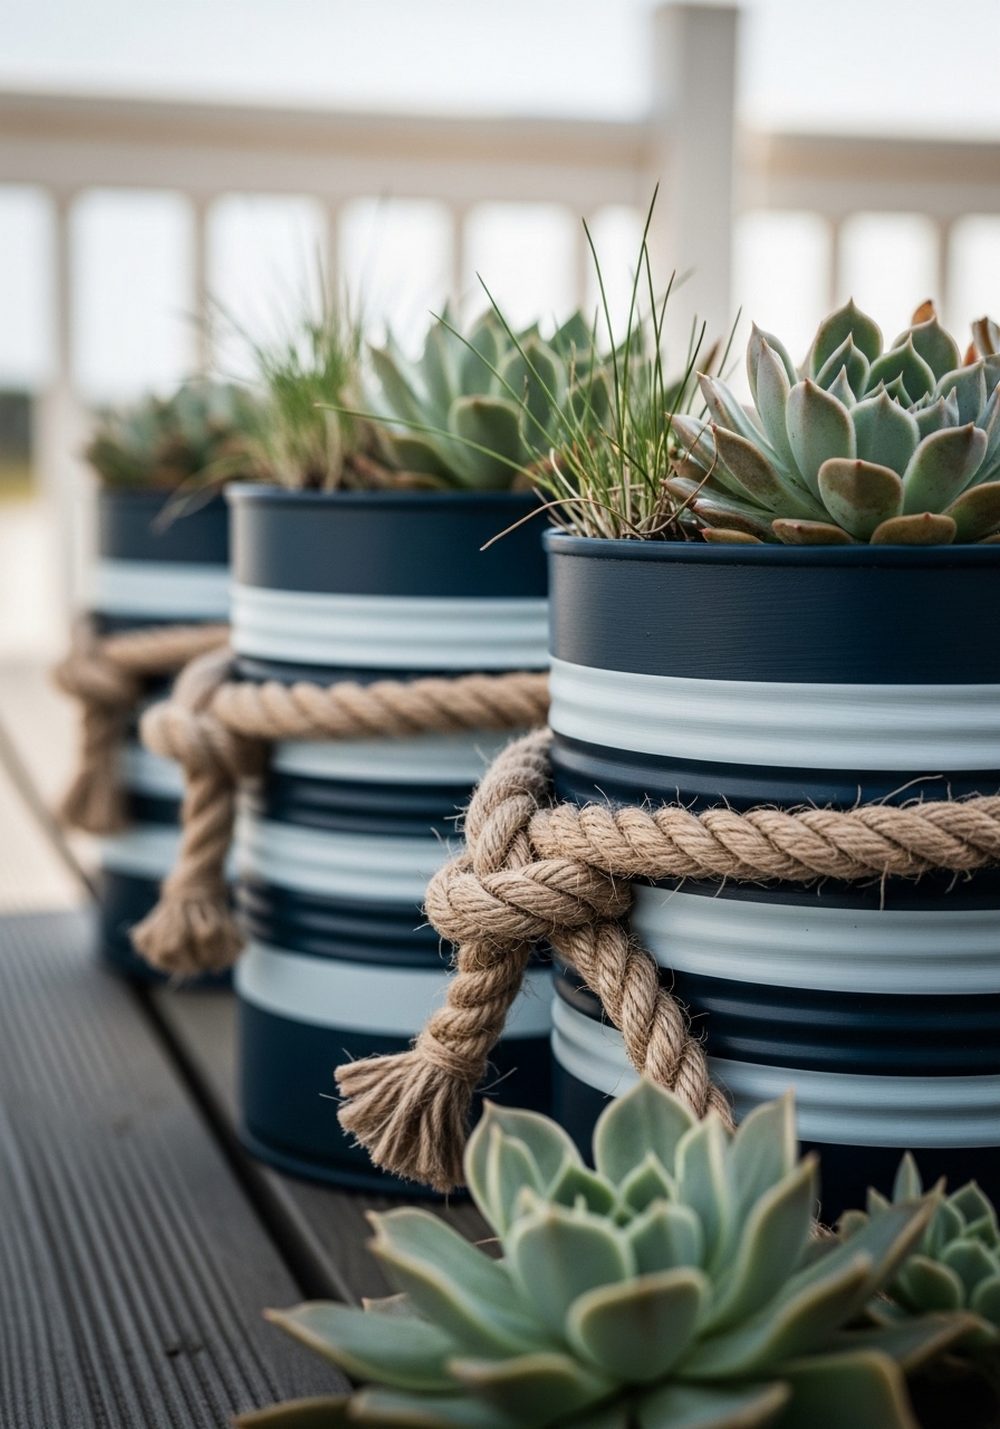
Give your cans a coastal twist with navy paint and chunky rope. Paint the top portion of each can in navy or white stripes and wrap the bottom section in jute or sisal rope, fixing it with strong glue. Fill the pots with succulents, small grasses, or silvery foliage, then group them on a deck, balcony, or doorstep. The mix of smooth paint, textured rope, and fleshy leaves instantly evokes a beach-house mood.
- Best For: Decks, seaside themes, and neutral outdoor palettes.
- Budget Tip: Use a single navy stripe instead of full coverage to save paint.
- Styling Idea: Add shells, driftwood, or a lantern nearby to complete the nautical look.
- Practical Note: Keep rope-wrapped cans off constantly damp ground to prevent mould.
8. Boho Patterned Tin Can Lantern Planters
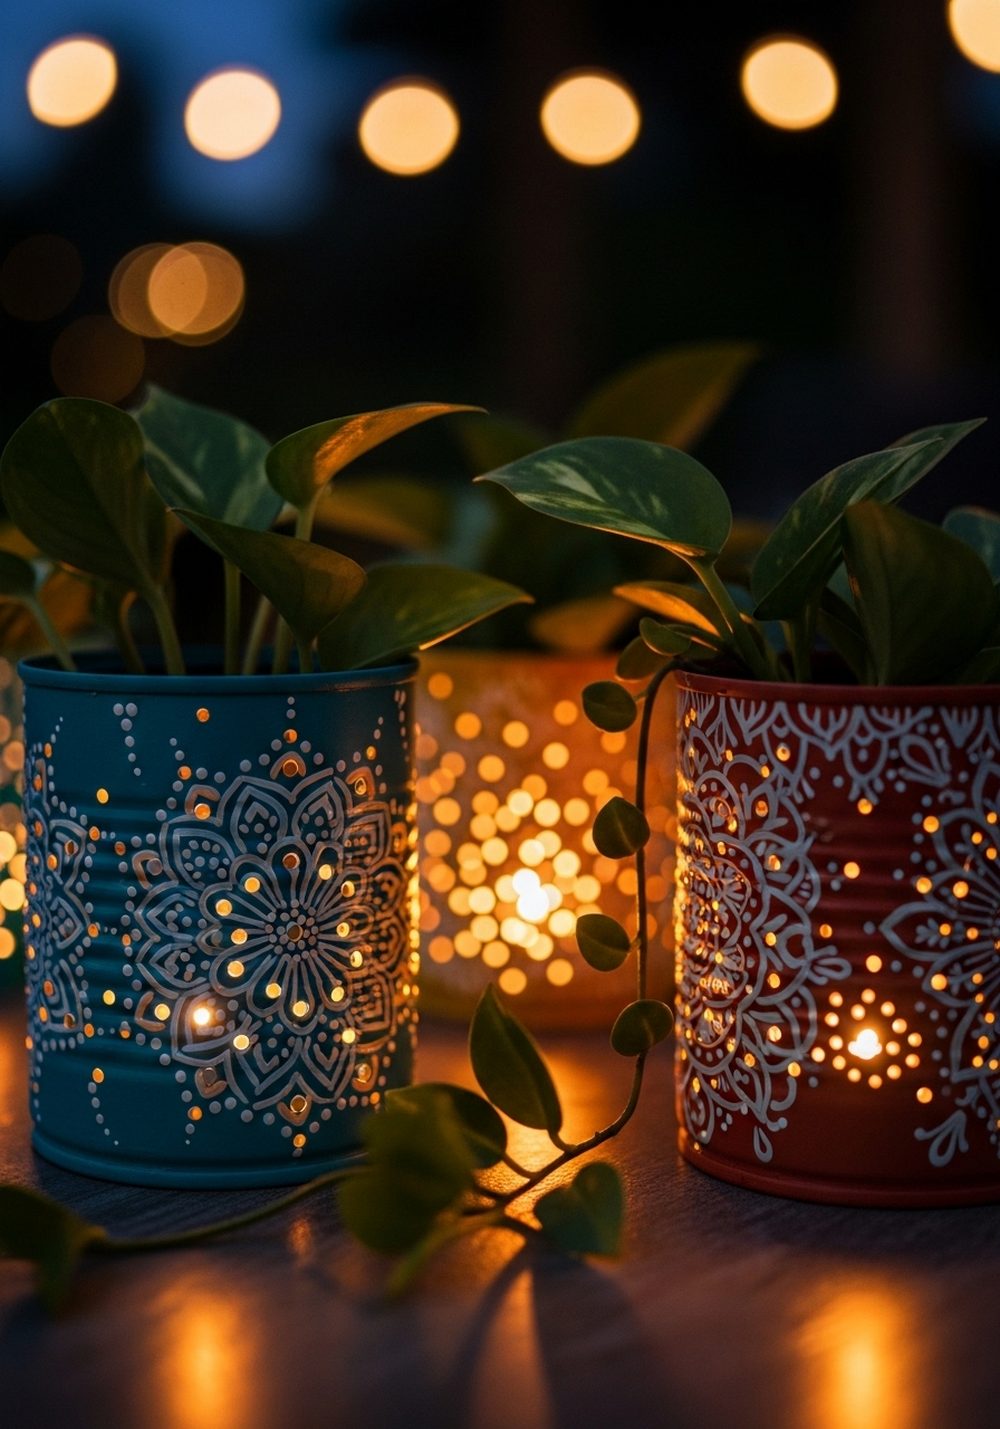
Combine planters and lanterns by punching tiny patterns into your cans before painting. After drilling drainage holes, use a nail and hammer to create rows of dots or mandala-inspired shapes. Paint the cans in rich boho colours and plant around the punched areas with trailing greenery. In the evening, tuck battery tealights inside so the patterns glow softly while the plants frame the light. It’s a simple way to add atmosphere to a patio table or low wall.
- Best For: Evening patios, pergolas, and cosy seating corners.
- Budget Tip: Use inexpensive battery candles instead of wired lighting.
- Styling Idea: Mix jewel tones like teal, mustard, and magenta for a festival feel.
- Practical Note: Smooth any sharp punched edges so they’re safe to handle.
9. Kids’ Hand-Painted Tin Can Bug Garden
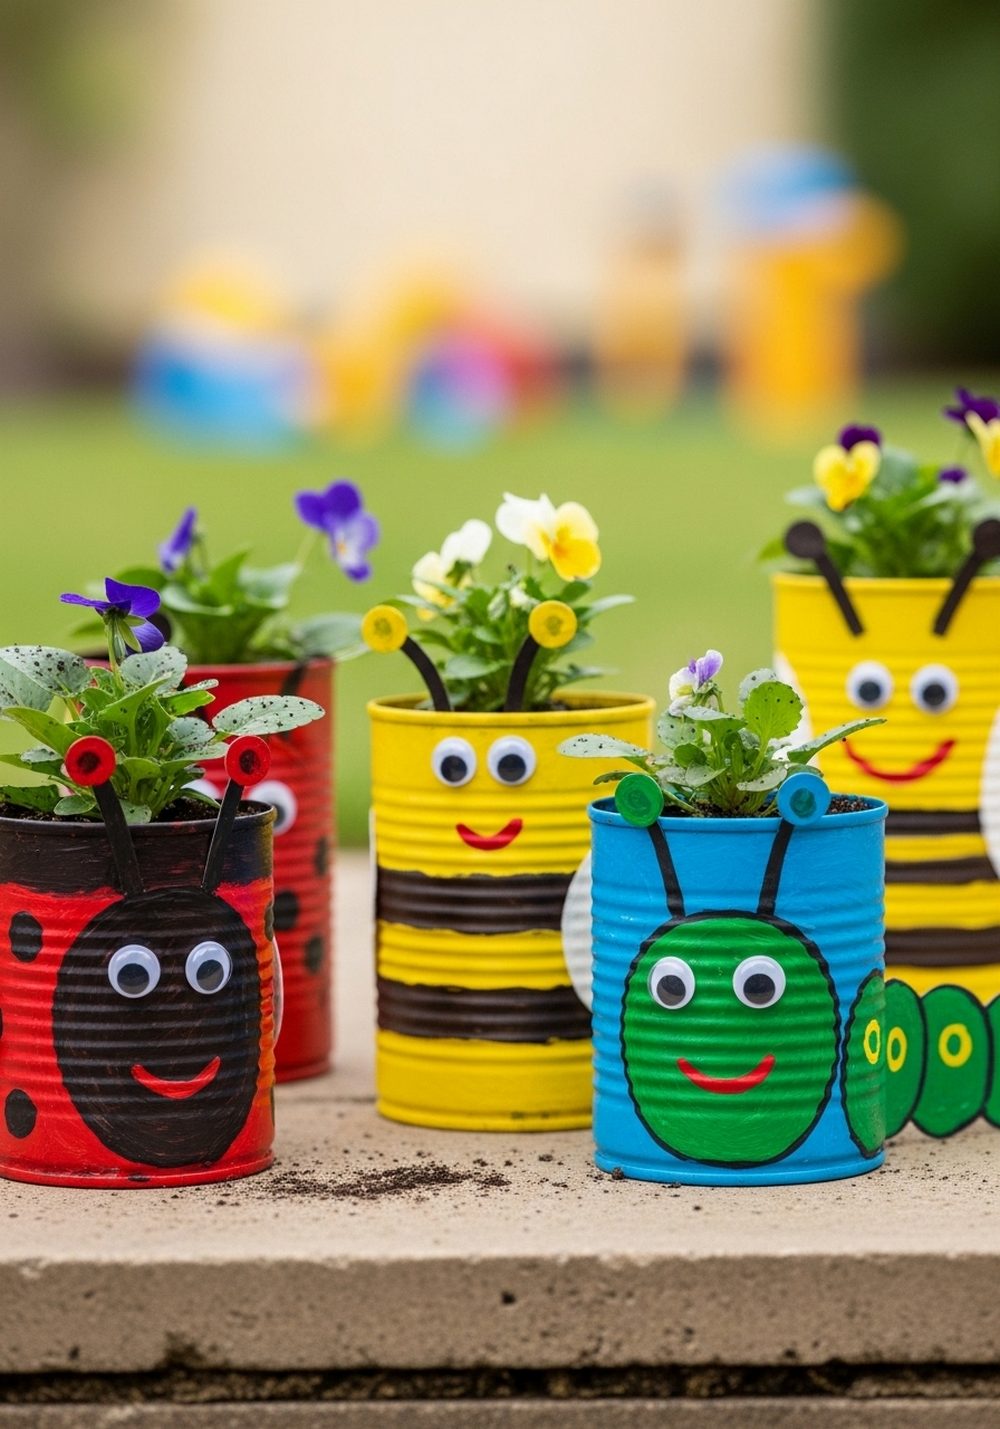
Invite children to decorate their own bug-inspired planters. Prime the cans, then let kids paint ladybirds, bees, caterpillars, or any fun creatures they like. Once dry, plant them with hardy, forgiving plants such as marigolds, small grasses, or easy herbs. Line the cans along a step or a low wall where little ones can easily water and observe them. The imperfect brushstrokes and bright colours bring a lot of personality to the garden and encourage kids to care for plants.
- Best For: Families, school gardens, and playful outdoor spaces.
- Budget Tip: Use basic poster paints sealed with clear outdoor varnish if you’re on a tight budget.
- Styling Idea: Add hand-painted stone “bugs” nearby for extra charm.
- Care & Maintenance: Choose tough plants that bounce back from occasional overwatering.
10. Monochrome Minimal Tin Can Table Planters
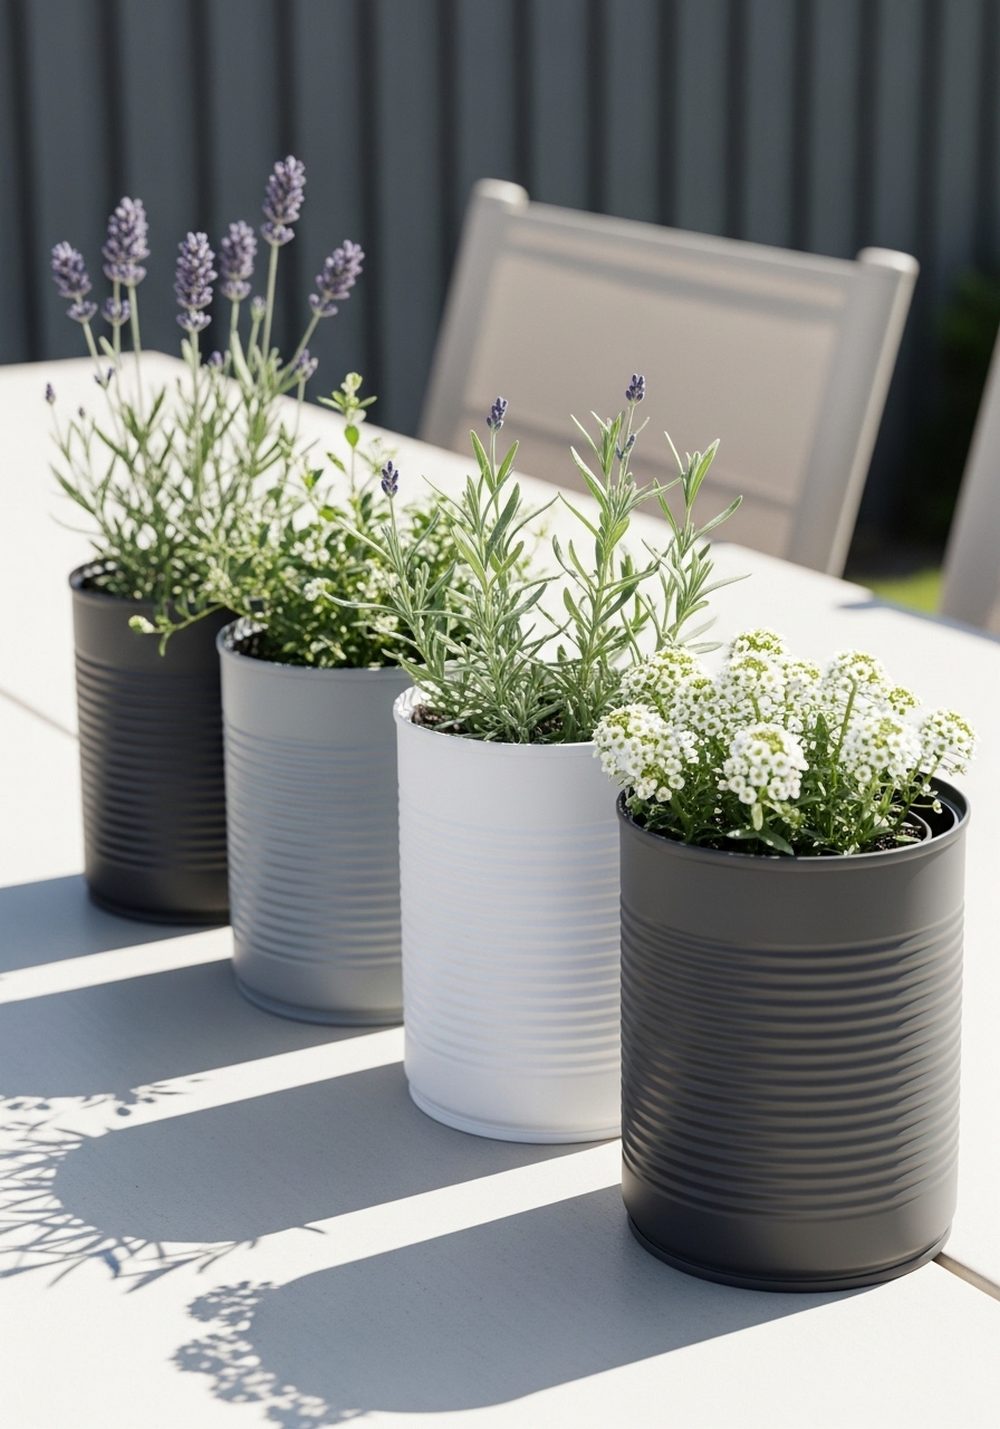
For a sleek, modern look, keep your cans strictly monochrome. Paint them in a mix of matte white, soft grey, and charcoal, then plant each one with a single variety—lavender, a tiny fern, or a low froth of white flowers. Arrange them down the centre of an outdoor table like a living runner. The simple colour palette feels calm and sophisticated, while the differing plant textures stop it from looking flat.
- Best For: Contemporary patios, roof terraces, and small dining balconies.
- Budget Tip: Stick to one neutral paint colour and vary plant heights to save money.
- Styling Idea: Pair with plain tableware and linen napkins for a relaxed, modern feel.
- Practical Note: Use low, stable cans so they’re not easily knocked over during meals.
Conclusion
Painted tin can planters prove that you don’t need a big budget to transform your outdoor space. With a few saved cans, some paint, and a bit of imagination, you can add colour, height, and personality to even the smallest balcony or patio. Start with one simple idea—perhaps a little herb rail or a set of table planters—and build from there. As your confidence grows, your collection of charming, upcycled pots can grow right along with your garden.
FAQs
1. How do I make painted tin can planters last outdoors?
First, remove labels, clean the cans, and let them dry fully. Add drainage holes in the base, then use a metal or exterior primer before painting. Finish with a clear outdoor sealer to protect the colours from rain and sun. Try to keep cans slightly raised so they’re not sitting in puddles after heavy rain.
2. What kind of paint works best on tin cans for outdoor use?
Acrylic craft paint works well if you prep with primer and seal afterward, but exterior metal paint is more hard-wearing. For a quick, even finish, spray paints designed for metal are handy. Whatever you use, a clear top coat helps prevent chipping and fading over time.
3. Are tin can planters safe for herbs and vegetables?
Yes, as long as the cans are clean, rust-free where the soil touches, and you use fresh potting mix. Many people use them for herbs, salad leaves, or small strawberries. If you’re concerned, line the inside with a plastic pot or food-safe liner with drainage holes so the metal doesn’t sit directly against the soil.
4. What plants are best for these small planters?
Compact plants do best: herbs like thyme, chives, and basil; trailing plants like ivy or lobelia; and small flowers such as pansies or marigolds. Succulents also work well because they don’t mind the limited soil and can handle slightly drier conditions. Avoid deep-rooted shrubs in tiny cans.
5. Can renters use these ideas without damaging walls or railings?
Definitely. Instead of drilling into walls, hang cans from over-the-door hooks on railings, use freestanding wooden frames, or place them on shelves and steps. Magnetic hooks can also work on some metal balcony rails. Always check weight limits and use non-permanent fixings so everything can move with you.
6. How can I decorate on a very small budget?
Save cans from everyday groceries, use leftover paint or tester pots, and look for free offcuts of wood or rope. Keep designs simple—solid colours, stripes, or basic dots still look stylish. Start with a few cans clustered together; even three well-painted planters can make a big difference to a small corner.