12 Easy Mason Jar Lid Plant Marker Ideas For A Rustic Garden Touch

If you have a stash of mason jar lids and a garden full of plants that keep “forgetting” their names, this is your perfect project list. These simple DIY plant markers turn something you already own into charming little labels that add a warm, rustic touch to beds, pots, and balcony planters.
In this post, you’ll find twelve easy ways to decorate and display mason jar lids as plant markers using paint, paper, twine, and a few everyday supplies. Most ideas are budget-friendly, beginner-friendly, and totally customizable to your garden’s look. By the end, you’ll have practical markers that help you stay organized and a garden that feels just a bit more personal and storybook-pretty.
Quick List
- Hand-Stamped Herb Names On Mason Jar Lid Stakes
- Chalkboard Mason Jar Lid Row Markers
- Twine-Wrapped Hanging Mason Jar Lid Tags
- Soft Watercolor Mason Jar Lid Botanical Markers
- Faux Burnt-Wood Mason Jar Lid Markers
- Pressed Flower Mason Jar Lid Markers With Clear Glue
- Vintage Seed Packet Collage Mason Jar Lid Markers
- Magnet-Backed Mason Jar Lid Markers For Metal Pots
- Mini Greenery Wreath Mason Jar Lid Plant Markers
- Photo Mason Jar Lid Markers For Favorite Varieties
- Color-Coded Mason Jar Lid Veggie Bed Markers
- Reversible Seasonal Mason Jar Lid Plant Markers
1. Hand-Stamped Herb Names On Mason Jar Lid Stakes

Turn plain mason jar lids into charming herb markers by stamping plant names directly onto the metal. Lightly paint the lids a soft cream or sage, let them dry, then use alphabet stamps and permanent ink to press in names like “Basil” and “Mint.” Glue or screw each lid onto a slim wooden stake or old chopstick and push into the soil near your plants. The stamped letters add a subtle vintage feel that looks right at home in a cottage-style herb bed.
- Best For: Herb gardens, raised beds, and rustic cottage-style spaces.
- Budget Tip: Use leftover paint samples and repurpose old wooden chopsticks or garden stakes.
- Styling Idea: Choose soft, muted lid colors so the stamped black letters stand out clearly.
- Practical Note: Seal the surface with a clear outdoor sealer to stop ink from fading in rain.
- Care & Maintenance: If letters ever lighten, simply restamp over them for a fresh look.
2. Chalkboard Mason Jar Lid Row Markers
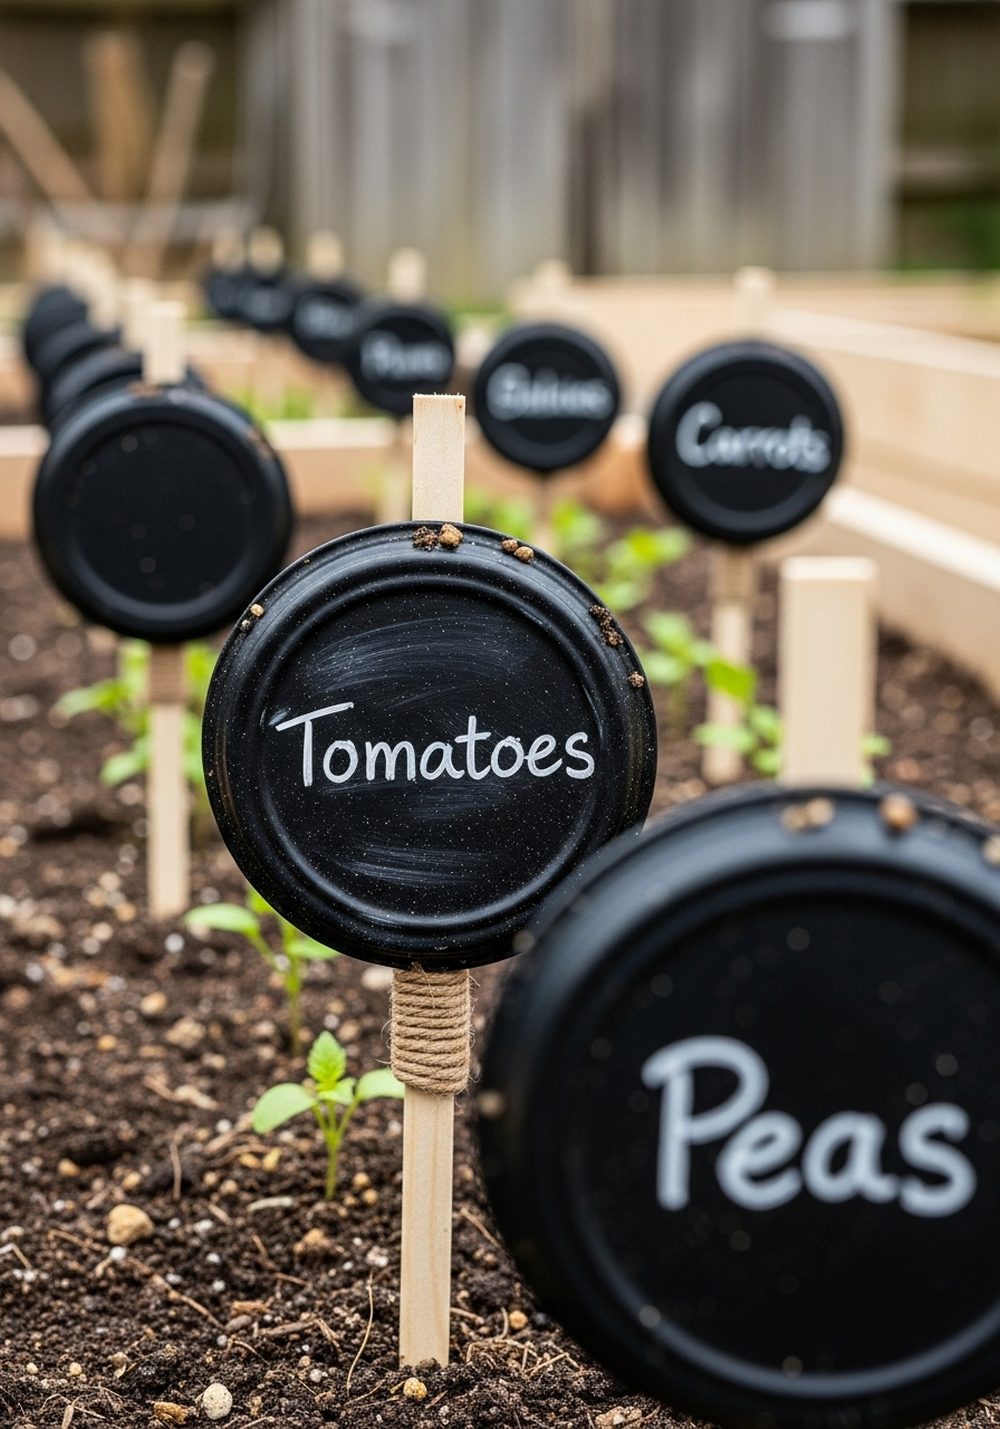
Chalkboard-style mason jar lid markers are great when your planting plans change often. Paint each lid with chalkboard or matte black paint, then write plant names with a white paint pen or outdoor chalk marker. Attach the lids to wooden stakes, small branches, or even skewers and place them at the ends of rows. The black-and-white contrast feels classic and makes labels easy to read from a distance, especially in dense veggie beds.
- Best For: Changing garden layouts, seed trials, and family veggie patches.
- Budget Tip: Make your own “chalkboard” using matte black spray paint instead of specialty paint.
- Styling Idea: Keep handwriting loose and casual for a relaxed farmhouse feel.
- Practical Note: Use paint markers instead of real chalk for labels that won’t wash away in the rain.
- Care & Maintenance: Wipe with a damp cloth and rewrite names whenever you rotate crops.
3. Twine-Wrapped Hanging Mason Jar Lid Tags

For pots and planters where stakes are awkward, twine-wrapped hanging lids work beautifully. Wrap the rim of each lid with jute or sisal twine, securing with hot glue as you go. Add a neat loop of twine and a simple paper or painted insert with the plant’s name in the center. Hang the finished tag over the edge of a pot or around the handle of a bucket planter. It creates a soft, textured look that feels cozy and handmade.
- Best For: Container gardens, balconies, and rental spaces where you avoid piercing pots.
- Budget Tip: Use recycled mason jar lids and leftover gift twine or string.
- Styling Idea: Pair with terracotta or white pots for a simple, earthy palette.
- Practical Note: Keep the tags short so they don’t touch wet soil or sit in puddles.
- Care & Maintenance: If twine gets worn or moldy, unwrap and rewrap with fresh twine in minutes.
4. Soft Watercolor Mason Jar Lid Botanical Markers

If you enjoy painting, turn your lids into tiny botanical art pieces. Cut circles of watercolor paper to fit inside the lids, lightly sketch the plant leaf or flower, then paint with gentle, watery color. Once dry, write the name in small, neat letters and glue the paper into the lid. Attach the lids to stakes or clip them to pots. The combination of soft color and metal rim gives each marker a pretty, old-garden-illustration feel.
- Best For: Gardeners who love art, calm spaces, and delicate details.
- Budget Tip: Use a basic watercolor set and scrap paper pieces instead of buying new supplies.
- Styling Idea: Stick to a pastel palette for a dreamy, vintage-botanical look.
- Practical Note: Seal finished artwork with clear spray to protect it from splashes.
- Care & Maintenance: If a piece gets damaged, simply pop it out and paint a fresh circle.
5. Faux Burnt-Wood Mason Jar Lid Markers

Create a warm, “burnt-wood” effect on metal lids for markers that look rustic and handcrafted. Paint lids in layers of tan and brown, then sponge darker paint around the edges to mimic charred wood. Write plant names in bold black or white. Mount each lid on a wooden stake and set them along borders or vegetable rows. They add depth and contrast against green foliage and look lovely near gravel paths or weathered wooden fences.
- Best For: Rustic garden paths, veggie beds, and natural-style landscapes.
- Budget Tip: Mix your own shades from a single brown paint to avoid buying multiple colors.
- Styling Idea: Pair with rough-cut wooden stakes for a truly “found-in-a-barn” look.
- Practical Note: Let each paint layer dry fully so the faux wood pattern doesn’t smudge.
- Care & Maintenance: Topcoat with outdoor varnish to keep the burnt effect from fading in sun.
6. Pressed Flower Mason Jar Lid Markers With Clear Glue

Pressed flowers plus mason jar lids equal wonderfully romantic markers. Glue a small circle of kraft paper or card inside the lid, add a tiny pressed flower or leaf, then drizzle clear-drying glue over the top to create a glossy “window.” Write the plant name before you pour the glue, or add a small label strip in the center. Once dry, these markers catch the light beautifully and bring a delicate, nature-inspired detail to herb beds and pots.
- Best For: Herb gardens, cottage borders, and decorative kitchen gardens.
- Budget Tip: Press your own flowers between heavy books instead of buying them.
- Styling Idea: Use soft neutrals for the background so the dried petals really stand out.
- Practical Note: Let the glue cure completely indoors before placing markers outside.
- Care & Maintenance: Avoid placing them where they sit in water; keep them slightly elevated.
7. Vintage Seed Packet Collage Mason Jar Lid Markers

Give your lids a nostalgic twist by decorating them with cut-outs from old or printed seed packet images. Trim illustrations or names into circles or pleasing shapes, layer them onto the lid with glue, then seal the collage with a clear matte finish. Attach the lids to stakes and line them up beside your crops. The tiny vintage artwork looks adorable next to the real plants, and it instantly adds character to plain garden beds.
- Best For: Vegetable gardens, allotments, and playful family plots.
- Budget Tip: Print seed packet designs at home or scan old packets to reuse the graphics.
- Styling Idea: Mix different fonts and illustration styles for a collected-over-time feel.
- Practical Note: Seal thoroughly so paper edges don’t peel in damp weather.
- Care & Maintenance: If a collage fades, glue a fresh piece right over the top and reseal.
8. Magnet-Backed Mason Jar Lid Markers For Metal Pots
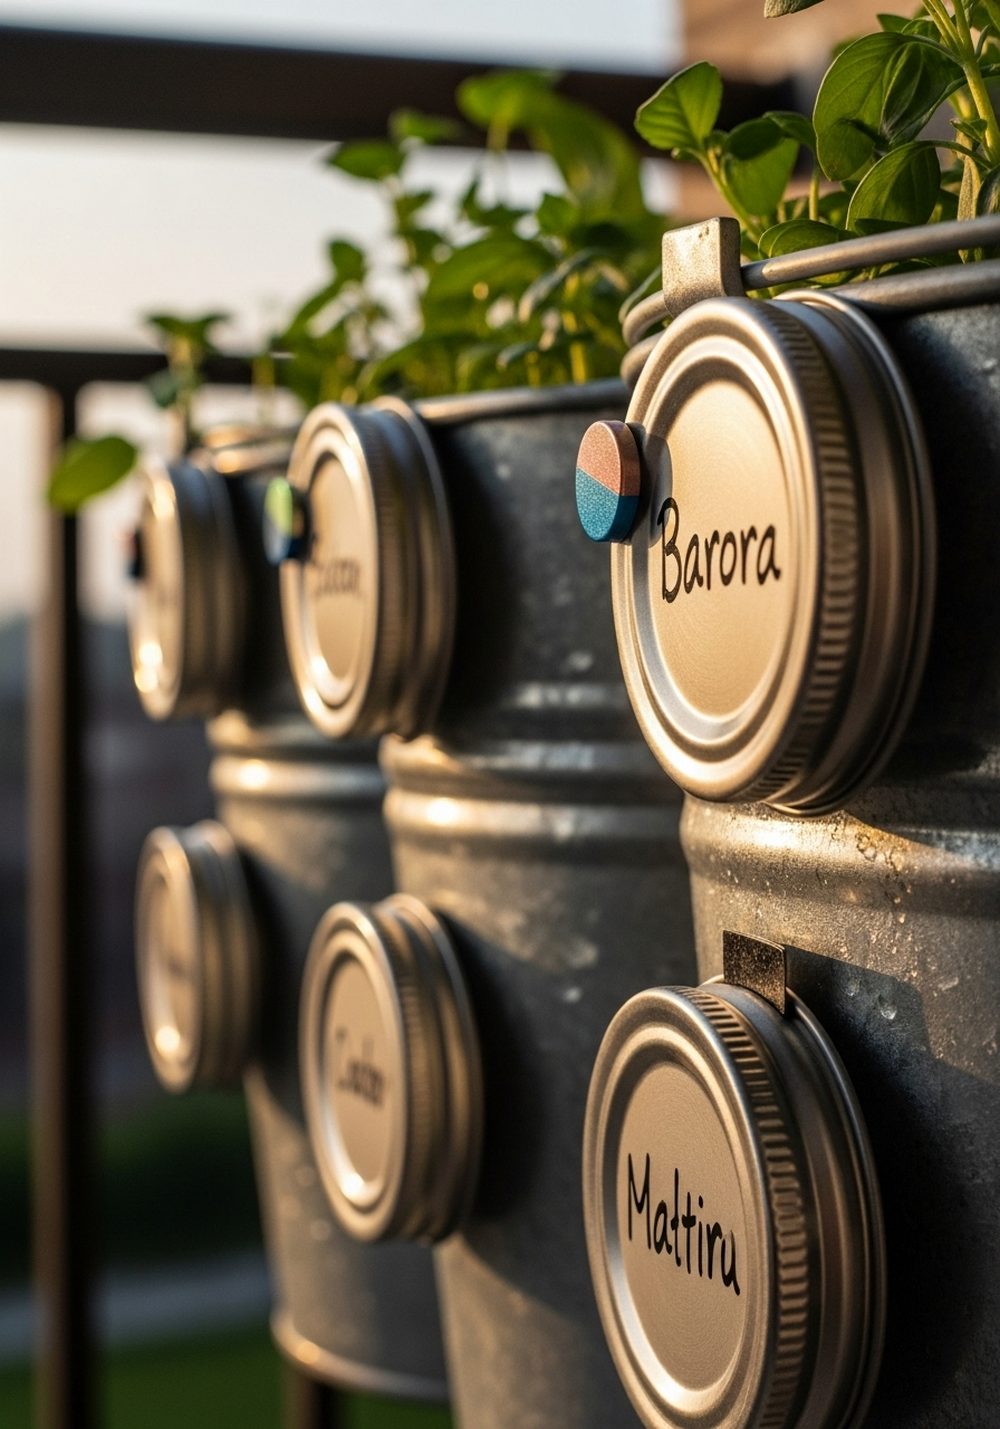
If you grow in metal buckets, rail planters, or balcony boxes, magnet-backed lids are a clever, non-permanent option. Attach strong, flat magnets to the back of each decorated mason jar lid using a reliable glue. Paint or label the front as you like, then simply snap them onto the sides of your metal containers. You can slide them up, down, or to new pots whenever you rearrange your plants, with no holes and no fuss.
- Best For: Renters, balconies, and anyone who rearranges pots often.
- Budget Tip: Save magnets from old fridge items to reuse on your jar lids.
- Styling Idea: Keep lids neutral and let the greenery and metal shine for a clean, modern-rustic mix.
- Practical Note: Use weather-resistant glue so magnets don’t detach in heat or moisture.
- Care & Maintenance: Wipe both magnet and metal surface occasionally to remove dirt and rust.
9. Mini Greenery Wreath Mason Jar Lid Plant Markers

Turn lids into tiny wreaths that frame your plant names. Wrap the rim with small sprigs of faux greenery, dried herbs, or tiny grapevine pieces, securing with floral wire or hot glue. Add a round paper or painted disc in the center with the plant name. Mount each wreath-lid on a stake or hang it from pot handles. The soft ring of green around each label adds a charming, woodland feel to even the simplest pots.
- Best For: Pretty patio displays, gift plants, and front porch planters.
- Budget Tip: Use leftover holiday greenery picks or trim faux garlands into small sections.
- Styling Idea: Mix eucalyptus, tiny berries, or dried lavender for a layered, textural look.
- Practical Note: If placed in full sun, choose greenery that won’t fade too quickly.
- Care & Maintenance: Refresh any brittle or faded sprigs at the start of each season.
10. Photo Mason Jar Lid Markers For Favorite Varieties

For varieties you love and replant each year, photo markers are both practical and fun. Print small photos of your plants—like your favorite cherry tomato or unusual basil—then cut circles to fit inside the lids. Glue the photo in place, add the plant name below or around the edge, and seal. Attach lids to stakes or clips. These markers make it easy to recognize what you’re growing, especially when seedlings look similar in early stages.
- Best For: Special varieties, kids’ gardens, and teaching new gardeners.
- Budget Tip: Print multiple photos on one sheet of paper at home, then cut them out.
- Styling Idea: Use black-and-white photos for a chic, old-photo look if color ink is limited.
- Practical Note: Laminate or seal the photo well so it doesn’t blur from moisture.
- Care & Maintenance: Replace images every couple of years if they fade from sun exposure.
11. Color-Coded Mason Jar Lid Veggie Bed Markers

Color-coding your mason jar lid markers makes it easier to see what’s where at a glance. Assign a color family to each type of plant—green for leafy greens, orange or yellow for roots, red for fruits and peppers, blue or white for herbs—then paint lids accordingly. Add clear labels in a contrasting color and mount them on stakes along your beds. From a distance, the colored dots create a cheerful, organized look.
- Best For: Larger vegetable gardens and shared family plots.
- Budget Tip: Use a single sample pot of paint, lightened or darkened with white or black, to create several hues.
- Styling Idea: Stick to soft, dusty tones for a more rustic feel rather than neon colors.
- Practical Note: Keep a simple key in your garden journal so you remember which color stands for what.
- Care & Maintenance: Touch up chips and scratches once a season to keep the color clear.
12. Reversible Seasonal Mason Jar Lid Plant Markers

Make your markers work twice as hard by decorating both sides of each lid for different seasons. Paint one side in soft spring colors with flowers or fresh greens, and the other in richer autumn tones with leaves or pumpkins. Write the plant’s name on both sides in matching styles. Mount the lid so it can flip or spin on its stake, then simply turn to the side that suits the season. It’s an easy way to refresh your garden’s look without making new markers.
- Best For: Perennial beds, long-term herb patches, and year-round gardens.
- Budget Tip: Use the same base paint and adjust with a little white or brown to get spring or autumn tones.
- Styling Idea: Add tiny details like dots, stripes, or vines around the edges for a decorative frame.
- Practical Note: Make sure the stake or screw allows the lid to turn easily but not wobble loose.
- Care & Maintenance: Wipe off dust and cobwebs when you flip sides at the start of each new season.
Conclusion
With just a handful of mason jar lids and a few simple supplies, you can turn your plant labels into tiny works of rustic art. These ideas help you keep track of what’s growing while adding warmth, personality, and charm to beds, pots, and planters. Start with one or two styles that feel doable, then slowly build a whole collection of coordinated markers. Over time, your garden will tell its own story, right down to the smallest label.
FAQs
1. How can I make mason jar lid plant markers on a very small budget?
Stick to ideas that use what you already have: leftover wall paint, scrap paper, old twine, and recycled wood for stakes. Simple painted lids with handwritten names are just as charming as more elaborate designs. You can always add extra details later as you collect more materials.
2. Are these mason jar lid markers suitable for renters or balcony gardens?
Yes. Hanging lids, twine-wrapped tags, and magnet-backed lids are especially good for renters because they don’t require drilling or permanent changes. You can move them to new pots or a new home without leaving any marks behind, making them perfect for balcony rail planters and metal containers.
3. How do I make sure my mason jar lid markers survive rain and sun?
Use outdoor-friendly paints and permanent markers whenever possible, and finish with a clear sealer designed for exterior use. Try to keep paper inserts sealed under glue or varnish so moisture can’t reach them. If your climate is very wet, choose simpler, fully painted designs without exposed paper.
4. What’s the easiest design for beginners to start with?
Chalkboard-style lids or simple painted lids with clear lettering are very beginner-friendly. You only need one or two colors of paint, a marker, and something to use as a stake. Once you’re comfortable with those, you can move on to collages, pressed flowers, or watercolor illustrations.
5. Can I safely mix these markers with edible plants?
Yes, as long as you avoid placing any painted surfaces directly in contact with the parts you harvest. Use non-toxic paints when you can, and keep the lids above soil level on stakes or hanging from pot rims. Always wash produce before eating, just as you would with any garden harvest.
6. How can I keep my plant names readable over time?
Choose high-contrast color combinations, like dark letters on light backgrounds or vice versa. Use paint pens or permanent markers rather than standard pens, and write fairly large, simple letters. If labels fade, they’re easy to retrace or rewrite, especially on chalkboard-style or color-coded lids.