10 From-Pantry-To-Planter Tin Can Herb Garden Ideas You’ll Love

If you’ve ever rinsed out a soup tin and thought, “This is too good to throw away,” this post is for you. Tin cans are the perfect bridge from pantry to planter: they’re free, easy to decorate, and just the right size for fresh herbs.
In this guide, you’ll find ten simple ways to turn everyday cans into charming herb gardens for windowsills, balconies, patios, and even your fridge door. You’ll get styling tips, budget shortcuts, and practical advice to keep your herbs happy. With just a few cans, some soil, and a handful of seeds or seedlings, you can create a fragrant, beautiful mini garden that feels personal and welcoming.
Quick List
- Classic Windowsill Tin Can Herb Row
- Hanging Tin Can Herb Rail In The Kitchen
- Magnetic Tin Can Herb Pots On The Fridge
- Color-Blocked Tin Can Herb Trio For Small Balconies
- Rustic Twine-Wrapped Tin Can Herb Centerpieces
- Tiered Tin Can Herb Ladder For Tiny Patios
- Chalkboard-Label Tin Can Herb Station
- Crate Of Tin Can Herbs By The Front Door
- Vertical Tin Can Herb Pallet Wall
- Mini Tin Can Herb Gifts For Friends
1. Classic Windowsill Tin Can Herb Row

Line your kitchen windowsill with a neat row of tin cans and you instantly have a bright, practical herb garden at eye level. Clean your cans, punch drainage holes in the base, and add a thin layer of small stones before soil. Plant easy herbs like basil, parsley, and chives, then slide the cans along the sill so each plant catches the light. The repeating metal cylinders, green foliage, and framed window view create a simple, stylish look with almost no effort.
- Best For: Sunny kitchen windowsills in small homes or rentals.
- Budget Tip: Use leftover cans from daily cooking and repurpose pebbles or broken terracotta for drainage.
- Styling Idea: Paint all cans one soft neutral shade for a calm, modern feel, or mix pastels for a cheerful cottage look.
- Practical Note: Place the cans on a narrow tray to catch drips and make watering easier.
2. Hanging Tin Can Herb Rail In The Kitchen

If counter space is precious, send your herbs up into the air. Fix a simple rail or rod above your backsplash, then hang tin cans using S-hooks and sturdy twine or wire. Fill each can with potting mix and herbs you reach for often—thyme, oregano, and rosemary are great. The little metal planters swing gently as you cook, adding movement and greenery without cluttering your surfaces. It feels like a mini kitchen garden right where you chop, stir, and season.
- Best For: Small kitchens with busy cooks who like herbs close to hand.
- Budget Tip: Use an inexpensive curtain rod or repurpose an old towel rail and basic S-hooks.
- Styling Idea: Keep cans metallic for an industrial look, or paint them to match your kitchen cabinets for a custom finish.
- Practical Note: Don’t hang them too low above the stove to avoid heat and steam damaging the plants.
3. Magnetic Tin Can Herb Pots On The Fridge

Turn your fridge into a living, breathing herb wall with tin cans and strong magnets. Glue heavy-duty magnets to the back of each can, add drainage holes, then sit the cans over a plastic saucer or use very light watering to avoid drips. Fill with compact herbs like basil or dill and arrange them like a green gallery on the door. Every time you reach for milk, you’re greeted by fresh scent and colour, and your herbs live right where you’re likely to use them.
- Best For: Renters or anyone with zero counter and windowsill space.
- Budget Tip: Reuse fridge magnets you already own or buy simple magnet strips and cut them to size.
- Styling Idea: Stick to two or three colours for the cans so the display feels intentional rather than cluttered.
- Practical Note: Keep the heaviest cans on the lower half of the fridge door to reduce strain on the hinges.
4. Color-Blocked Tin Can Herb Trio For Small Balconies
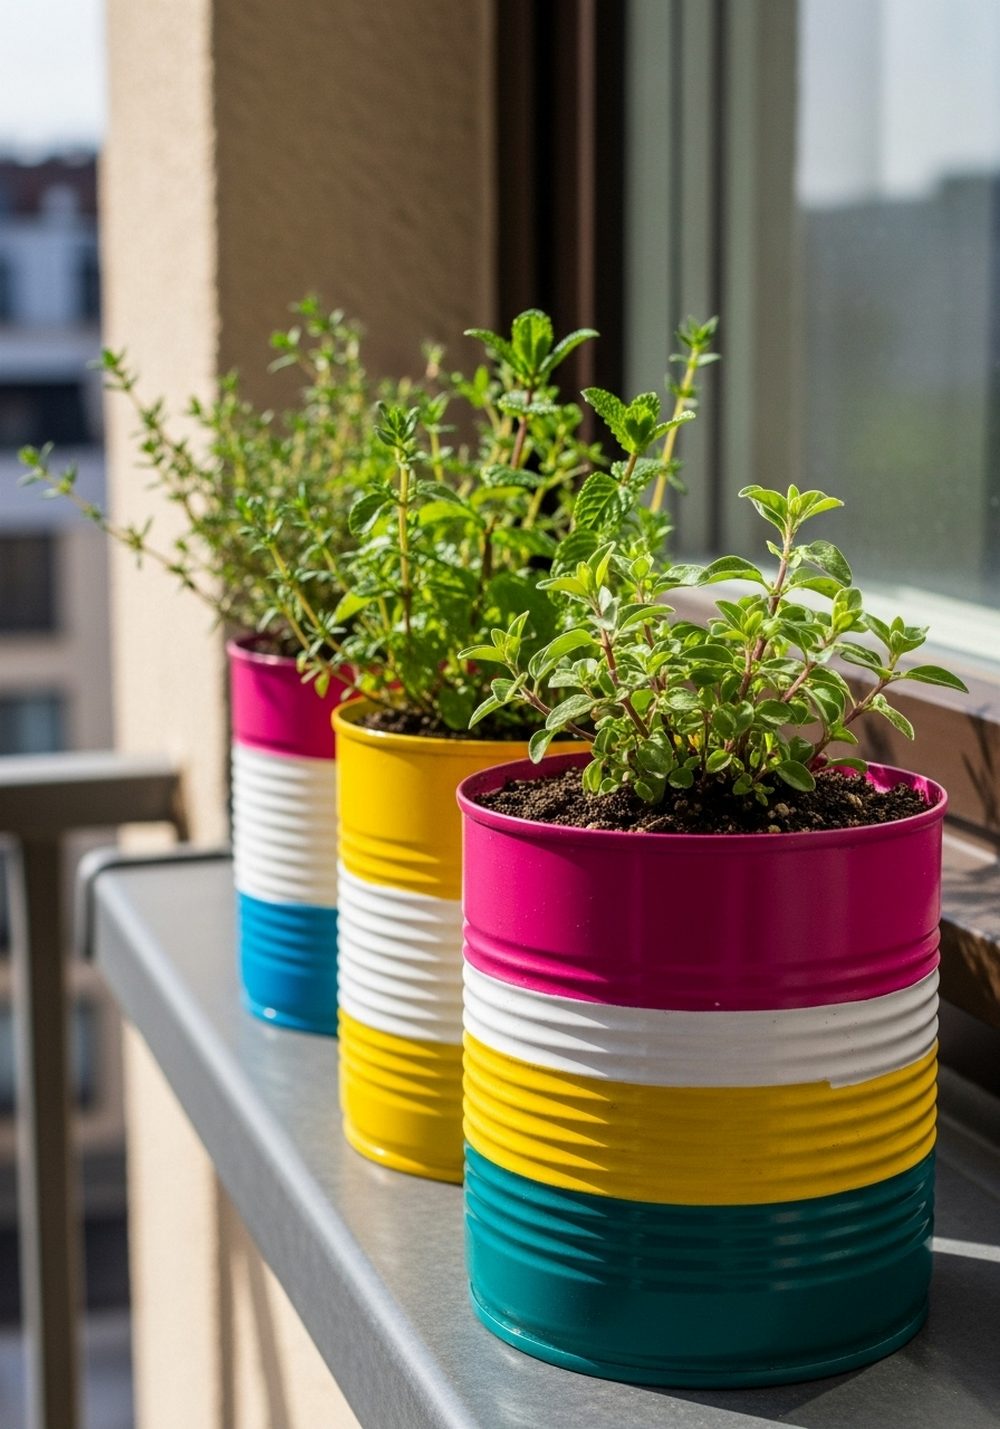
On a tiny balcony, a trio of bold, color-blocked tin cans can be enough to make the whole space feel designed. Paint each can in chunks of contrasting colour—think white and mustard, blush and terracotta, navy and cream—then group them together on a stool, crate, or ledge. Fill with herbs like mint, thyme, and oregano, choosing different textures so the foliage looks varied. The sharp lines of colour against lush greenery give a stylish, modern edge.
- Best For: Narrow balconies, fire escapes, or small steps with just enough room for a cluster.
- Budget Tip: Use sample paint pots or leftover wall paint instead of buying new craft paints.
- Styling Idea: Match one of the can colours to your outdoor cushions or railing for an easy, cohesive look.
- Practical Note: Use heavy stones in the bottom of each can to stop them tipping over in windy weather.
5. Rustic Twine-Wrapped Tin Can Herb Centerpieces

For instant farmhouse charm, wrap your tin cans in twine. Start at the base, glue as you go, and wind the twine up until the metal disappears. Add a strip of lace, burlap ribbon, or a simple bow, then plant herbs like rosemary, sage, or parsley. Group three or five cans in the center of your outdoor table for a fragrant, casual centerpiece that works for daily meals and weekend gatherings alike. It looks warm, handmade, and welcoming.
- Best For: Outdoor dining tables, picnic setups, or cozy patio corners.
- Budget Tip: Buy twine in bulk or use jute string from the hardware store and reuse any ribbon you already have.
- Styling Idea: Mix plain twine-wrapped cans with a few painted ones to keep the display interesting.
- Care & Maintenance: Rotate the cans every few days so each herb gets even light from all sides.
6. Tiered Tin Can Herb Ladder For Tiny Patios

A slim ladder leaning against a wall turns vertical space into a surprisingly generous herb garden. Attach tin cans to the rungs using sturdy wire or hose clamps, then fill them with a mix of cascading and upright herbs. Place trailing mint or oregano on higher rungs and compact thyme or chives lower down. The staggered height creates a lush, layered effect without stealing floor space, and the ladder itself becomes a decorative feature.
- Best For: Tiny patios, side yards, or bare walls that need greening up.
- Budget Tip: Hunt for an old wooden ladder at thrift shops or build a simple one from scrap wood.
- Styling Idea: Leave the ladder weathered for rustic character, or paint it black or white for a crisp, modern contrast.
- Practical Note: Make sure the ladder is stable and, if needed, fix it to the wall so it can’t slip or blow over.
7. Chalkboard-Label Tin Can Herb Station

If you like to keep things organised, a chalkboard-style tin can herb station is perfect. Paint your cans in matte black and leave a rectangle free for a chalk label, or paint the whole can in chalkboard paint. Once dry, plant your herbs and write their names right on the sides. Group them on a tray, shelf, or cart so you can move the whole collection around the house or garden. It looks neat, a little bit “bistro chic,” and makes it easy to tell your thyme from your oregano at a glance.
- Best For: Cooks who grow several herbs and want everything labeled clearly.
- Budget Tip: One small pot of chalkboard paint goes a long way across multiple cans.
- Styling Idea: Use white chalk for a classic look or coloured chalks to match your kitchen palette.
- Care & Maintenance: Wipe off and rewrite labels when you swap plants or reseed cans with new herbs.
8. Crate Of Tin Can Herbs By The Front Door

Greet guests with a burst of scent by placing a wooden crate of tin can herbs by your front door. Arrange cans of lavender, rosemary, and oregano inside the crate, tilting a few for a relaxed, layered look. The rough wood, shiny or painted tins, and soft green foliage combine into a charming, cottage-style welcome. As you come and go, you can brush the plants with your hand to release fragrance, turning a simple threshold into a mini garden moment.
- Best For: Entryways, porches, and shared front steps.
- Budget Tip: Reuse an old fruit crate or small storage box rather than buying new containers.
- Styling Idea: Stencil a simple word like “Herbs” or a tiny motif on the crate for a custom touch.
- Practical Note: Move the crate slightly in or out depending on how much sun your herbs need in each season.
9. Vertical Tin Can Herb Pallet Wall
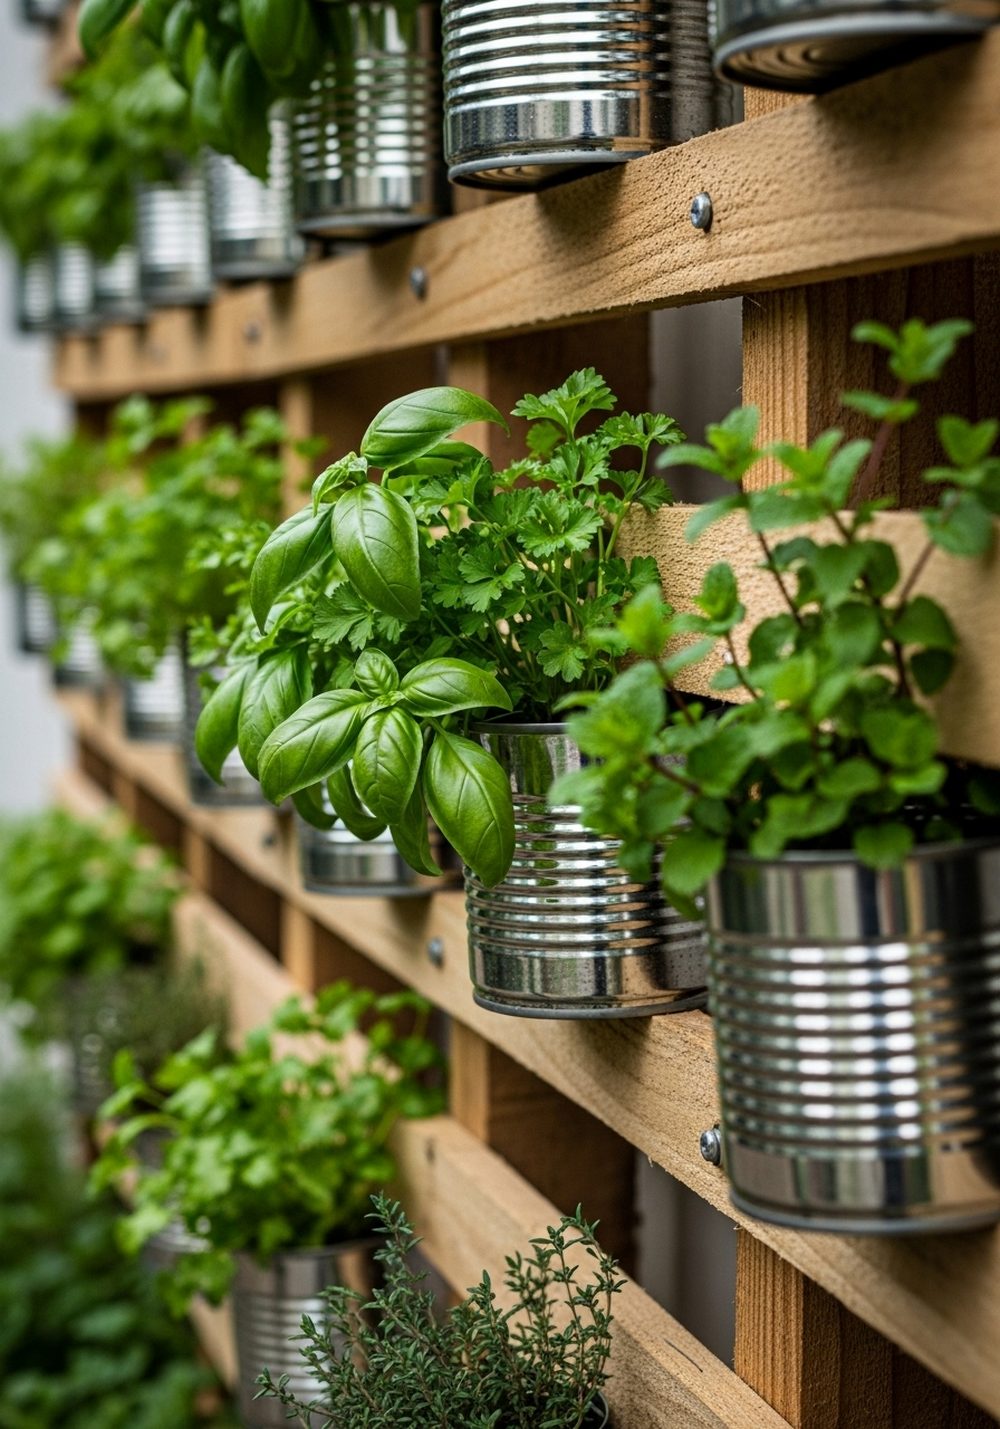
A pallet plus tin cans equals a bold herb feature wall. Fix a reclaimed pallet to a fence or wall, then screw or clamp tin cans along the slats in staggered rows. Fill with a variety of herbs to create blocks of different textures and shades of green. The repeating cans make a graphic pattern, while the pallet’s wood adds warmth and structure. It’s a statement piece that doubles as a super-productive growing space.
- Best For: Bare fences, garage walls, or dull corners that need a focal point.
- Budget Tip: Look for free pallets locally and clean them up rather than buying new wood.
- Styling Idea: Paint a few cans in an accent colour and leave others metallic for a mix of polished and raw.
- Practical Note: Plant thirstier herbs lower down where they’ll catch more water runoff when you irrigate.
10. Mini Tin Can Herb Gifts For Friends

Turn your tin can herb project into a way to share the green. Use small cans—like tomato paste or condensed milk sizes—poke drainage holes, and fill them with potting mix and a young herb seedling. Tie a ribbon, twine bow, or simple kraft paper band around each, and add a handwritten tag with the herb’s name and care tip. These little planters look incredibly sweet lined up on a table, and they make thoughtful, low-cost gifts that feel personal and homemade.
- Best For: Party favours, thank-you gifts, or welcoming new neighbours.
- Budget Tip: Grow a tray of herb seedlings from seed so you can fill many cans cheaply.
- Styling Idea: Keep the look simple with neutral wrapping so the herb foliage remains the star.
- Care & Maintenance: Include basic watering and light instructions on the tag so recipients can keep their plant thriving.
Conclusion
With a stack of clean tin cans and a little creativity, you can turn pantry leftovers into a whole collection of beautiful herb gardens. Whether you line a windowsill, build up a pallet wall, or dress your table with twine-wrapped centerpieces, each idea adds life, scent, and personality to your space. Start with a single can on the sill or one small trio on the balcony, see how it transforms the mood, and let your tin can garden grow from there.
FAQs
1. How do I stop tin can herb planters from rusting?
Rust is natural over time, but you can slow it down by thoroughly drying cans before painting and using a rust-resistant primer and outdoor-grade topcoat. Avoid letting water sit in saucers and keep cans on trays so drainage can escape. If a bit of rust appears, many people embrace it as rustic charm, or you can lightly sand and repaint.
2. Are tin can herb gardens safe for renters who can’t make permanent changes?
Yes, they’re ideal for renters. Most of these ideas are completely portable and don’t require drilling into walls or railings. Choose options like crates, trays, small ladders, or fridge magnets that can be removed without leaving marks. When you move out, simply take your tins with you or gift them to friends.
3. What are the easiest herbs to grow in tin cans for beginners?
Start with herbs that forgive a little neglect, such as mint, chives, parsley, and thyme. They handle small containers well and bounce back from the odd missed watering. Place them where they get at least a few hours of light, use a decent potting mix, and check moisture with your finger so you don’t overwater.
4. How can I decorate tin cans on a very small budget?
You don’t need fancy craft supplies. Leftover house paint, permanent markers, twine, newspaper, or scrap fabric can all dress up a can. Simple stripes, dots, or a single band of twine already looks stylish. Focus on keeping the palette limited—two or three colours repeated across all your cans will make them look coordinated and intentional.
5. Will tin can herb gardens survive outdoors in bad weather?
They can, with a little planning. Add drainage holes so rainwater doesn’t pool and choose herbs that suit your climate. In heavy rain or strong wind, group cans in crates or on trays so you can move them under cover. If winters are harsh where you live, bring a few favourite cans indoors and treat them as kitchen windowsill herbs until spring.