10 Painted Flower Pot Ideas for a Colorful Garden
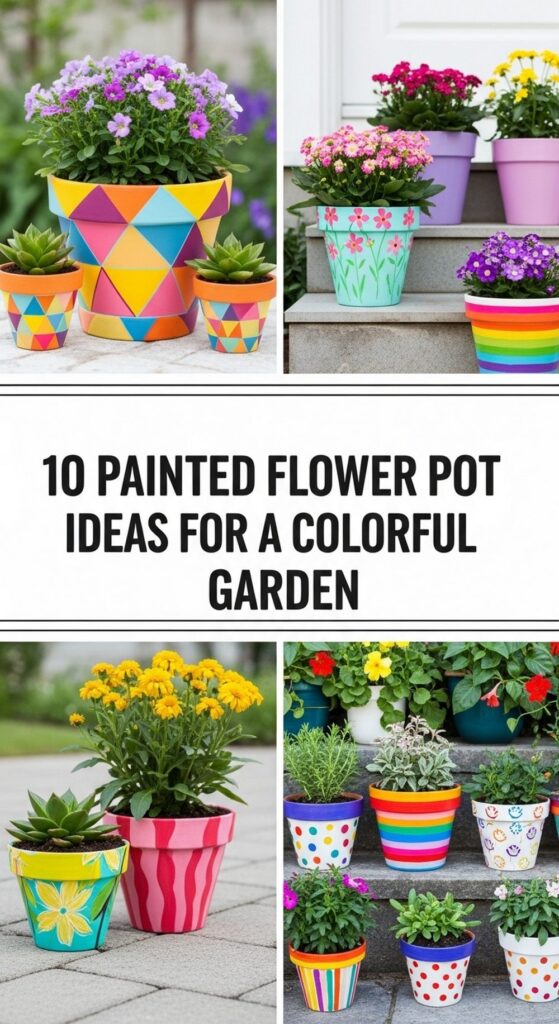
Painted flower pots are one of the easiest ways to inject personality and color into your garden without a big budget or a full makeover. With a few simple supplies and a free afternoon, you can turn plain terracotta or plastic containers into cheerful little artworks that brighten every corner.
This post is perfect for home gardeners, renters, and small-space plant lovers who want decor that’s quick, fun, and totally customizable. You’ll find simple painted pot ideas, from soft pastels to bold patterns and playful designs for kids. Pick a style that suits you, grab a brush, and get ready to turn your garden into a colorful, welcoming space.
Quick List
Rainbow Ombre Pots
Black & White Geometric Pots
Pastel Drip-Paint Herb Pots
Terracotta Pots With Bold Brush Strokes
Chalkboard Label Pots
Mediterranean Blue & White Mosaic Pots
Whimsical Face Pots
Stenciled Leaf Silhouette Pots
Galaxy Night-Sky Pots
Storybook-Inspired Kids’ Pots
Main Ideas Section
1. Rainbow Ombre Pots
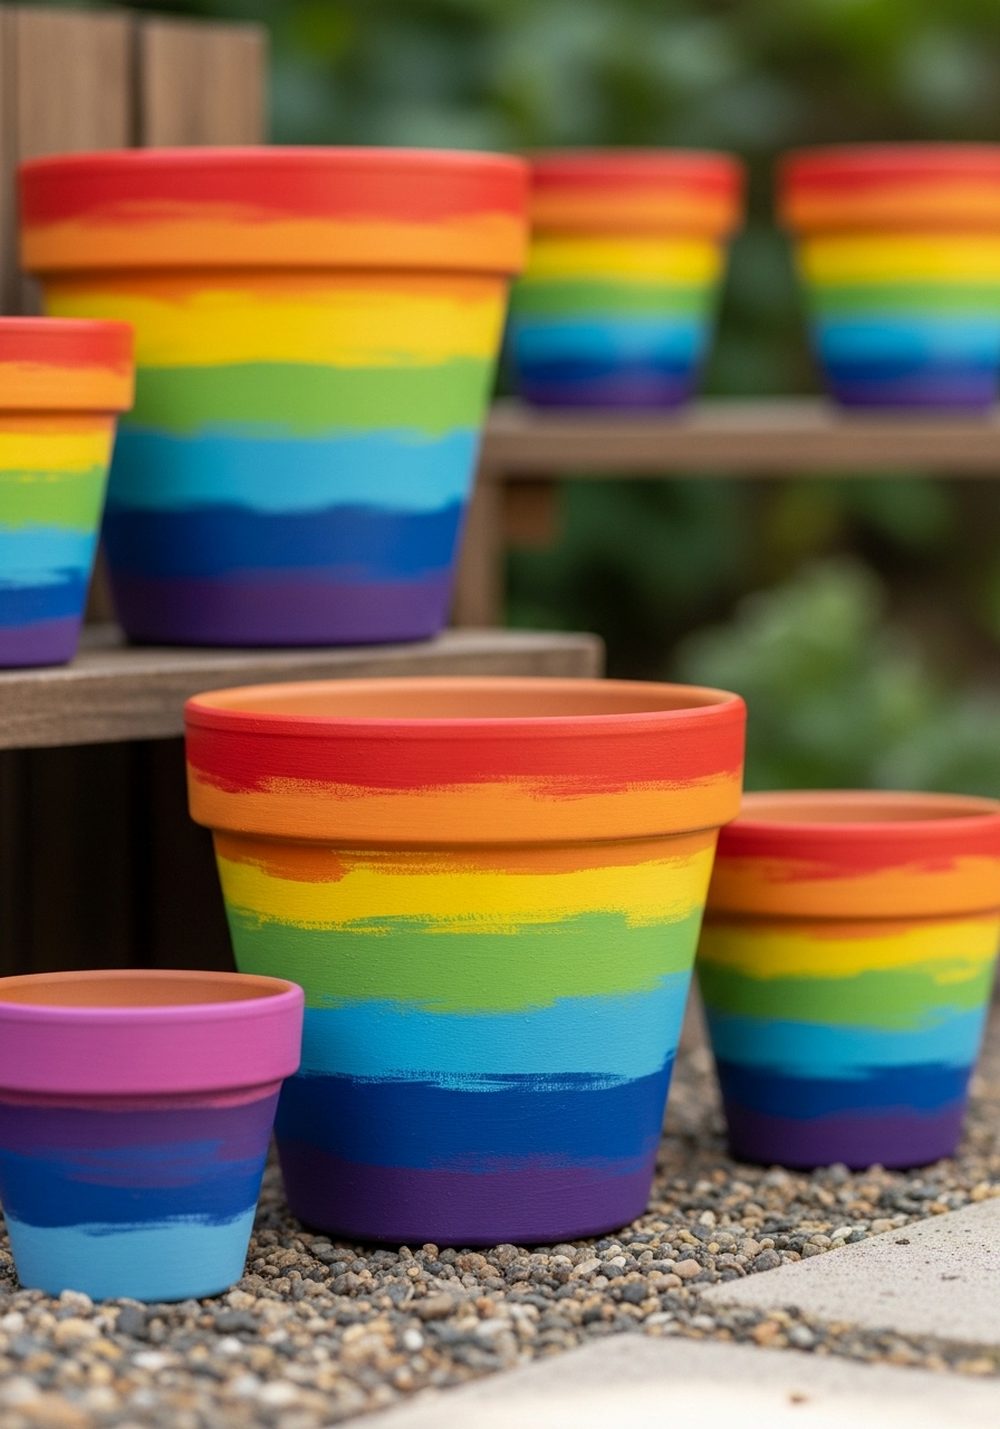
Rainbow ombre pots are a joyful way to add instant color to a dull corner. Start with a primed terracotta pot and choose acrylic paints in a rainbow gradient. Work in sections, blending where the colors meet so they softly fade into each other. Once dry, seal the pot with a clear outdoor varnish to help protect it from the weather. Group a few ombre pots together with simple green plants and your garden will look like a mini celebration all year round.
- Best For: Brightening up entryways, patios, and kids’ play areas.
- Budget Tip: Use a basic set of craft paints and mix shades to stretch your colors further.
- Styling Idea: Keep plants mostly green so the rainbow effect stands out instead of competing with flower colors.
- Practical Note: Always paint the outside only so the paint doesn’t touch the soil.
- Care & Maintenance: Reseal once a year if the pots sit in full sun or get heavy rain.
2. Black & White Geometric Pots
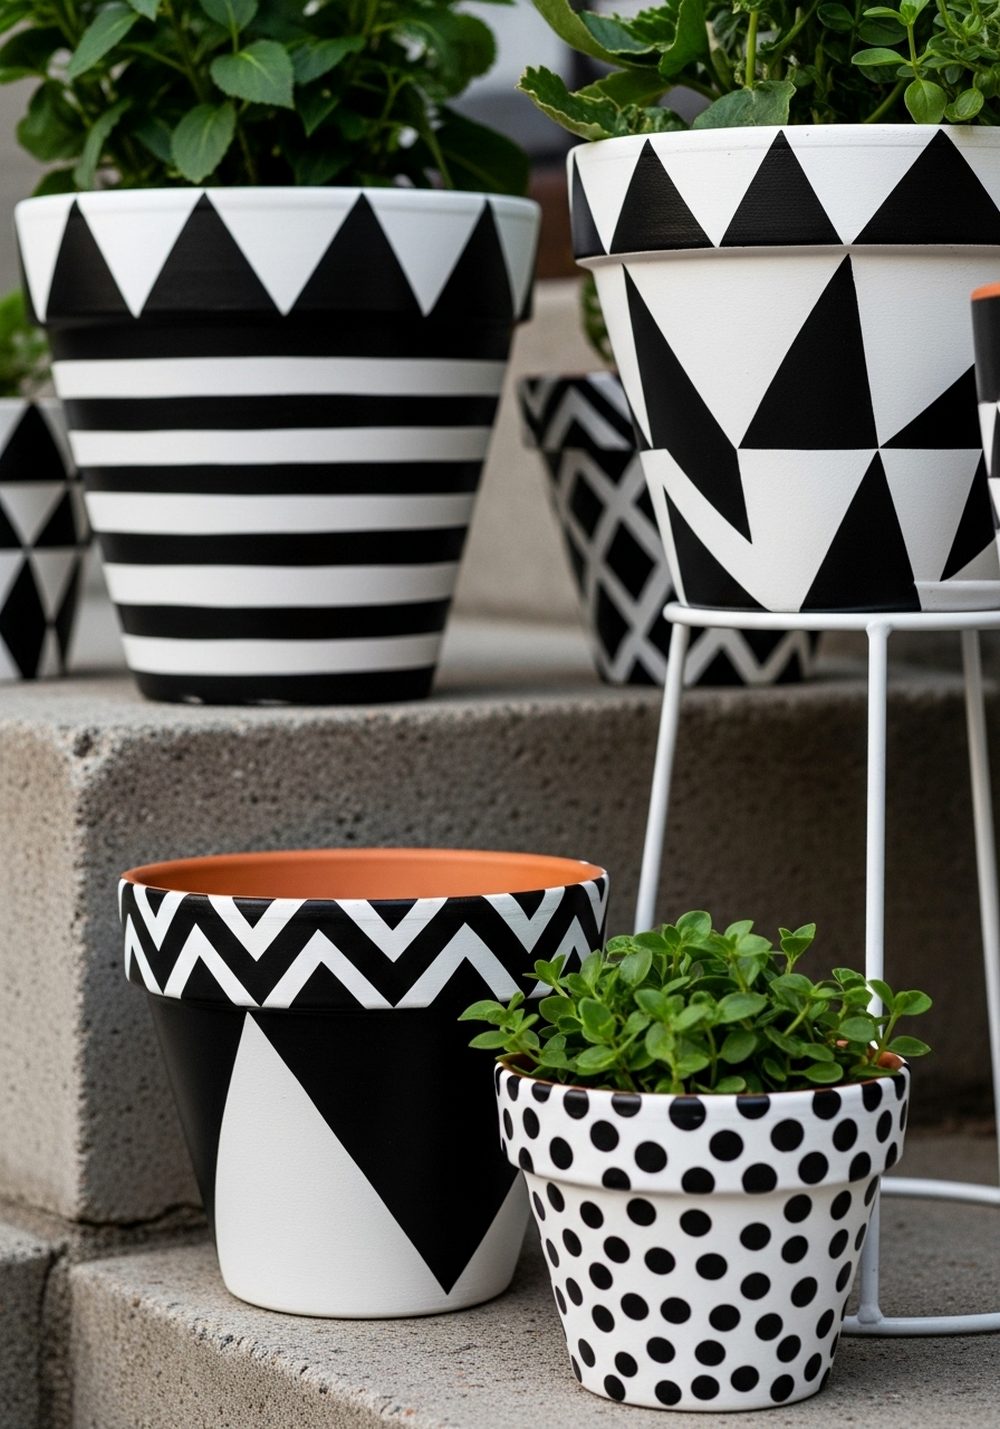
Black and white geometric pots are ideal if you love a clean, modern look. Paint your pots a solid white base, let them dry fully, then add black triangles, stripes, chevrons, or polka dots using painter’s tape or freehand brushwork. The sharp contrast looks amazing with lush green foliage and works well in both indoor and outdoor spaces. Cluster several patterns together on steps or a plant stand to create a striking display that feels curated and stylish.
- Best For: Contemporary patios, balconies, and small urban gardens.
- Budget Tip: Start with just two large pots as focal pieces and add more over time.
- Styling Idea: Combine different patterns but keep the color palette strictly black and white for a cohesive look.
- Practical Note: Use outdoor-rated paint and sealer if the pots will live outside year-round.
- Extra Idea: Add a matching black and white painted tray or side table to pull the area together.
3. Pastel Drip-Paint Herb Pots
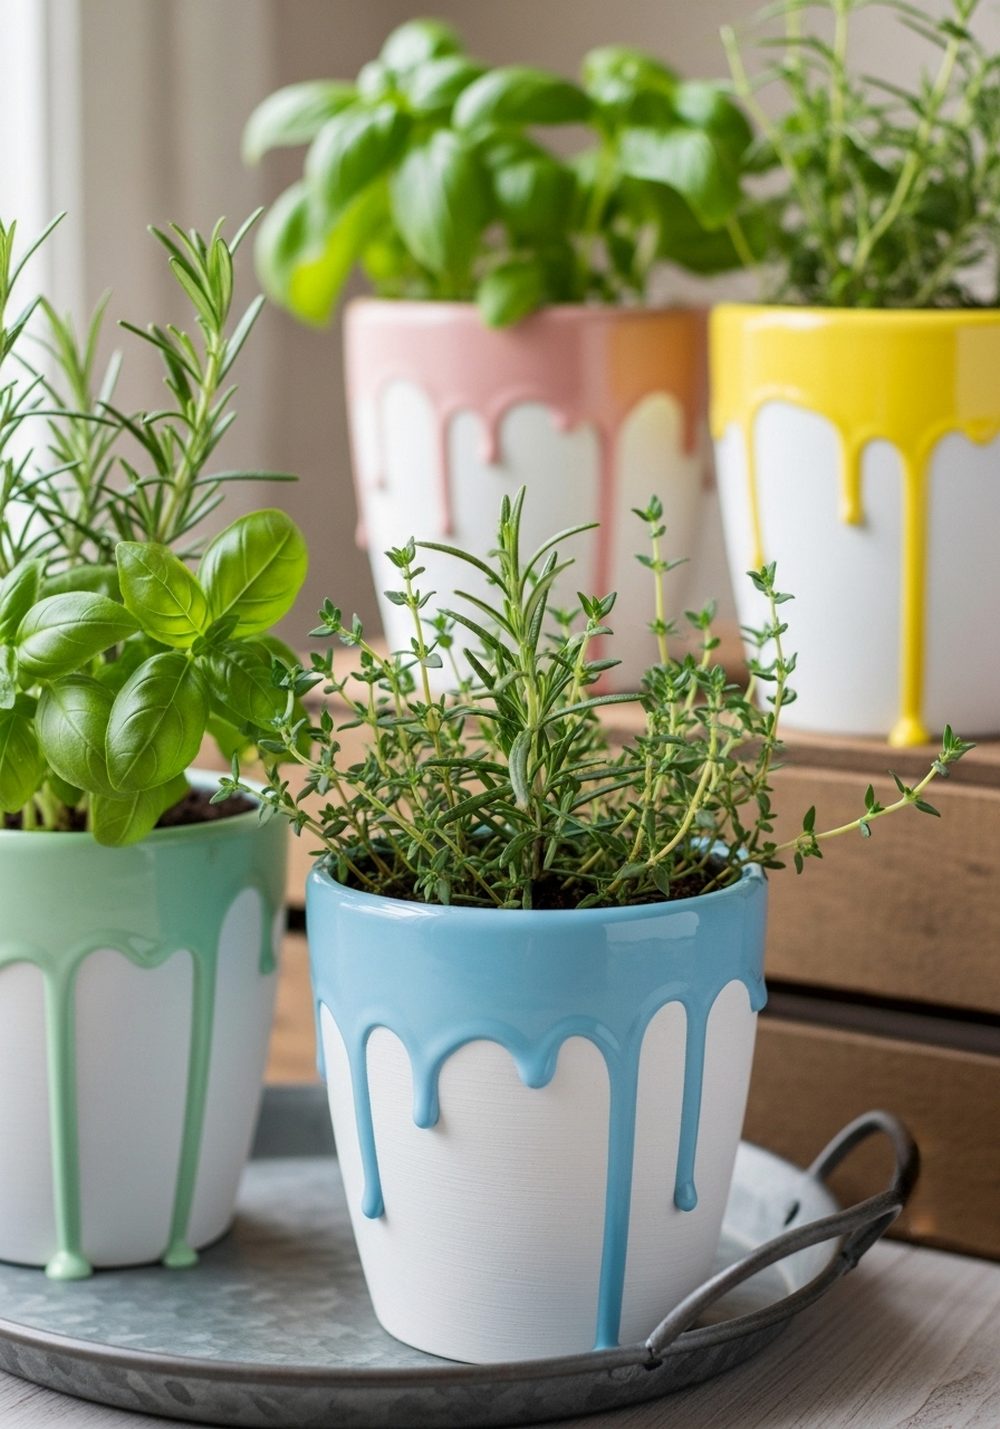
Pastel drip-paint herb pots bring a soft, playful feel to windowsills and kitchen gardens. Paint each pot a simple white base, then thin pastel acrylics with a bit of water and pour around the rim, letting the paint drip naturally down the sides. Rotate the pot gently to guide the drips in different directions. When the drips have dried, plant your favorite herbs. The mix of delicate leaves with glossy pastel paint gives your garden a sweet, bakery-style charm.
- Best For: Kitchen herb gardens, windowsills, and small balconies.
- Budget Tip: Use mini terracotta pots and a few pastel colors to make a set on a tight budget.
- Styling Idea: Stick to 3–4 pastel shades that repeat across all pots for a coordinated feel.
- Practical Note: Place pots on a tray while painting to catch any mess from the drips.
- Care & Maintenance: Wipe gently with a damp cloth; avoid harsh scrubbing on the drip edges.
4. Terracotta Pots With Bold Brush Strokes
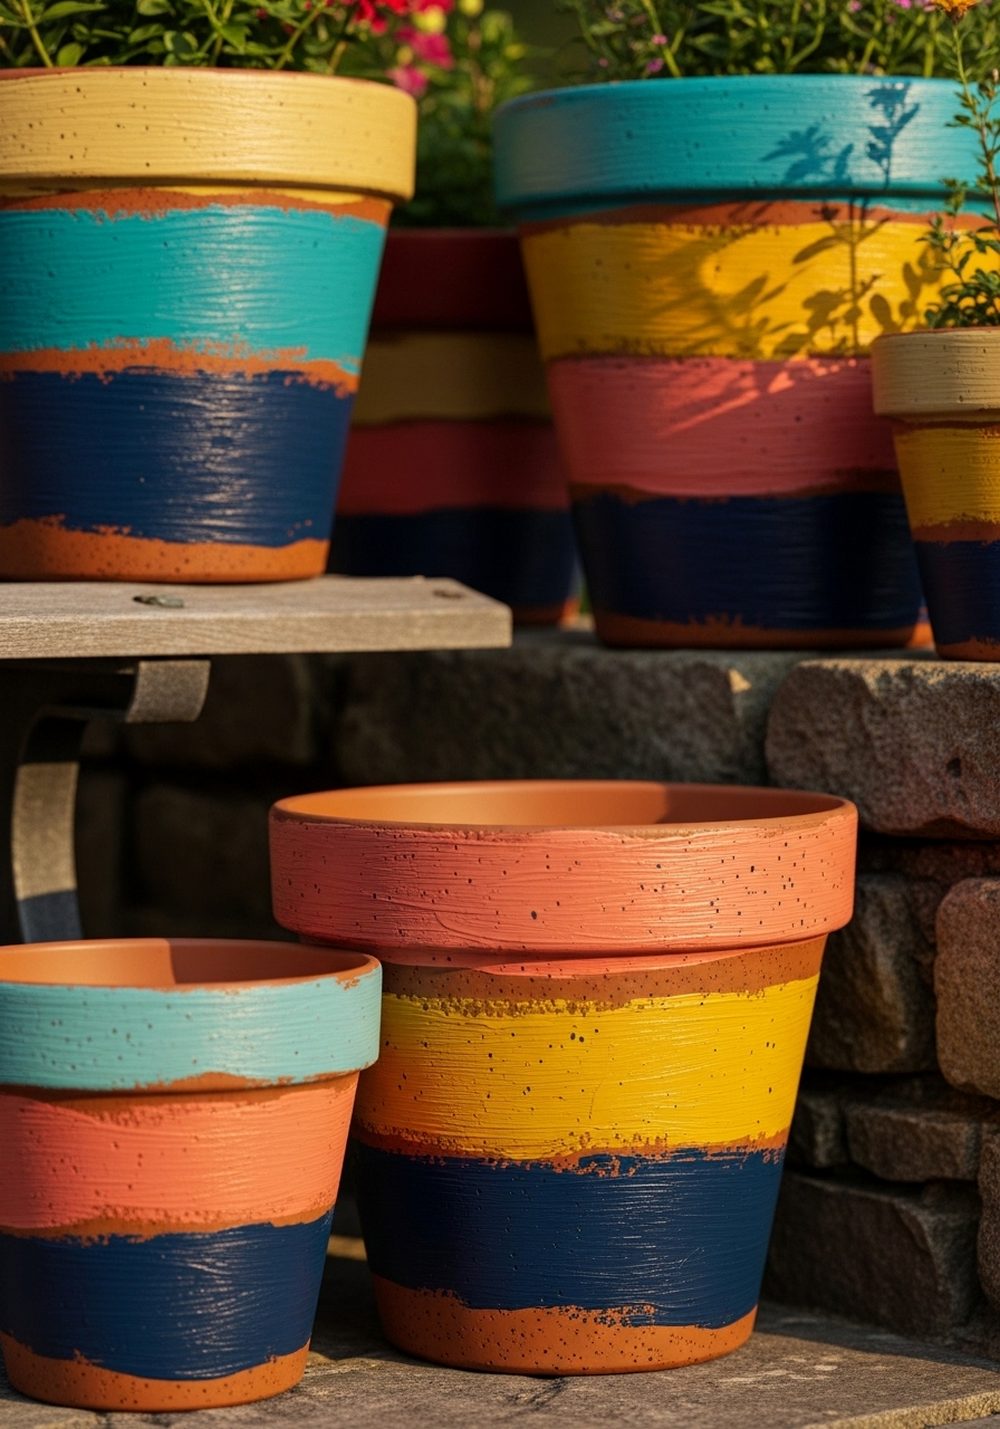
If you love an artsy, relaxed look, bold brush stroke pots are perfect. Leave some of the terracotta exposed, then use a wide brush to sweep on thick strokes of color—teal, mustard, coral, navy, or whatever suits your garden palette. Let each color dry slightly before adding another so they layer instead of blending. The result feels like modern art scattered through your plants, especially when grouped in different sizes for added height and interest.
- Best For: Eclectic gardens, casual seating areas, and creative corners.
- Budget Tip: Use leftover paints from other projects and lean into a mixed-color look.
- Styling Idea: Echo one or two pot colors in outdoor cushions or a throw for a pulled-together theme.
- Practical Note: Avoid painting the bottom of the pot so it can drain and dry properly.
- Care & Maintenance: Touch up any chipped strokes with a small brush as needed.
5. Chalkboard Label Pots
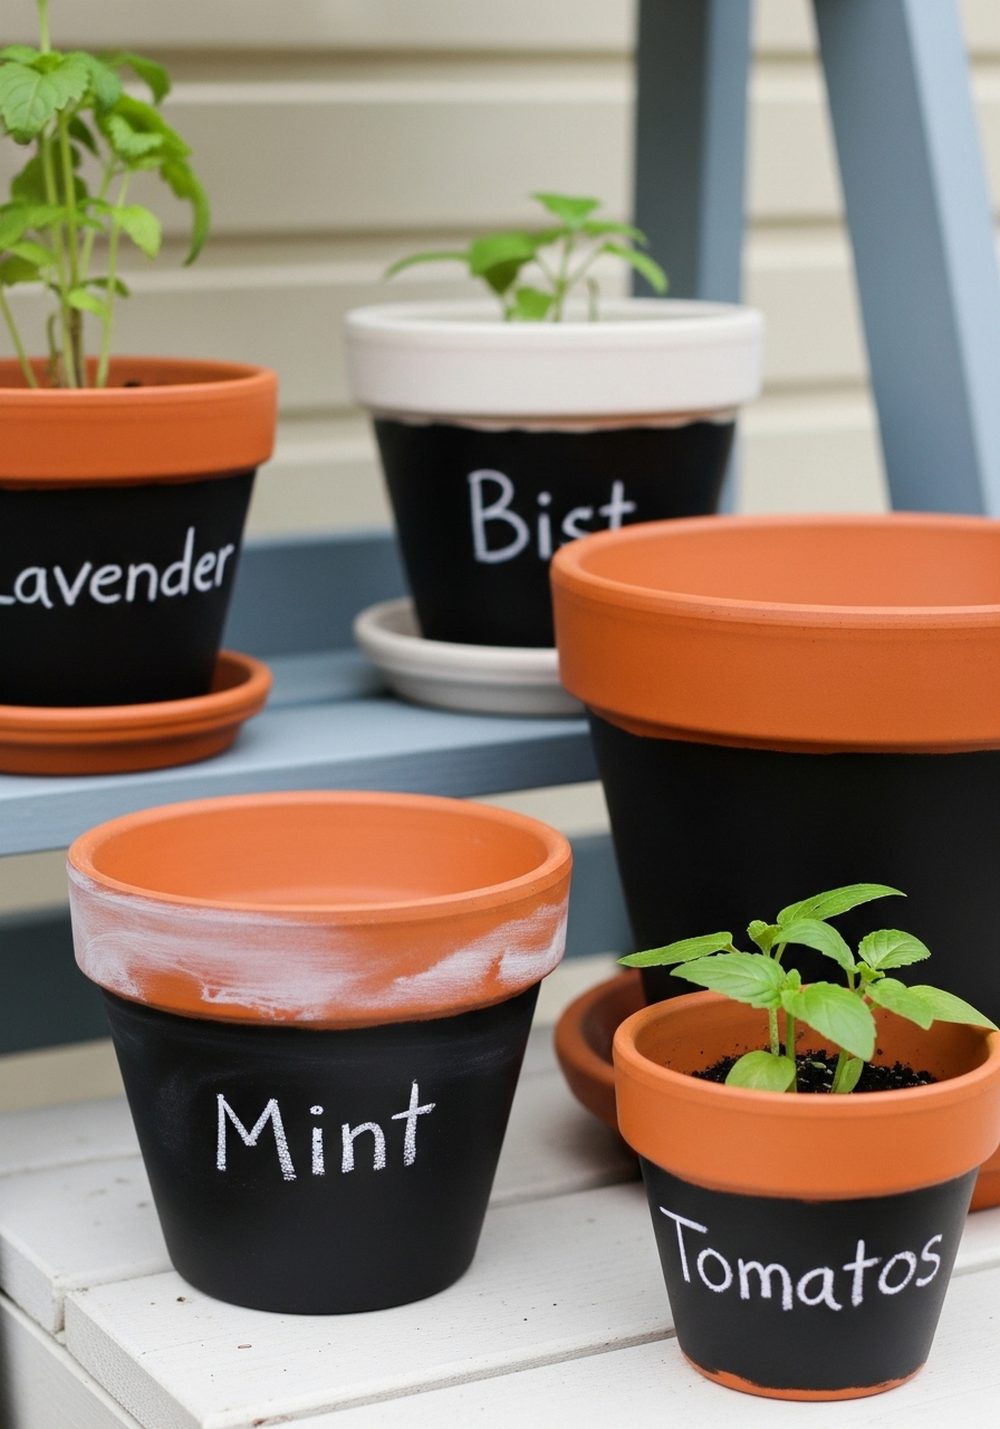
Chalkboard label pots are both practical and decorative, especially for herb or veggie gardens. Paint a rectangular panel of chalkboard paint on each pot, leaving the rest terracotta or a contrasting color. Once dry, write the plant name with chalk or a chalk marker. This makes it easy to remember what you planted and adds a neat, organized look to shelves and potting benches. You can change the labels anytime, which is ideal if you like to experiment with different plants.
- Best For: Herb gardens, vegetable seedlings, and organized gardeners.
- Budget Tip: Use one small tin of chalkboard paint on many pots; it goes a long way.
- Styling Idea: Keep lettering simple and add tiny doodles like leaves or hearts for charm.
- Practical Note: Use chalk markers for cleaner lines, then remove with a damp cloth when you want to relabel.
- Care & Maintenance: Avoid heavy scrubbing on the chalkboard area to keep it smooth.
6. Mediterranean Blue & White Mosaic Pots
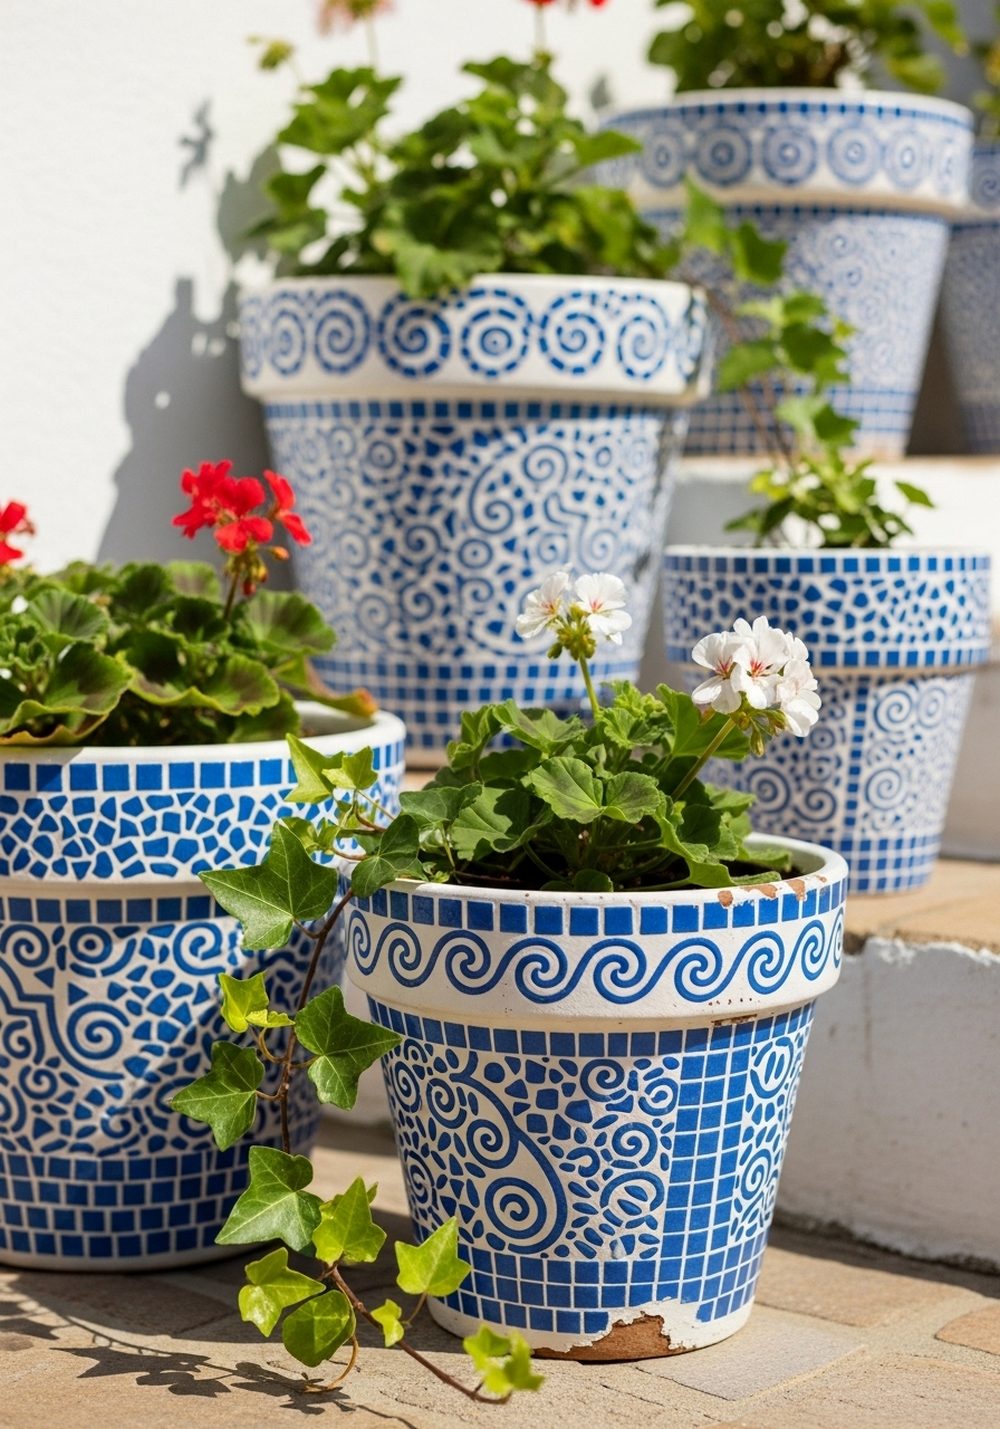
Mediterranean blue and white mosaic pots bring a holiday feel straight into your garden. Start with a white-painted pot as your base, then use stencils or a steady hand to paint repeating patterns in deep blue—think little tiles, swirls, and borders. These pots look stunning with geraniums, olive-style trees, or trailing ivy. Placed near a white wall, stone steps, or gravel, they instantly evoke sunny courtyards and sea breezes without any complicated landscaping.
- Best For: Sunny patios, courtyards, and front door steps.
- Budget Tip: Focus on painting just one or two statement pots to anchor a simple seating area.
- Styling Idea: Combine with woven baskets, neutral cushions, and lanterns for a relaxed Mediterranean feel.
- Practical Note: Use a small brush for fine details and work slowly to keep lines crisp.
- Care & Maintenance: Repaint the white base as needed if it becomes stained or weathered.
7. Whimsical Face Pots
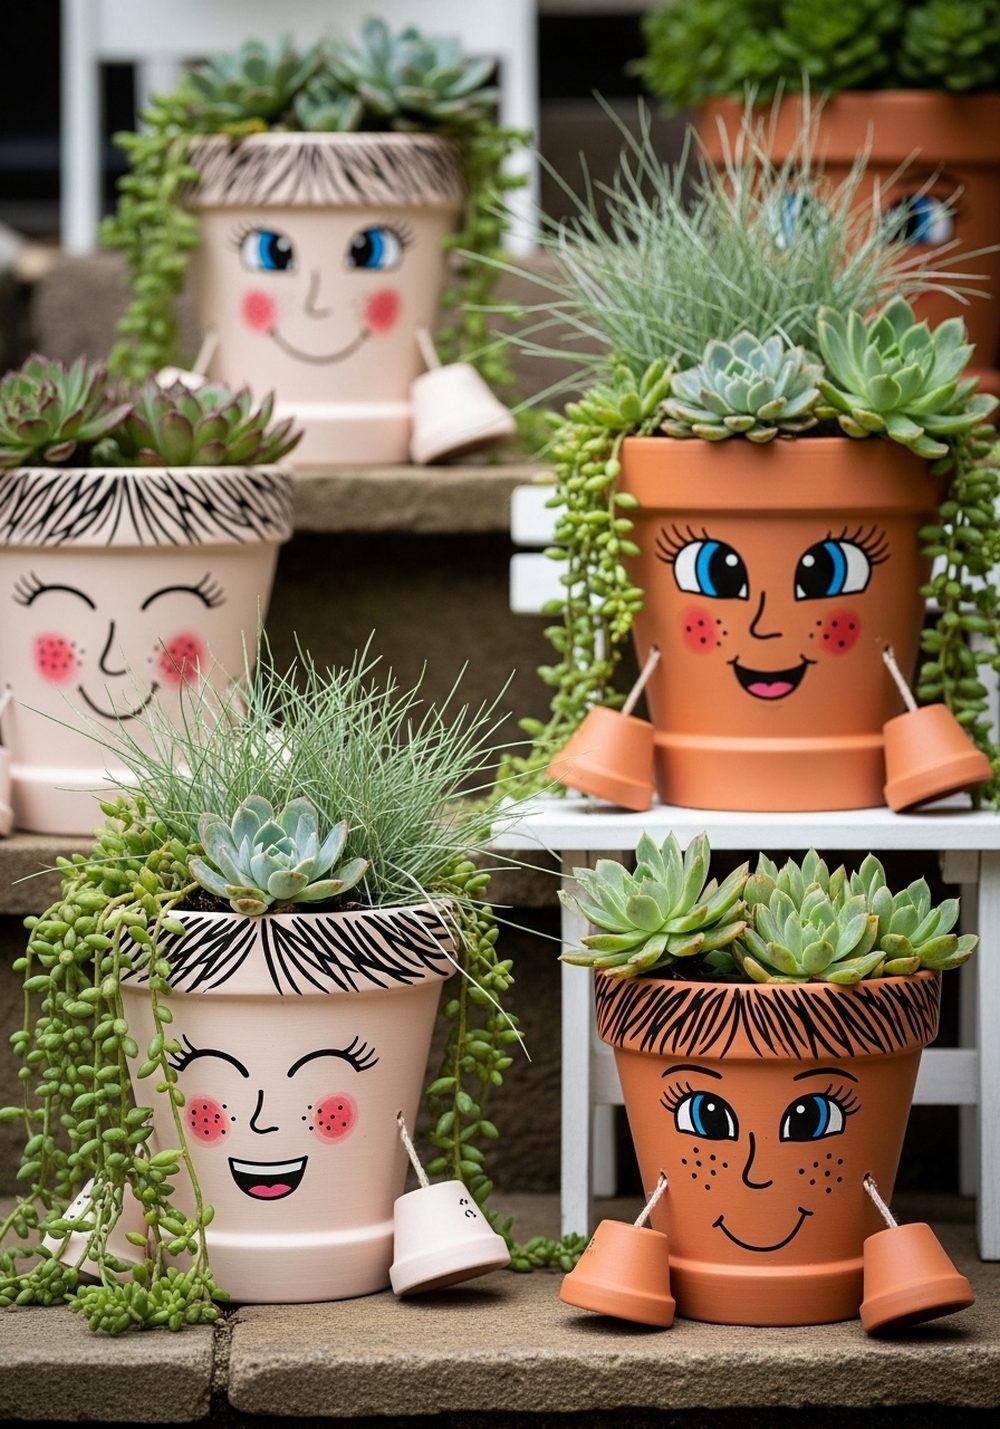
Whimsical face pots add personality and a sense of fun to your plants. Paint simple faces on your pots—closed eyes with long lashes, rosy cheeks, little smiles—keeping the designs mostly in black and soft accent colors. Plant cascading succulents, trailing vines, or spiky grasses to create “hair” that completes each character. Cluster a few together at different heights and it will feel like a group of friendly garden guests greeting you every time you step outside.
- Best For: Family gardens, playful patios, and kids’ corners.
- Budget Tip: Transform old mismatched pots; the faces will unify them into a cute collection.
- Styling Idea: Keep faces minimal and repeat the same color for cheeks or lips to tie them together.
- Practical Note: Use a fine liner brush or paint pens for neat facial features.
- Extra Idea: Give each pot a name and tiny painted accessory like glasses or freckles.
8. Stenciled Leaf Silhouette Pots
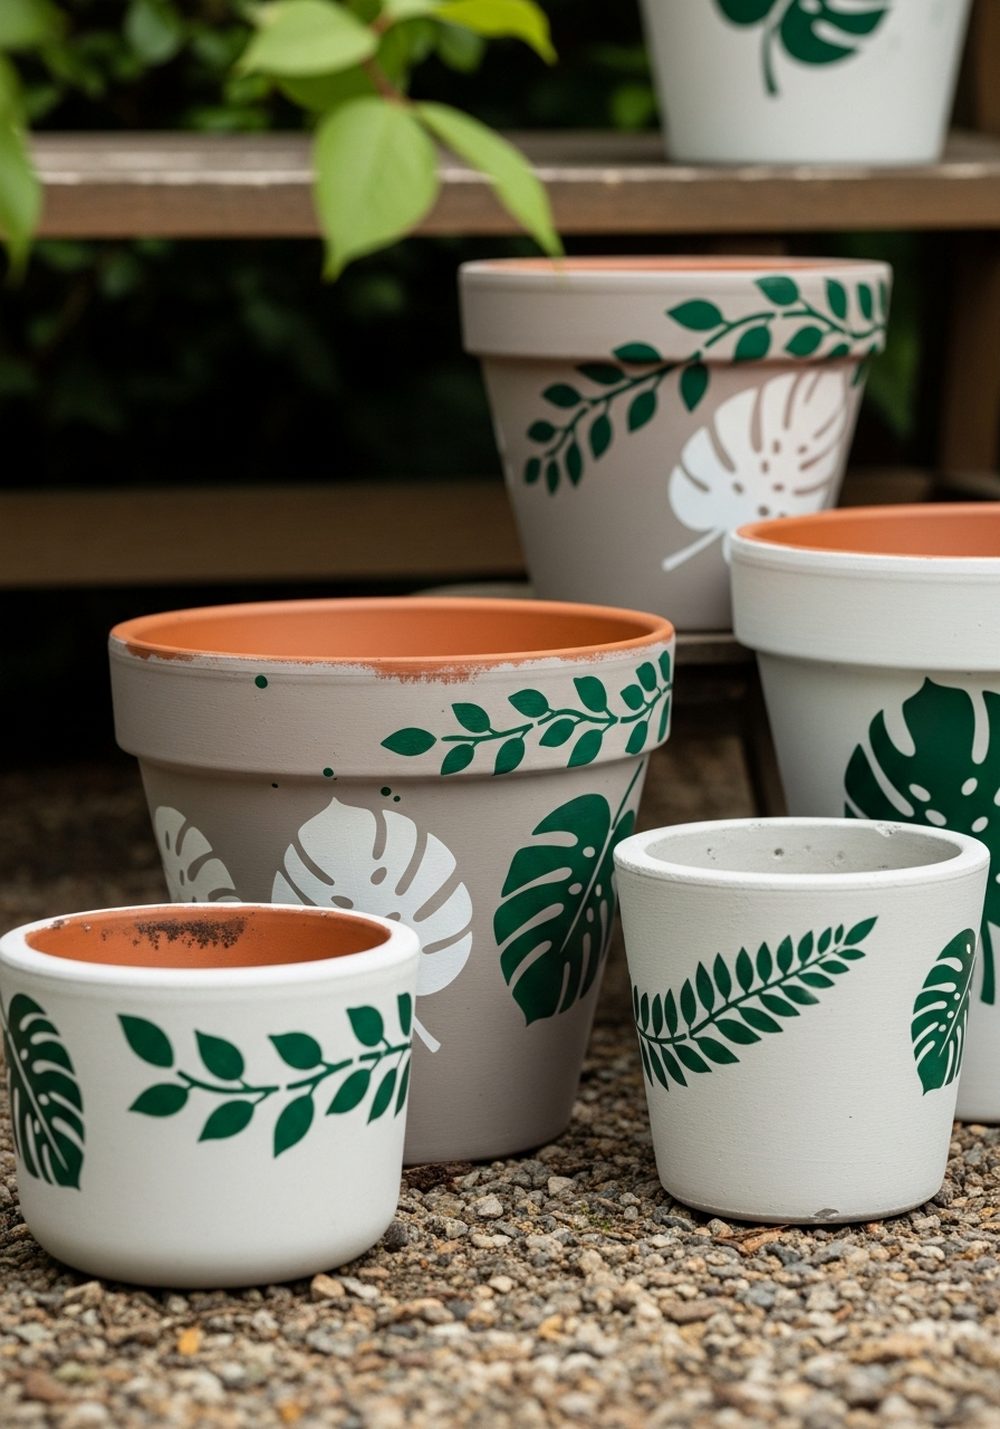
Stenciled leaf silhouette pots have a calm, nature-inspired look that works with nearly any style. Paint your pots in soft neutrals—warm grey, cream, or sage—then use leaf stencils to add silhouettes in a darker or lighter shade. Fern fronds, monstera leaves, or simple oval leaves all look lovely. The designs feel understated yet stylish and pair beautifully with both leafy plants and flowering ones. A row of these on a bench instantly makes the space feel more thoughtful and designed.
- Best For: Relaxed, minimal gardens and renters who want subtle decor.
- Budget Tip: Cut your own stencils from sturdy plastic or card to reuse on multiple pots.
- Styling Idea: Stick to one leaf style repeated across all pots for a calm, cohesive look.
- Practical Note: Lightly tape the stencil in place and dab the paint rather than brushing to avoid bleeding.
- Care & Maintenance: Store stencils flat so you can refresh designs or make new pots later.
9. Galaxy Night-Sky Pots
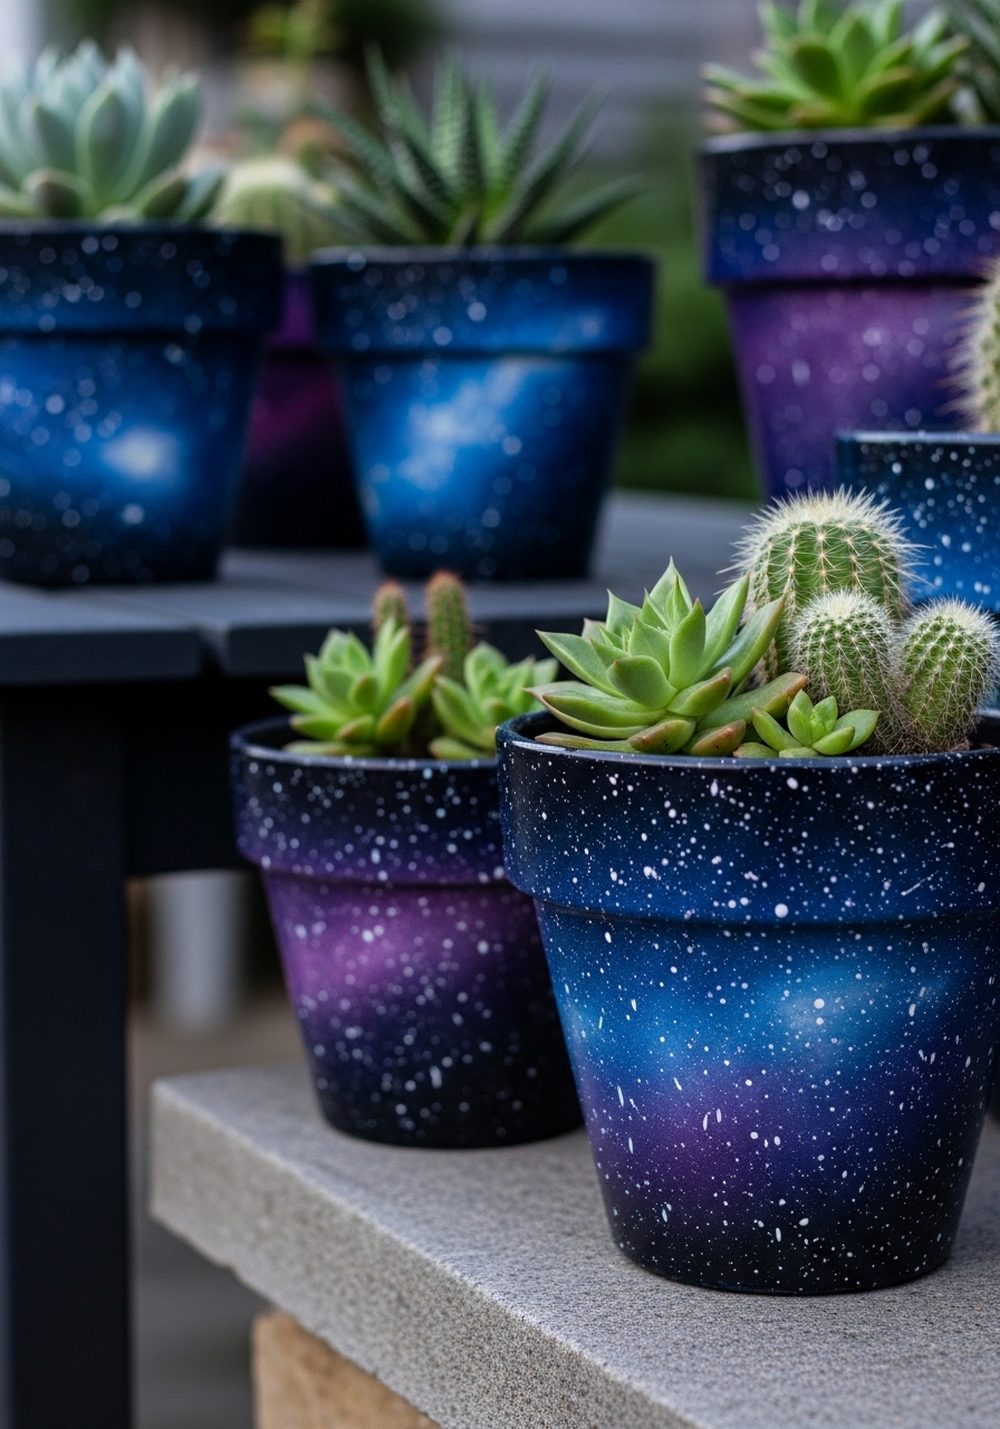
Galaxy night-sky pots are perfect if you love a bit of magic and drama. Start with a dark navy or black base, then sponge on layers of blue, purple, and a touch of pink to create a swirling sky effect. Flick diluted white paint with a small brush to add stars, concentrating more in some areas to mimic clusters. These pots look especially striking with simple green succulents or cacti and are gorgeous on a balcony or table where you can enjoy them in the evening.
- Best For: Evening seating areas, balconies, and cozy corners with string lights.
- Budget Tip: Use a basic sponge and just a few paint colors—blending creates the rest of the effect.
- Styling Idea: Pair with dark-stained wood, lanterns, and soft lighting for a dreamy night-sky mood.
- Practical Note: Practice your paint flicks on scrap card first to control star density.
- Care & Maintenance: Use a glossy sealant to keep colors rich and easy to wipe clean.
10. Storybook-Inspired Kids’ Pots
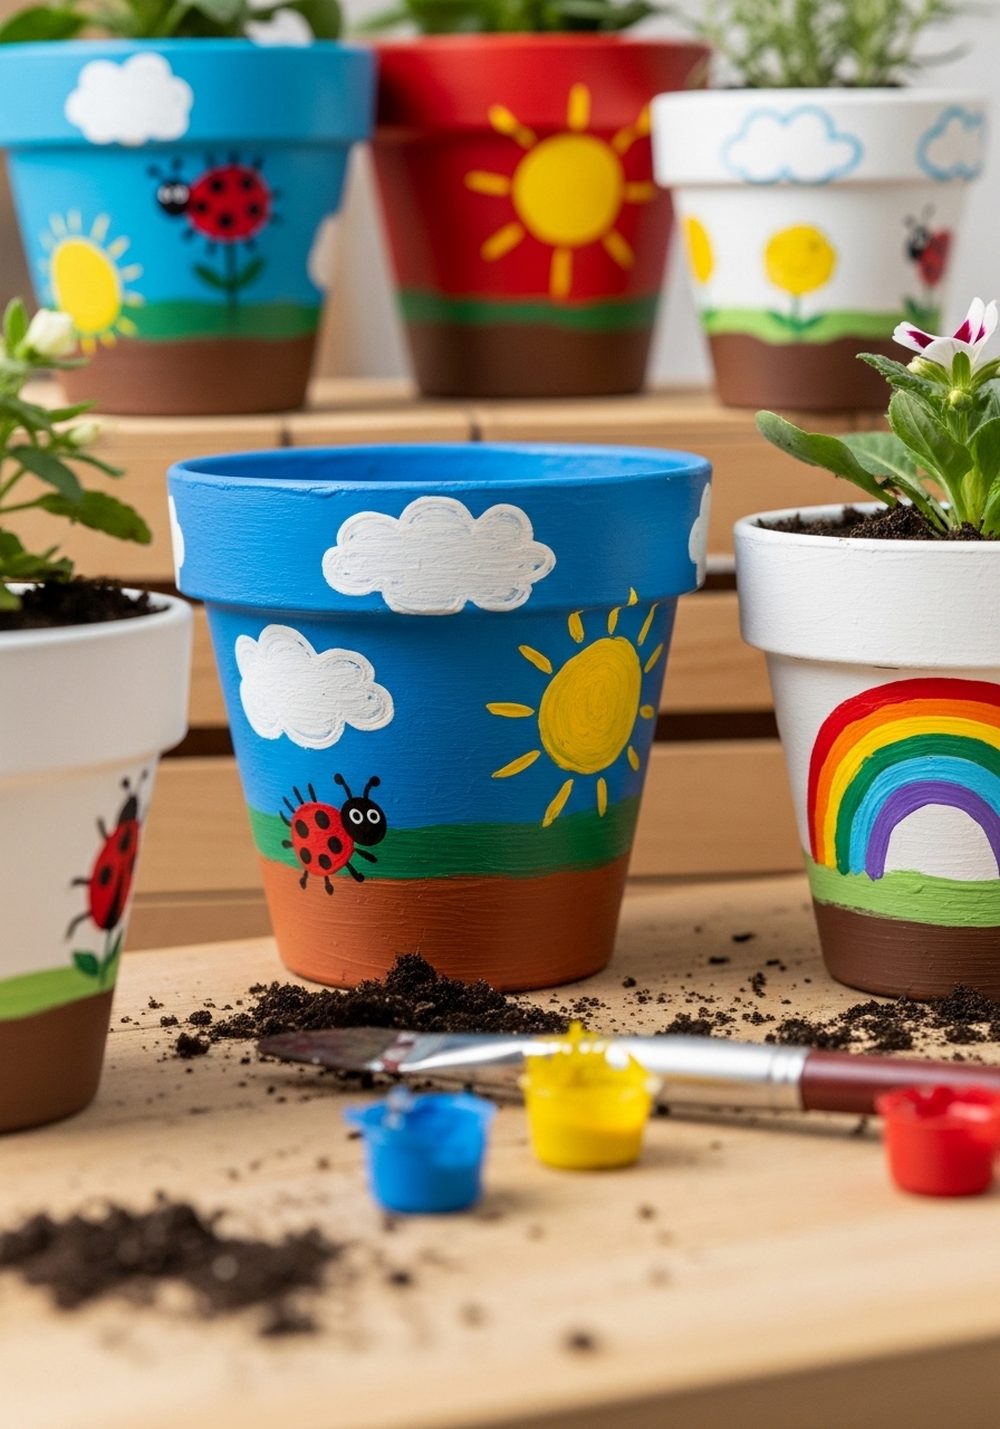
Storybook-inspired kids’ pots turn gardening into a fun craft project for little ones. Paint pots in bright base colors, then help children add simple shapes like suns, clouds, rainbows, ladybirds, or stars. The designs don’t need to be perfect—those wobbly lines and fingerprints make them extra charming. Plant fast-growing flowers, strawberries, or herbs so kids can quickly see the results of their efforts. Display the pots at child height so they can water and admire their mini garden easily.
- Best For: Family gardens, school projects, and grandparents’ patios.
- Budget Tip: Buy a multipack of small pots and a set of basic acrylics to share between kids.
- Styling Idea: Choose a loose theme like “sky,” “bugs,” or “weather” to guide designs without limiting creativity.
- Practical Note: Put old shirts or aprons on kids and set up outside for easier clean-up.
- Care & Maintenance: Reseal pots occasionally if they live outdoors and get heavy use.
Conclusion
Painted flower pots are a simple, satisfying way to turn an ordinary garden into a colorful, personal haven. Whether you love soft pastels, bold patterns, or playful designs for children, a few brushes and some paint can make a huge difference. Start with one or two ideas that excite you, transform a small cluster of pots, and see how the whole space suddenly feels brighter and more welcoming. From there, you can keep adding color, pot by pot.
FAQs
Q1. What kind of paint should I use on flower pots?
Use acrylic or outdoor craft paint on terracotta and most plastic pots. These paints adhere well and are easy to work with. Always finish with a clear outdoor sealer to help protect your designs from sun and rain, especially if the pots will live outside year-round.
Q2. Can I paint pots if I’m renting and can’t change much in the garden?
Yes, painted pots are perfect for renters because they’re completely portable and non-permanent. You can group them on balconies, patios, or near doorways to add personality without altering any fixed surfaces. When you move, just take your colorful collection with you.
Q3. How do I keep painted pots from peeling or fading outdoors?
Make sure the pots are clean and dry before you start, and avoid painting the inside or bottom where moisture sits. Use good-quality acrylic or outdoor paints, let each coat dry thoroughly, and finish with a clear sealer. Over time, you can refresh the sealer or touch up any small chips to keep them looking new.
Q4. Are painted pots safe for plants?
They are safe as long as you only paint the outside and leave the inside unpainted, so the roots and soil don’t come into direct contact with paint. Also be sure drainage holes remain open. If you’re unsure, you can use a painted pot as a decorative cover and keep the plant in a plain plastic nursery pot inside it.
Q5. What’s the easiest painted pot idea for beginners?
Start with simple designs like bold brush strokes, basic stripes, or chalkboard labels. These don’t require perfect lines or detailed drawing skills, and any little imperfections just make them look more handmade. Once you feel more confident, you can try ombre, stencils, or small illustrations.
Q6. How can I decorate painted pots on a very small balcony?
Choose a few standout pots rather than many small ones to avoid clutter. Use a slim plant stand, wall shelves, or rail-hanging holders to build upwards instead of taking up floor space. Keeping to one or two color themes across your pots will make the balcony feel stylish and intentional, even if it’s tiny.