10 Painted Tin Can Planters For Tiny Patios

If your patio is so small it feels like a glorified doormat, painted tin can planters might be your new best friend. They’re budget-friendly, easy to make in an afternoon, and slim enough to tuck onto railings, walls, and narrow shelves without stealing your precious floor space.
In this guide, you’ll find ten creative ways to turn simple tins into colorful mini planters that brighten up even the tiniest outdoor area. We’ll mix vertical ideas, clever rail tricks, and cute tabletop displays so you can add personality, greenery, and charm to your patio without needing a big garden or big budget. Grab a few cans from the recycling bin and let’s decorate.
Quick List
- Rainbow Vertical Tin Can Planter Wall
- Pastel Ombre Herb Rail Planters
- Chalkboard Label Tin Cans On A Narrow Shelf
- Mosaic Dot Patio Table Tin Can Cluster
- Nautical Stripe Hanging Tin Can Trio
- Boho Pattern Tin Cans On A Step Ladder Shelf
- Minimal Black & White Tin Cans In A Crate
- Kids’ Handprint Art Tin Can Planters
- Rustic Distressed Tin Cans Wrapped In Jute
- Seasonal Stencil Art Tin Can Planters
1. Rainbow Vertical Tin Can Planter Wall

Turn a plain wall into a happy rainbow with a grid of painted tin can planters. Screw a pallet or simple wooden board to your patio wall, then attach cans in neat rows, each one painted a different bright color. Fill them with trailing ivy, small flowering plants, or herbs. The vertical layout keeps your floor clear, while the rainbow shades make the whole space feel bigger and more joyful.
- Best For: Micro patios with spare wall space and almost no floor area.
- Budget Tip: Use leftover wall paint or tester pots instead of buying new colors.
- Styling Idea: Keep the plants mostly green and let the cans be the star of the show.
- Practical Note: Drill drainage holes in the cans and add a shallow tray at the bottom to catch drips.
2. Pastel Ombre Herb Rail Planters

If your tiny patio has a rail, turn it into a pretty mini herb garden. Paint your tins in gentle ombre shades, fading from white to soft mint, blush, or blue. Clip or tie them securely along the railing, spacing them out so each plant has breathing room. Plant herbs like basil, chives, and thyme for a fragrant, useful display that’s always within reach for cooking.
- Best For: Apartments and balconies with sturdy balcony railings.
- Budget Tip: Make your own ombre by mixing a little white into your main color in stages.
- Styling Idea: Stick to 2–3 pastel tones to keep the look calm and cohesive.
- Practical Note: Place thirstier herbs toward the ends where you can water them more easily.
3. Chalkboard Label Tin Cans On A Narrow Shelf

A slim wall shelf loaded with labeled tin cans makes your patio look organized and intentional. Paint the cans matte black and leave a small rectangle for chalkboard paint. Once dry, write plant names or fun messages with a chalk marker. Line them up on a narrow shelf or old plank bracketed to the wall. It’s a smart way to show off herbs, small flowers, or succulents without crowding your floor.
- Best For: Renters who can spare a couple of screw holes or use freestanding shelves.
- Budget Tip: Skip real chalkboard paint and use a very matte black paint instead.
- Styling Idea: Pair black cans with white or pale walls for a cool café-style look.
- Care & Maintenance: Wipe labels occasionally and re-write for a fresh, tidy feel.
4. Mosaic Dot Patio Table Tin Can Cluster

Dress up a tiny bistro table with a cheerful cluster of dotted tins. Start with white or pale-colored cans, then add simple “mosaic” patterns using colorful dots of paint from a cotton bud or the end of a brush. Group three to five cans in the table’s center and plant each with a different small plant. It creates a playful, artsy focal point that’s easy to move when you need the table space.
- Best For: Small patios with a café table or folding side table.
- Budget Tip: Use cheap craft paints and seal with clear varnish for longer life.
- Styling Idea: Choose two main colors and one accent color for your dots to avoid visual clutter.
- Practical Note: Pop a cork mat or tray under the cans to protect the tabletop from water.
5. Nautical Stripe Hanging Tin Can Trio

Add a seaside touch to even the most landlocked patio with stripey hanging cans. Paint each tin with navy and white stripes, then thread sturdy rope through drilled holes to make hanging pots. Group three at slightly different heights from a hook or bracket. Fill them with trailing plants to echo seaweed and foam. The hanging design draws the eye up and leaves limited surfaces free for chairs and a tiny table.
- Best For: Patios with overhead hooks, beams, or strong brackets.
- Budget Tip: Reuse rope from old projects or repurpose clean twine.
- Styling Idea: Combine with a striped outdoor cushion or blue rug to build the nautical theme.
- Practical Note: Make sure the hook is well-fixed and the rope knots are secure before planting.
6. Boho Pattern Tin Cans On A Step Ladder Shelf

Turn a slim step ladder into a boho plant tower using patterned tins. Paint cans in warm earthy colors, then add simple mandalas, dots, or zigzags with a detail brush or paint pen. Set them on each rung of your ladder shelf and fill with trailing vines, succulents, and small flowering plants. The layered height adds depth to a small patio, making it feel styled rather than cramped.
- Best For: Corners of tiny patios that feel flat or empty.
- Budget Tip: Hunt for an old ladder at a flea market or use a basic narrow shelf.
- Styling Idea: Layer in a lantern or small woven basket on one of the steps for extra texture.
- Care & Maintenance: Rotate sun-loving plants to the top rung where the light is strongest.
7. Minimal Black & White Tin Cans In A Crate

If you prefer clean lines over color explosions, go for a monochrome crate display. Paint your cans in bold black and white blocks or stripes, then arrange them tightly inside a wooden crate or low box. Plant structural options like succulents, snake plant pups, or small grasses. The contrast of white, black, and fresh green looks modern and chic, even on the smallest slab of patio.
- Best For: Modern balconies or renters who like a sleek, clutter-free look.
- Budget Tip: Use one can of white and one can of black paint—simple and cost-effective.
- Styling Idea: Keep everything else neutral so the green foliage really pops.
- Practical Note: Line the crate with plastic and add drainage holes so water doesn’t pool.
8. Kids’ Handprint Art Tin Can Planters
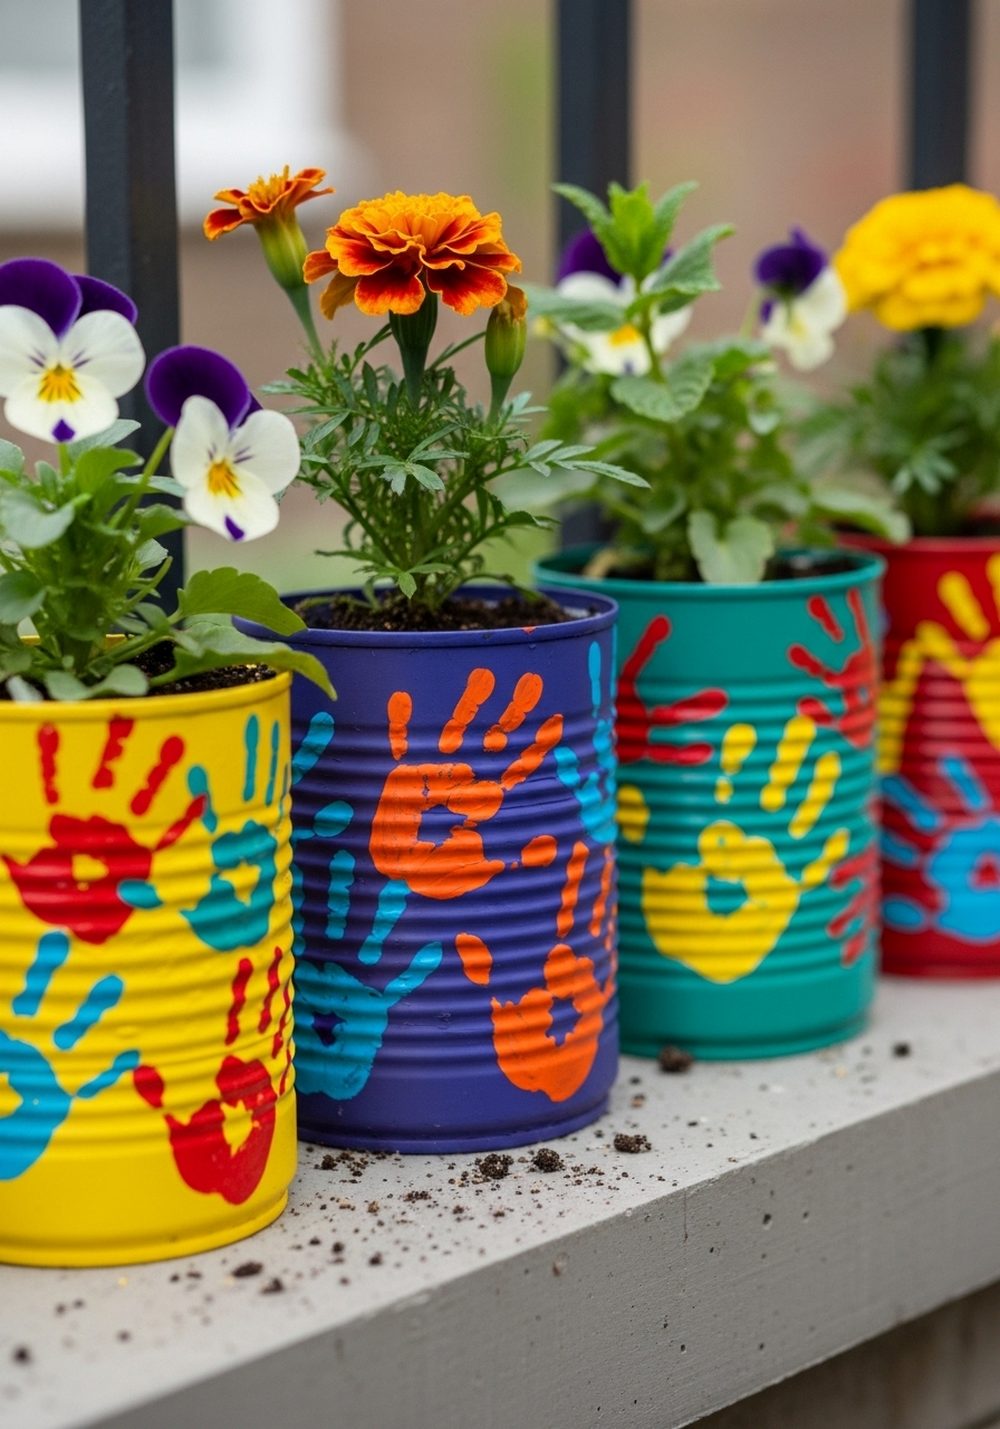
Turn crafting time into decor with handprint planters that kids will love. Paint each tin in a bright base color, let it dry, then brush kids’ hands with contrasting paint and press them around the can. Once sealed and dry, line them up on a ledge, step, or low shelf and plant cheerful flowers or easy herbs. They’ll look playful and personal, and children will feel proud every time they see their artwork growing.
- Best For: Families who want the patio to feel fun and kid-friendly.
- Budget Tip: Use leftover children’s paints and cheap annual flowers or seeds.
- Styling Idea: Stick to 3–4 bold colors so the display looks intentional, not chaotic.
- Practical Note: Involve kids in watering but supervise to avoid over-soaking the plants.
9. Rustic Distressed Tin Cans Wrapped In Jute

If you love a cottage or farmhouse vibe, try distressed tins with a jute wrap. Paint each can in layers of white and soft green, then lightly sand edges to reveal hints of metal beneath. Wrap a band of jute string around the center and knot it. Group them on a crate, low stool, or step and plant lavender, thyme, or soft trailing plants. The textured mix of worn paint and natural twine feels calm and cozy.
- Best For: Shady or part-sun patios where soft, muted colors shine.
- Budget Tip: Use cheap twine and a sanding sponge to create the rustic finish.
- Styling Idea: Add a candle lantern or old watering can nearby to extend the cottage look.
- Care & Maintenance: Refresh the jute if it gets too weather-worn or moldy over time.
10. Seasonal Stencil Art Tin Can Planters

Create a set of tins you can swap out with the seasons. Paint cans in neutral base tones like cream or gray, then use simple stencils to add leaves for autumn, snowflakes for winter, stars for summer, or flowers for spring. Plant seasonal picks—pansies, mini evergreens, or bright annuals—and arrange them on a step, crate, or narrow shelf. One small change in color or motif instantly updates your tiny patio’s mood.
- Best For: Anyone who loves decorating for seasons but has very limited space.
- Budget Tip: Cut your own stencils from cardboard or plastic folders instead of buying them.
- Styling Idea: Keep the base colors the same and only switch stencil colors to keep things cohesive.
- Practical Note: Store off-season tins in a box and rotate as the weather and holidays change.
Conclusion
You don’t need a big garden—or a big budget—to create a patio that feels special. With a few painted tin cans, some basic paints, and simple plants, you can turn walls, railings, shelves, and tabletops into colorful little scenes. Start with one idea that fits your space and materials, then add more planters over time. As your collection grows, your tiny patio will slowly transform into a charming, personal outdoor nook you’ll love using every day.
FAQs
1. How can I make painted tin can planters on a very small budget?
Save tins from your kitchen, wash them well, and use leftover house paint or sample pots instead of buying new supplies. Start with just two or three cans and a single color, then add patterns or extra shades later. You can also grow plants from cuttings or seeds instead of buying mature plants.
2. Are tin can planters safe for renters and balconies?
Yes, as long as you secure them properly. Use strong brackets, hooks, or rail clips, and avoid overloading railings. Always drill drainage holes and place trays or liners underneath to protect floors and keep water from dripping onto neighbors below. If you can’t drill into walls, use freestanding shelves, crates, or ladders.
3. What kind of paint should I use for outdoor tin cans?
Outdoor acrylic or metal paint works best because it handles moisture and sun better than basic craft paint. If you only have indoor paint, add a clear outdoor sealer on top once your design is dry. This helps prevent peeling and fading, especially on sunny or exposed patios.
4. How do I stop tin can planters from rusting too quickly?
Clean and dry the cans thoroughly, then apply a primer before painting. Seal the finished design with a clear varnish, paying attention to the rim and drainage holes where water collects. You can also place a plastic pot inside the can instead of filling it directly with soil to reduce contact with moisture.
5. What plants work best in tiny tin can planters?
Choose compact, shallow-rooted plants like herbs (thyme, basil, chives), small succulents, mini ferns, or low-growing flowers like pansies and marigolds. Avoid large, thirsty plants that need lots of soil and water. Check them often, as small containers dry out quickly, especially in full sun.