10 Painted Tin Can Planters With Rustic Charm
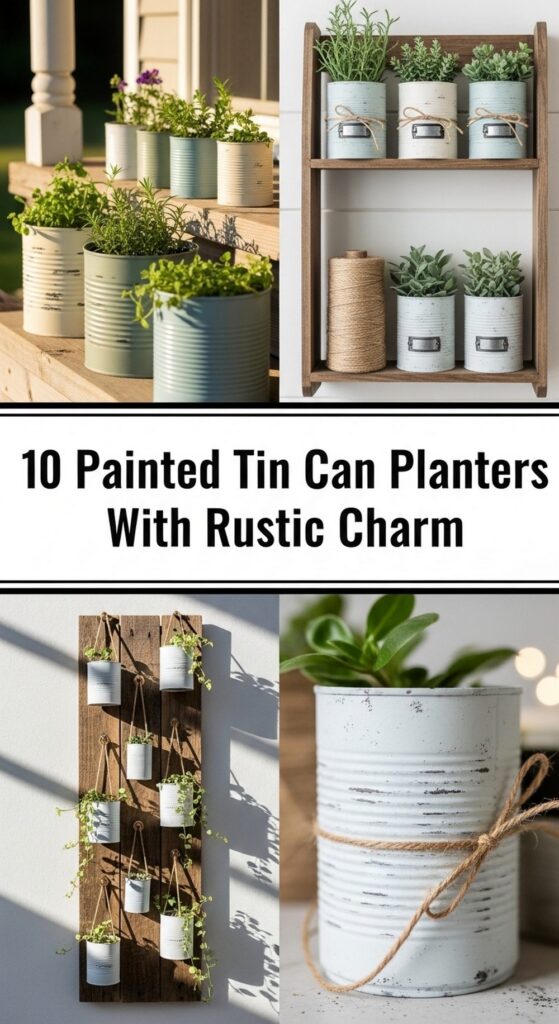
If you love the look of rustic garden decor but don’t want to spend a fortune, painted tin cans are a perfect starting point. They’re easy to find, simple to customize, and surprisingly stylish once you add a bit of paint, twine, and greenery.
In this post, you’ll find ten charming ideas for turning ordinary cans into cozy planters with real farmhouse character. Whether you have a balcony, a porch, or a backyard, these projects are beginner-friendly, budget-conscious, and totally adaptable. Use them to add color, texture, and personality to your outdoor space, one little can at a time.
Quick List
- Pastel Farmhouse Tin Cans On A Wooden Crate Shelf
- White Enamel-Style Tin Cans On The Front Steps
- Chalkboard-Label Herb Cans In A Rustic Caddy
- Vintage Floral Tin Cans On The Kitchen Windowsill
- Distressed Hanging Tin Cans With Jute Handles
- Numbered Tin Cans As A Farmhouse Table Centerpiece
- Coffee Tin Planters On A Rustic Ladder Shelf
- Punch-Tin Lantern Planters For Evening Glow
- Mismatched Colorful Cans In A Weathered Fruit Crate
- Faux-Patina Tin Cans Around A Cozy Seating Nook
1. Pastel Farmhouse Tin Cans On A Wooden Crate Shelf
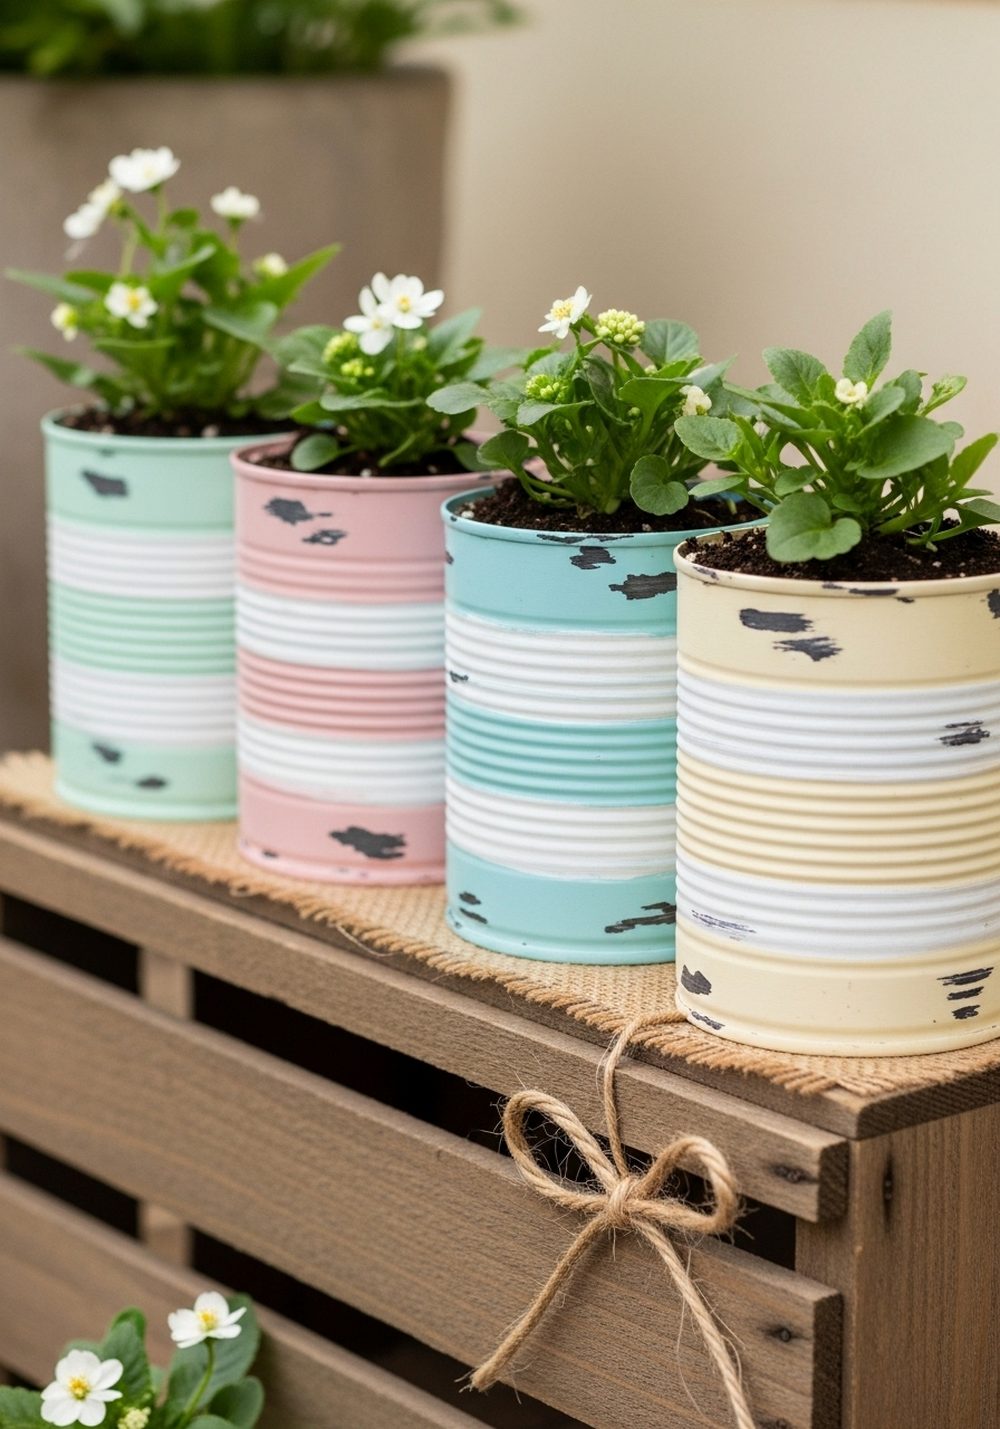
Soft pastel cans on a stacked crate shelf instantly give your garden a gentle farmhouse feel. Paint cleaned cans in muted shades like mint, duck-egg blue, and blush, then add simple stripes or bands with a dry brush. Once dry, punch drainage holes, fill with soil, and plant cheerful blooms or herbs. Arrange them on a wooden crate turned into a mini shelf, with the crates stacked at different heights to create a layered display.
- Best For: Small patios, balcony corners, or bare fence lines that need a soft focal point.
- Budget Tip: Use leftover wall paint or sample pots instead of buying special craft paint.
- Styling Idea: Tie a jute bow around one or two cans and add a scrap of burlap under the crates for extra rustic texture.
- Practical Note: Seal the inside rim with a clear outdoor sealant to slow rusting if you’re in a rainy climate.
2. White Enamel-Style Tin Cans On The Front Steps
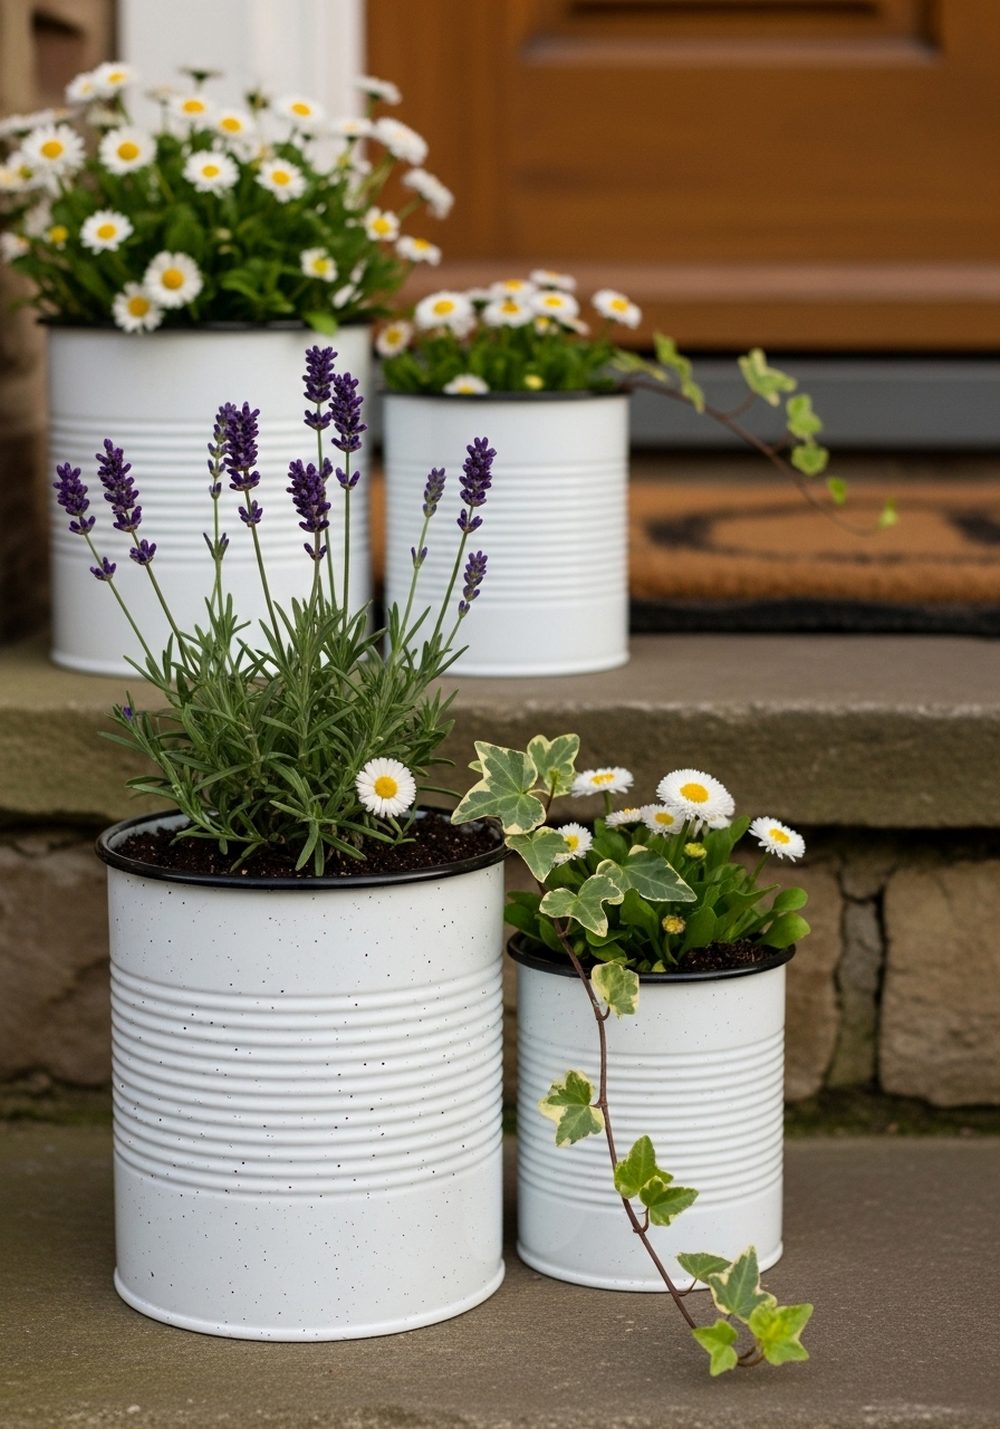
Create a classic country look by painting tin cans to mimic old enamelware. Start with a coat of white paint, then add a thin black rim around the top and tiny speckles using a stiff brush. Fill them with daisies, lavender, or simple greenery and line a few cans up the front steps or porch. The crisp white finish makes plants pop and instantly brightens the entrance without feeling fussy or overdone.
- Best For: Front porches, stoops, or any entryway that needs a simple, smart refresh.
- Budget Tip: Use the same white paint you’d use on furniture or trim, and only buy a small tester in black.
- Styling Idea: Pair the cans with a coir doormat and a woven basket for a clean farmhouse porch vibe.
- Care & Maintenance: Repaint the rims every season if they start to chip; a little wear actually adds to the rustic charm.
3. Chalkboard-Label Herb Cans In A Rustic Caddy
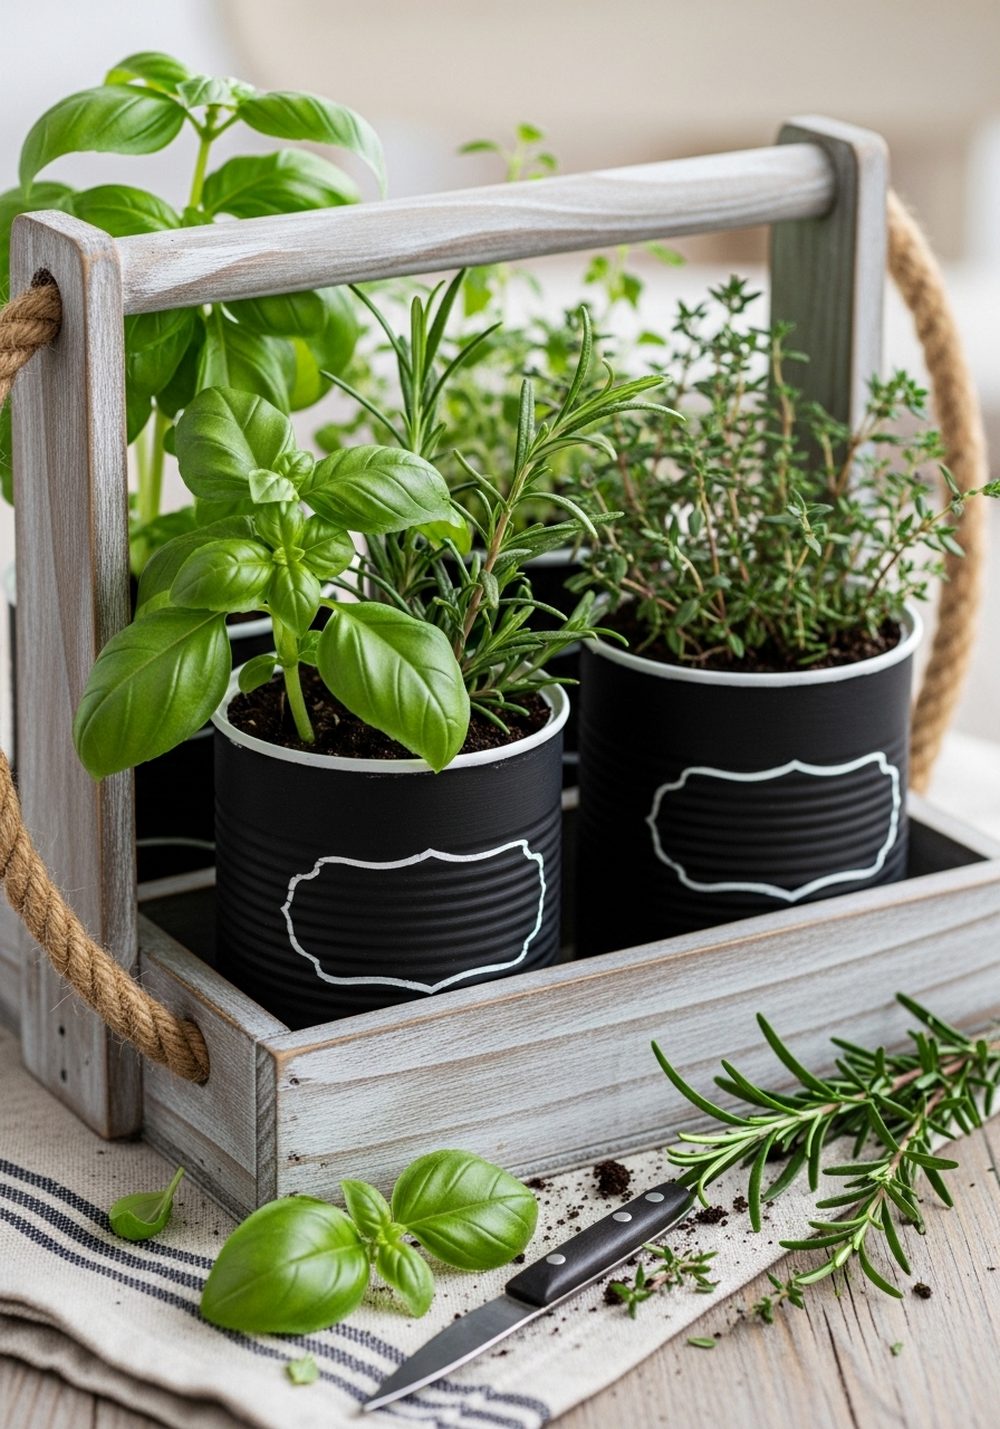
Turn tin cans into practical herb planters with faux chalkboard labels. Paint the cans in matte black or dark charcoal and leave a clean rectangle on the front for labeling. Pop them into a wooden caddy or shallow crate so you can move the whole collection easily from kitchen to balcony. Plant a mix of herbs—basil, rosemary, mint, thyme—and enjoy the scent and texture every time you brush past.
- Best For: Cooks and tea lovers who want herbs within arm’s reach of the kitchen.
- Budget Tip: Use chalkboard spray paint for a quick coat, or mix black paint with a little baking soda for a similar texture.
- Styling Idea: Add a rope handle or metal pull to the crate and tuck in a small pair of garden scissors for a lived-in look.
- Practical Note: Keep mint in its own can so it doesn’t spread and crowd other herbs.
4. Vintage Floral Tin Cans On The Kitchen Windowsill
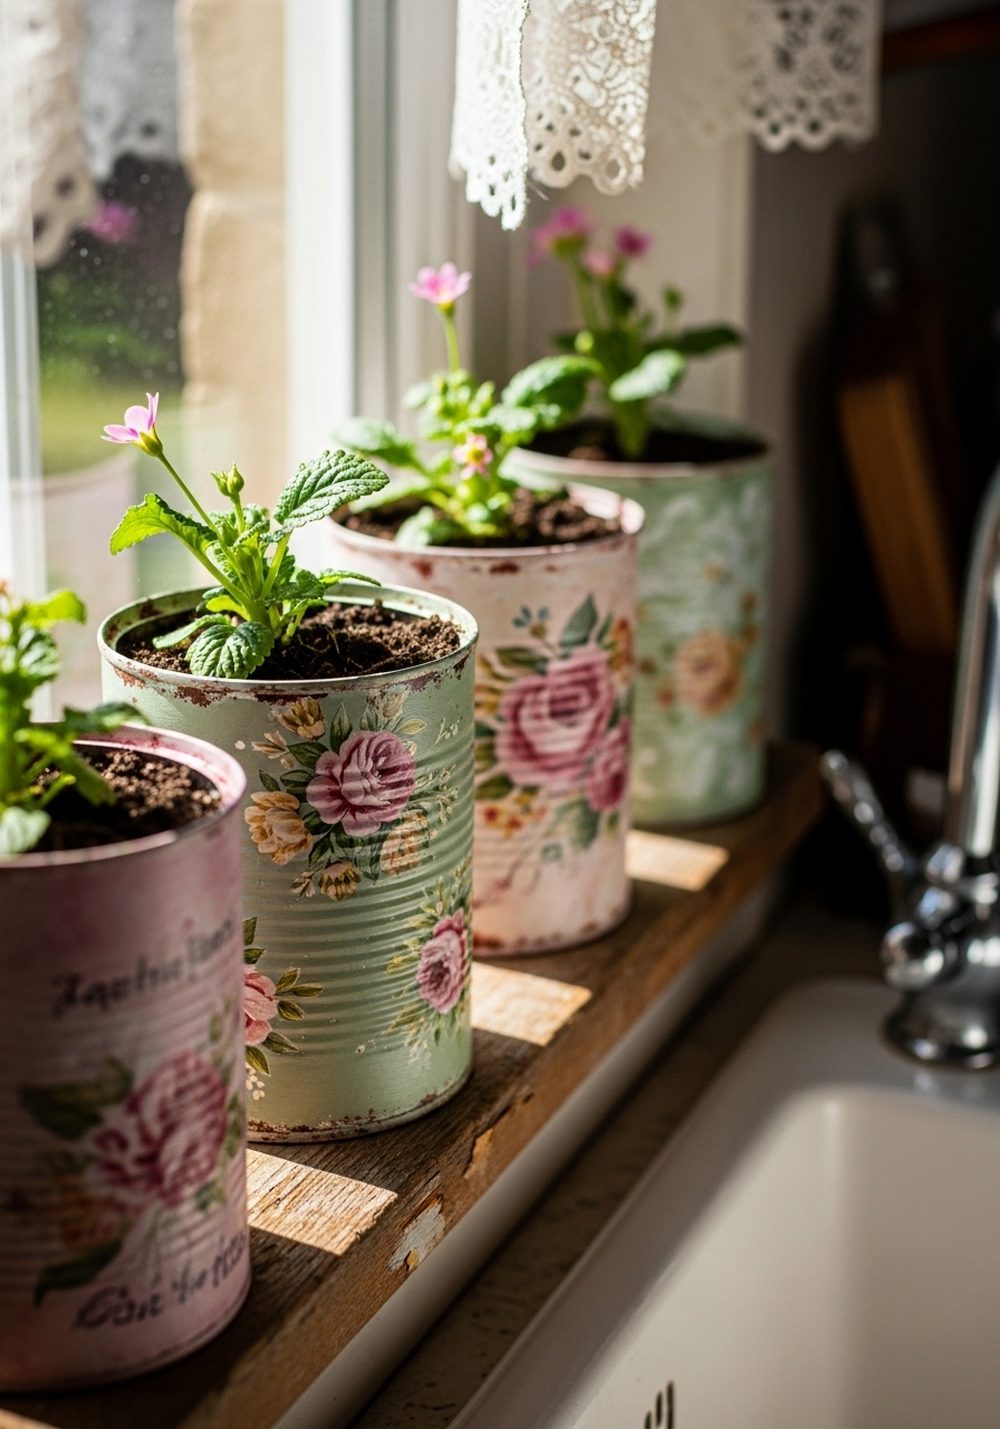
If you love romantic cottage style, dress your cans in vintage florals. Paint them in soft cream, then add floral motifs with decoupage napkins or hand-painted clusters of roses and leaves. Lightly sand the edges so a hint of metal shows through. Line these pretty planters along your kitchen windowsill with a mix of mini roses, trailing ivy, or simple green houseplants. The soft pattern will catch the light and make even a plain window feel special.
- Best For: Indoor windowsills, sheltered porches, and spots where you see them often.
- Budget Tip: Use floral paper napkins or scraps of gift wrap instead of buying specialty paper.
- Styling Idea: Pair the cans with lace-trimmed curtains and a simple ceramic jug to complete the cottage feel.
- Care & Maintenance: Add saucers underneath to catch drips and protect your windowsill from water stains.
5. Distressed Hanging Tin Cans With Jute Handles
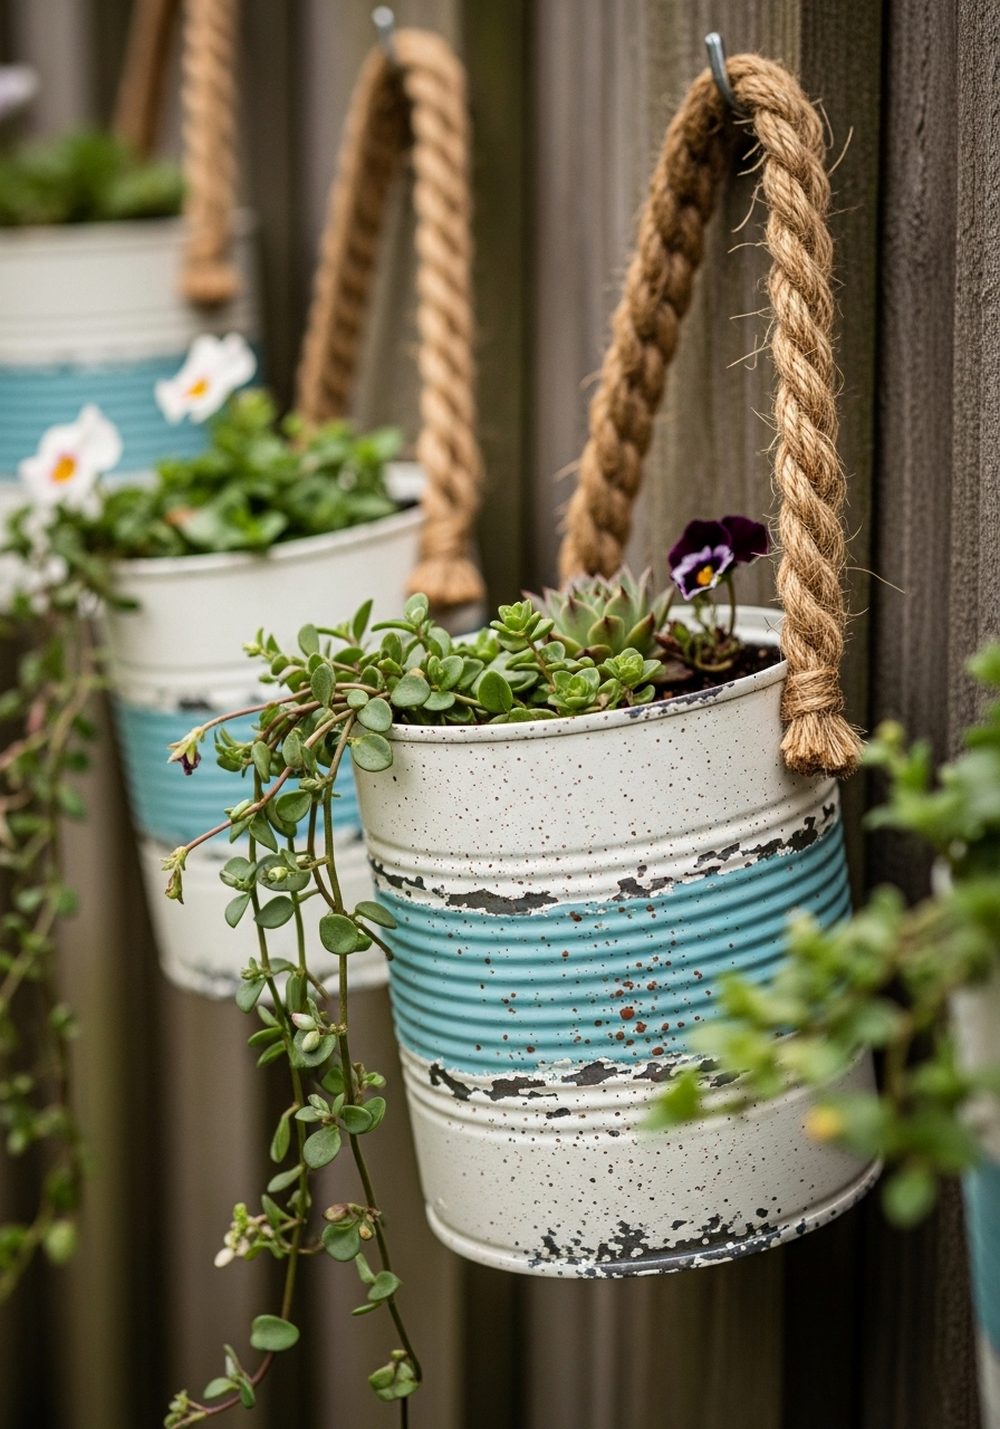
Hanging planters are perfect when floor space is limited. To make distressed hanging cans, layer two colors of paint—such as cream over a darker blue—then gently sand edges and raised areas once dry. Punch two holes near the rim on opposite sides and thread through thick jute rope to form handles. Hang them along a fence, balcony railing, or wall hook and plant trailing flowers, ivy, or succulents for a cascading effect.
- Best For: Balconies, fences, or plain walls that need vertical interest.
- Budget Tip: Reuse rope or twine you already have, or braid thinner pieces to make it thicker.
- Styling Idea: Mix can heights and rope lengths so the plants hang at slightly different levels.
- Practical Note: Keep the weight in mind; don’t overfill with heavy soil if your hooks or railings are delicate.
6. Numbered Tin Cans As A Farmhouse Table Centerpiece
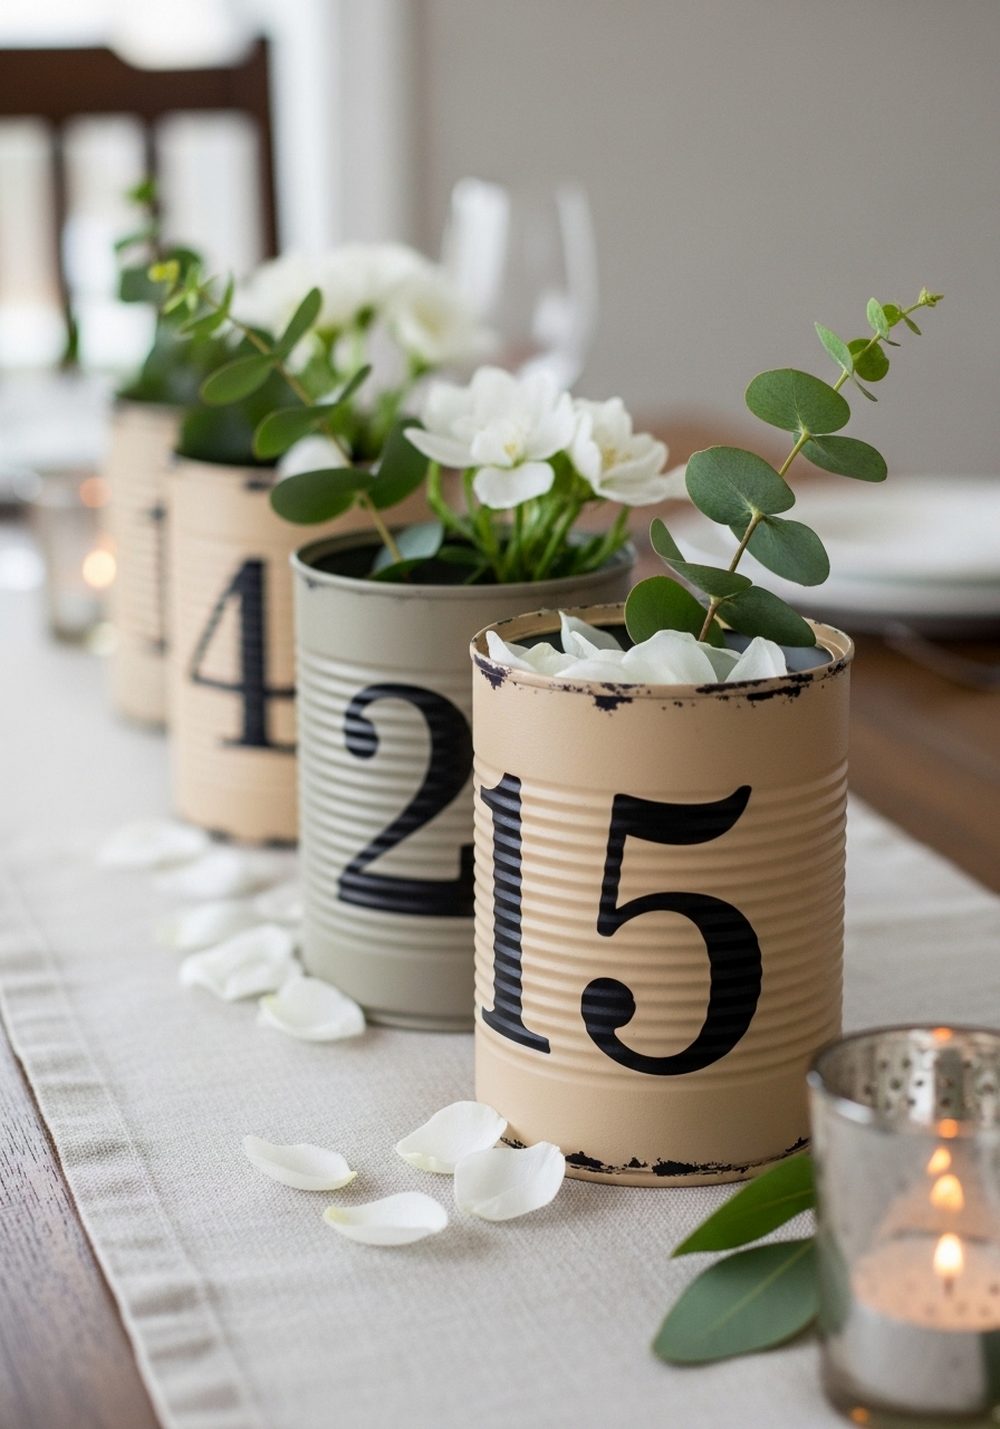
A row of numbered tin cans creates a simple but striking centerpiece. Paint each can in a warm greige, cream, or soft taupe, then add large hand-painted numbers in black or charcoal. Line them down the center of your table on a narrow wooden board or runner and fill with small blooms, eucalyptus, or dried grasses. The numbers add a subtle graphic touch that still feels rustic and relaxed.
- Best For: Dining tables, outdoor dinner parties, or a long coffee table on a covered patio.
- Budget Tip: Use stencils or homemade templates for the numbers instead of buying pre-cut decals.
- Styling Idea: Add a few tea lights or votives between the cans to create a warm evening glow.
- Practical Note: Keep arrangements low and airy so guests can see over them and chat easily.
7. Coffee Tin Planters On A Rustic Ladder Shelf
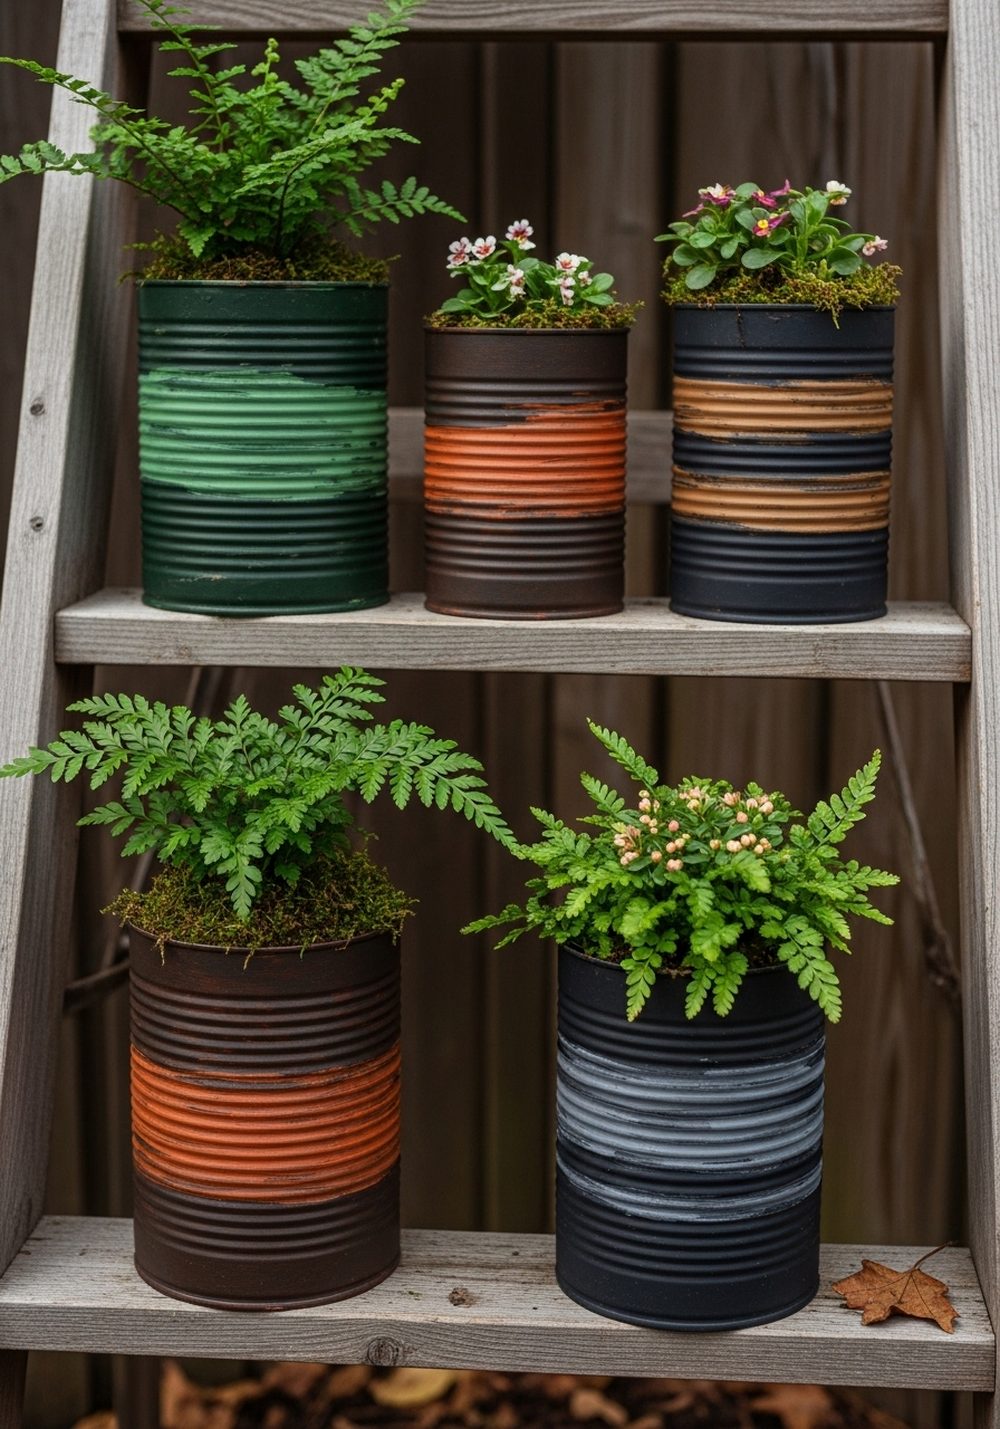
Old coffee tins are perfect for a slightly industrial rustic look. Clean and lightly sand the tins, then paint them in deep, earthy colors like charcoal, forest green, or rust, leaving some of the original embossing or text to peek through if you like. Set up a simple wooden ladder and place the cans on each rung, grouping taller plants at the bottom and smaller ones higher up. It creates a vertical garden that looks curated but casual.
- Best For: Narrow patios, small courtyards, or spots beside a shed or garage.
- Budget Tip: Use a secondhand ladder or make one from scrap wood and old dowels.
- Styling Idea: Mix in one or two unpainted metal tins for contrast and a more collected-over-time feel.
- Care & Maintenance: Rotate the ladder occasionally so all plants get equal sunlight.
8. Punch-Tin Lantern Planters For Evening Glow
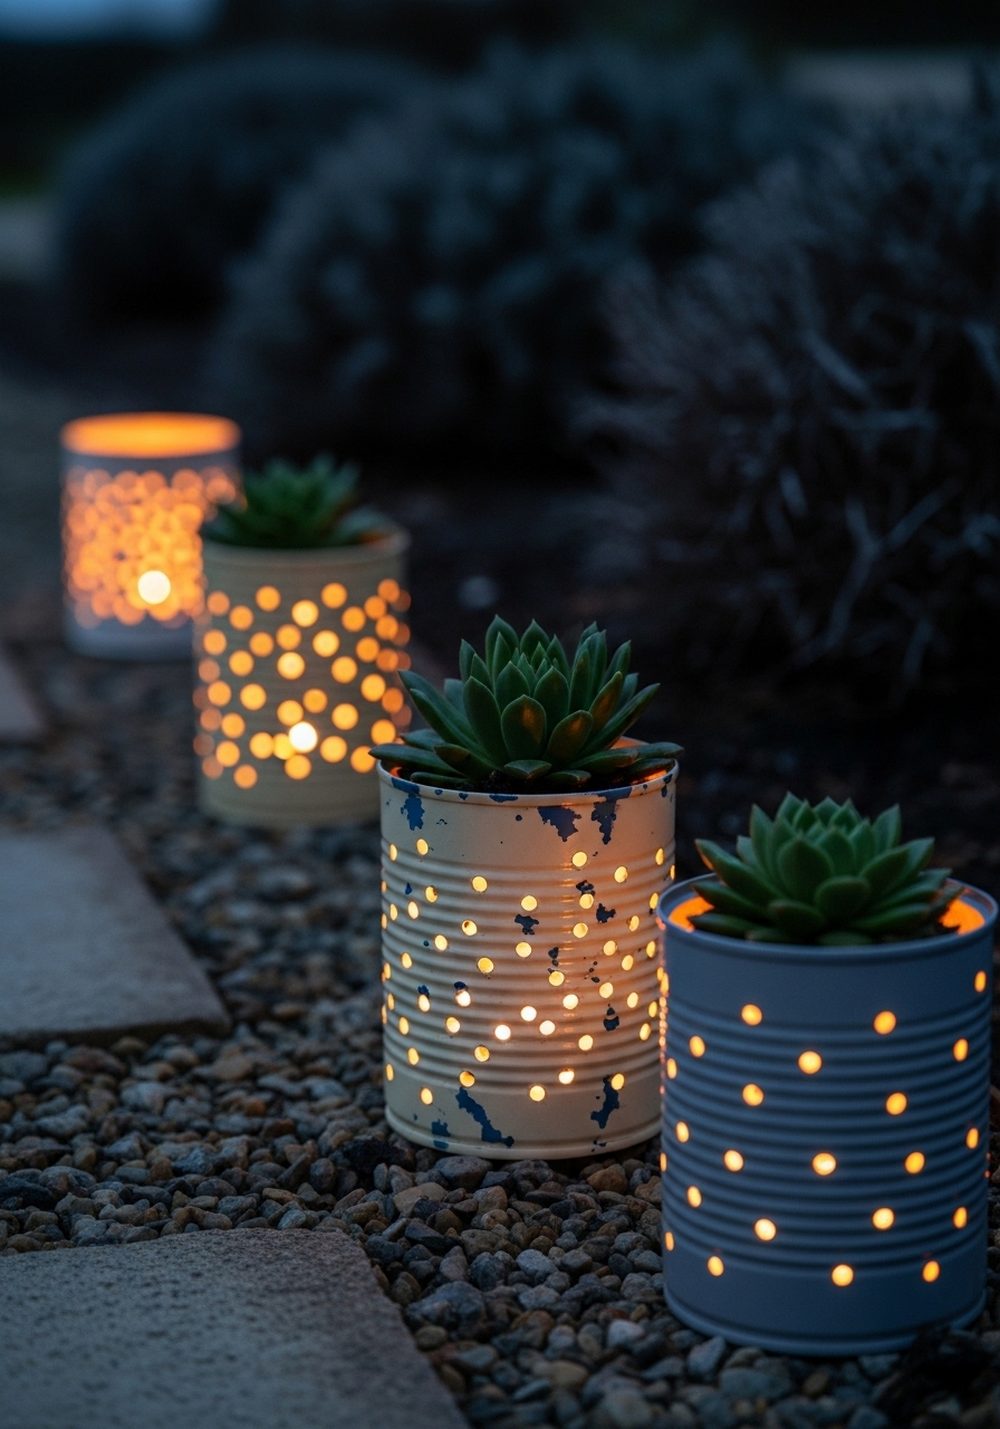
Punch-tin lantern planters do double duty: they hold small plants by day and cast beautiful patterns of light by night. Paint your cans in soft neutrals, then use a hammer and nail to create simple star, heart, or dotted designs. Add a layer of gravel at the bottom for drainage, plant low-growing succulents or moss, and tuck a small candle or LED tea light beside the plant. Line them along a path or cluster them on a table for instant atmosphere.
- Best For: Evening patios, garden paths, and cozy corners used after dark.
- Budget Tip: Use battery-powered tea lights you can reuse instead of replacing wax candles often.
- Styling Idea: Choose one pattern and repeat it across all cans for a more cohesive, calm look.
- Practical Note: If using real candles, keep foliage trimmed away from the flame and never leave them unattended.
9. Mismatched Colorful Cans In A Weathered Fruit Crate
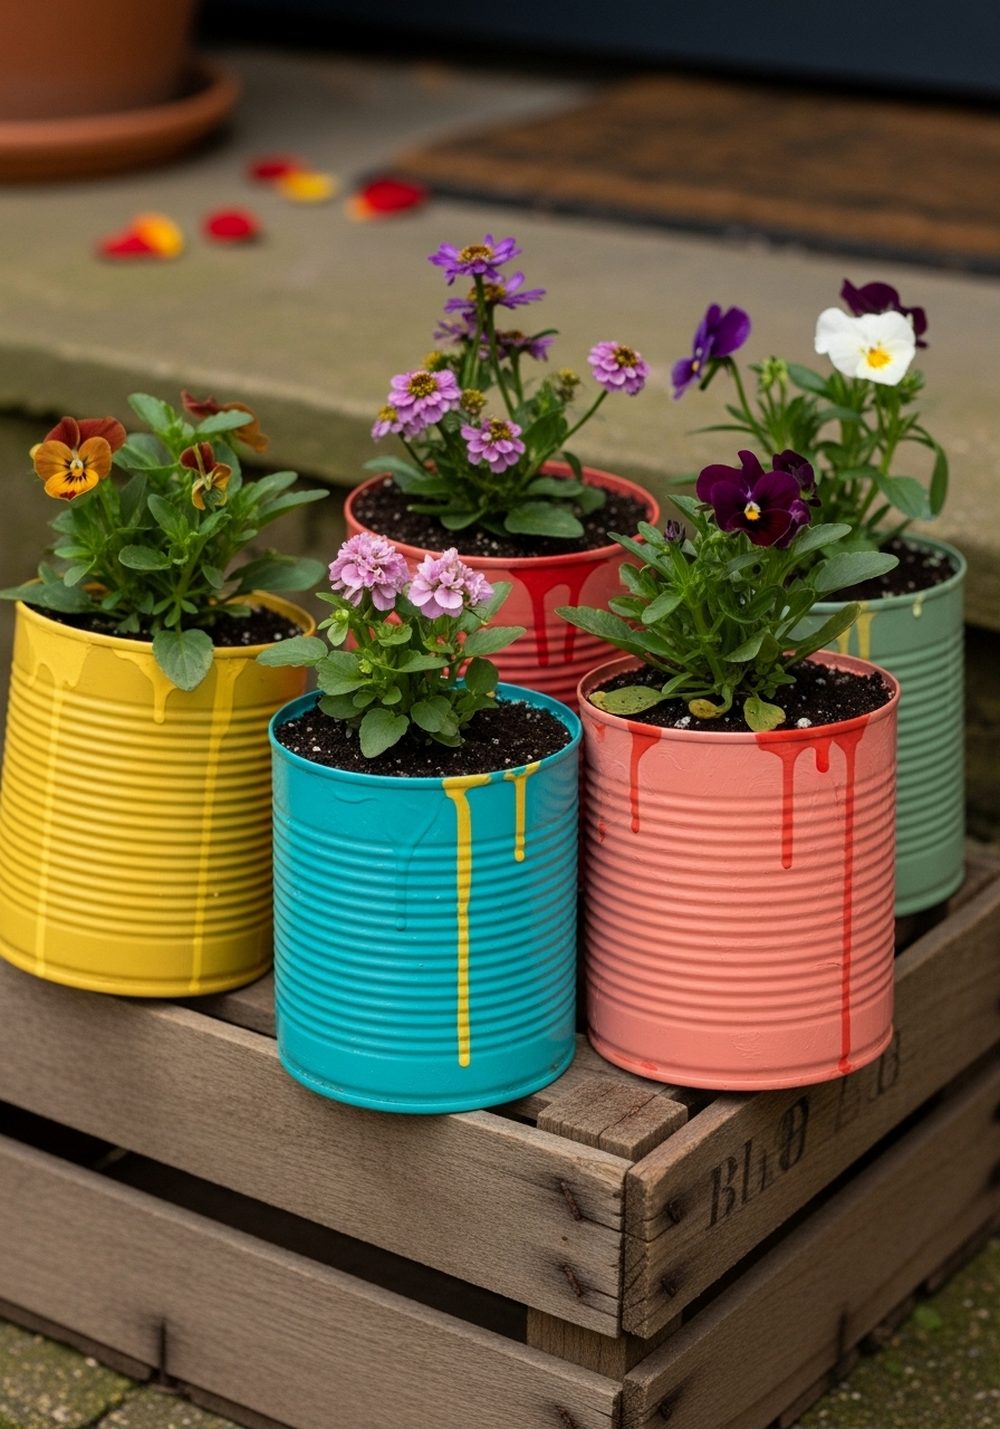
For a more playful rustic look, paint each can a different color and gather them in an old fruit crate. Think mustard yellow, teal, coral, sage, and warm white, all slightly muted so they still feel cozy rather than neon. Once the paint is dry, pop in a mix of small flowering plants and foliage, then tuck the crate by the front door, on a step, or under a window. The mix of colors and textures feels cheerful but still charmingly worn-in.
- Best For: Entryways, porches, and rental spaces where you want one movable feature piece.
- Budget Tip: Mix your own colors from basic red, blue, yellow, and white paints to avoid buying lots of shades.
- Styling Idea: Stencil a simple word like “Garden” or a date onto the crate for that market-find look.
- Practical Note: Line the crate with plastic or an old tray to protect surfaces from water and soil spills.
10. Faux-Patina Tin Cans Around A Cozy Seating Nook
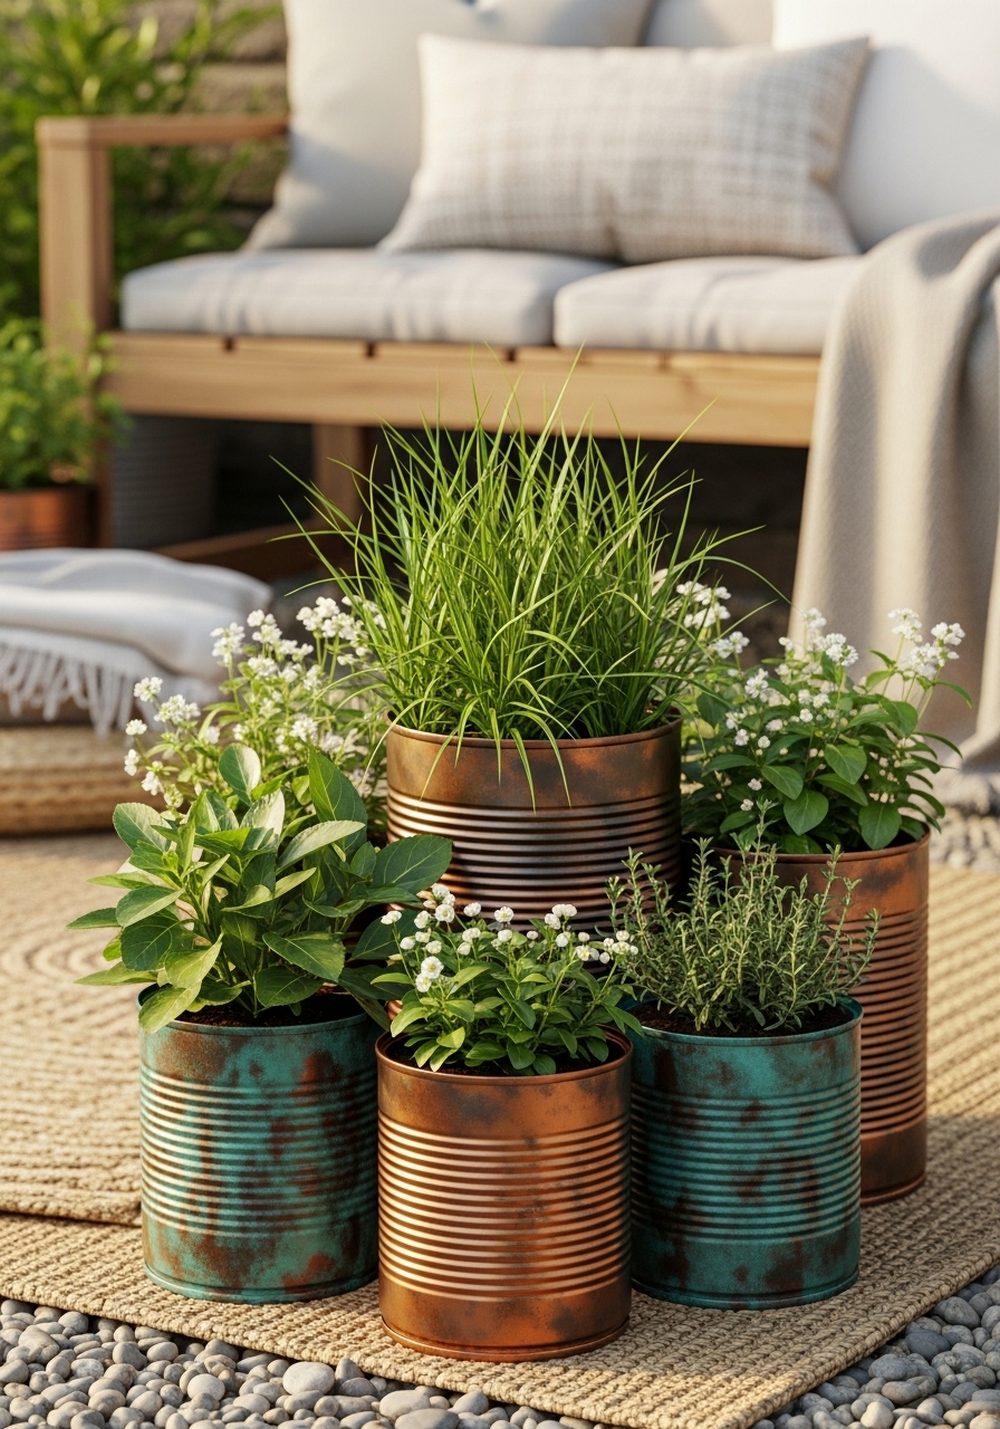
Faux-patina cans bring a hint of old-world charm to any seating area. Start with a copper-toned base coat, then dab on greens and turquoise with a sponge to imitate aged metal. Group several cans around a bench or pair of chairs, filling them with ornamental grasses, white flowers, and herbs for movement and scent. Add a small outdoor rug and a blanket, and suddenly your simple corner feels like a thoughtfully designed garden retreat.
- Best For: Backyard corners, rooftop terraces, or any spot you like to sit and unwind.
- Budget Tip: Use metallic spray paint for the base and just a tiny craft pot of green for the patina effect.
- Styling Idea: Keep cushions and textiles neutral so the weathered metal and greenery stay the stars.
- Care & Maintenance: Refresh the patina with a quick dab of paint every year if the finish fades too much.
Conclusion
With a few saved cans, a bit of paint, and some imagination, you can create planters that look like they’ve lived in your garden for years. These rustic tin-can projects are small enough to try in an afternoon but impactful enough to transform steps, shelves, and forgotten corners. Start with one idea that fits your space, then slowly build a collection that feels personal, cozy, and uniquely yours.
FAQs
1. How can I make painted tin can planters on a very small budget?
Start by saving cans from everyday groceries instead of buying new containers. Use leftover wall paint, sample pots, or paint you already have rather than specialty craft paint. Simple details like a wrapped jute bow, a strip of fabric, or a bit of sanding for a distressed look can make even the cheapest can feel charming and intentional.
2. Are tin can planters suitable for renters who can’t make permanent changes?
Yes, they’re ideal for renters because every project is completely portable. You can arrange cans in crates, caddies, or on ladder shelves instead of mounting anything to walls. When it’s time to move, just pick up your containers and take your little garden with you—no drilling, no patching, and no damage left behind.
3. How do I stop tin cans from rusting too quickly outdoors?
Punch drainage holes so water doesn’t sit inside the can, then line the base with small stones or gravel. You can also seal the inside and outside with a clear outdoor sealant to slow rusting. A little wear and patina adds to the rustic look, but if you see heavy rust, consider slipping a plastic nursery pot inside the can so the metal isn’t constantly wet.
4. What plants work best in small tin can planters?
Look for compact plants with shallow roots, such as herbs, small succulents, mini daisies, pansies, or trailing ivy. Avoid large, deep-rooted plants that will quickly outgrow the can. For sunny spots, herbs and succulents do well; for shadier areas, try ferns, ivy, or small shade-tolerant flowers to keep everything healthy and happy.
5. How can I mix tin can planters with my existing garden decor?
Match at least one element so the cans feel intentional—color, material, or style. For example, echo the color of your door, cushions, or existing pots in the paint you choose for the cans. Pair them with other rustic pieces like crates, woven baskets, or wooden furniture so the textures repeat. This keeps everything looking like one relaxed but coordinated scheme.
6. What’s the easiest tin can idea for complete beginners?
Start with a simple coat of paint and basic plants. Try white enamel-style cans or a single soft color, punch drainage holes, and plant one type of flower or herb in each. Skip patterns or lettering at first; you can always add stripes, numbers, or distressing later once you feel more confident. Even the most basic painted can looks surprisingly charming on a step or shelf.