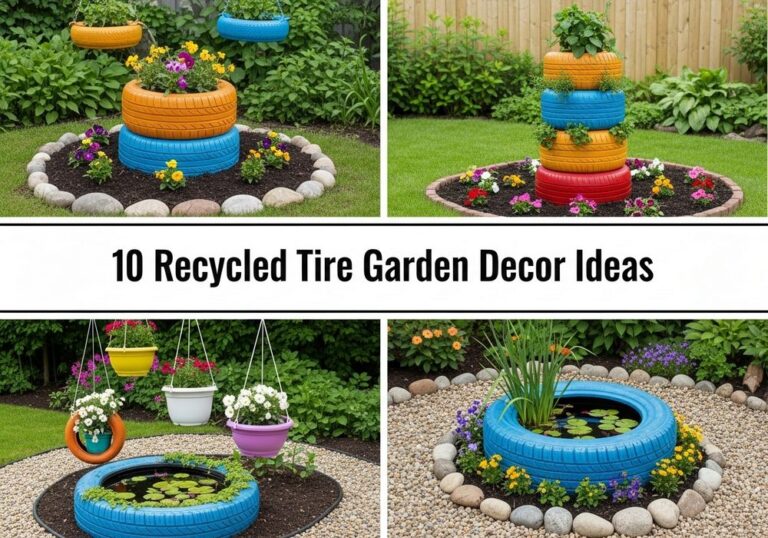
10 Recycled Garden Art Ideas Kids Can Paint And Proudly Display
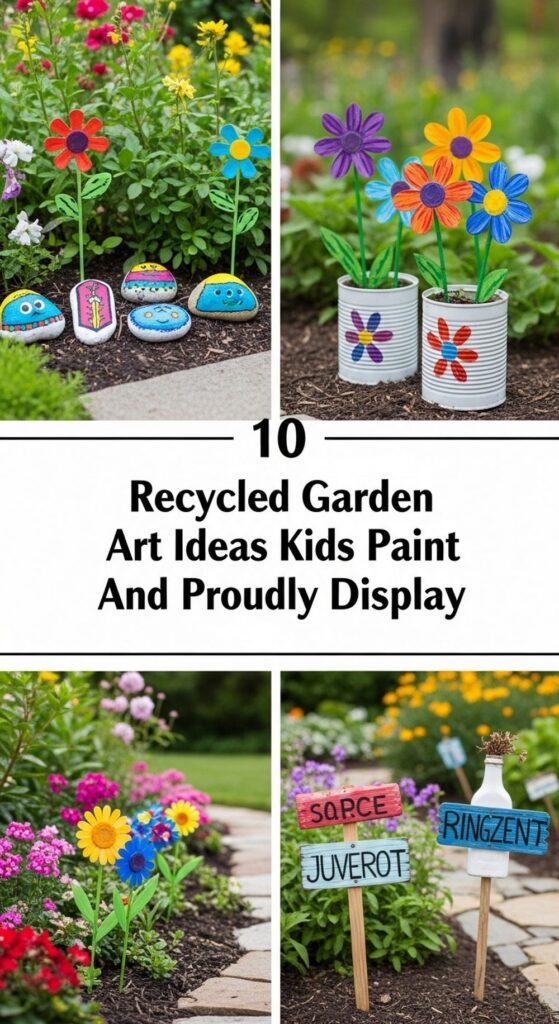
If your kids love getting messy with paint and you love the idea of a prettier, more personal garden, these recycled projects are a perfect match. You do not need fancy supplies or a big budget, just a few everyday items headed for the recycling bin and some family time outdoors.
In this post you will find simple, kid-friendly garden art ideas made from tins, rocks, jars, bottles, and more. Each one is easy to decorate, fun to display, and gentle on the planet. Mix a few together and you will quickly turn your outdoor space into a colorful little gallery of their creativity.
Quick List
- Painted Tin Can Flower Pots
- Rainbow Rock Critters And Bugs
- DIY Milk Carton Birdhouses
- Colorful CD Sun-Catchers
- Upcycled Plastic Bottle Flower Garden
- Painted Wooden Spoon Plant Markers
- Recycled Jar Lanterns With Painted Designs
- Scrap-Wood Garden Welcome Sign
- Bottle Cap Mosaic Stepping Stones
- Painted Clay Pot Totem Characters
1. Painted Tin Can Flower Pots
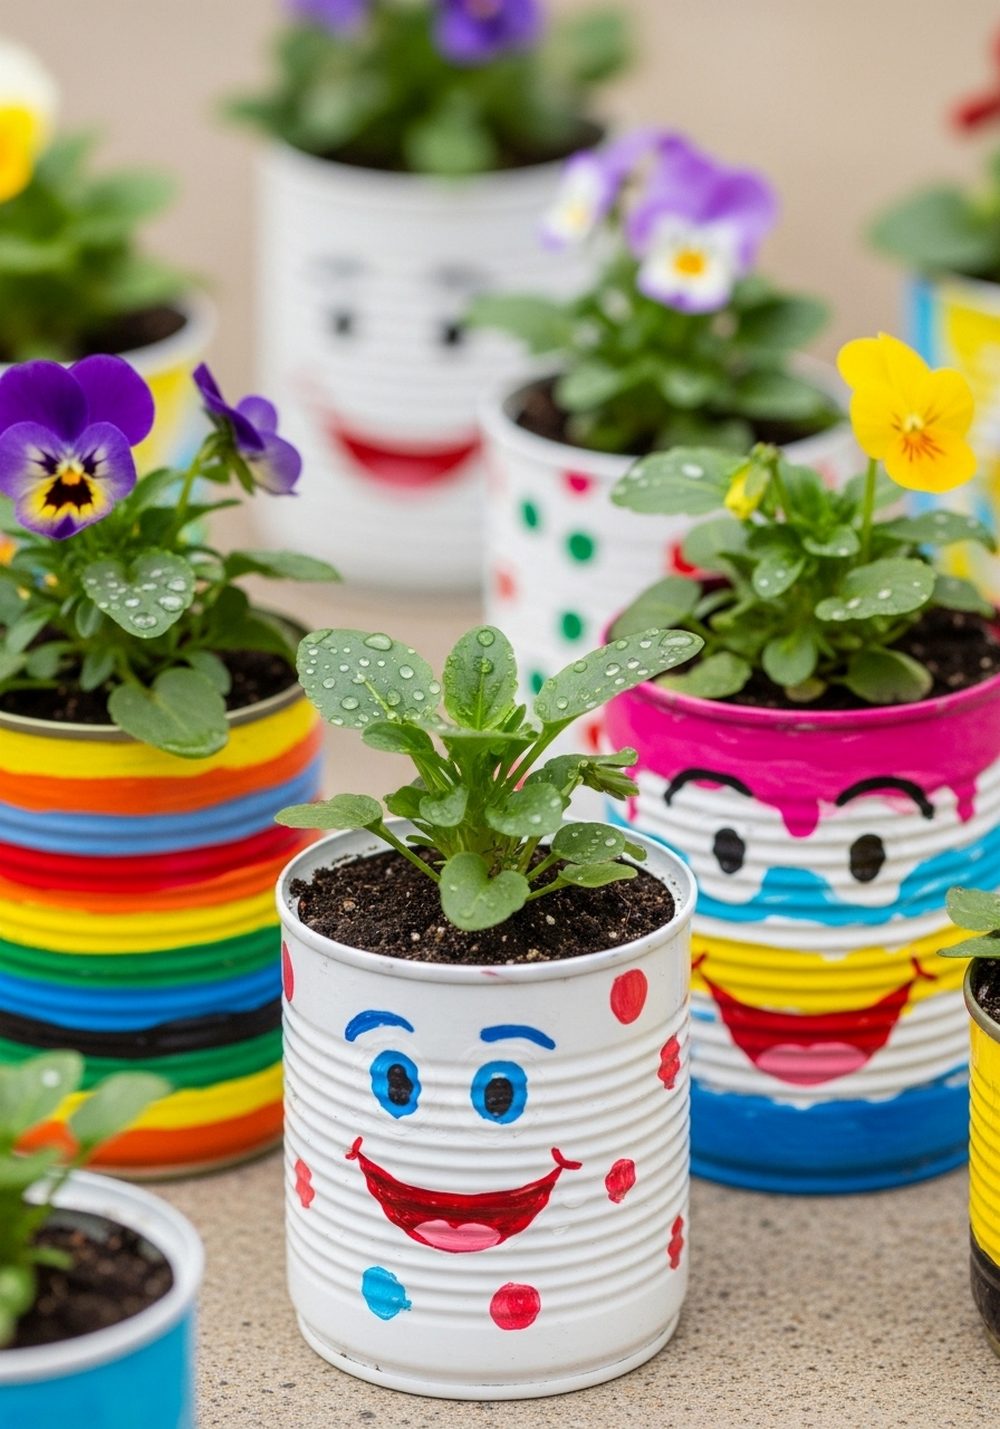
Save a few food cans, rinse them well, and turn them into cheerful little flower pots your kids can decorate any way they like. Add a quick coat of primer or white paint as a base, then let them go wild with stripes, dots, doodles, or funny faces. Once dry, punch a couple of drainage holes in the bottom, add a little gravel and potting mix, and tuck in herbs, marigolds, or succulents. Lined up on steps or hung on a fence, these cans make a bright, charming display.
- Budget Tip: Use leftover house paint or tester pots instead of buying special craft paint.
- Best For: Balconies, small patios, and narrow ledges that need a pop of color.
- Practical Note: Sand any sharp edges and supervise drilling holes for safety.
- Styling Idea: Stick to two or three main colors for a more coordinated look.
2. Rainbow Rock Critters And Bugs

Rock painting is simple, satisfying, and almost mess-proof, which makes it ideal for younger kids. Collect smooth, palm-sized stones and wash them before painting. Show children how to turn each rock into a tiny creature: a ladybird with a red body and black spots, a bumblebee with yellow stripes, or a rainbow monster with silly eyes. Once sealed with an outdoor varnish, these little critters can peek out from flower beds, nestle in pots, or form a playful border along a path.
- Budget Tip: Use rocks from the garden and a basic set of paints and brushes.
- Best For: Kids of all ages, especially those who like quick projects they can finish in one sitting.
- Care & Maintenance: Recoat with clear sealant each year if colors begin to fade.
- Extra Idea: Hide a few critters for a mini “garden bug hunt” game.
3. DIY Milk Carton Birdhouses
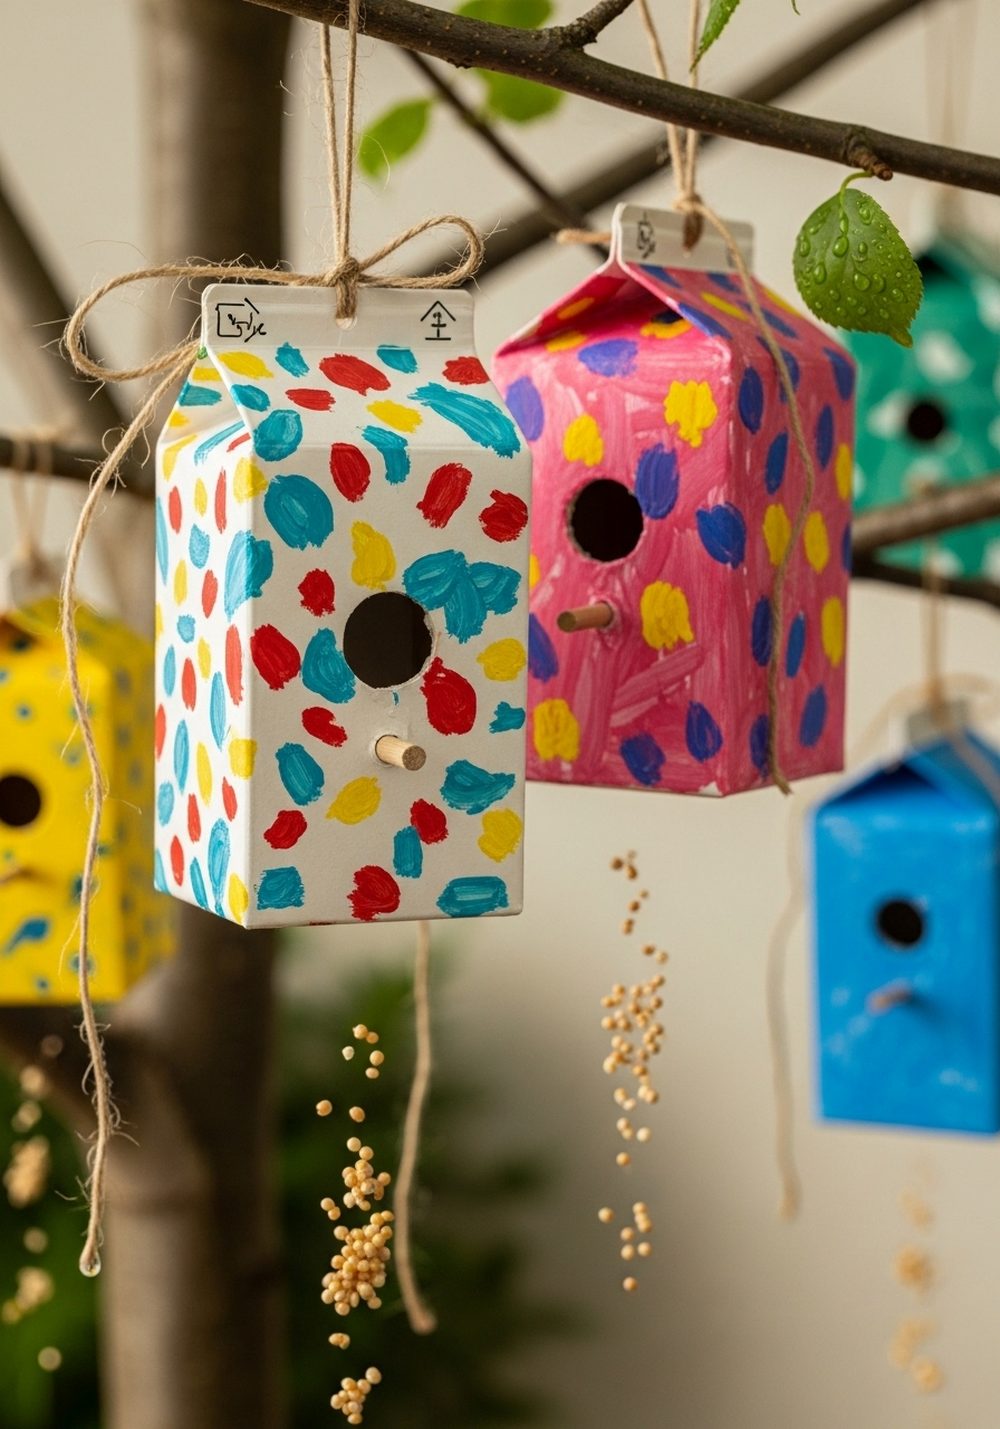
Empty milk or juice cartons make brilliant little birdhouses once they are clean and dry. An adult can carefully cut a doorway into the front and punch a small hole underneath for a stick perch. Then kids can paint the carton in bright stripes, spots, or rustic cottage patterns. Add a coat of clear outdoor sealant and hang the birdhouses from branches or hooks using string. Over time, they become a sweet part of the garden and may even attract curious birds.
- Practical Note: Adults should handle all cutting; kids can focus on painting and decorating.
- Budget Tip: Use scrap ribbon, buttons, or fabric from your sewing box as extra embellishments.
- Styling Idea: Create a “birdhouse village” in different colors along a fence line.
- Care & Maintenance: Replace cartons if they become soggy or damaged after heavy rain.
4. Colorful CD Sun-Catchers
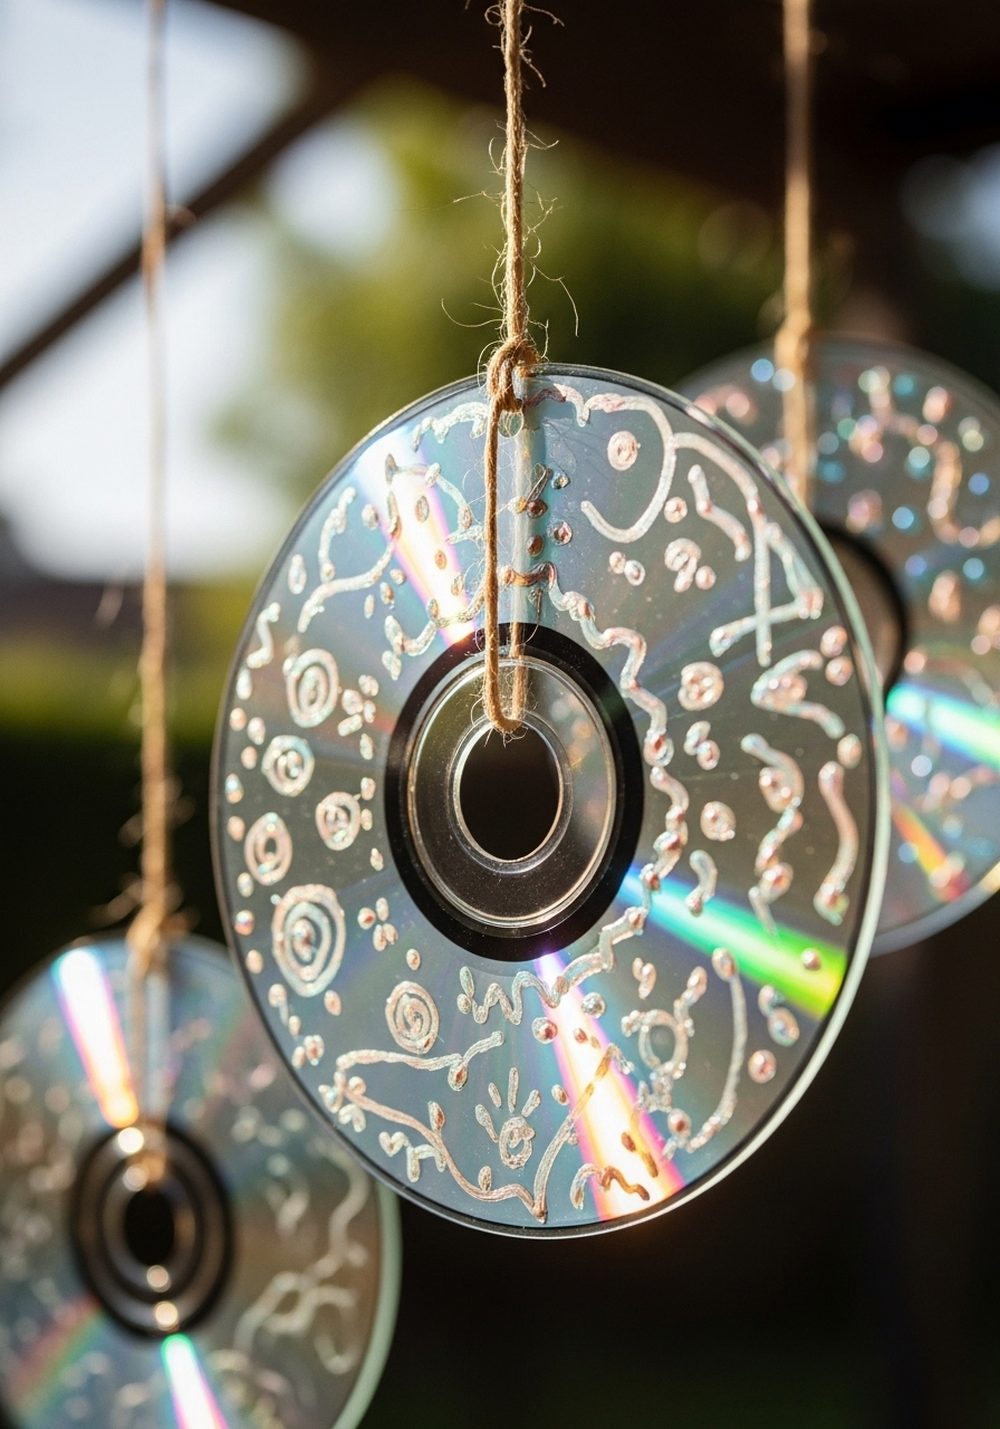
Old, scratched CDs that no longer play can shine again as sparkly sun-catchers. Kids can paint simple shapes or patterns using glass or acrylic paints, leaving some of the shiny surface exposed. Thread string or fishing line through the center hole and hang them where the light can catch. As the sun moves, the CDs throw little bursts of color and light across the garden, adding movement and magic. They are especially pretty near seating areas or above a sandpit or play corner.
- Budget Tip: Ask friends and family for unwanted discs, or use old game and software CDs.
- Best For: Gardens that get good daylight, especially in the late afternoon.
- Practical Note: Hang them high enough that they do not become toys for very young children.
- Styling Idea: Group several together at different heights for a mobile-style display.
5. Upcycled Plastic Bottle Flower Garden
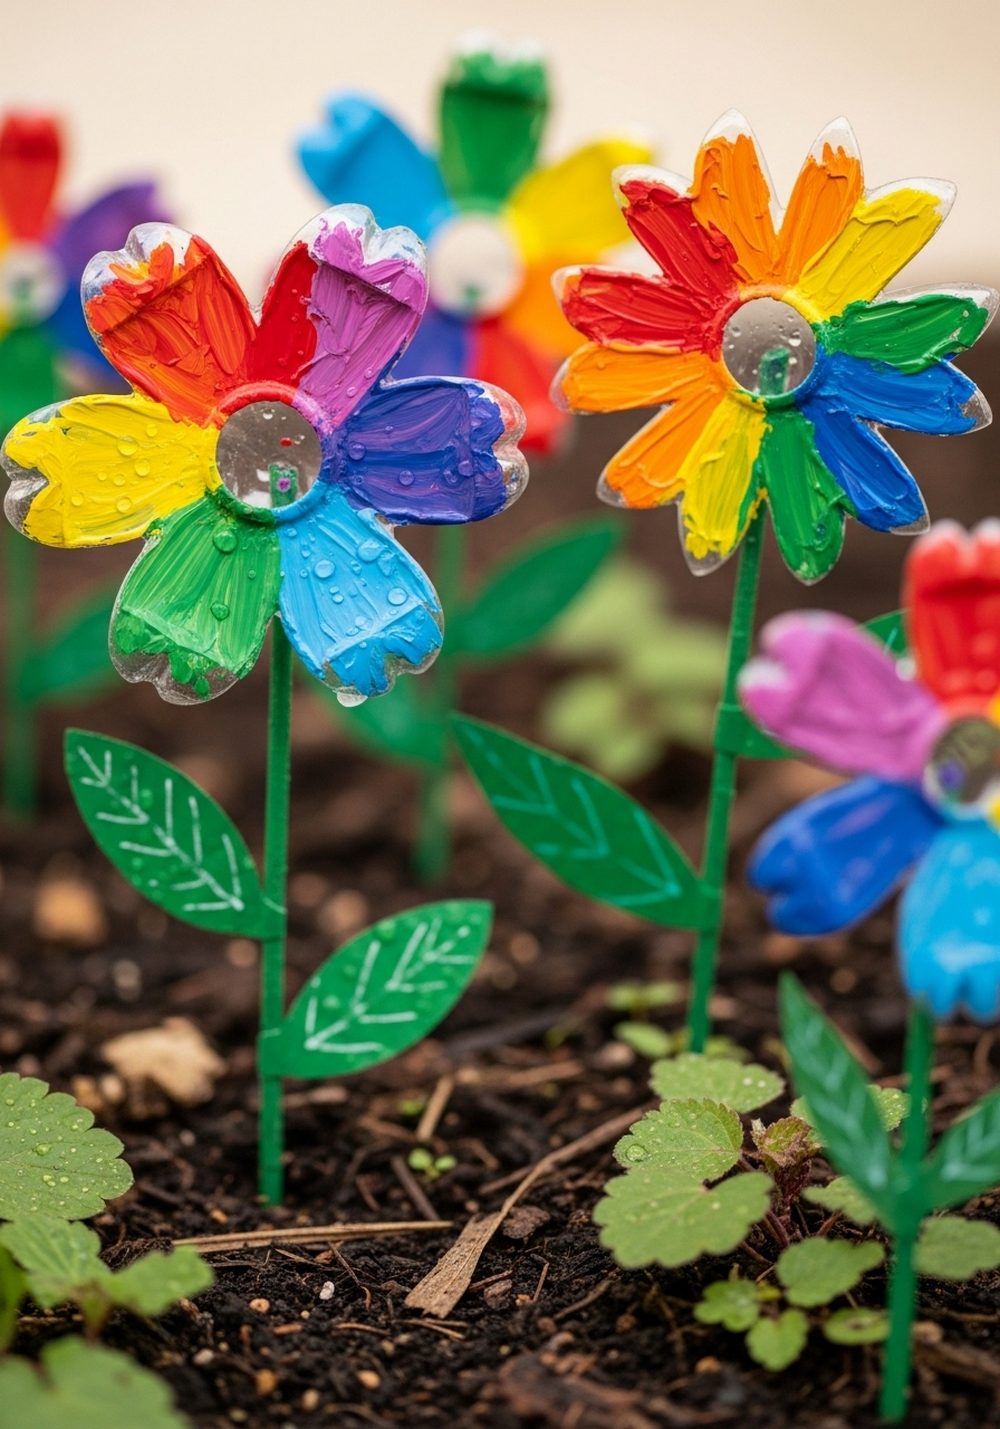
Plastic bottles can be transformed into long-lasting “flowers” that brighten borders all year. An adult can cut the bottle into petal shapes and round any sharp edges, then kids paint the petals in bold colors and patterns. Attach the flowers to green-painted sticks or canes and plant them in pots or garden beds. Mixed among real plants, they add a quirky, playful touch and keep their color even when blooms are finished. Children love spotting “their” flowers every time they go outside.
- Practical Note: Adults should do all cutting and help sand rough plastic edges.
- Budget Tip: Use bottles in different sizes to create a whole bouquet from recycling alone.
- Styling Idea: Choose one color per child so you can see everyone’s “patch” in the garden.
- Care & Maintenance: Give them a quick wipe now and then to remove dust or spider webs.
6. Painted Wooden Spoon Plant Markers
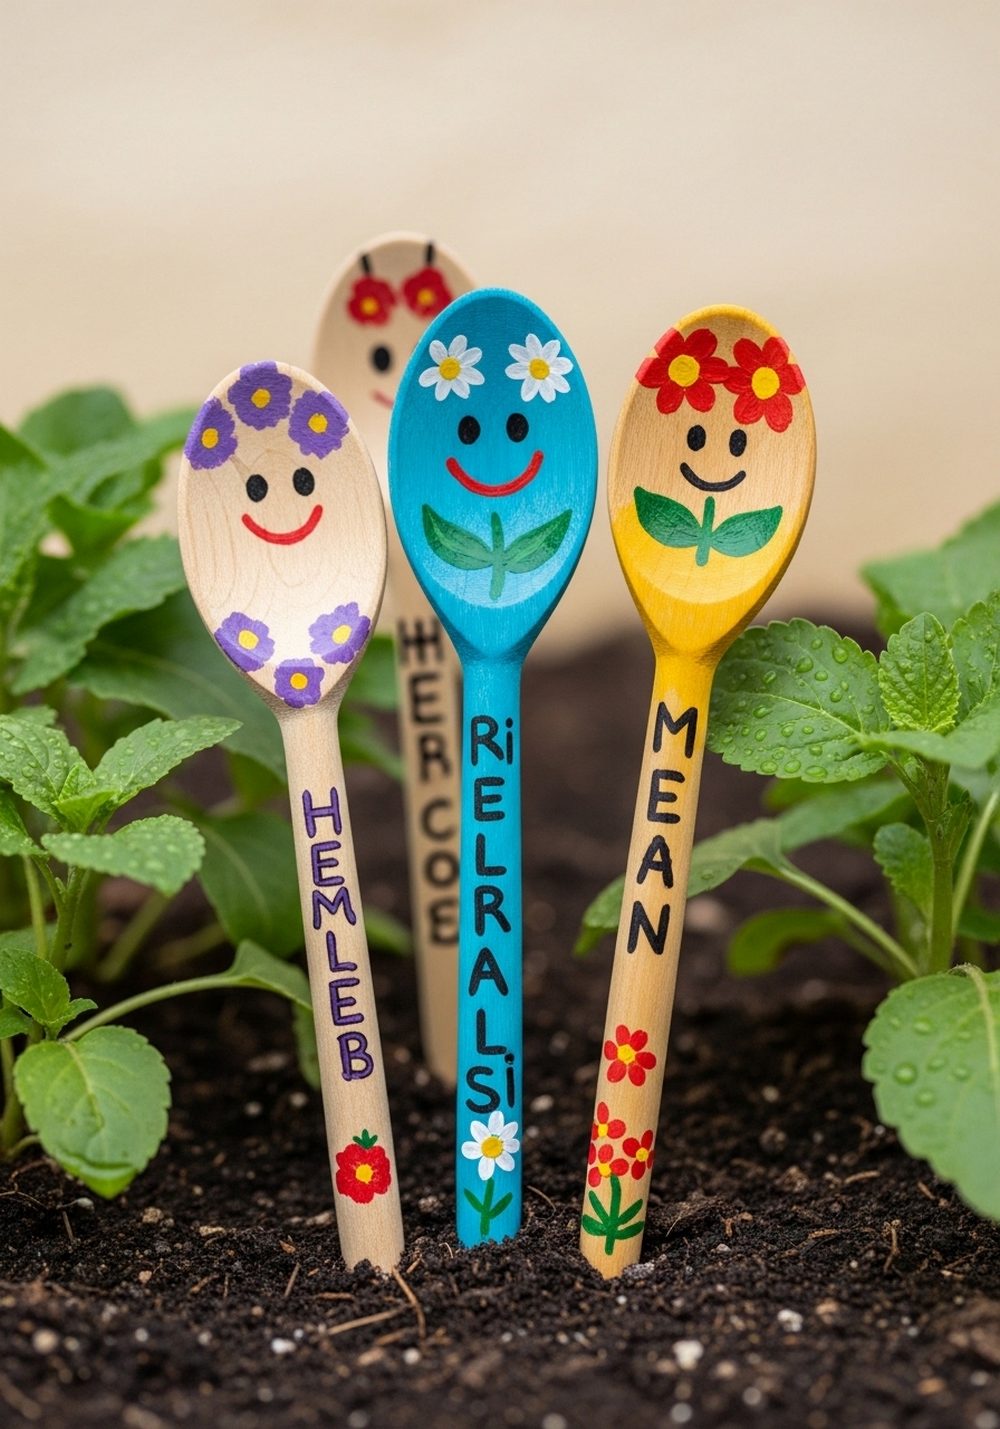
Old wooden spoons or cheap extras from the discount store become charming plant markers with a bit of paint. Kids can decorate the spoon heads as faces, suns, or ladybirds, and write the plant name down the handle. Once dry and sealed, push the spoons into the soil beside herbs or vegetables. They make it easy to see what is growing where, and they add a friendly, handmade touch to your beds and containers.
- Best For: Herb gardens, raised beds, or container collections on a balcony.
- Budget Tip: Use permanent marker for the names so you do not need special lettering paints.
- Styling Idea: Pick a theme like “garden gnomes” or “weather faces” and keep all spoons matching.
- Care & Maintenance: Bring them indoors over winter to extend their life.
7. Recycled Jar Lanterns With Painted Designs
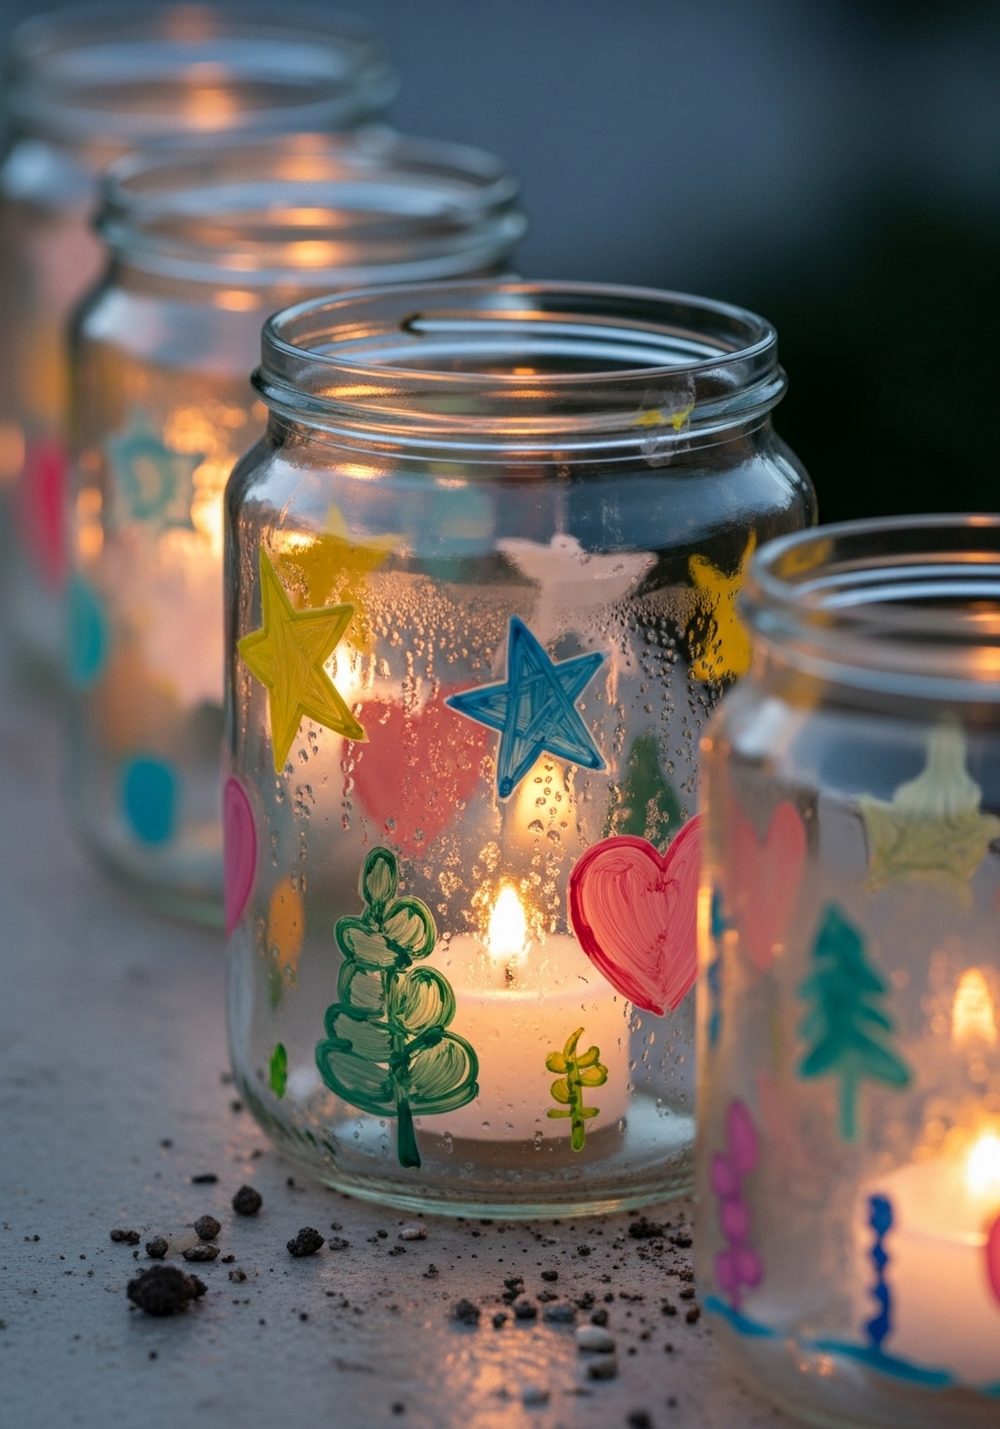
Glass jars from sauces, jams, or pickles can become magical little lanterns. After a good wash, kids can paint stars, hearts, dots, or simple nature shapes around the outside, leaving gaps for the light to shine through. Pop an LED tealight inside (safer than real candles), and line them up along a path, table, or windowsill. When evening comes, they glow softly, turning your garden into a cozy, storybook space that kids are proud to have helped decorate.
- Practical Note: Always use LED or battery candles with children, not open flames.
- Budget Tip: Save jars over a few weeks rather than buying new ones.
- Styling Idea: Tie twine or ribbon around the rims for a rustic or fairy-tale feel.
- Care & Maintenance: Store indoors when not in use to prevent rusting of lids and clips.
8. Scrap-Wood Garden Welcome Sign
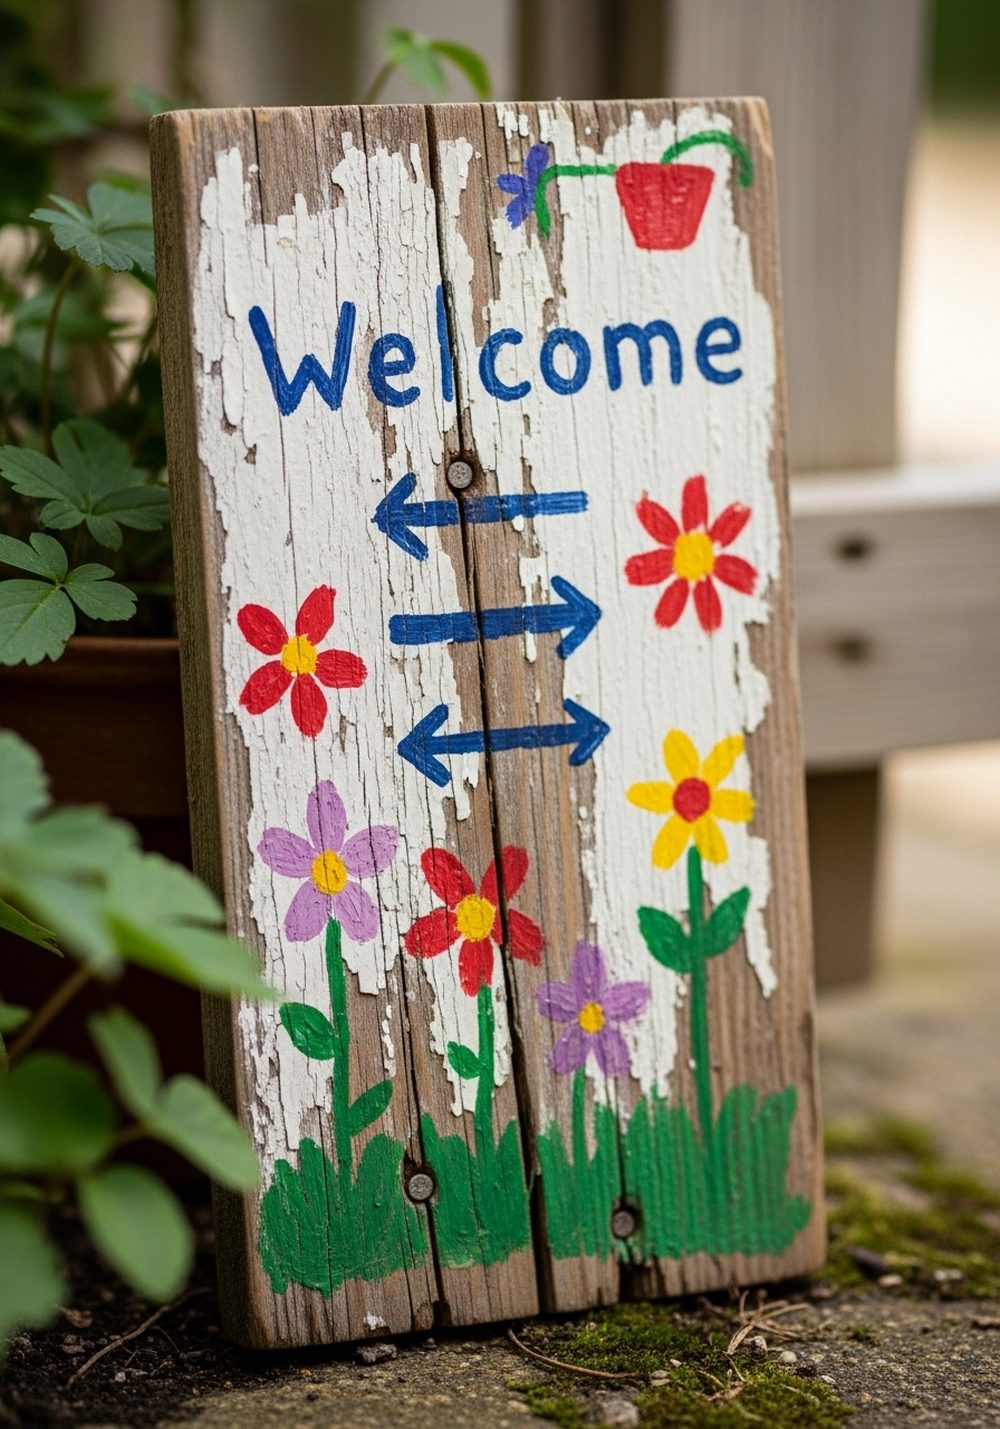
Offcuts of wood, old pallet boards, or a retired shelf can all become a welcoming sign for your garden. Sand any rough patches, then let the kids decide on a message: “Welcome,” “Our Garden,” or even the family name. They can add flowers, birds, or simple shapes around the words. A quick coat of outdoor sealant helps it stand up to the weather. Lean the sign against a pot, fix it to a stake, or mount it on a wall or fence as a friendly focal point.
- Budget Tip: Ask at local hardware stores for scrap pieces of wood they are throwing away.
- Styling Idea: Use white or pastel lettering on a dark background for a chalkboard look.
- Practical Note: Pre-draw the letters lightly in pencil to help younger kids paint inside the lines.
- Care & Maintenance: Repaint and reseal every couple of years if it starts to fade.
9. Bottle Cap Mosaic Stepping Stones
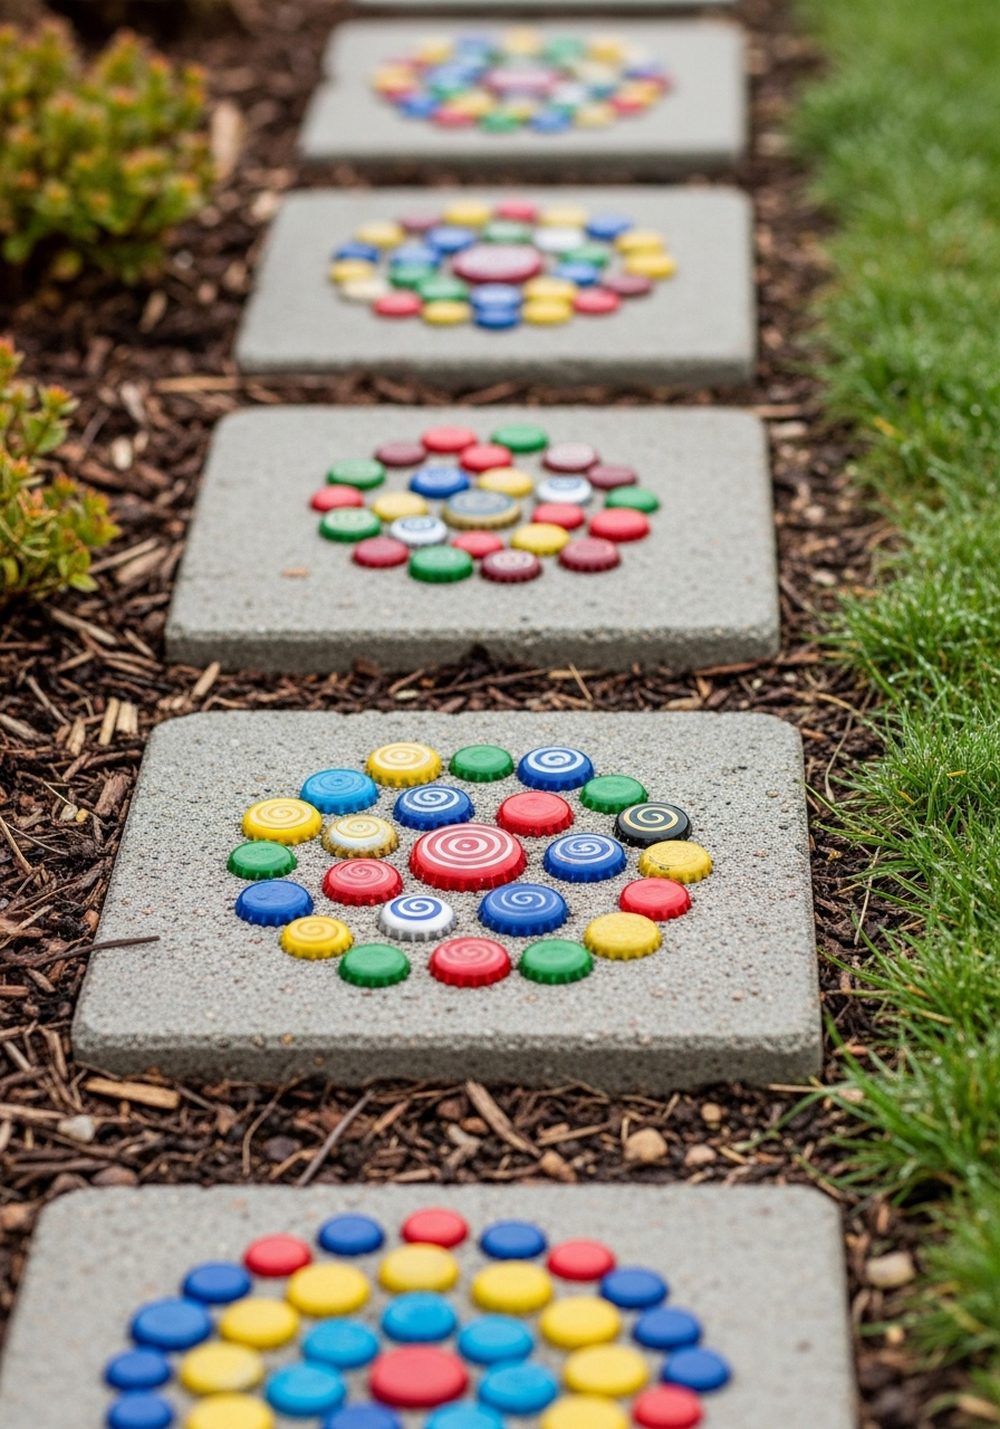
Instead of tossing bottle caps, save them for colorful stepping stones. Pour quick-setting concrete into shallow trays or large plastic lids, then, while it is still wet, let the kids press painted caps into patterns. They can create flowers, spirals, or random rainbow designs. Once fully cured, the stones can be laid into a path or tucked between plants. It is a fun way to reuse small bits of metal and add bursts of color at ground level.
- Practical Note: Adults should handle the concrete mixing and lifting; kids can focus on design.
- Budget Tip: Collect caps over time from soft drinks and sparkling water, and wash them well.
- Styling Idea: Use one color for the border and another for the center to make each stone stand out.
- Care & Maintenance: Brush off mud now and then to keep the patterns visible.
10. Painted Clay Pot Totem Characters
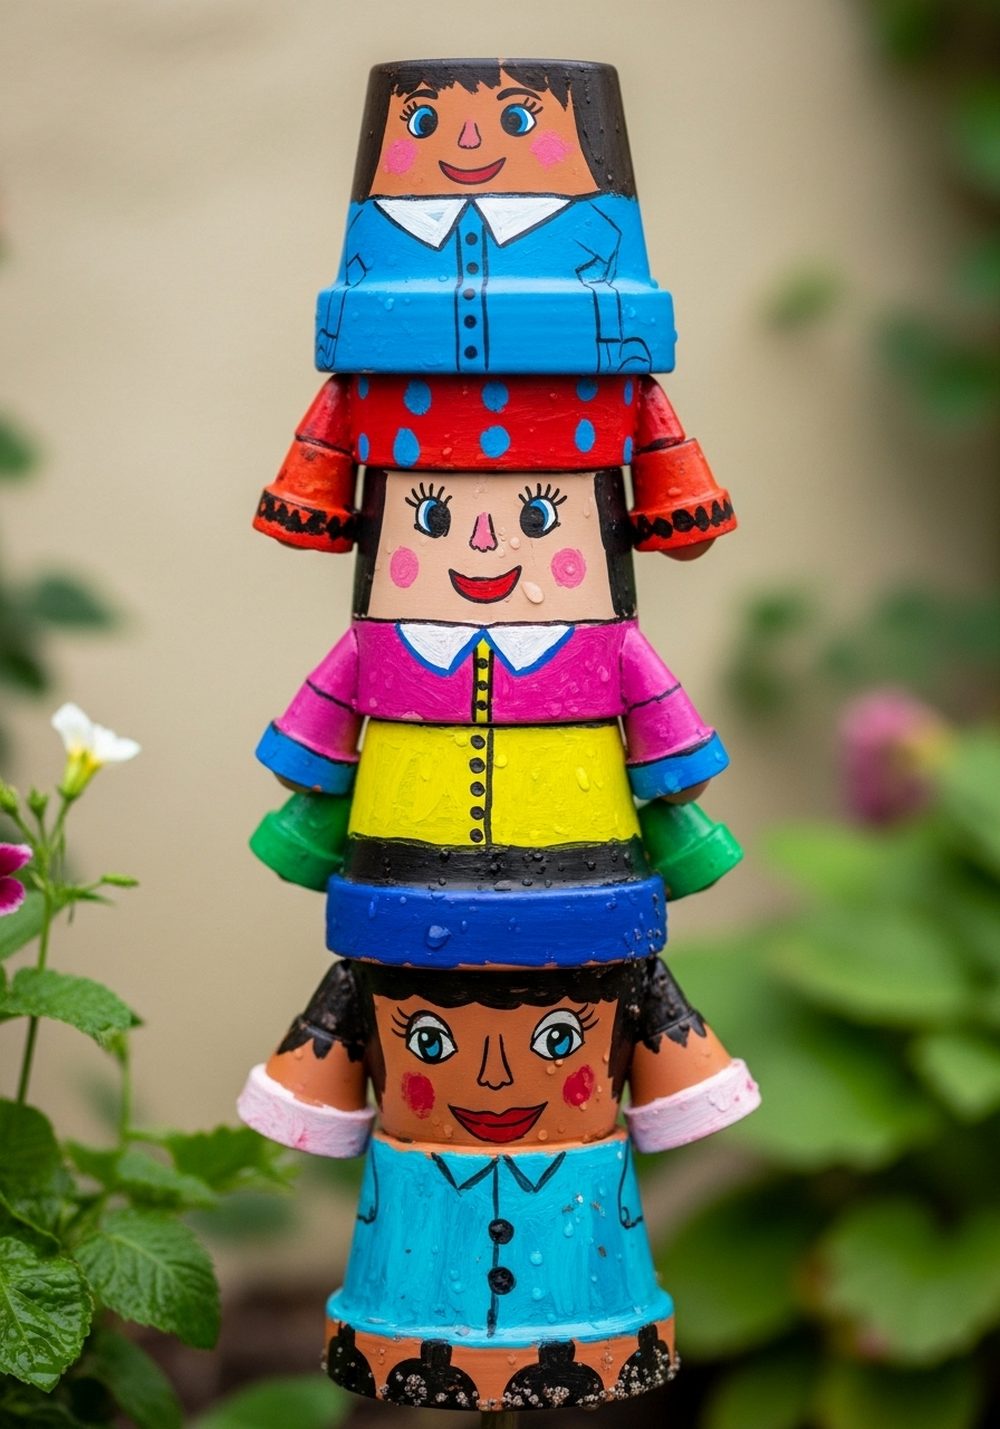
If you have a few old clay pots with chips or marks, do not throw them out. Stack them on a sturdy rod or stake and let the kids paint each pot as part of a big totem character: perhaps a cat, a robot, or a stack of silly faces. Bright colors and bold shapes work best from a distance. Once dry, stand your totem in a flower bed or beside the front door. It becomes a joyful, sculptural piece of garden art that shows off their imagination.
- Best For: Corners that need height and personality, like beside sheds or fences.
- Budget Tip: Mix old pots with a couple of new, inexpensive ones to get the size you want.
- Styling Idea: Choose a theme such as “garden monsters” or “flower fairies” for the whole family to follow.
- Practical Note: Make sure the base is stable so it will not topple in strong wind.
Conclusion
Recycled garden art is a lovely way to keep kids busy, cut down on waste, and fill your outdoor space with color and character. None of these projects need perfect drawing skills or expensive materials, just a bit of time and a few old containers, bottles, or scraps. Start with one or two ideas that fit your space, let your children take the lead, and watch your garden gradually turn into their favorite outdoor gallery.
FAQs
1. How can I keep recycled garden art projects low-cost?
Focus on using what you already have: tins, jars, cartons, bottles, and leftover paint. Plan projects around your recycling bin and basic supplies like brushes and markers. If you do need extras, buy a small set of outdoor paints and clear sealant that can be shared across many projects instead of buying special products for each one.
2. Are these ideas suitable for renters who cannot make permanent changes?
Yes, almost all of these decorations are portable. Tin can planters, rock critters, jar lanterns, and painted spoons can all move with you when you go. Even signs and pot totems can simply be lifted and taken to your next garden, balcony, or courtyard without leaving marks behind.
3. What are the safest options for very young children?
For younger kids, choose projects that do not involve cutting, glass, or concrete. Rock critters, spoon markers, and tin can painting (with pre-sanded edges and adult-drilled holes) are good choices. Offer larger brushes, washable paints, and plenty of supervision, and handle any sharp or tricky steps yourself before they start decorating.
4. How do I protect painted garden art from rain and sun?
Use outdoor or acrylic paints where possible and always finish with a clear outdoor sealant or varnish. This helps colors stay brighter for longer and protects surfaces from water damage. Place more delicate pieces in sheltered spots, like under eaves or in partially covered corners, and refresh the sealant each year if needed.
5. Do these projects work in very small spaces, like balconies?
Absolutely. Tin can pots, jar lanterns, spoon markers, CD sun-catchers, and mini totem characters all work brilliantly in containers and railing planters. Choose just one balcony corner or wall to decorate so it feels intentional, and use vertical space with hanging items or stacked pieces to keep the floor clear.
6. How can I make sure the decor does not harm plants or wildlife?
Avoid sharp edges sticking into beds, use non-toxic paints, and skip any loose glitter that might blow away. Hang items securely so they do not fall on plants, and keep birdhouses at a safe height away from pets. When decorations become damaged or too worn, recycle what you can and dispose of the rest rather than leaving bits scattered outdoors.