10 Painted Tin Can Planters For Cottage Gardens

If you love that slightly scruffy, flower-filled cottage garden look, painted tin can planters are a lovely way to add charm without spending much. They turn everyday leftovers into sweet little accents that feel personal, playful, and very “you.”
In this post, you’ll find ten cottage-style ideas using simple tins, basic paints, and the plants you already enjoy. Whether you have a tiny patio, a country-style front step, or a rambling backyard, these projects help you add color, height, and whimsy. Most are easy to move, renter-friendly, and gentle on your budget, so you can transform your space one tin can at a time.
Quick List
- Pastel Polka-Dot Tin Can Fence Planters
- Wildflower Tin Cans On The Cottage Windowsill
- Herb Garden Tin Cans On A Wooden Rack
- Hanging Tin Can Planters In The Apple Tree
- Tin Can Planter Ladder By The Back Door
- Storybook Floral Tin Cans On The Front Steps
- Tin Can Planter Crate Display Near The Shed
- Children’s Painted Tin Can Fairy Corner
- Vintage-Inspired Tin Can Table Centerpieces
- Tin Can Lantern Planters Along The Garden Path
1. Pastel Polka-Dot Tin Can Fence Planters

Give a plain fence a cottage makeover by lining it with pastel, polka-dot tin cans. Clean and prime your tins, then paint them in soft pinks, mints, creams, and blues. Add simple dots with the back of a brush or a pencil eraser for a playful pattern. Punch drainage holes in the base, then screw or wire the cans to the fence at different heights. Fill with pansies, trailing ivy, or small daisies so the fence becomes a cheerful ribbon of color.
- Best For: Narrow borders where you want flowers but lack ground space.
- Budget Tip: Use leftover wall paint or tester pots instead of buying special craft paints.
- Styling Idea: Keep dots in just two or three colors for a calmer, cottage-coordinated look.
- Practical Note: Line the bottom with a bit of gravel to stop soil blocking drainage holes.
- Care & Maintenance: Repaint cans each spring if the weather dulls the colors.
2. Wildflower Tin Cans On The Cottage Windowsill

Turn your exterior windowsill into a mini meadow with painted tin cans full of wildflowers. Choose a gentle color palette—soft blues, creams, and grey-greens—and paint tiny wildflower shapes or loose speckles that hint at blooms. Arrange three to five cans in a row on the sill, leaving gaps so the plants can spill a little over the edges. Fill with seed mixes or small plugs like cornflowers, poppies, and chamomile to get that pretty, slightly untidy cottage feel as they grow.
- Best For: Cottage façades, sheds, or kitchen windows overlooking the garden.
- Budget Tip: Use inexpensive wildflower seed mixes rather than individual plants.
- Styling Idea: Match the can colors to your shutters, front door, or trim for a pulled-together look.
- Practical Note: Make sure the sill has a lip or tray so water doesn’t run down the wall.
- Care & Maintenance: Deadhead flowers regularly to keep the cans blooming for longer.
3. Herb Garden Tin Cans On A Wooden Rack
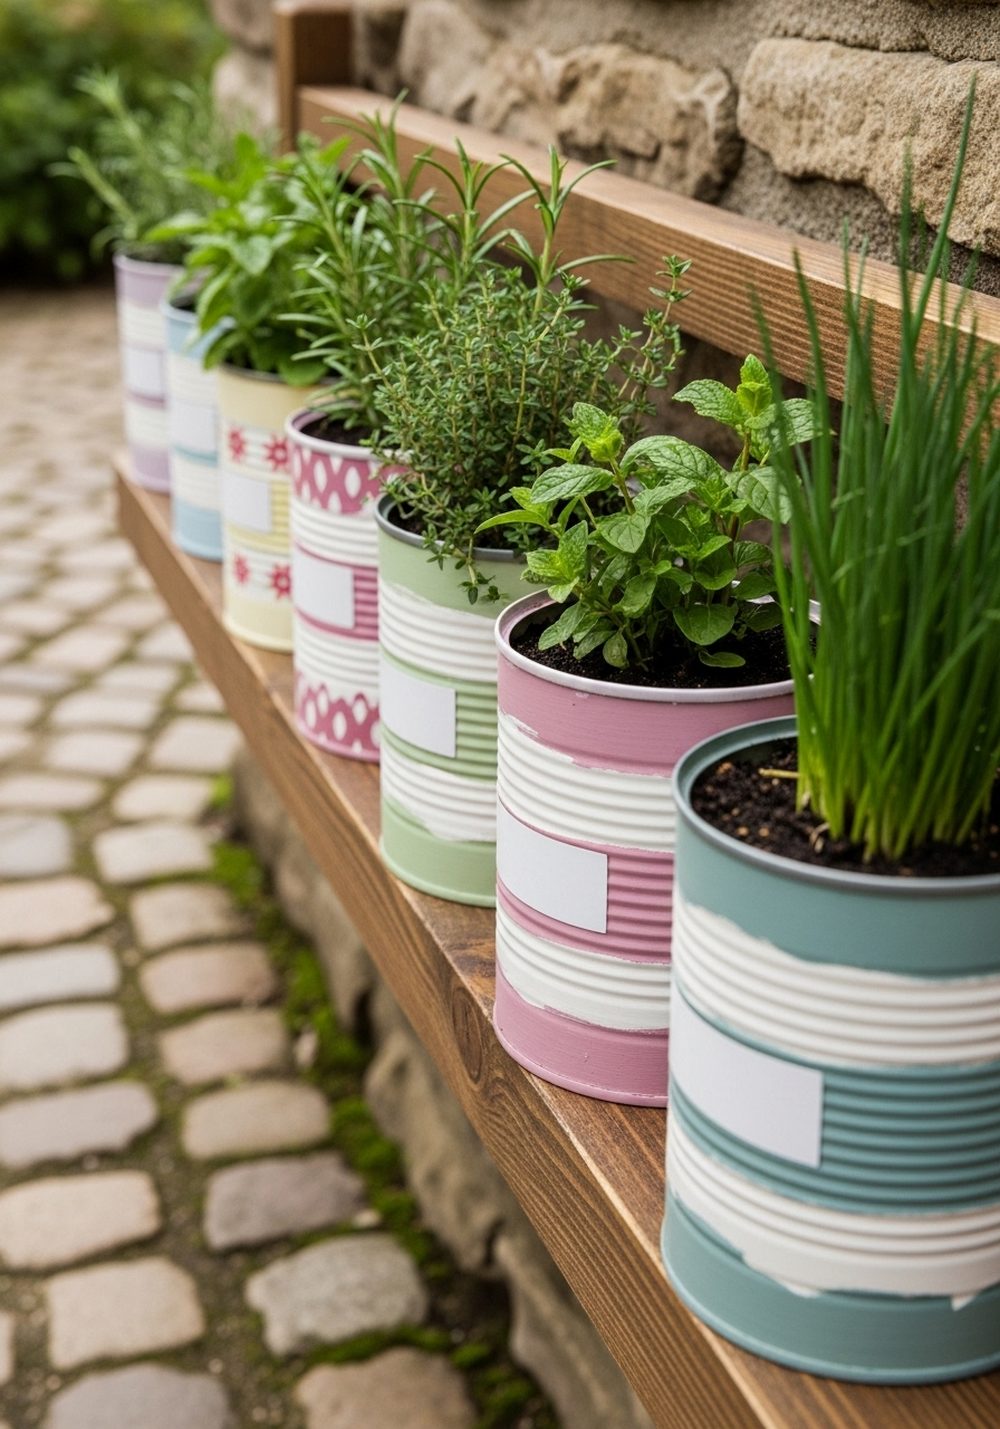
Create a vertical cottage herb garden by lining up painted tin cans on a simple wooden rack. Paint each can a different soft shade—sage green for sage, silvery blue for rosemary, warm cream for thyme—so you can recognize herbs by color instead of writing labels. Fix the rack to a sunny wall near your kitchen door and secure each can with screws or sturdy clips. Fill with fresh compost and your favorite herbs, then enjoy the sight and scent every time you step outside.
- Best For: Small courtyards, patios, and wall space near the kitchen.
- Budget Tip: Build the rack from reclaimed pallets or offcuts and reuse tins from your pantry.
- Styling Idea: Sand back a few areas of paint on the cans for a softly distressed, vintage finish.
- Practical Note: Drill extra drainage holes so herbs don’t sit in soggy soil.
- Care & Maintenance: Refresh the compost and replant tired herbs each spring for a full, lush look.
4. Hanging Tin Can Planters In The Apple Tree

If you’re lucky enough to have a small tree, turn it into a whimsical hanging garden. Paint your tin cans in stripes, florals, or simple blocks of color that echo cottage fabrics. Punch two holes at the rim, thread through twine or jute, and knot securely. Plant them with trailing lobelia, tiny ferns, or flowering thyme. Hang the cans at different heights among the branches so they sway gently in the breeze and peek out between leaves and fruit, like little surprises.
- Best For: Mature shrubs or small trees in relaxed cottage-style gardens.
- Budget Tip: Use natural twine and offcut paint instead of buying decorative chains or hooks.
- Styling Idea: Keep to one color family (all blues or all pinks) for a dreamy, storybook feel.
- Practical Note: Don’t hang heavy, waterlogged cans on thin branches; test weight first.
- Care & Maintenance: Water slowly and carefully so you don’t wash soil over the sides.
5. Tin Can Planter Ladder By The Back Door
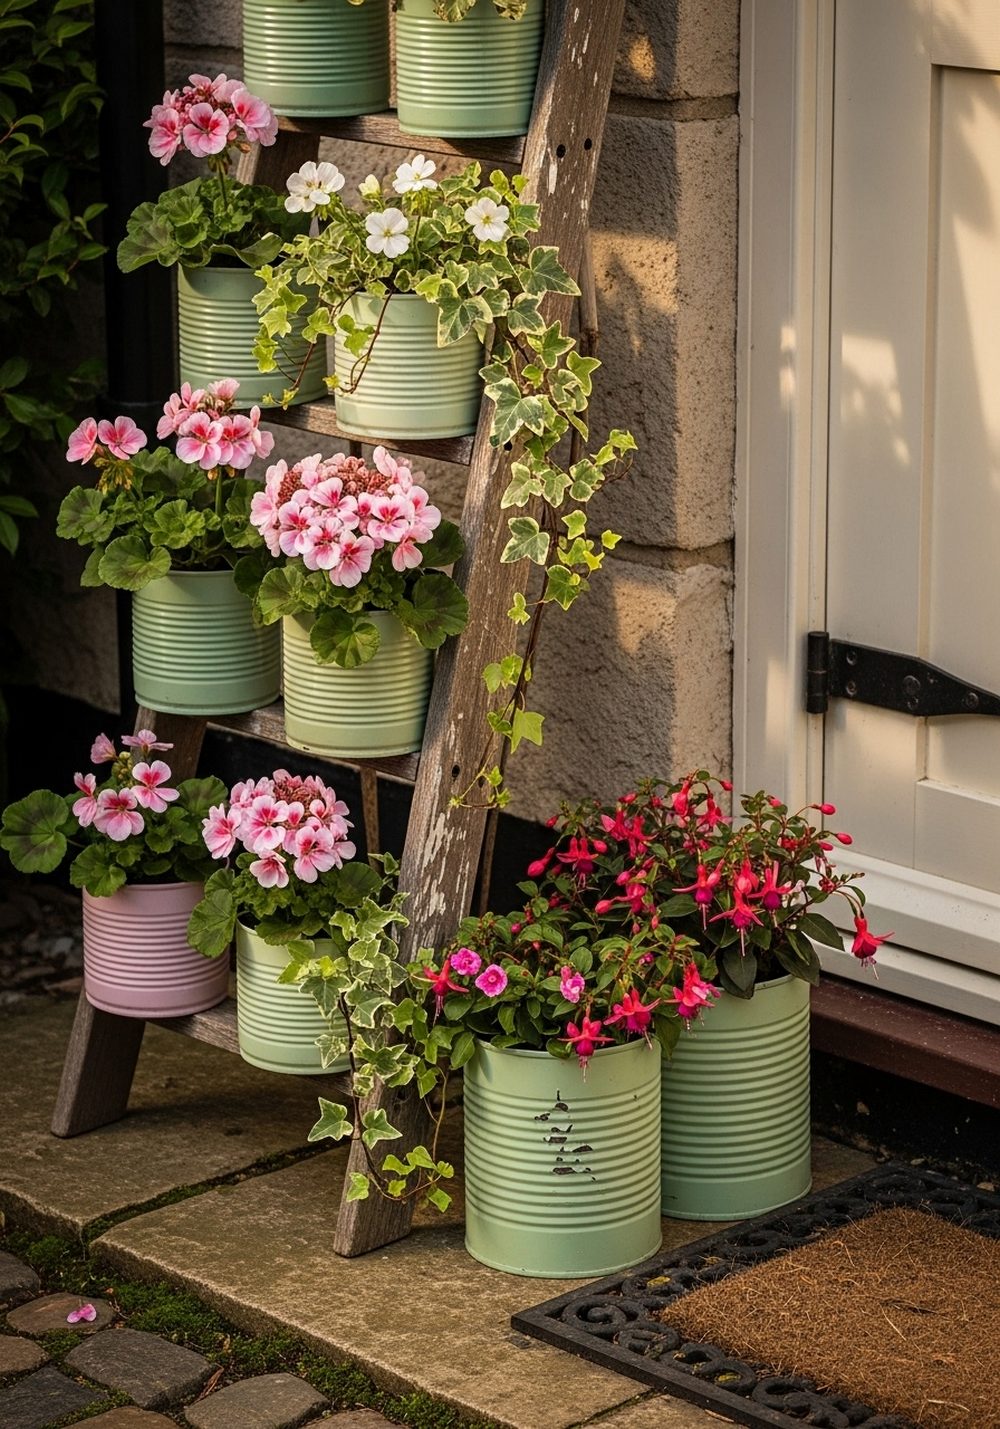
Lean a simple ladder against the wall by your back door and turn it into a tiered display of tin cans. Paint the cans in a mix of soft, chalky shades that suit your cottage walls, then arrange them on each rung, largest at the bottom and smallest at the top. Plant with geraniums, trailing ivy, and some scented flowers like stocks or sweet alyssum. As they grow, they’ll soften the straight ladder lines and create a vertical curtain of color and fragrance.
- Best For: Tight spaces beside doors or between windows where you want height.
- Budget Tip: Use an old wooden ladder or build a simple frame from inexpensive timber.
- Styling Idea: Wrap a short length of fairy lights around the ladder for warm evening sparkle.
- Practical Note: Secure the ladder to the wall so it can’t slip or blow over.
- Care & Maintenance: Rotate sun-loving plants to the top rungs and shade-lovers lower down.
6. Storybook Floral Tin Cans On The Front Steps

Add instant charm to your entrance by lining your front steps with storybook-style floral tins. Take your time hand-painting roses, daisies, or little vines around each can, using soft reds, pinks, and greens. Group the cans in threes on each step for a full, generous look. Plant them with petunias, violas, and small ferns so the plants tumble, layer, and soften the edges of the steps. It’s a simple way to make your doorway feel like it belongs in a children’s story.
- Best For: Front stoops, porch steps, or any small stairway into the garden.
- Budget Tip: Mix a few showy annuals with cheaper, long-lasting foliage plants.
- Styling Idea: Coordinate the floral designs with your doormat or a seasonal wreath.
- Practical Note: Leave enough step space for safe footing and guests carrying bags.
- Care & Maintenance: Sweep fallen petals regularly so the steps don’t get slippery.
7. Tin Can Planter Crate Display Near The Shed

That forgotten corner near the shed can become a charming focal point with a crate-and-can display. Stack old wooden crates at angles to form shelves, then fill them with painted tin cans in soft, weathered colors. Plant each can with a different cottage favorite—lavender, foxgloves, nasturtiums, or marigolds—for a relaxed, collected-over-time feeling. The mix of rough wood, peeling paint, and bright flowers instantly adds character and makes even the most practical part of the garden look intentional.
- Best For: Awkward corners, shed walls, or areas that need softening.
- Budget Tip: Ask local shops for free crates and use secondhand tins of paint.
- Styling Idea: Add a small lantern, birdhouse, or enamel jug among the cans for extra charm.
- Practical Note: Place heavier crates at the bottom and secure the stack so it doesn’t wobble.
- Care & Maintenance: Rotate plants in and out as seasons change to keep the display fresh.
8. Children’s Painted Tin Can Fairy Corner

Invite children to help design a fairy corner by letting them paint their own tin cans in bright, imaginative colors. Once dry, arrange the cans around a tree stump or garden corner with a simple fairy door, tiny stones, and a little path. Plant with moss, miniature ferns, violas, and any “tiny” plants that make the area feel magical. Their imperfect brushstrokes, fingerprints, and doodles only add to the charm and give the space a joyful, handmade feel.
- Best For: Family gardens, play areas, and shaded corners that need life.
- Budget Tip: Use cheap poster paints sealed with a clear outdoor varnish or sealant.
- Styling Idea: Let each child choose a “fairy color” for their can to build a rainbow cluster.
- Practical Note: Avoid sharp edges on tins; file or tape them before giving to children.
- Care & Maintenance: Let kids help with watering and replanting to keep them involved.
9. Vintage-Inspired Tin Can Table Centerpieces

For outdoor tea parties or weekend breakfasts, use vintage-style painted tins as table centerpieces. Take inspiration from old wallpaper or china patterns—faded florals, stripes, or tiny dots—using muted rosy pinks, dusty blues, and cream. Fill the cans with loosely arranged garden roses, sweet peas, herbs, and greenery, keeping the look relaxed rather than formal. Place them on a linen cloth or lace runner to tie it all together and instantly make your cottage table feel special.
- Best For: Patio tables, garden tea parties, and special-occasion dinners.
- Budget Tip: Mix whatever flowers you have with foliage and herbs to bulk out arrangements.
- Styling Idea: Add small votive candles or mismatched teacups around the cans for extra romance.
- Practical Note: Use weighted pebbles in the bottom of cans to prevent them tipping in the breeze.
- Care & Maintenance: Refresh water regularly if using cut flowers, or choose potted plants instead.
10. Tin Can Lantern Planters Along The Garden Path

Combine soft light and cottage planting by turning tin cans into lantern planters along your path. Paint them in pale, misty shades, then punch simple patterns—stars, hearts, or random holes—around the sides. Add a layer of gravel, a little compost, and low-growing plants like lobelia or alyssum. In the evening, tuck battery tea lights or small solar candles inside so the light glows through the punched holes and over the flowers, guiding you down the path.
- Best For: Evening entertaining areas and meandering cottage-style paths.
- Budget Tip: Use inexpensive battery candles instead of real ones to avoid constant replacements.
- Styling Idea: Repeat one simple pattern on all cans for a calm, rhythmic look along the path.
- Practical Note: Make drainage holes in the base so rainwater can escape easily.
- Care & Maintenance: Check lights regularly and replace if they get damp or dim.
Conclusion
Painted tin can planters are a wonderfully simple way to bring storybook charm to any cottage garden, no matter its size. With a few saved tins, some soft colors, and your favorite plants, you can brighten fences, steps, and forgotten corners. Start with one small project—a ladder, a windowsill, or a fairy corner—and add more as you collect cans. Over time, all those little details will stitch together into a garden that feels warm, personal, and lovingly handmade.
FAQs
1. How can I decorate with tin can planters on a small budget?
Save tins from your regular cooking, wash them well, and use leftover paints or tester pots instead of buying new supplies. Start with just a few cans in key spots like your front step or windowsill. Add plants gradually by dividing existing perennials, swapping cuttings with friends, or buying small seedlings rather than mature plants.
2. Are painted tin can planters suitable for renters?
Yes, they’re very renter-friendly because they’re light, portable, and easy to move. Use ladders, crates, and freestanding racks instead of fixing cans directly to walls or fences. You can take the entire display with you when you move, and it won’t leave marks behind. Just make sure any screws or hooks you use are allowed under your rental agreement.
3. How do I make tin can planters weather-resistant?
Use an outdoor metal primer before painting and finish with a clear, weatherproof sealant to help resist rust and peeling. Try to avoid leaving cans sitting directly on wet soil or grass; raise them on bricks, crates, or steps. If you live somewhere very wet, pop a plastic pot inside the can so you can swap plants out and protect the metal a little more.
4. What plants work best in tin can planters for cottage gardens?
Compact, shallow-rooted plants are ideal, such as violas, pansies, herbs, trailing ivy, lobelia, and small ferns. Many classic cottage annuals and herbs cope well in small containers as long as they’re watered and fed. Avoid very thirsty or deep-rooted shrubs, which can struggle in limited soil. Think in layers: some trailing, some upright, and a little foliage for texture.
5. How can I stop tin can planters from looking cluttered?
Choose a simple color palette for your cans—perhaps all pastels, or all soft blues and creams—and repeat it throughout the garden. Group cans in small clusters rather than scattering them everywhere. Keep surrounding items like lanterns, crates, and furniture in similar tones so everything feels coordinated. A limited palette makes even a busy cottage garden look charming rather than chaotic.
6. What’s the easiest tin can planter project for beginners?
A small trio of painted cans on a windowsill or front step is a great place to start. You only need a handful of tins, one or two paint colors, and a few cheerful plants. Once you see how quickly that little area transforms, you can build up to bigger ideas like ladders, hanging cans, or path lanterns with more confidence.