
10 Rain Barrel Garden Ideas To Save Water And Beautify Your Yard

If you’re looking for ways to save water and still keep your garden lush, rain barrels are one of the simplest upgrades you can make. Instead of watching all that precious rain rush down the drain, you can capture it and use it to water your flowers, veggies, and pots on dry days.
This guide is for home gardeners, renters, and anyone with a balcony, courtyard, or backyard who wants practical ideas that also look good. You’ll find easy ways to disguise, decorate, and display rain barrels so they become part of your garden style, not an eyesore. With a few clever tweaks, your water-saving setup can feel intentional, beautiful, and totally at home in your outdoor space.
Quick List
- Paint A Statement Rain Barrel Corner
- Add A Climbing Trellis Around Your Barrel
- Turn The Barrel Lid Into A Planter
- Create A Rustic Rain Barrel Wall Trio
- Hide A Barrel Behind A Screen And Vines
- Use A Rain Barrel To Feed Drip Irrigation Beds
- Build A Pebble Splash Basin Under The Spout
- Pair A Rain Chain With A Decorative Barrel By The Porch
- Raise Your Rain Barrel With A Storage Nook Beneath
- Design A Family-Friendly Rain Barrel Learning Corner
1. Paint A Statement Rain Barrel Corner

A plain barrel can look industrial, but a few coats of paint turn it into a garden feature. Choose a soft neutral to blend in, or go bold with deep blue, sage green, or terracotta, then add simple leaf or wildflower motifs if you’re feeling creative. Tuck the barrel into a corner near a downpipe, surround it with pots at different heights, and add a small stool or crate for extra plants. Suddenly, your water saver becomes a charming little focal point.
- Best For: Small gardens and patios where every corner is visible.
- Budget Tip: Use leftover exterior paint and simple stencil shapes rather than detailed freehand art.
- Styling Idea: Repeat one color from the barrel on nearby pots or cushions to make it look intentional.
- Practical Note: Use outdoor-grade, UV-resistant paint so the design doesn’t peel or fade quickly.
2. Add A Climbing Trellis Around Your Barrel

A slim trellis around or just behind your rain barrel softens the shape and helps it blend into the planting. Choose a freestanding metal obelisk or a flat wooden panel and grow climbers like clematis, jasmine, or sweet peas. As the plants fill in, you’ll see more foliage and flowers than plastic, while the barrel still does its job quietly in the background. This trick adds height, texture, and drama to otherwise bare wall space.
- Best For: Narrow side passages and along fences where vertical interest is needed.
- Budget Tip: Use simple wire mesh or repurposed lattice instead of expensive decorative trellises.
- Styling Idea: Match the trellis color to your fence or window frames for a coordinated look.
- Care & Maintenance: Choose climbers with manageable growth so they don’t block access to the tap.
3. Turn The Barrel Lid Into A Planter

If your rain barrel has a flat or slightly recessed lid, you can turn it into a mini garden. Place a shallow tray, bowl, or planter on top and fill it with drought-tolerant plants such as sedums, small grasses, or herbs. Add a layer of gravel for drainage and a tidy finish. This vertical planting draws the eye upwards and disguises the utilitarian top of the barrel, especially when seen from windows or an upper balcony.
- Best For: Courtyards and small yards where you view the barrel from above.
- Budget Tip: Repurpose an old baking tray, metal dish, or plastic saucer as the planter base.
- Styling Idea: Use silvery foliage and soft pastels for a calm look, or hot colors for a fun, lively vibe.
- Practical Note: Make sure the added planter doesn’t block access to the lid for cleaning.
4. Create A Rustic Rain Barrel Wall Trio

If you have space and need more water storage, turn multiple barrels into a design feature. Line up two or three matching barrels along a fence or wall on a neat gravel strip, then place a small herb pot or lantern on each lid. The repeating shapes and materials create a strong visual rhythm, almost like a rustic outdoor sideboard. Connect them with linking kits so they fill and drain together, giving you plenty of rainwater for your beds.
- Best For: Larger gardens and allotments needing serious water capacity.
- Budget Tip: Start with two barrels and add a third when budget allows; keep them matching for cohesion.
- Styling Idea: Choose barrels with wood-effect sides or wooden cladding for a softer, natural look.
- Practical Note: Ensure the ground is level and firm so the barrels stay safe when full.
5. Hide A Barrel Behind A Screen And Vines

Sometimes you want the function but not the look. A simple wooden or bamboo screen in front of your rain barrel hides it in plain sight while still allowing access from the sides. Plant climbing or rambling plants at the base and let them scramble over the screen for a leafy wall effect. You’ll still know the barrel is there, but visitors will mostly notice the greenery and texture.
- Best For: Rentals or front gardens where you prefer a more polished appearance.
- Budget Tip: Use lightweight, freestanding screens that can move with you if you relocate.
- Styling Idea: Go for slatted screens in black or dark green for a modern, minimalist feel.
- Care & Maintenance: Leave enough space for air flow to prevent mildew and make it easy to reach the tap.
6. Use A Rain Barrel To Feed Drip Irrigation Beds
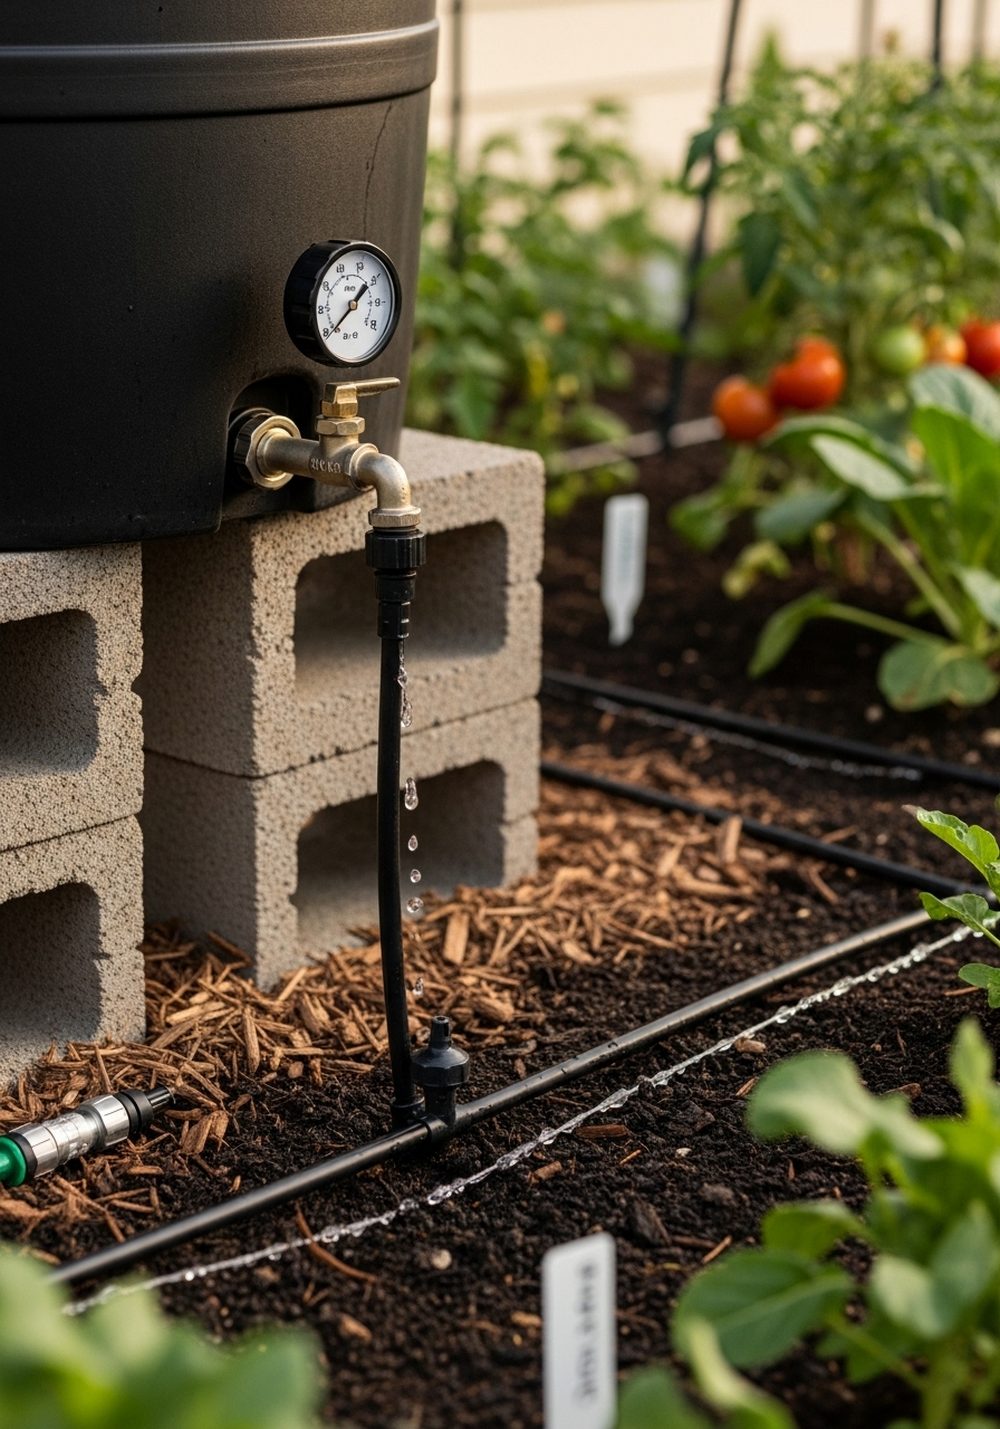
A raised rain barrel can power a simple gravity-fed drip system that waters your beds or containers slowly and efficiently. Place the barrel on sturdy blocks or a stand, attach a filter and tap connector, then run drip lines or soaker hoses through your veggie patch or flower border. The setup looks neat and purposeful, and once everything is tucked under mulch, you’ll mainly see healthy plants, not pipes. It’s a great way to save time and water at once.
- Best For: Busy gardeners and vegetable growers who forget to hand-water.
- Budget Tip: Start with one bed and a basic hose, then extend the system later.
- Styling Idea: Cover irrigation lines with bark or gravel to keep the design clean.
- Practical Note: Raise the barrel high enough to create good pressure and add a simple filter to avoid clogs.
7. Build A Pebble Splash Basin Under The Spout

Instead of letting overflow water gouge a muddy hole in the soil, give it a beautiful landing place. Create a shallow basin directly under the barrel spout using edging stones and fill it with smooth river pebbles. Plant moisture-loving varieties like hostas, ferns, or iris just beyond the stone circle. When it rains, water trickles over the pebbles and seeps into the soil, creating a small, natural-looking feature that manages splashes and protects your paths.
- Best For: Shady corners and areas near paths that get soggy.
- Budget Tip: Mix found stones with bought pebbles to fill the basin economically.
- Styling Idea: Choose pebbles in one color family (all light, all dark) for a calm, spa-like feel.
- Care & Maintenance: Occasionally lift and rinse the stones if algae or debris builds up.
8. Pair A Rain Chain With A Decorative Barrel By The Porch

Turn your front downpipe into a tiny water show. Replace a standard gutter downspout with a decorative rain chain and position a pretty barrel or half-barrel beneath it. Fill the top with stones and a few plants so you see a charming mini water garden when it rains. From the porch, you’ll enjoy the soft sound of water and a much more appealing view than plain pipework. It’s a smart way to show off that you’re saving water with style.
- Best For: Front porches, entryways, and covered patios.
- Budget Tip: Look for simple chain designs or make one from metal cups you already own.
- Styling Idea: Match metal finishes (copper, black, galvanized) to your door hardware and light fixtures.
- Practical Note: Make sure overflow has a clear route away from foundations and paths.
9. Raise Your Rain Barrel With A Storage Nook Beneath

Lifting your rain barrel off the ground not only improves water pressure, it also creates useful storage space. Build or buy a sturdy wooden or metal stand and design a small shelf or open cubby underneath to hold watering cans, a hose, or a bucket. Group a couple of pots nearby, and you’ve got a tidy little watering station that looks organized, not cluttered. This works especially well next to sheds, garages, or along a wall.
- Best For: Small gardens that need every bit of storage.
- Budget Tip: Build a simple stand from treated timber or reclaimed pallets, checking it’s strong enough when full.
- Styling Idea: Paint the stand the same color as your fence or shed so it blends smoothly.
- Practical Note: Ensure the stand is level and anchored, as water is heavy and needs solid support.
10. Design A Family-Friendly Rain Barrel Learning Corner

Turn water saving into a fun feature for kids. Choose a bright color for the rain barrel and add simple level marks or shapes down the side so children can see how full it is after a storm. Place it next to a small raised bed or a few large pots that are “their” plants to water. Add a chalkboard or sign that explains how rainwater helps the garden grow. This transforms a functional item into a little outdoor classroom.
- Best For: Families with young children and school gardens.
- Budget Tip: Use leftover paint and basic markers or stickers instead of custom decals.
- Styling Idea: Keep the designs simple and bold so they look playful, not messy.
- Care & Maintenance: Always keep the barrel securely lidded and supervise children while they’re using it.
Conclusion
Rain barrels don’t have to be the dull, plastic lumps you try to hide in a corner. With a bit of paint, smart placement, and thoughtful planting, they can become some of the most charming features in your garden while quietly saving water in the background. Start with one small change—maybe a painted barrel or a pebble basin—and build from there. Each clever detail will make your outdoor space feel more intentional, greener, and kinder to your water bill.
FAQs
1. How can I decorate a rain barrel on a very small budget?
Stick to simple upgrades like paint and plants. A single color that matches your fence or trim instantly looks neater, and you can add a couple of secondhand pots or repurposed containers around the base. Gravel, pebbles, or mulch underneath also tidy the area and help prevent muddy splashes.
2. Are these rain barrel ideas suitable for renters?
Yes, many of them are renter-friendly. Freestanding screens, portable trellises, raised stands, and decorative trays or planters on top can all move with you when you go. Just make sure any gutter or downpipe changes, like adding a diverter or rain chain, are reversible and allowed by your landlord.
3. What’s the easiest rain barrel decor idea for beginners?
Painting the barrel and adding a couple of pots around it is the quickest win. You don’t need advanced DIY skills, and it can be done in a weekend. Choose an exterior paint, give the surface a light clean and sand, then apply two thin coats. Finish by placing a few plants of different heights nearby to soften the edges.
4. How do I keep a rain barrel area looking tidy year-round?
Plan for low-maintenance surroundings. Use gravel or pavers under the barrel to stop mud, plant tough perennials rather than fussy annuals, and keep hoses coiled on a hook or tucked under a stand. Check the barrel lid, filter, and tap seasonally so they stay clean and functional, which helps the whole setup feel well cared for.
5. Are rain barrels safe to use near edible gardens?
Rainwater is generally fine for watering soil around vegetables and fruit trees, especially if it’s collected from clean roofing and gutters. Avoid using rain barrel water for washing produce directly or for leafy crops you eat raw if you’re unsure about roof contaminants. When in doubt, water the soil, not the leaves, and give everything a good rinse before eating.
6. What weather-resistant materials work best around a rain barrel?
Choose exterior-grade paints, treated or naturally durable wood, metal stands made for outdoor use, and stones or gravel that won’t break down over time. For plants, pick varieties that suit your climate and the light around the barrel so they stay healthy and attractive without constant replacing. This keeps your water-saving setup looking good season after season.


