10 Rustic Pallet Raised Beds For Backyard Gardens

If you love the look of a cottage-style backyard but don’t want to spend a fortune on fancy planters, rustic pallet raised beds are a brilliant solution. With a few basic tools and some salvaged pallets, you can create charming garden beds that feel handmade, homey, and full of character.
This post walks you through ten different ways to turn humble pallets into beautiful raised beds for vegetables, herbs, and flowers. You’ll find simple designs for small yards as well as more generous layouts for bigger spaces, plus plenty of styling and budget tips. Use these ideas to give your backyard a warm, welcoming feel that looks thoughtfully designed, not overly polished.
Quick List
- Classic Rustic Pallet Box Bed
- Long Pallet Border Bed Along The Fence
- Tiered Pallet Vegetable Bed
- Pallet Herb Bed Beside The Patio
- U-Shaped Pallet Kitchen Garden
- Pallet Raised Bed With Trellis Backdrop
- Pallet Corner Bed With Gravel Edge
- Pallet Strawberry & Salad Ladder Bed
- Pallet Raised Bed With Built-In Seating
- Mini Pallet Beds For Kids’ Garden
1. Classic Rustic Pallet Box Bed
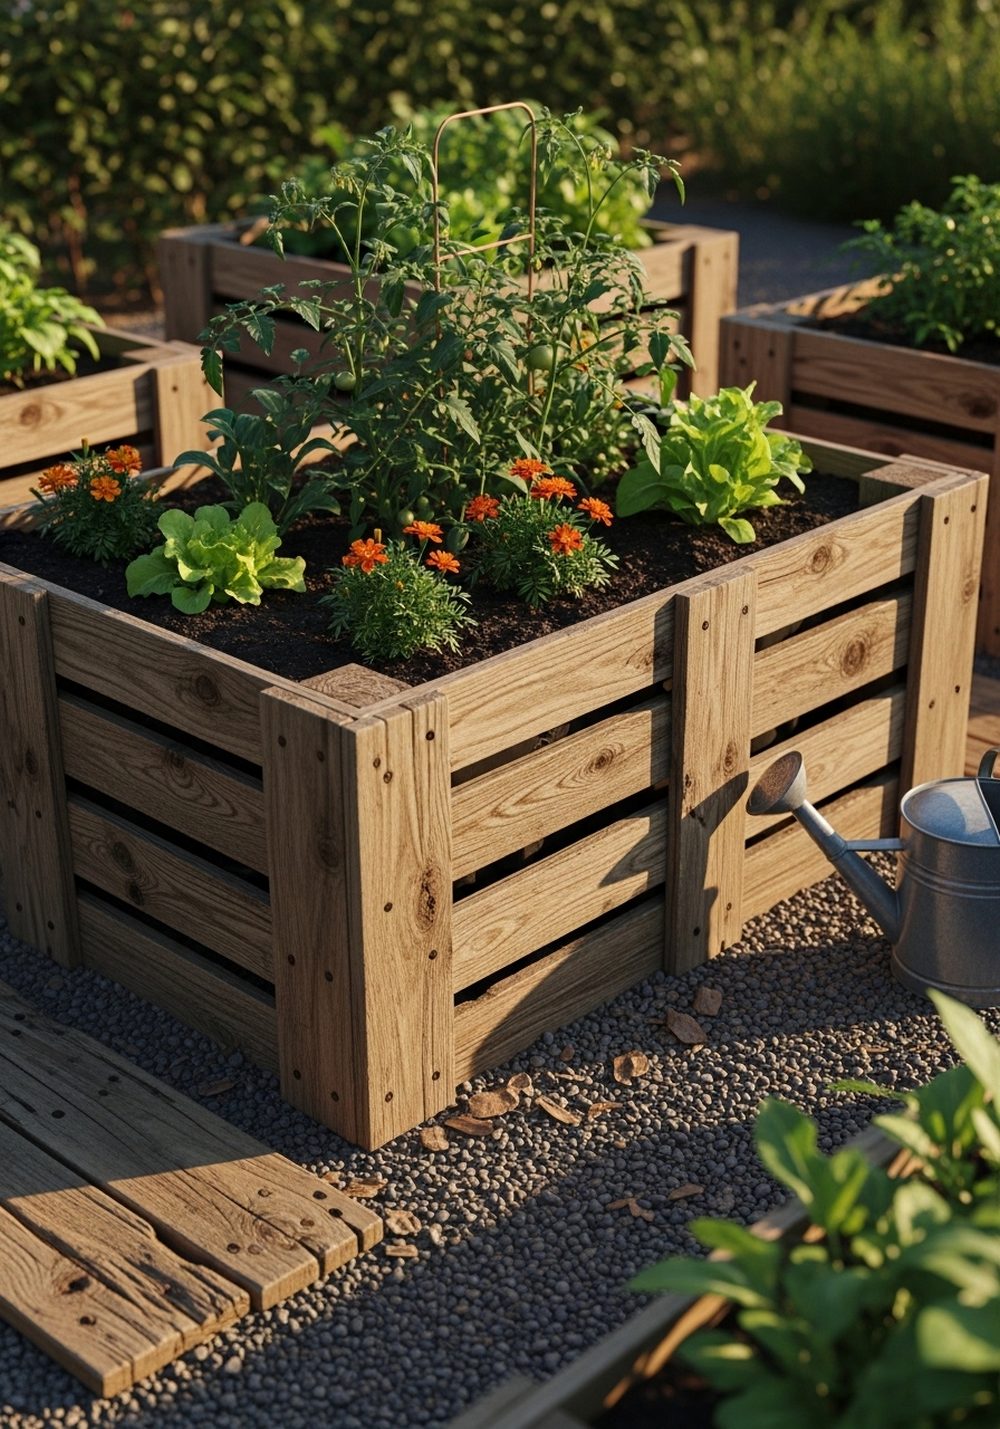
A simple pallet box bed is often the easiest and most satisfying place to start. Use two or three pallets taken apart, then screw the boards together into a sturdy rectangle. Set it on bare soil or weed membrane, fill with good compost, and plant a mix of vegetables and companion flowers for a full, rustic look. The weathered boards and visible screws create that handmade charm, especially when paired with gravel paths or bark chips around the edges.
- Best For: Beginners and anyone trying raised beds for the first time.
- Budget Tip: Look for free pallets from local stores and fill gradually with compost as you plant.
- Styling Idea: Keep it simple with one big, overflowing bed and a metal watering can or rustic crate nearby.
- Practical Note: Line the inside with landscape fabric to help extend the life of the pallet wood.
2. Long Pallet Border Bed Along The Fence

Turn the dead space along a fence into a lush rustic border by building a long, shallow pallet raised bed. Line up pallet boards to form a continuous wall and brace it every meter or so for strength. Fill with herbs, small shrubs, and low perennials that soften the base of the fence and hide any scruffy patches. This instantly makes a plain boundary feel intentional, as if your whole fence became part of the garden design.
- Best For: Narrow backyards with long fences or walls.
- Budget Tip: Patch together mismatched pallet boards; the irregular tones actually boost the rustic feel.
- Styling Idea: Mix silvery foliage, soft grasses, and a few bright flowers for a relaxed country look.
- Practical Note: Leave a small gap between bed and fence if your fence needs airflow or maintenance access.
3. Tiered Pallet Vegetable Bed

If your yard slopes or you’d like to grow more in a compact footprint, a tiered pallet bed adds both height and drama. Stack two or three rectangular pallet frames on top of each other, each one slightly smaller than the one below. Plant tall crops like kale or chard in the top tier, medium plants in the middle, and trailing flowers or herbs on the lowest level. The stepped shape looks striking, and the rustic wood pairs beautifully with lush greenery.
- Best For: Sloping gardens or anyone wanting more planting space in a small area.
- Budget Tip: Build the bottom tier first, then add upper tiers later as you find more pallets.
- Styling Idea: Paint the front edge of each tier in muted tones like sage green or soft cream, leaving most wood natural.
- Care & Maintenance: Water from the top and let it trickle down; add mulch to reduce drying out on higher tiers.
4. Pallet Herb Bed Beside The Patio
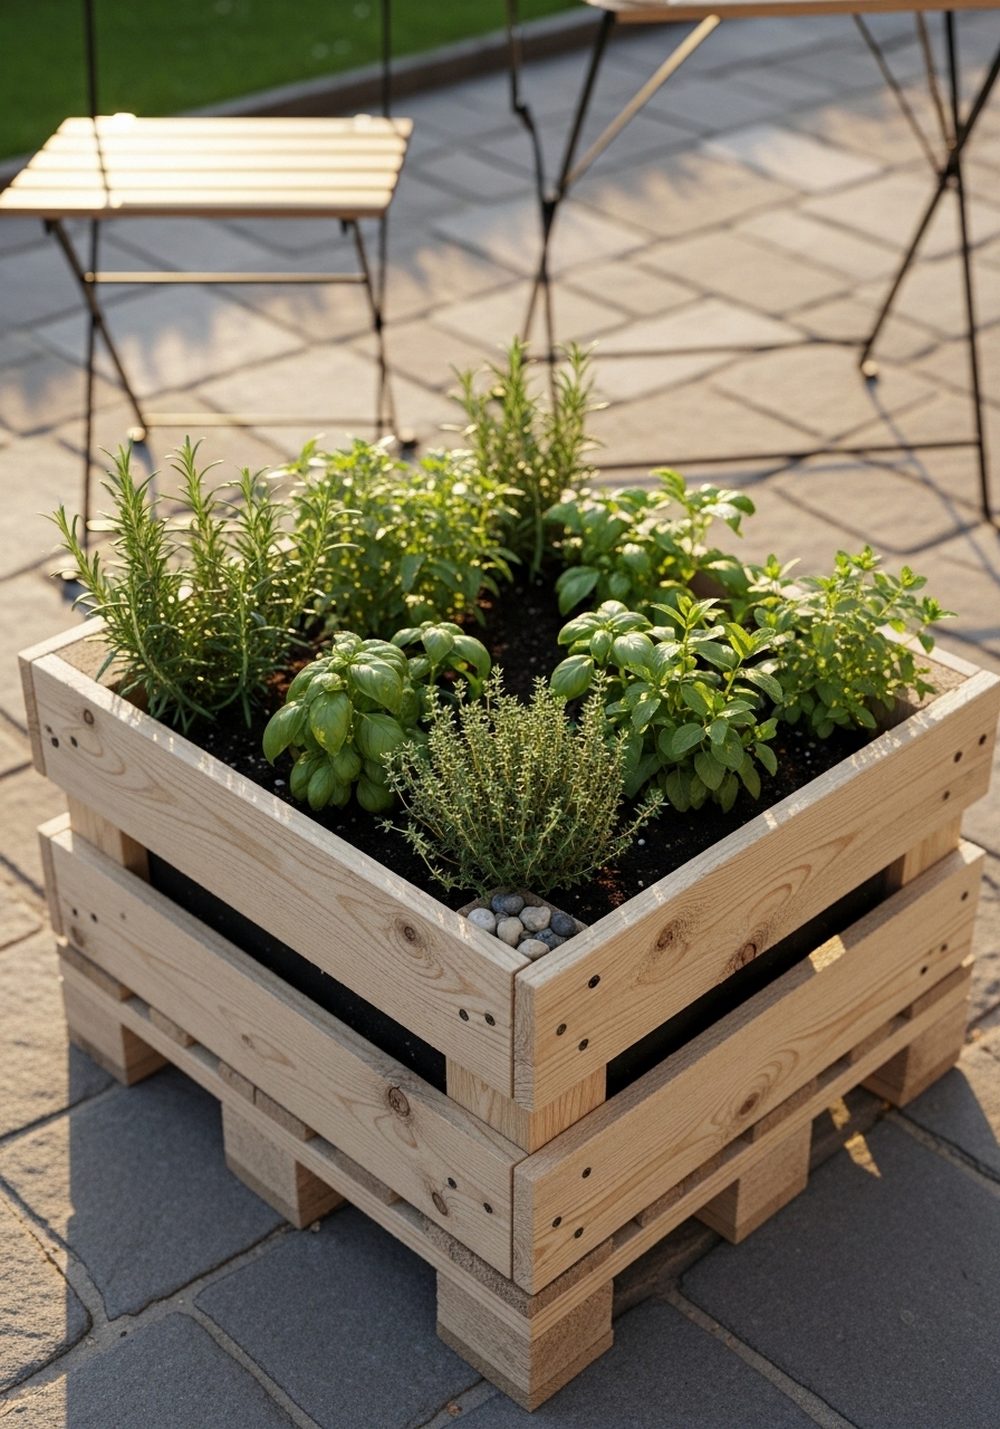
A compact pallet herb bed right next to the patio makes cooking and entertaining feel effortless. Create a low rectangular box from pallets and tuck it along the edge of your seating area. Fill it with fragrant herbs—rosemary, thyme, chives, mint in a contained corner—and maybe a few edible flowers. The rough timber and fresh green foliage create a lovely contrast with paving stones and outdoor furniture, making the patio feel more like an outdoor kitchen than just a sitting space.
- Best For: Home cooks and anyone who grills or eats outside often.
- Budget Tip: Start with smaller herb seedlings or cuttings from friends to keep costs low.
- Styling Idea: Add simple plant markers made from offcuts of pallet wood, handwritten in white paint.
- Practical Note: Keep fast-spreading herbs like mint in a buried pot inside the bed to stop them taking over.
5. U-Shaped Pallet Kitchen Garden

A U-shaped pallet layout gives you that “step into your garden” feeling without needing much more wood than a few straight beds. Arrange three pallet box beds so they create a shallow U you can walk into, leaving enough space in the middle for one person to move and kneel. Plant intensively with your favorite vegetables and salad greens, and add a little stepping stone path inside. This design feels like a mini kitchen garden, and the cozy shape makes tending plants much more pleasant.
- Best For: Keen veggie growers with a medium-sized backyard.
- Budget Tip: Use full-length pallets for the long sides and cut them down for the shorter front piece.
- Styling Idea: Hang a simple string of garden lights overhead to make the U-shaped bed a nighttime feature.
- Practical Note: Keep the bed height comfortable for bending—usually two pallet boards high works well.
6. Pallet Raised Bed With Trellis Backdrop

Attach a pallet upright at the back of a raised pallet bed to create a built-in trellis, perfect for climbing beans, peas, or sweet peas. The horizontal and vertical slats are ready-made support for tendrils, and as plants fill in they form a living green wall. In front, plant low-growing veggies or flowers so the trellis becomes a leafy backdrop. The combination of rough wood, vertical growth, and bright blooms gives your backyard a cozy, cottage-garden vibe.
- Best For: Small gardens where vertical growing really helps.
- Budget Tip: Use the least-perfect pallet for the trellis, since most of it will be covered in foliage.
- Styling Idea: Train a mix of edible and ornamental climbers for a wild, romantic look.
- Practical Note: Anchor the trellis well so it can withstand wind once covered in growth.
7. Pallet Corner Bed With Gravel Edge

Corners often get forgotten, but a pallet bed designed to nestle into a corner can turn dead space into a pretty focal point. Build two pallet sides at right angles and close the front with a shorter board, forming a triangular or L-shaped bed. Surround it with a gravel edge and a ring of smooth stones for neatness. Fill with hardy perennials and herbs that spill over the rustic wood, transforming the corner into a relaxed, low-maintenance planting pocket.
- Best For: Awkward corners and shady or semi-shady spots.
- Budget Tip: Use cut-off pallet pieces and offcuts; corners are forgiving and don’t need perfect boards.
- Styling Idea: Add a lantern or small birdbath just in front to draw the eye into the corner.
- Care & Maintenance: Choose drought-tolerant plants if watering in that corner is inconvenient.
8. Pallet Strawberry & Salad Ladder Bed

A pallet ladder bed is a clever way to grow strawberries and salads when ground space is tight. Use a pallet stood on its side or angled slightly back, with fabric or boards forming pockets between the slats. Fill each pocket with soil and plant strawberries on the top rows, salad greens lower down where they’re easy to cut. The cascading plants soften the rough wood and create a lush, layered effect that feels both rustic and playful.
- Best For: Small yards and gardeners who love snacking straight from the garden.
- Budget Tip: Use scrap landscape fabric or burlap to create the soil pockets inside the pallet.
- Styling Idea: Lean the pallet ladder against a fence and tuck a few trailing flowers into the lower pockets.
- Practical Note: Water gently from above so each level gets moisture without washing out the soil.
9. Pallet Raised Bed With Built-In Seating
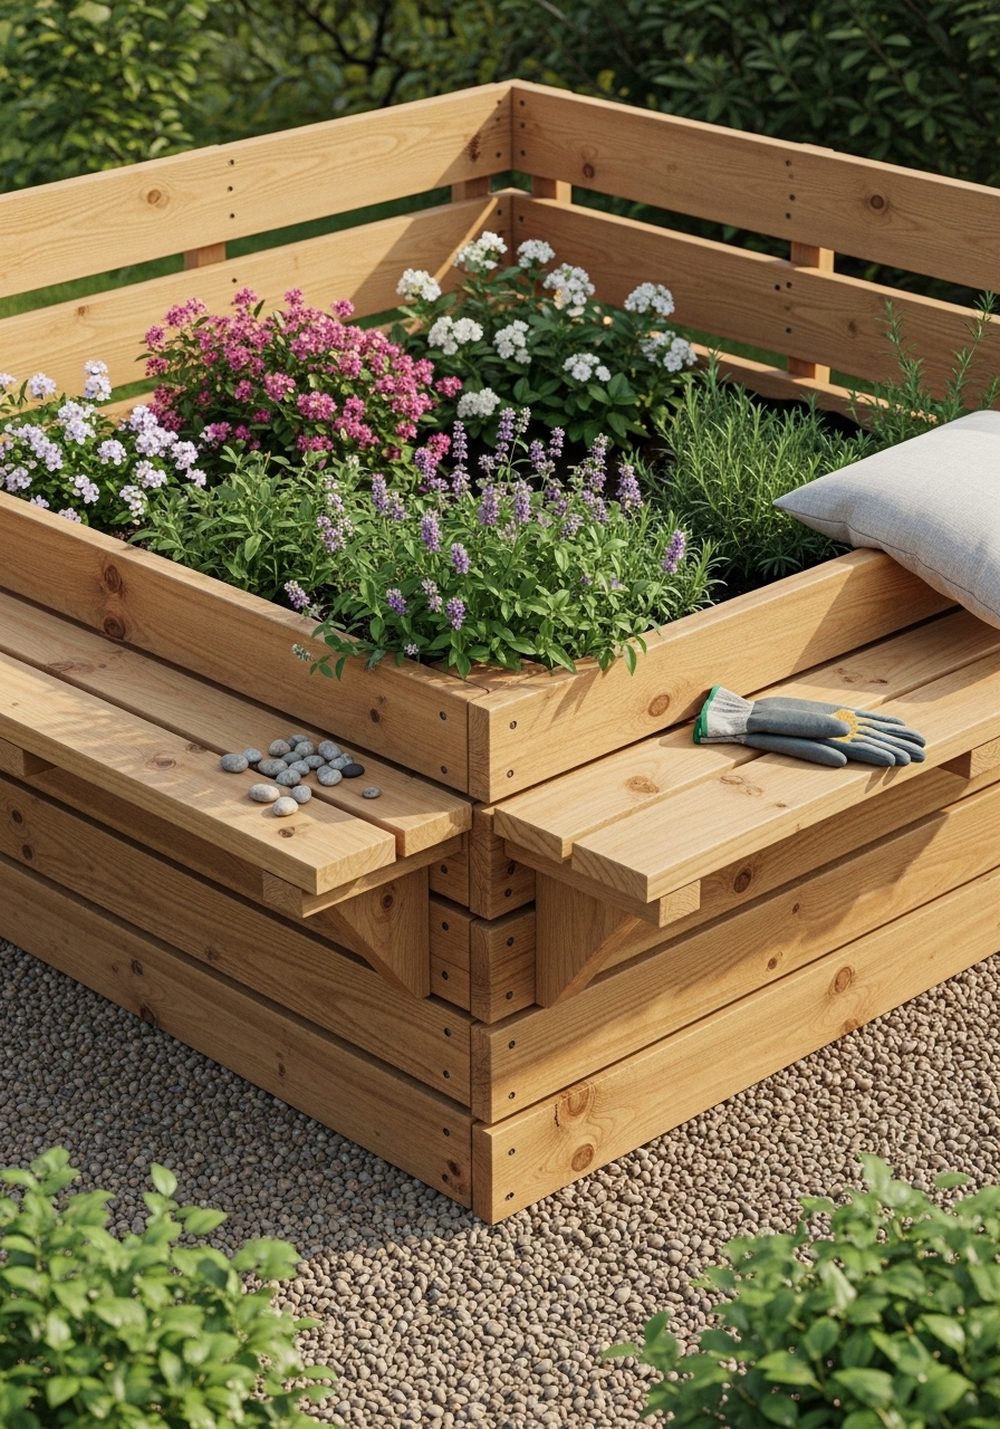
Combining seating with planting makes a backyard feel more like an outdoor room. Build a sturdy pallet bed, then add a wide board or two along one or two sides as a bench. The rustic seat invites you to sit, sip a drink, and admire your plants at eye level. Fill the bed with scented herbs, flowers, or low shrubs so they brush against the seat and release fragrance when you move. This design is especially charming in a corner or near the back door.
- Best For: Social backyards where people like to linger.
- Budget Tip: Use thicker pallet beams or doubled-up boards for the seating ledge to avoid needing new lumber.
- Styling Idea: Add outdoor cushions in earthy tones or stripes to soften the rustic wood.
- Practical Note: Sand and seal the seating surface to prevent splinters and help it last longer outdoors.
10. Mini Pallet Beds For Kids’ Garden

Mini pallet beds are a sweet way to give children their own patch of garden without sacrificing much space. Cut pallet boards down into small squares or rectangles and let each child “own” a bed. Help them choose easy plants—sunflowers, peas, cherry tomatoes, or bright annuals—and decorate the sides with non-toxic paint, handprints, or names. The low beds are easy for little hands to reach, and the rustic look blends nicely into the rest of your backyard.
- Best For: Families and grandparents who garden with kids.
- Budget Tip: One pallet can often be cut into pieces for two or three mini beds.
- Styling Idea: Add handmade plant markers and small windmills or pinwheels for playful color.
- Practical Note: Keep these beds close to the house so watering and supervision stay simple.
Conclusion
Rustic pallet raised beds are a friendly, affordable way to transform a plain backyard into a warm, lived-in garden. With just a few recycled pallets and some creativity, you can add structure, height, and personality to your growing space. Start with one simple box or corner bed, see how it changes the feel of your yard, and then slowly add more designs as time and budget allow. Before long, your backyard will feel like a cozy, handmade retreat.
FAQs
Q1: Can I build pallet raised beds on a very small budget?
Yes. Many businesses give pallets away for free if you ask politely, and you can build beds gradually as you collect them. Fill the beds in layers with cardboard, yard waste, and compost to reduce the amount of bagged soil you need to buy at once.
Q2: Are pallet raised beds safe for growing vegetables?
Choose heat-treated pallets (usually marked with “HT”) rather than chemically treated ones, and avoid pallets that look heavily stained with unknown substances. If you’re unsure, line the inside with heavy plastic or landscape fabric before adding soil. This adds a layer of protection and also helps the wood last longer.
Q3: Are pallet beds suitable for renters who can’t make permanent changes?
Definitely. Most pallet beds simply sit on top of existing ground, grass, or weed membrane and are not permanently fixed. You can dismantle them or move them if you leave. Just be sure to protect lawns with a membrane if you don’t want the grass permanently affected.
Q4: How do I make sure pallet beds last in all weather?
Use sturdy pallets and keep the wood off constantly wet ground if possible. Lining the inside of the bed, adding a layer of gravel beneath, and occasionally treating the outside with a garden-safe wood preservative or natural oil will help. Avoid direct soil contact on the outer side by keeping mulch or gravel between bed and paths.
Q5: What’s the easiest pallet raised bed idea for beginners?
The classic box bed is the simplest to tackle. It’s basically a wooden rectangle, filled with soil and planted up. Once you’ve tried that, you can move on to slightly more advanced designs like tiered beds, border beds along the fence, or a small herb bed beside the patio.
Q6: Will pallet raised beds work on a patio or concrete area?
Yes, but you’ll need to think about drainage. Place the pallet beds on small bricks or blocks so water can escape underneath, and avoid letting water collect around the base. Deep beds can be heavy, so position them where they don’t need moving often, and keep paths clear for easy access.